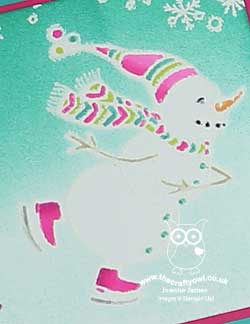
Christmas Wishes From A Skating Spirited Snowman

by Joanne James30. August 2018 08:00

Before I get into my creative post today, I just wanted to remind you that we are nearing the end of the month so you have just two more days to take advantage of this month's offers: a free bonus coupon for every £45 spend, redeemable against next month's purchases, and also the limited time Blended Seasons bundle and the second colour assortment pack of watercolor pencils. You can read more about both of these offers here and here.

Check out this post with details on my Creative Escapes Luxury Weekend Retreats too - you have until the end of the week to take advantage of my Bank Holiday booking offer for my next weekend in October!

A day off yesterday as we had a family day out at the Black Country Museum (a fun visit if you're in the UK and never been - lots of fun interactive history) and I needed to give the first episode of the Great British Bake Off my undivided attention yesterday evening (more on that later!) but I'm back with you today and I'm sharing a card using this week's CAS(E) This Sketch and the current bright colour palette over at Inspire.Create for a fun Christmas card:
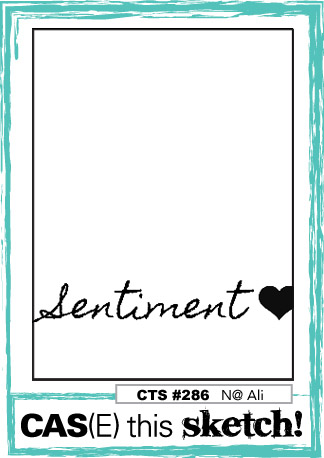
      

This another of those great sketches that can be used in lots of different ways with the sentiment diecuts that I love - although I did need to rotate my card base through 90 degrees and go 'long and thin' to fit everything in! Take a look:


Here's the low-down on today's card:

Merry Christmas Thinlits - Today is the turn of the 'Christmas' thinlit to feature, stamped with a 'merry' for good measure; these dies are going to get a full work out this season, I think they are just great! I love that with the co-ordinating bundled stamp set, there are so many sentiment combinations you can make; this is absolutely a 'go-to' set for me this Christmas.

Spirited Snowman - I liked the 'object' at the end of the sentiment on the sketch and thought the little skating snowman from the new Spirited Snowmen set would fit perfectly and look as if he was almost skating the sentiment into the ice. I decided to heat emboss the snowman and an array of snowflakes from the same set across the top of my card, so that the white elements, i.e. the snow, would be white against my sponged background. I must confess whilst this looks great in white in real life, especially with the sparkle of the Wink of Stella on the snowman, the snowman loses some of his definition in white when photographed. In hindsight silver might have been a better choice - or maybe a little added definition to the body of the snowman with my Blends; something to play around with on version 2!

Unconventional Brights For Christmas - You could have looked at the Inspire.Create colour challenge colours this week and be forgiven for thinking that a Christmas card would not come immediately to mind with these bright colours; I actually thought they would be perfect for a sponge-brayered sky and his bright woollen scarf and hat combo. Once I'd stamped the snowman onto my cardfront, I stamped him again onto a post-it note and cut it out to create a mask so that I could brayer my Bermuda Bay sky, whilst keeping my snowman white. I then coloured the rest of my Snowman with my Blends/Blendabilities/Stampin' Write Markers. I did stick to the colour palette along with a smidge of black and grey neutrals, save one exception - I used orange for the snowman's carrot nose. I'm not sure any other colour would do so I hope I'll be forgiven this departure! Lastly, I painted my snowman liberally with Clear Wink of Stella; difficult to see on the photo, but so pretty in real life.

Here is the visual summary of the key products used on today's project for you to pin for easy reference:
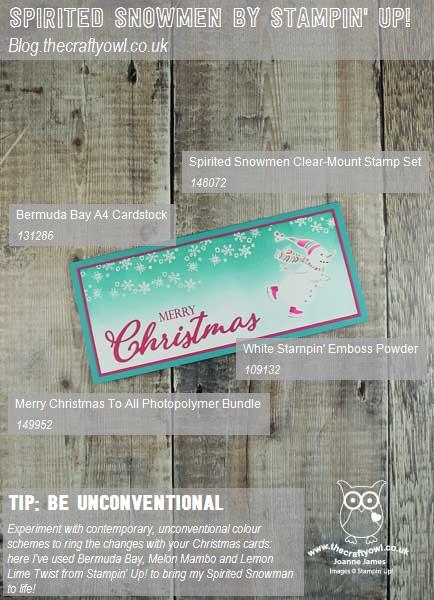
 

You can see all of my 'How To' summaries on my 'How To - Tips and Techniques' Pinterest board in case you've missed any. 

So what do you think - do these unconventional brights work on today's Christmas card? Do leave me a comment below - I would love to hear your thoughts.

Enjoy the rest of your day; the James Juniors are currently in the kitchen baking homemade wagon wheel biscuits, having been inspired by the technical challenge on last night's Great British Bake Off - I'll let you know tomorrow how they turned out when I'll be back with another project! Until then, happy stampin'!

I typed this post up last night but am finally going live this morning - I will share the wagon wheels tomorrow! 

Stampin' Up! Supplies Used:

Table built using Product Table Builder by The Crafty Owl - Independent Stampin' Up! Demonstrator.

Enjoy Life And A Million Dollar Sunrise For The Paper Players PP405

by Joanne James12. August 2018 09:00

It's Sunday and time for this week's new challenge over at The Paper Players! It's the turn of my wonderful and talented friend LeAnne to host this week and she has a gorgeous colour challenge for us to work with:


I fell in love with this trio of orange/yellows that LeAnne chose and whilst I was tempted to go floral, I decided instead to use the sketch inspiration over at Fusion for my layout and create a pretty sunrise and silhouette scene using the Enjoy Life stamp set - take a look:


Here's the low-down on today's card:

A Million Dollar Stamp Set - I decided to use a combination of images from the 'Enjoy Life' stamp set on my card today. This stamp set, with its beautiful collection of silhouettes and inspirational sentiments, was designed by Connie Fitzgerald, one of Stampin' Up!'s Million Dollar Sales Achievers, as a celebration of this milestone achievement. I absolutely love this set and it was one of the first on my wishlist when the annual catalogue was launched - thank you Connie for such a great set!

Sunrise, Sunset Made Easy - I wanted to create a vertical panel with a sunrise that featured all three of the challenge colours, so I punched a 3/4" circle and masked off my sun and used a sponge brayer to build up a graduated sunrise, blending each of the colours in turn starting with the lightest colour at the top. Sponge brayers are so great for this; they make light work of the art of ink blending, and can be washed out when you're done. I also brayered the colours on the diagonal of the bottom corner of the inside panel too and added a little interior detail:


Blended Ombre Embossing - My card today is ultra-clean, with minimal layers and detail to allow my inked panel to really shine, but I'd also like to share another great tip with you; did you notice I created a blended ombre of colour on my sentiment that mimics my sunrise? Curious as to how I created it? With a Basic Black card base, I originally heat-embossed the sentiment in white, but this was too stark. I decided to use my Pumpkin Pie Blends to carefully colour the lettering and change its colour. Did you know you can use your Stampin' Blends alcohol markers in this way? This tones down the brightness of the white and adds a co-ordinating pop of colour that wouldn't have been possible with ink alone on such a dark background.

Here is the visual summary of the key products used on today's project for you to pin for easy reference:


You can see all of my Product and 'How To' summaries on my 'How To - Tips and Techniques' Pinterest board in case you've missed any. 

Before you reach for your ink and papers, check out what our amazing team has created to inspire you this week:

Here's a quick recap of our challenge rules:
 
1.  Create a new paper project
2.  Upload your creation to your blog with a link back to us and provide a direct link to the post featuring your challenge submission.
3.  Please link your card to no more than four challenges, TOTAL.
4.  Have FUN!

I usually struggle with colour challenges, but this bright, monotone pallet really spoke to me - so many creative possibilities! I can't wait to see what you create with this week's colours and look forward to visiting your blogs this week. Enjoy the rest of your weekend as it will be over all too quickly. I'll be back tomorrow with another project; until then, happy stampin'!


Stampin' Up! Supplies Used: 

Table built using Product Table Builder by The Crafty Owl - Independent Stampin' Up! Demonstrator.

Irresistibly Floral Spring Thank You Card

by Joanne James22. February 2017 07:00

Today I'm sharing a card for this week's challenge over at CAS(E) This Sketch:

I decided to break out one of my new sponge brayers and some Irresistibly Floral embossed paper for my card today - take a look:


Here's the low-down on today's card:

Easy Embossing - I decided to brayer the circle shape onto a piece of Irresistibly Floral Specialty Designer Series Paper using a sponge brayer. This is the first time I've brayered with one of these and I must confess I'm rather impressed - they make it so easy to get a smooth graduated finish and are great for this kind of ink technique, really bringing out the pattern of the paper. I created a simple circle stencil using a spare piece of cardstock and my Circle Framelits and brayered from bottom left to top right of my circle as I wanted to try and emulate the less-than-perfect circle of the sketch. As for the paper - this patterned clear-embossed white paper is great for colouring and sponging - a great embossed finish without any for of Versamark or heat tool required. Cheating? No! Easy? Most definitely!!

Co-ordinating Florals - I stamped a flower from the Falling Flowers stamp set and diecut it and a couple of leaves from the co-ordinating May Flowers Framelits to ground my simple diecut sentiment (cut from the now retired Greetings Thinlits - still one of my go-to sets!) This bundle which you can see on page 127 of the annual catalogue also co-ordinates with the patterns on the Irresistibly Floral embossed paper - and makes designing easy!

Fresh Colour Combination - I chose a fresh, spring colour combination of pink and green to compliment my contrasting black and white background and sentiment today - here it is if you would like to save it for future inspiration too:


Here is the visual summary of the key products used on today's project for you to pin for easy reference:


You can see all of my 'How To' summaries on my 'How To - Tips and Techniques' Pinterest board in case you've missed any. 

Enjoy your day and I'll be back tomorrow with another project. Until then, happy stampin'!


Stampin' Up! Supplies Used:

Table built using Product Table Builder by The Crafty Owl - Independent Stampin' Up! Demonstrator.

Serene Silhouettes Pieced Sunset Card

by Joanne James27. January 2016 21:00

Another quick silhouette card from my brayer class today - this one featuring the birds in a tree stamp from the Serene Silhouettes stamp set:

This card uses a similar pieced silhouette technique that I used on yesterday's card, with the sunset sky panel made from a combination of Pumpkin Pie, Tangerine Tango and Real Red inks. I used the sentiment from the 'Wetlands' stamp set again and this time in addition to my black mat and Pumpkin Pie card base, I added a piece of black satin ribbon tied around the bottom of the panel.

A quick post from me today; do come back tomorrow to see what I created for this week's new challenge over at Create With Connie and Mary - I have something rather special to share!

Until then, happy stampin'!


Stampin' Up! Supplies Used:

Table built using Product Table Builder by The Crafty Owl - Independent Stampin' Up! Demonstrator.


Serene Silhouettes Turquoise Ombre Card

by Joanne James26. January 2016 20:32

I've spent a lovely day today teaching a group of ladies how to brayer in a Brayer Technique Masterclass and witnessed lots of lovely sunsets and beautiful colour schemes as they learned the 'do's and don'ts' of perfecting the technique. Today's card is one of the ones we made, practising creating a monochromatic ombre:

We used a small 3/4" circle of post-it note to mask out a moon, then having brayered in the blue sky, I stamped the tree image partially off the panel in Black Archival ink and mounted this onto a mat of Basic Black. I then stamped the tree again on the Tempting Turquoise card base, using my stamp-a-ma-jig to line up with the partial stamped image. I added my sentiment from the 'Wetlands' stamp set to complete my card. 

I'm linking my card up again with the lovely ladies over at Less Is More whose challenge this week is to use a silhouette on your card. I like the way the partial stamping adds interest to the silhouette on this otherwise monochromatic card and this card was a great way to start today's class. Here's a shot of my ladies hard at work and having fun:


Very messy, but well worth it! 

If you would like to join one of my classes, please do get in touch for details of upcoming classes or check out the listings on my web page here

I'll be back tomorrow with another project; until then, happy stampin'!


Stampin' Up! Supplies Used:

Table built using Product Table Builder by The Crafty Owl - Independent Stampin' Up! Demonstrator.


New Online Exclusives

There are new products available exclusively in the online store from 5 November - check them out here.

Latest Kits!

Stampin Cut and Emboss

The Layered Landscapes Kit and Nature's Paintings Kit are the latest kits in the online store - get yours here!

Shop Online

Access my online shop 24 x 7, 365 days of the year:

Current November hostess code:

9NKXDTTR

Shop Online

Mini Catalogue

BROWSE THE CATALOGUE

'Tis The Season - the new Stampin' Up! Mini Catalogue is here! For more details and to download your copy click here

Scrapbooking

Stampin' Up! has introduced a new range of 12x12" scrapbooking product and kit - the full range is now available to purchase online. To download a copy of the new digital Scrapbooking Catalogue click here.

2024-25 Annual Catalogue

BROWSE THE CATALOGUE

Click on the image to download your copy of the 2024-25 annual catalogue. For a full list of current SU! supplies, go to my online store. If you would like any help or advice, please drop me a line at joanne@thecraftyowl.co.uk or give me a call on 07773 421446 - I'd be happy to help.

Join My Team

It's always a great time to join Stampin’ Up! New team members can get £130 worth of products for only £99 + free business supplies + free shipping + all the fun being a part of Stampin’ Up! Stampin' Up! has something for everyone: join my growing team and benefit from my support to enjoy Stampin' Up! however you choose.

If you're interested, call me for a chat to understand how I can help you realise your goals. Alternatively, if you have already decided to sign up and you just can't wait, please click here for the link to the online form where you can sign up and order your starter kit right away! 

About Me

Hi I'm Joanne and live in Northampton and when I'm not looking after my husband and two beautiful children, am an avid crafter with a passion for all things Stampin' Up!

I must confess that I have never been a big rubber stamper - until I discovered Stampin' Up! that is. I love the fact that I can get such great results with co-ordinating stamps, inks, papers and punches - the possibilities are endless! Join me on my stamping journey as I share the things I love and be inspired to create amazing things yourself!

Follow Me

Monthly Newsletter

Box Builder

Click the button above to use Box Buster to create your custom box design using the Envelope Punch Board!

Kits Collection Now Available!

Stampin Cut and Emboss

The new Kits Collection from Stampin' Up! is now available!

Click here to see the current kits available and order yours online today.

I Design For


Stampin' Up Stuff

This is my personal blog and is not endorsed by Stampin’ Up! I hope you find it a plentiful source of ideas and personal inspiration but please don't copy my designs for contest submission or use for classes, publication or sale without express permission.