
Cheerful Critters Easter Cards

by Joanne James15. March 2024 09:00

Today I have a double post day! I'll be back later with my card for our new challenge over at As You See It, but first I'm guesting over at CAS on Friday! I won Challenge 277 with this card, so I was asked to join the ladies as their guest this week for their new challenge where the theme is 'Easter'. I'm a little thin on current Easter-themed supplies, so I dug into my retired stash for some old sets that I could use in a new way. Here's my card for the new CAS on Friday challenge that also uses the colours over at Color Throwdown this week: 


Here's the low-down on today's card:

I've always loved the little sign-holding characters in the retired 'Cute Critters' stamp set and I thought that the bunny would make a cute clean and simple Easter card when combined with a suitable sentiment. For my bunny I paired her with a sentiment from the retired 'Basket Bunch' stamp set and simply coloured with my Stampin' Blends:


Perfect for a simple card to accompany an Easter egg gift.

I had so much fun with this card that I decided to make another slightly stepped-up version using the chick in the 'Cheerful Critters' set, this time featuring the colours over at Hand Stamped Sentiments:


I backed my card with a piece of Inked Botanicals plaid paper and used one of the Everyday Details Dies to diecut my stamped and coloured panel, with a sentiment from the another retired stamp set, 'Arrange A Wreath':


I'm also linking my second card up over at SUO Challenges where the theme is also Easter/Spring.

This was a fun dip into the retirement box to use some old stamps in new ways. Do you ever do this? Do leave me a comment below - I'd love to hear your thoughts.

Enjoy your morning and I'll be back later with my card for our new challenge over at As You See It. Until then, happy stampin'!


Seasonal Swirls Pretty Pines Christmas Wreath CCS 445

by Joanne James9. November 2021 12:00

It's Tuesday and time for a new challenge over at CAS Colours & SketchesThis week's challenge is a sketch challenge and I designed the following sketch for us to work with:


I designed the sketch to have a layer beneath a single focal point, with an overlapping sentiment. Whilst the focal point on the sketch is a circle, you can use any shape you like. Also feel free to flip or rotate the sketch when making your card.

I have been trying (and failing!) to find the time to play along with the lovely ladies over at Inspired By for several weeks, but when I saw this week's inspiration photo of that welcoming Christmas wreath, I couldn't resist! The fact that I could combine with my sketch was a bonus! Both of their inspiration photos this week feature wreaths, and having had an aborted attempt using wheatgrasses for the first one, I decided to give that up as a bad job and work with this oh-so-pretty Christmas wreath as my inspiration. I actually went on to create two cards, one being slightly less clean and simple than the other. Here's my first clean and simple one:


Here's the low-down on today's card:

I used the leaf wreath in the Seasonal Swirls Dies set for my wreath base, snipping off the leaves to leaves just the twigs. I used the retired Pretty Pines Thinlits for my sprigs of greenery and berries, adding some sponged white ink to my Soft Succulent greenery and some large retired candy dots for berries. I finished with a gingham DSP bow and added a heat-embossed sentiment from the retired 'Arrange A Wreath' stamp set onto a little stitched rectangle of wood-effect paper which seemed to fit the photo. I backed my wreath with a scrap of white wood effect paper, reminiscent of the shiplap in the photo: 


 And that was that - card complete! I decided to make another one, identical save for one additional detail: I switched out the DSP bow for an actual one, tied with gingham ribbon that I had coloured from its original black and white to black and red with the aid of my Stampin' Blends markers:


 That showy, double-looped bow definitely crosses a CAS boundary, hence not adding it to my original card; I do love it though! Here's a close-up: 


So two cards for the price of one today! Which one gets your vote? Do leave me a comment below - I'd love to hear your thoughts.

Enjoy your day and I'll be back tomorrow with another project. Until then, happy stampin'!


Stampin' Up! Supplies Used:

Table built using Product Table Builder by The Crafty Owl - Independent Stampin' Up! Demonstrator.

Arrange A Wreath Easter Card PP534

by Joanne James28. March 2021 09:00

Today it's Sunday and time for this week's new challenge over at The Paper Players! It's the turn of the fabulous Anne Marie to host this week and she has my favourite, a sketch challenge for you to work with:
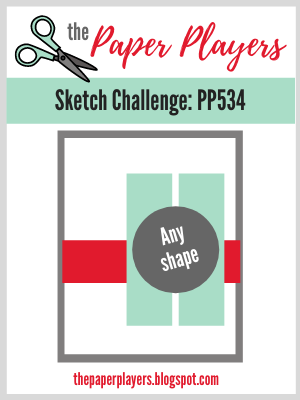
    

I got myself into something of a tizzy with this week's sketch and ended up making two cards - this one is for sure my favourite! I loved the inspiration photo over at Just Add Ink this week and thought an Easter wreath would be perfect for the shape in Anne Marie's sketch - take a look:
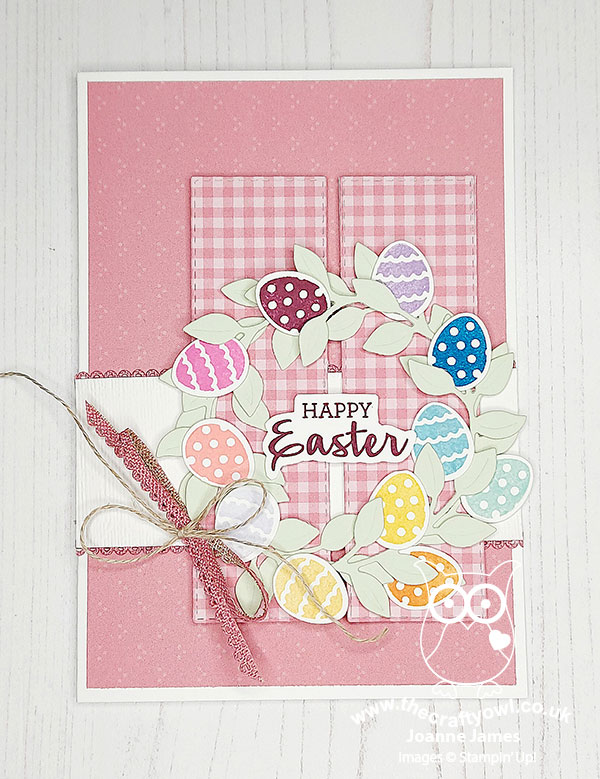
 

Here's the low-down on today's card:

Arrange A Wreath - The Arrange A Wreath bundle is perfect for an Easter wreath and this is the only type of wreath I think I've yet to make with this versatile set! I layered two pale green leaf wreath diecuts, then stamped a variety of rainbow-coloured Easter eggs and nestled them in between the leaves, mixing and matching the patterns:
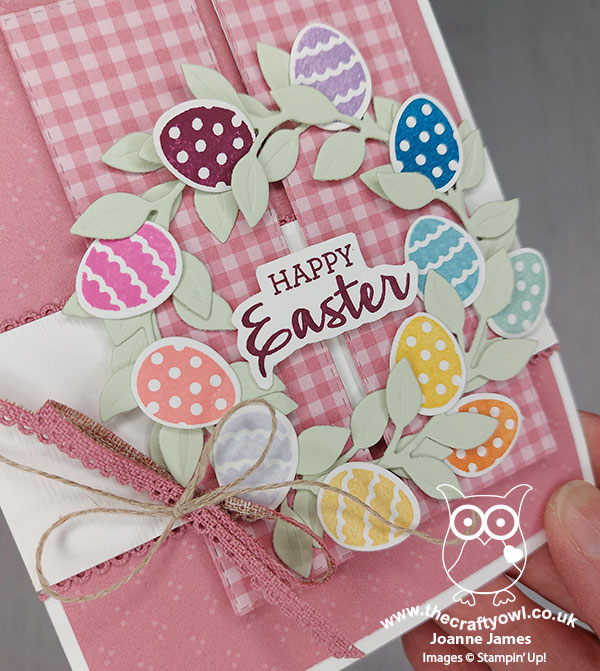
Pink Patterns - I decided to use a pink background for my wreath, again inspired by the JAI photo. I used a piece of Hydrangea Hill DSP in a soft Rococo Rose pattern. I wanted my vertical panels to co-ordinate but not be too busy, as I didn't want them to detract from the detail of my wreath, so I used some of last year's retired in-colour DSP in a gingham pattern.

Going, Going ... - Today's card features so many of my favourite things that will be retiring with the annual catalogue: The Arrange A Wreath stamp set and Wreath Builder Dies, the in-colour Rococo Rose in all its forms, and my favourite embossing folder, the Subtle 3D Embossing Folder. If these items are still on your wish list, you should snap them up now whilst you still can! You can find links to them in the online store below.

Here is the visual summary of the key products used on today's project for you to pin for easy reference:
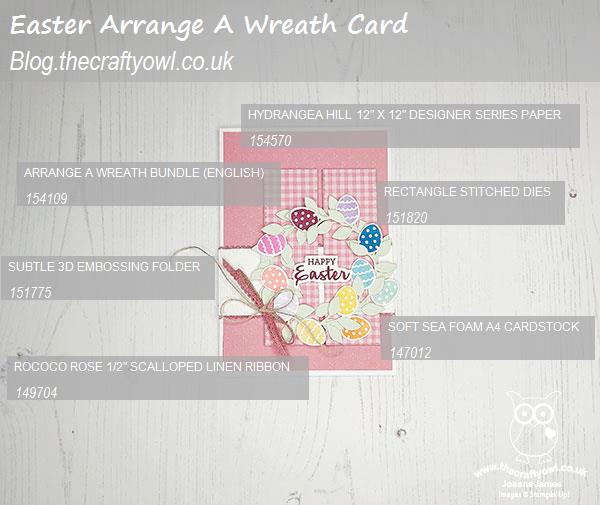
 

You can see all of my Product and 'How To' summaries on my 'How To - Tips and Techniques' Pinterest board in case you've missed any. 

Before you reach for your ink and papers, check out what our amazing team has created to inspire you this week:

Here's a quick recap of our challenge rules:
 
1.  Create a new paper project
2.  Upload your creation to your blog with a link back to us and provide a direct link to the post featuring your challenge submission.
3.  Please link your card to no more than four challenges, TOTAL.
4.  Have FUN!

You can see all of my 'How To' summaries on my 'How To - Tips and Techniques' Pinterest board in case you've missed any. 

Enjoy your day; if you're in the UK, did you remember to put your clocks back? Whilst we lose an hour, the additional hours of sunlight are always welcome - British Summer Time is here at last! I am planning on pottering in the garden today and may have to start eating the Easter eggs that are accumulating in the James household - I know Easter isn't until next weekend, but the temptation is proving too much! I'll be back tomorrow with another project. Until then, happy stampin'!


Stampin' Up! Supplies Used: 

Table built using Product Table Builder by The Crafty Owl - Independent Stampin' Up! Demonstrator.

Evergreen Forest Embossed Trees Christmas Card TTT82

by Joanne James17. September 2020 18:00

It's Thursday and time for a new challenge over at TicTacToe! It's the turn of Team X to host this week and this week's board was designed by Amy. This is the fun board that we are playing along with: 


We are rapidly approaching autumn and this week's board has lots of elements that would suit a fall card, but I combined it with the current Fab Friday sketch and went straight to Christmas as I continue to build my card stash! The Fab Friday sketch has a lovely open panel that is open to all kinds of interpretation and after some deliberation I knew exactly what I wanted to use it for - take a look:


Here's the low-down on today's card:

Centre Stage Embossing - I'm not generally a big user of embossing folders, although I do have my favourites: any that create a lightly textured background (bring on Subtle or Tasteful Textile 3D!) or embossing folders that make a statement in their own right (past favourites include Seasonal Wreath or Winter Wonder). The current Autumn Winter catalogue includes an embossing folder that can be used either as a background or a centrepiece - love a double-duty solution! The Evergreen Forest 3D Embossing Folder has a ton of texture and whilst it doesn't need to be confined to Christmas projects, I wanted to showcase it today as a forest of potential Christmas trees - just look at the depth of the embossed detailing:

It's In The Detail - I went down the first column of the TicTacToe board for today's card - Trees, Embossing, Diecut - and whilst it's easy to see where the first two elements are on my card, blink and you could miss the last one! I used a Rectangle Stitched Die to cut out my heat embossed sentiment (tick!) and backed this with a simple punch banner. The colours on today's card were inspired by this retired piece of Wrapped in Plaid designer series paper that I chose so that I could highlight my lovely green embossed trees and tie in the gold sentiment and brushed gold foil matting too.

Perfectly Plaid Inside Too - I continued the plaid theme onto the inside of my card too with a stamped plaid Christmas tree and sentiment from the annual catalogue set, 'Perfectly Plaid':


I like this card so much I think I'll make a few more - a great excuse to use up some of that retired plaid paper too!

Here is the visual summary of the key products used on today's project for you to pin for easy reference:


You can see all of my Product and 'How To' summaries on my 'How To - Tips and Techniques' Pinterest board in case you've missed any. 

A tictactoe board offers so many creative possibilities - how does this week's board inspire you? Why not have a go? We would love to see you in the gallery and who knows - you might be selected for Designer's Choice and be eligible to be a guest designer on a future challenge. 

Enjoy your evening; I'll be back tomorrow with another project. Until then, happy stampin'!


Stampin' Up! Supplies Used: 

Table built using Product Table Builder by The Crafty Owl - Independent Stampin' Up! Demonstrator.

Give Thanks With Arrange A Wreath Square Card

by Joanne James20. July 2020 18:15

Happy Monday everyone! Mine has been a busy one and has run away with me somewhat; I just realised if I didn't get today's post written I would miss linking up with the wonderful team over at Freshly Made Sketches where I used the fabulous Jen T's sketch as the starting point for my card today:

This is such a great sketch! I have been playing with the new 'Arrange A Wreath' set for the past week or so in readiness for my upcoming class using this set and thought Jen's square design would be the perfect place to showcase it - take a look:


Here's the low-down on today's card:

Plaid Tidings - The colour inspiration came from this fabulous plaid design from the forthcoming DSP pack 'Plaid Tidings' that will debut next month in the new Autumn-Winter catalogue. It contains some great patterns and colour schemes and I loved the autumnal colours of this one.

Build A Wreath - I used the Wreath Builder dies to cut two wreaths and layer them, to which I added my stamped leaves and a bow made from the edge of some Pretty Peacock scallop edge ribbon. 

Autumn Leaves - I stamped a collection of leaves, some in solid colour and some that I used my sponge daubers to add colour to the edges to create that variagated coloured look that is often a feature of autumn leaves. The colours maybe a little atypical with the Pretty Peacock in the mix, but it does provide a lovely contrast to the warm tones of Cajun Craze and Crushed Curry and I think overall it works - don't you? I also added a little detail to the inside:


Here is the visual summary of the key products used on today's project for you to pin for easy reference:


You can see all of my 'How To' summaries on my 'How To - Tips and Techniques' Pinterest board in case you've missed any. 

Enjoy your evening and I'll be back tomorrow with another project. Until then, happy stampin'!


Stampin' Up! Supplies Used:

Table built using Product Table Builder by The Crafty Owl - Independent Stampin' Up! Demonstrator.

Fancy Fold Wreath Of Love For AYSI 228

by Joanne James19. June 2020 11:00

Today I'm sharing my design team card for our new challenge over at As you See It where it's time for a recipe challenge:


I thought I'd go simple with my card today, but I reached for some new goodies and by the time I had incorporated all the elements of this week's recipe, I ended up creating something altogether more fancy - take a look:


Here's the low-down on today's card:

I decided to create a square card with a wreath in the centre as I wanted to play with my new 'Arrange A Wreath' bundle as I am running an online class with it on 27th July so wanted to start getting the ideas flowing. I decided to go with hearts and flowers so that I could incorporate my 'pink' and 'repeating images' elements. I ended up creating a fancy fold style card, with an outer wrap that I added a couple of panels to that I embossed with one of the new 'Greenery' embossing folders, and diecutting a circle in the centre to reveal my wreath on the inner card below. The outer flaps are held closed by some silver twine wrapped around a couple of mini brads, that when untwined open up to reveal the body of the card inside:


This is the layer where I created my wreath, which is a combination of stamped and diecut pieces. Fortunately there is a die in the Wreath Builder Die set that has the word 'love' cut out of a heart, so I used that for my one-word sentiment (check) and added a bow of white spotted tulle ribbon (check!). This card layer then opens as a conventional card to reveal the inside where you can write your greeting:


I added a little tone-on-tone sentiment and the letters that diecut out of the heart on the front, along with a strip of Petal Pink DSP leftover from another project (check!!)

I have no idea what kind of fold this is called - I saw one similar on Pinterest but without any details, and I had a search but am honestly none the wiser! So if it has a name that you know of, do let me know! Either way, it definitely constitutes 'fancy' in my book so I will be linking up with the team over at Just Add Ink where that is their challenge theme this week:

Here is the visual summary of the key products used on today's project for you to pin for easy reference:


You can see all of my 'How To' summaries on my 'How To - Tips and Techniques' Pinterest board in case you've missed any. 

What do you think? When I'd finished I wondered if I'd got a little carried away, as this card is certainly a little busier than my usual cards. 

Here's a summary of our challenge rules:

  • Create any card, scrapbooking page, 3D project or packaging project that fits the challenge.
  • Please include the challenge graphic and link back to the challenge in your blog post. Turn off word verification so we can leave you lots of lovely comments. Make sure you link the post not the whole blog to the Linky. Use #AYSIXXX when uploading to a public gallery.
  • If you’re unsure about ‘the rules’, check the details under the Challenge Guidelines tab on the As You See It Challenge homepage.

We look forward to seeing your creations in the AYSI gallery.

And talking of Just Add Ink - I have some exciting news today! In an hour's time there will be another blog post from me as I am guesting with the lovely Kelly Kent, one of the JAI design team, and her Paper Adventures team on a blog hop so be sure to come back and check it out. Until then, happy stampin'!


Stampin' Up! Supplies Used:

Table built using Product Table Builder by The Crafty Owl - Independent Stampin' Up! Demonstrator.


New Online Exclusives

There are new products available exclusively in the online store from 5 November - check them out here.

Latest Kits!

Stampin Cut and Emboss

The Layered Landscapes Kit and Nature's Paintings Kit are the latest kits in the online store - get yours here!

Shop Online

Access my online shop 24 x 7, 365 days of the year:

Current November hostess code:

9NKXDTTR

Shop Online

Mini Catalogue

BROWSE THE CATALOGUE

'Tis The Season - the new Stampin' Up! Mini Catalogue is here! For more details and to download your copy click here

Scrapbooking

Stampin' Up! has introduced a new range of 12x12" scrapbooking product and kit - the full range is now available to purchase online. To download a copy of the new digital Scrapbooking Catalogue click here.

2024-25 Annual Catalogue

BROWSE THE CATALOGUE

Click on the image to download your copy of the 2024-25 annual catalogue. For a full list of current SU! supplies, go to my online store. If you would like any help or advice, please drop me a line at joanne@thecraftyowl.co.uk or give me a call on 07773 421446 - I'd be happy to help.

Join My Team

It's always a great time to join Stampin’ Up! New team members can get £130 worth of products for only £99 + free business supplies + free shipping + all the fun being a part of Stampin’ Up! Stampin' Up! has something for everyone: join my growing team and benefit from my support to enjoy Stampin' Up! however you choose.

If you're interested, call me for a chat to understand how I can help you realise your goals. Alternatively, if you have already decided to sign up and you just can't wait, please click here for the link to the online form where you can sign up and order your starter kit right away! 

About Me

Hi I'm Joanne and live in Northampton and when I'm not looking after my husband and two beautiful children, am an avid crafter with a passion for all things Stampin' Up!

I must confess that I have never been a big rubber stamper - until I discovered Stampin' Up! that is. I love the fact that I can get such great results with co-ordinating stamps, inks, papers and punches - the possibilities are endless! Join me on my stamping journey as I share the things I love and be inspired to create amazing things yourself!

Follow Me

Monthly Newsletter

Box Builder

Click the button above to use Box Buster to create your custom box design using the Envelope Punch Board!

Kits Collection Now Available!

Stampin Cut and Emboss

The new Kits Collection from Stampin' Up! is now available!

Click here to see the current kits available and order yours online today.

I Design For


Stampin' Up Stuff

This is my personal blog and is not endorsed by Stampin’ Up! I hope you find it a plentiful source of ideas and personal inspiration but please don't copy my designs for contest submission or use for classes, publication or sale without express permission.