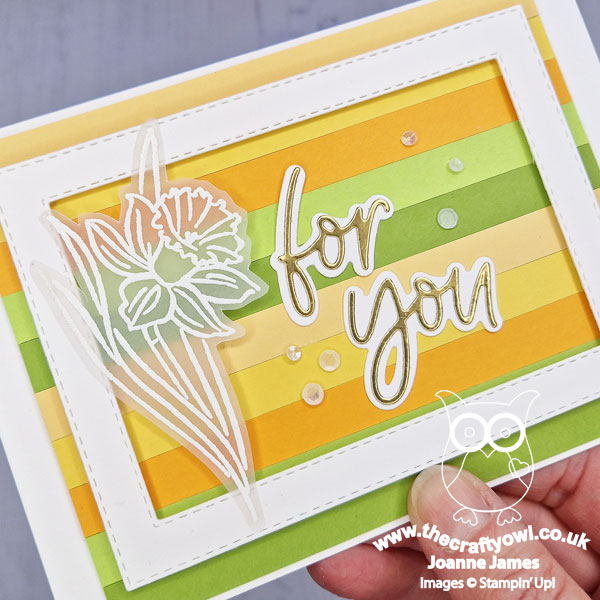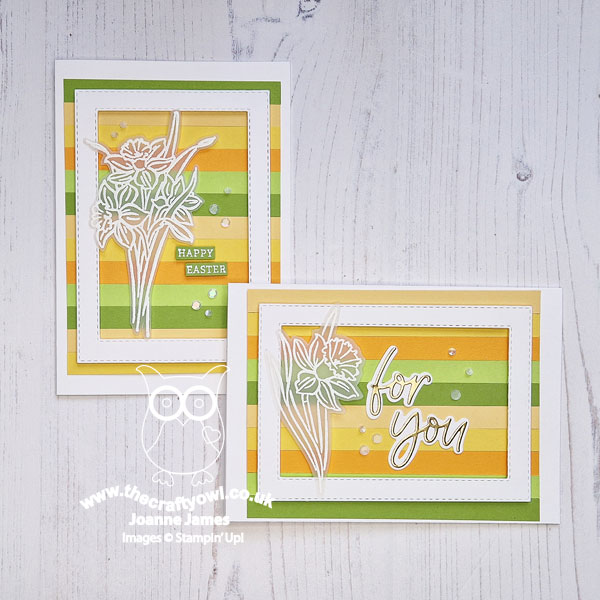
Sending Smiles Layered Slimline Birthday Card TTT160

by Joanne James5. May 2022 17:00

It's Thursday and time for a new challenge over at TicTacToe! It's the turn of Team X to host this week and the lovely Vicky is our featured designer this week. This is the fun board that we are playing along with: 


I went down the middle column with twine, flowers and leaves and today paired something old with something new - take a look:


Here's the low-down on today's card:

Color Throwdown - Today's card features the colours over at Color Throwdown this week - check out these fresh colours:


I was supposed to be this week's Featured Stamper over at Color Throwdown following my win with this card here a couple of weeks ago. But I got my dates muddled and thought I needed to be ready for next week not this week! So I added some twine to the card I'd prepared and thought I'd share with you today instead. Isn't this a great mix of colours?

Slimline Stripes - Today's card was not only inspired by the colours but also the striped pattern on the dress of the CTD inspiration photo. I thought the Slimline Dies would be a great way to incorporate the colours but also add interest to the front of my card, don't you think? The Mint Macaron co-ordinates beautifully with the slimline envelopes too.

Sending Smiles - I couldn't resist another outing with the Sending Smiles bundle on today's card. I backed my flower stem with a circle of vellum so that it wouldn't get lost against the background. The real star of today's card though is the sentiment; I just love that layered 'sending' diecut and it's so versatile as it can be paired with lots of other greetings in the set:  

I'm also linking up with the lovely ladies over at SUO Challenges who are featuring sentiments for their current challenge. They are also celebrating their 300th challenge - way to go!

Here is the visual summary of the key products used on today's project for you to pin for easy reference:
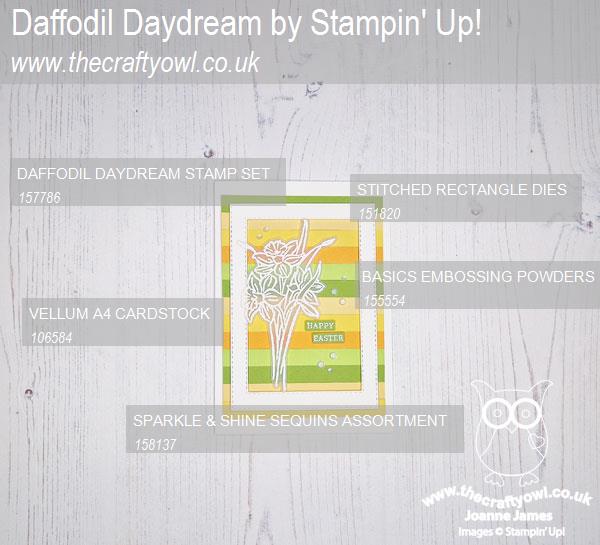
 

You can see all of my Product and 'How To' summaries on my 'How To - Tips and Techniques' Pinterest board in case you've missed any. 

A tictactoe board offers so many creative possibilities - how does this week's board inspire you? Why not have a go? We would love to see you in the gallery and who knows - you might be selected for Designer's Choice and be eligible to be a guest designer on a future challenge. 

Enjoy your day; I'm out at an art exhibition this evening, so looking forward to that. I'll be back tomorrow with another project. Until then, happy stampin'!


Stampin' Up! Supplies Used: 
Table built using Product Table Builder by The Crafty Owl - Independent Stampin' Up! Demonstrator.

Simple Sending Smiles In-Color Card And Time To Join The New In Color Club

by Joanne James4. May 2022 18:00

Today I'm sharing the card that I sent out with the paper copies of the new Stampin' Up! annual catalogue to my loyal customers. I used the new 'Sending Smiles' bundle and my card also features each of the new in-colours - take a look:


Here's the low-down on today's card:

Sending Smiles - I had lots of these cards to make, so purposely designed a fairly clean and simple, almost one layer (save the diecut sentiment) card. For this kind of mass production the Stamparatus is a must: I added flower stems, each set of petals and then the sentiment to separate platform plates, then without needing to move my card, stamped each colour in turn. Once all my card bases were stamped, I added my diecut sentiment; I added adhesive sheets to the reverse of my Tahitian Tide cardstock to speed up the gluing process and added some Tombo behind the vellum to attach it to the cardbase.

New In Colors - Let's take a look at those new 2022-24 In Colors: 


Whilst the In Color collections aren't designed to be used together, the colours in this collection compliment each other beautifully, don't you think? 

Want Them All? - Would you like to add these colours to your ink collection? Stampin' Up! have made that even easier for you this month. Between 3-31 May, when you join Stampin' Up! as a new demonstrator, you receive not only £130 of product for £99, but you will get an additional £62.50 worth of In-Color products FOR FREE! 


You will receive a full set of in color ink pads, a mixed pack of in color cardstock, in color designer series paper and a pack of in-color grid paper in your FREE product bundle. Your kit is sent postage-free and there are a range of ongoing benefits, from product discounts to training and most of all the opportunity to grow a business that works for you and have fun and build friendships as part of the wider Stampin' Up! community.

If this isn't for you, then you might like to consider joining my new In Color Club. 

2022-24 In Color Club Details

To help you spread the cost and gradually grow your new in-colour collection, I am offering an in-colour club (UK customers only). It begins this month and runs for the next 5 months, up to and including September. Each month, you will receive a collection of products for one of the colours, with each month featuring a different colour. You will be sent a reminder on the 1st of the month, and your in-color club invoice will need to be paid by the 15th of the month in order that items can be ordered in good time.

Each month, you will receive: 

  • 1/2 pack of A4 cardstock (12 sheets)
  • 1/2 roll of 1/8" (1cm) In Color Metallic Woven Ribbon
  • 1 ink pad
  • 1 ink refill
  • 1 Stampin' Write Marker
  • 30 In Color Matte Decorative Dots
  • Eight 6”X6” In Color DSP sheets
  • Four sheets 6" x 6" In Color Glimmer paper
  • In Color Baker's Twine
  • A hand stamped card featuring your in-colour of the month

Since all of the colours are also available as Stampin' Blends, there is the option to add on a Stampin' Up! Blends Marker Combo Pack each month for an additional £8.50.   

Details:

Basic Pack Cost: £31.65 plus postage and packaging (Royal Mail 2nd Class Signed For) every month May through September. If you are local, you can avoid the cost of shipping and arrange to collect. 

Payment can be made by Paypal or bank transfer (or cash/cheque for local customers).

If you would like to join my new colour club this month, then you can email me to sign up here.

Here is the visual summary of the key products used on today's project for you to pin for easy reference:


You can see all of my 'How To' summaries on my 'How To - Tips and Techniques' Pinterest board in case you've missed any. 

I am also linking my card up over at The Alphabet Challenge where they are currently on 'B is for Blooms' as we go back through the alphabet once more.

Enjoy your day and I'll be back tomorrow with another project. Until then, happy stampin'!


Stampin' Up! Supplies Used:

Table built using Product Table Builder by The Crafty Owl - Independent Stampin' Up! Demonstrator.

A Clean and Simple Cup Of Tea With A Friend CCS468

by Joanne James3. May 2022 13:00

It's Tuesday and time for a new challenge over at CAS Colours & Sketches.  We are into May and so a new month means a new hostess! This month it's the turn of Shannon and our first challenge is a colour challenge: 


I also used the sketch layout over at Just Add Ink for my layout. Today's card is all about the new - well it is the Stampin' Up! annual catalogue launch day, after all! I used two new stamp sets and two new dies - take a look:


Here's the low-down on today's card:

A stitched circle courtesy of the Stylish Shapes Dies in Pale Papaya forms the backdrop for my sweet heat-embossed teacup brimming with flowers, courtesy of the new Cup of Tea bundle. A fussy cut sentiment from the 'Happiness Abounds' stamp set (I just love that script/font!) and a few in-colour gems complete my clean and simple card:

And that's all there is to it! Here is the visual summary of the key products used on today's project for you to pin for easy reference:


You can see all of my 'How To' summaries on my 'How To - Tips and Techniques' Pinterest board in case you've missed any. 

As a reminder, for our colour challenges, you must use all of the stated challenge colours. You may also use neutral colours; however, the challenge colours should be the most noticeable ones featured on your card. We use Stampin' Up! color names for reference, but you are welcome to use any other companies' products as long as you match the challenge colours as closely as possible.

Enjoy your day and I'll be back tomorrow with another project. Until then, happy stampin'!


Stampin' Up! Supplies Used:

Table built using Product Table Builder by The Crafty Owl - Independent Stampin' Up! Demonstrator.

Stampin' Up! 2022-23 Annual Catalogue Live and In Color Join Promotion

by Joanne James3. May 2022 09:00

The wait is over - it's May 3rd and the new 2022-23 Stampin' Up! Annual Catalogue is here! You will find a permanent link to the new catalogue on the right hand side of my blog but for today you need look no further than the picture below which will take you straight to the new catalogue: 


The new catalogue is fantastic, with so many great new products to choose from. I've sent paper copies to everyone who has shopped with me in the last 6 months; a digital copy of the new catalogue can be accessed via the image above and it will be permanently linked via my blog on the right hand side if you don’t have a paper copy and wish to browse. If you have your paper copy and just want to go straight to the shop to place your order, click here - ordering systems have now fully transitioned from the old stock items to the new so you are good to go! Also, remember to add the current hostess code for May CUUXZD2C if your order is less than £150 and ensure your preferences are set to 'contactable' to receive a thank you in the post from me.

Due to ongoing supply issues, there are a number of items that are unavailable at catalogue launch - this includes the magnetic plates for both of the Stampin' Cut and Emboss machines (even though only one is listed below):


I will keep you up to date here on the blog as these items arrive.

There is also a promotion that goes live today to coincide with the launch of the new catalogue:


It’s always exciting to be able to invite people to join our community of crafters and creators. And right now it’s even more exciting because when you sign up between 3 and 31 May to become a Stampin’ Up! demonstrator, in addition to £130 worth of products for only £99 + free business supplies + free shipping + all the fun being a part of Stampin’ Up! will receive the following 2022–2024 In Color products in their Starter Kit for FREE:


Click on the links above for a closer look at each item.

I would love to chat with you about the benefits of joining my team and being a Stampin' Up! demonstrator; as always, you can always find the link to join my team on the right hand side of my blog page; alternatively it's right here if you fancy jumping right in!

That's a lot of information for one post; if I were you I would put the kettle on, put your feet up and get comfy and settle down with your new catalogue for a browse and start creating that all-important wish list!

Back later this morning with today's creative post; until then, happy shopping!

Celebrate Without Flowers And A Cautionary Tale

by Joanne James2. May 2022 17:00

As promised, today I have a second card for you. I started this card on Saturday but only managed to finish it this afternoon. It uses Jen B's fabulous layout over at Freshly Made Sketches and the colours over at Color Throwdown (and was inspired by the geometric triangle pattern on the cushion in the inspo photo too):


Here's my card - take a look:


Here's the low-down on today's card:

At first glance, there really is nothing that remarkable about this card: a simple card base in Bumblebee, a mat in Night of Navy and then a vertical sentiment from the 'Celebrate With Flowers' stamp set in triplicate with a pattern in between formed from some tiny triangles in the challenge colours and diecut with the Stitched Triangle Dies. This card should have been super-simple to execute and the idea came to me in a flash when I saw Jen's sketch; normally I would have chosen one of my (many!) beloved patterned papers for those three shapes, however the stamp set was still on my desk from a previous project and I thought it would be fun to rotate the sketch through 180 degrees and flip the sentiment and decorative elements. Easy, right? Famous last words!! I actually started making two cards, the one you see above and a one layer one, but all in all I must have made about 6 versions, all of which ended up in the dustbin, before I finally finished one. There were mis-aligned sentiments, misaligned diecut borders, changes of cardbase colour, smudged ink - you name it, it happened on this card! Eventually I cut down my one layer version for the above card and added my diecut triangles so that I could at least say I finally finished one!

I think this makes a good clean and simple masculine birthday card, but I can't say I'll be making another one anytime soon - this one may well be unique! The moral of the story here? Well, stick to the sketch and go with your first instinct. Oh and even the most experienced of us cardmakers sometimes fail to get it right first, second ... or even fifth time!


I hope you enjoyed reading about my crafting trials and tribulations! Enjoy your evening and I'll be back tomorrow with another project and links to the new catalogue - woohoo! Until then, happy stampin'!


Waves of The Ocean Pocket Edge To Edge Shaker Card

by Joanne James2. May 2022 10:00

Happy Bank Holiday Monday to my UK readers! Today I'm sharing a card that uses the colour palette over at Hand Stamped Sentiments

I'm loving all of the blue colour palettes that are about at the moment, especially since I have been giving my Waves of The Ocean Suite a workout and the two pair perfectly! I thought the HSS colours were perfect for a little project that I've been wanting to have a go at for a while - an edge to edge pocket shaker card. My good blog friend and fellow Tic Tac Toe challenge team member Stef Perry over at Perry Papercrafts made this fabulous card a while ago and I have been wanting to have a go and thought that the Waves of Inspiration bundle would be just the thing to make my own version - take a look:


Here's the low-down on today's card:

Waves Of The Ocean - Since this card is really all about the shaker, the stamping is fairly simple. I used all three ink colours to create my blended seascape background using my blending brushes and stamped a single wave in Versamark and heat embossed it in white; this forms the base of my shaker. 

A Pocket Shaker - creating the shaker itself is rally easy. You just need a flimsy acetate pocket - the wrapping that your new dies come in is perfect for this - then you attach it to the back of the panel on three sides to form a pocket, fill with the sequins on your choice (I used some retired ones from the Whale of a Time suite, minus the pink shells, along with some clear, white and silver ones) before taping the fourth side shut. You then mount this panel on your card front, and add any additional diecuts to the front of your card; I layered a Coastal Cabana foil and white cardstock pair of waves cut with the Waves Dies over my stamped image, and snipped a sentiment and added it to the opposing corner:


The sequins still move around the front of the card, although a little less freely than with a traditional shaker. On the upside there is less bulk though so this kind of card is great for posting. I just love this idea and am really happy with how this card turned out - thanks Stef for the inspiration, I knew I'd get around to making one eventually!

Going, Going, Gone - Today is your final reminder that lots of things are ending today - it is the last day that the following items will be available:

  • Last Chance Products, stamps and accessories from the current 2020-21 Stampin' Up! Annual Catalogue
  • All Together exclusive paper, stamps and dies (only the skin tone Blends are carrying over to the new annual catalogue)
  • Waves of The Ocean Suite exclusive papers, foils and embellishments (only the stamp set and dies are carrying over to the new annual catalogue)

When tomorrow comes, it will be all about the new annual catalogue so if any of the above are still on your list, you best click the links below and hop over to the online store today! 

Here is the visual summary of the key products used on today's project for you to pin for easy reference:


You can see all of my 'How To' summaries on my 'How To - Tips and Techniques' Pinterest board in case you've missed any. 

Enjoy your day; I will be back later with one (maybe two!) posts as I have a few makes 'in progress' on my desk along with news of a great new joining offer that will be starting tomorrow to coincide with the new annual catalogue launch - exciting stuff! Until then, happy stampin'!


Stampin' Up! Supplies Used:

Table built using Product Table Builder by The Crafty Owl - Independent Stampin' Up! Demonstrator.

Honeybee Home Miss You Hexagon Trio

by Joanne James1. May 2022 08:00

Today it's Sunday and time for this week's new challenge over at The Paper Players! It's the turn of the fabulous Jaydee to host this week and she has a fun 'and/or' theme challenge for us to work with:


Birds and/or bees - what fun! I decided to go with 'bees' for my card today - take a look:


Here's the low-down on today's card:

Honeybee Home - I decided that 'Honeybee Home' would be the perfect set for today's card. I paired my bees with a watercoloured floral stem and some diecut florals and grasses from the co-ordinating Honeybee Blooms Dies in white and yellow. I also added a little stamping to the inside of my card:

Beautiful Shapes - The eagle-eyed amongst you may well recognise the layout I used for today's card - it's the sketch I designed for my week as Paper Players hostess last week. I thought the three elements would work really well as hexagons in various sizes, so I used my Beautiful Shapes Dies to cut some hexagons in various sizes and stencilled one, watercoloured and  embossed another and layered them to build up my scene. I added some twine and hexagon enamel shapes to complete my design. 

Bye Bye Bumblebee - To give my card a cohesive feel, I worked in black, white and the retiring Bumblebee. By using a combination of blending, watercolouring, markers and cardstock it varies the intensity of colour:


With Bumblebee as my choice colour, I am also entering today's card over at Inspire.Create for their current challenge too. I really like this set; this card took a long time to create as there are lots of elements and small details, but it was so worth it!

Here is the visual summary of the key products used on today's project for you to pin for easy reference:


You can see all of my Product and 'How To' summaries on my 'How To - Tips and Techniques' Pinterest board in case you've missed any. 

Before you reach for your ink and papers, check out what our amazing team has created to inspire you this week:

Here's a quick recap of our challenge rules:
 
1.  Create a new paper project
2.  Upload your creation to your blog with a link back to us and provide a direct link to the post featuring your challenge submission.
3.  Please link your card to no more than four challenges, TOTAL.
4.  Have FUN!

Enjoy your day; we have a long weekend here in the UK so an extra day with everyone at home. We have no specific plans other than to relax, spend some time in the kitchen and enjoy the sunshine too. I'll be back tomorrow with another project. Until then, happy stampin'!


Stampin' Up! Supplies Used: 

Table built using Product Table Builder by The Crafty Owl - Independent Stampin' Up! Demonstrator.

Sweet Little Rainbow Treats FF108

by Joanne James29. April 2022 09:00

Today I have my card for the new challenge over at Festive Friday. 


The challenge that we are celebrating this week is 'National Eat What You Want Day' which is on 11th May - who knew?! Remember the fun thing is that at Festive Friday you do not need to actually celebrate the occasion; your goal is to simply use three or more items from the inspiration list on your project. This week I used food, treat packaging, red, pastels and twine and this is what I came up with:


 What better for the end of the week but a Friday treat! Here's the low-down on today's treat box:

Sweet Little Boxes - OK first up is a confession: I didn't make the box from scratch! There was absolutely no need when the mini catalogue has the perfect solution - the Sweet Little Boxes! These little boxes are sweet indeed - and at 3 1/2" x 2 1/2" x 5/8", they are the perfect size for some chocolates or sweets and fit in your hand perfectly:


Playful Patterns - The boxes are flat packed, so it's super easy to customise them. I decided to use some Playful Patterns host reward striped paper for mine and simply used the box as a template, drew around it and cut out the paper and adhered it the box before putting the box together. This does mean that extra double-sided tape will be required in addition to the tape that is already on the box, but that's it - super easy. 

Brilliant Rainbows - I decorated my box with a large diecut rainbow cut using my Brilliant Rainbows Dies, pulling colours out of the paper. I added some stitched clouds courtesy of the Give It A Whirl Dies and and diecut and stamped a tag using the same bundle and tied it to my box using some (retired) Bermuda Bay and white striped baker's twine.

My box contains a packet of Skittles and has already made its way into the schoolbag of one of the James Juniors for a special break time surprise (don't worry, the other one has one too!)

Here is the visual summary of the key products used on today's project for you to pin for easy reference:


You can see all of my 'How To' summaries on my 'How To - Tips and Techniques' Pinterest board in case you've missed any. 

How does our board inspire you? I can’t wait to see what YOU create! For more inspiration, be sure to visit the rest of the  Festive Friday Challenge Design team:

Ann Schach
Beth McCullough
Sharon Hashimoto Burkert
Melanie Hungerford
Helen Jennings
Stephanie Lanzalotto
Melva Peters
Jaydee
Diane Evans
Joanne James - that's me!

Enjoy your day - today is a two-post day so be sure to check today's other project too. Until then, happy stampin'!


Stampin' Up! Supplies Used:

Table built using Product Table Builder by The Crafty Owl - Independent Stampin' Up! Demonstrator.

Days To Remember CAS Birthday Card

by Joanne James29. April 2022 09:00

Today I have a second post for you in addition to my Festive Friday post: this time with a card for the new challenge over at CAS on Friday where I am the Guest Designer this week following my previous win in their stencil challenge (here's that winning card if you missed it). The theme for the new challenge is 'numbers'; take a look at what I came up with:


Here's the low-down on today's card:

Days To Remember - I decided to break out my unused 'Days To Remember' stamp set to create a fun calendar birthday reminder card. This is a great set that enables you to easily create any day/date/month combo in calendar format - I decided to make a birthday card with a tear-off calendar sheet showing a birthday circled, highlighted with a fun sentiment and trio of ombre glimmer balloons for decoration. I also added another couple of sentiments from the set to the inside of my card:


Perfect Perforations - Do you spot the new product I used on my calendar piece? That fun border edging is courtesy of a die that is in the new Blossoming Happiness Dies set - I thought it made the perfect tear-off border detail. 

A New Old Favourite - I used another item from the upcoming new annual catalogue on my card today - did you notice that stitched banner that outlines the sentiment? My regular readers know how much I missed the Stitched Shapes Dies when they retired. Well now they're back - stitched circles and squares and new banner shapes too! Take a closer look on the photo below:

In case you're wondering - the birthday on my card is mine :-) No vanity here though; when the day comes around, this card will actually be headed to a friend of mine - can you believe that I actually know two other people that share the same birthday?! A quirky coincidence for sure!

Here is the visual summary of the key products used on today's project for you to pin for easy reference:


You can see all of my 'How To' summaries on my 'How To - Tips and Techniques' Pinterest board in case you've missed any. 

I also used the current sketch over at Try Stamping on Tuesday (squished to fit my landscape design :-) ) as the inspiration for my layout today. 

Enjoy your day and I'll be back tomorrow with another project. Until then, I have a super busy day ahead so need to crack on; happy stampin'!


Stampin' Up! Supplies Used:

Table built using Product Table Builder by The Crafty Owl - Independent Stampin' Up! Demonstrator.

Playful Alphabet Brilliant Rainbow and Sequins CAS Shaker Cards CCS 467

by Joanne James26. April 2022 13:00

00It's Tuesday and time for a new challenge over at CAS Colours & Sketches. This week it's our final challenge for the month of April and Bhavya has asked that we create something with three distinct sentiment elements for her final sketch challenge:


Feel free to flip or rotate the sketch when making your card. For my card today I ended up creating not one, not two but three cards! I'm sharing my favourite one first - a clean and simple shaker card - take a look:


Here's the low-down on today's card:

Farewell Playful Alphabet Dies - Time to say goodbye to a craftroom staple - the Playful Alphabet Dies! Yes, they are retiring with current annual catalogue next week and newsflash - there are NO alphabet die sets in the new annual catalogue, so not only will I be hanging on to my set, if you don't have them you have just one week to nab a set! I can't recommend them highly enough: they are so useful for personalising cards, but also to create bespoke messages or greetings. Use them flat or on dimensionals, or as I've done here to create a bespoke message that I then backed with window sheet to create a fun clean and simple shaker card! How cool is this?


Rainbows or Candles? - My initial shaker was inspired by the inspiration challenge of 'make a wish - rainbows' over at TGIF Challenges this week and I paired my simple message with a paper-pieced rainbow made using my Beautiful Rainbow Dies and some scraps of cardstock in Poppy Parade, Daffodil Delight, Coastal Cabana and Fresh Freesia to co-ordinate with the (retired) Ice Cream Shaker Sprinkles that I used inside my shaker. I used my rainbow offcuts to add a decorative border to the inside of my card, along with a sentiment from the retiring 'Sweet Ice Cream' stamp set:


I liked this card so much, I made another one, this time using the retiring white, gold and silver Sequins For Everything (currently half price) for my shaker and a trio of (retired) gold Candle Embellishments I found on my shelf:


Check out the sparkles - how fun!


Here are both shakers together - which one do you prefer?


I honestly can't decide - I love this design so much I think I'm going to make a whole bunch more!!

A CAS Thankyou Trio - Finally I have one extra 'bonus' card for you, that was the one I made before my shakers - a super simple repeating 'thanks' sentiment using a trio of dies cut with the Amazing Thanks Dies, with each one backed by the fresh colours of the current Color Dare challenge:


By using the colour for the base layer of the diecut and making the top layer white, it allows for a white base and preserves the clean and simple feel with all that 'white space'. This is a great way to use up scraps and whilst I love the fresh colour combo I used on today's card - Flirty Flamingo, Mango Melody, Daffodil Delight - this simple layout would work with whatever colours you have available.

Here are the visual summaries of the key products used on today's projects for you to pin for easy reference:


You can see all of my 'How To' summaries on my 'How To - Tips and Techniques' Pinterest board in case you've missed any. 

I actually made four cards for today's challenge; the first one was mediocre at best; I had an idea that just didn't look right when I made it - so much so, I'm not even going to share it with you!  So I left it and when I went back to desk 24 hours later, I started fresh and came up with my thankyou trio, quickly followed by my fun shaker cards - suddenly I was on a creative roll! Does that ever happen to you when your creating? How do you combat that feeling you get when you've made something but are just not 'feeling' it? Do leave me a comment below - I'd love to hear from you!

Enjoy your day; the James Juniors are both back to school today following the Easter break so I will be aiming to get more work done this week. This is a super-busy term, with everything from cricket fixtures to the school musical production, internal exams, speech days, university open days and lots more besides! I really do need to get organised!! On that note, I'll be back tomorrow with another project. Until then, there's work to do - happy stampin'!


Stampin' Up! Supplies Used:

Table built using Product Table Builder by The Crafty Owl - Independent Stampin' Up! Demonstrator.


New Online Exclusives

There are new products available exclusively in the online store from 5 November - check them out here.

Latest Kits!

Stampin Cut and Emboss

The Layered Landscapes Kit and Nature's Paintings Kit are the latest kits in the online store - get yours here!

Shop Online

Access my online shop 24 x 7, 365 days of the year:

Current November hostess code:

9NKXDTTR

Shop Online

Mini Catalogue

BROWSE THE CATALOGUE

'Tis The Season - the new Stampin' Up! Mini Catalogue is here! For more details and to download your copy click here

Scrapbooking

Stampin' Up! has introduced a new range of 12x12" scrapbooking product and kit - the full range is now available to purchase online. To download a copy of the new digital Scrapbooking Catalogue click here.

2024-25 Annual Catalogue

BROWSE THE CATALOGUE

Click on the image to download your copy of the 2024-25 annual catalogue. For a full list of current SU! supplies, go to my online store. If you would like any help or advice, please drop me a line at joanne@thecraftyowl.co.uk or give me a call on 07773 421446 - I'd be happy to help.

Join My Team

It's always a great time to join Stampin’ Up! New team members can get £130 worth of products for only £99 + free business supplies + free shipping + all the fun being a part of Stampin’ Up! Stampin' Up! has something for everyone: join my growing team and benefit from my support to enjoy Stampin' Up! however you choose.

If you're interested, call me for a chat to understand how I can help you realise your goals. Alternatively, if you have already decided to sign up and you just can't wait, please click here for the link to the online form where you can sign up and order your starter kit right away! 

About Me

Hi I'm Joanne and live in Northampton and when I'm not looking after my husband and two beautiful children, am an avid crafter with a passion for all things Stampin' Up!

I must confess that I have never been a big rubber stamper - until I discovered Stampin' Up! that is. I love the fact that I can get such great results with co-ordinating stamps, inks, papers and punches - the possibilities are endless! Join me on my stamping journey as I share the things I love and be inspired to create amazing things yourself!

Follow Me

Monthly Newsletter

Box Builder

Click the button above to use Box Buster to create your custom box design using the Envelope Punch Board!

Kits Collection Now Available!

Stampin Cut and Emboss

The new Kits Collection from Stampin' Up! is now available!

Click here to see the current kits available and order yours online today.

I Design For


Stampin' Up Stuff

This is my personal blog and is not endorsed by Stampin’ Up! I hope you find it a plentiful source of ideas and personal inspiration but please don't copy my designs for contest submission or use for classes, publication or sale without express permission.