Needlepoint Nook Birthday Card

by Joanne James1. June 2019 07:00

Happy weekend everyone! Today I'm sharing another of my Needlepoint Nook cards from a previous class that really showcases the co-ordinating designer series paper  - take a look:


Here's the low-down on today's card:

Embroidered Paper - The Needlepoint Nook Suite is perfect for creating the look of handcrafted embroidery with much less effort and has stamps, papers, accessories and framelits that fit the theme. The papers in this suite are so pretty, they look almost as if they have been hand embroidered. I love the multi-coloured pattern I used on this card - so pretty!

Hand-Stitched Stamping - The floral elements in the Needle & Thread stamp set are distinctive stamps that have the almost photographic appearance of embroidered flowers. I used a combination of ink pads and Stampin' Write Markers to create a bright spray of flowers, adding in a few additional diecut pieces too. 

A Stitch in Time - There's more stitching with the stitched border but my favourite is definitely the stitched sentiment label that conveniently fits the Pretty Label Punch.

Here is the visual summary of the key products used on today's project for you to pin for easy reference:


You can see all of my 'How To' summaries on my 'How To - Tips and Techniques' Pinterest board in case you've missed any. 

Enjoy your day and I'll be back tomorrow with another project. Until then, happy stampin'!


Stampin' Up! Supplies Used:

Table built using Product Table Builder by The Crafty Owl - Independent Stampin' Up! Demonstrator.

Follow Your Art For PP443

by Joanne James26. May 2019 09:00

Today it's Sunday and time for this week's new challenge over at The Paper Players! It's the turn of the fabulous LeAnne to host this week and she has my favourite, a sketch challenge, for you to work with:


I sometimes struggle with making when we are in transition between an old and new Stampin' Up! catalogue - just too much to choose from! - so I was glad of a sketch this week to help things along. I decided to get creative with one of my favourite new suites from the upcoming catalogue called Follow Your Art - take a look:


Here's the low-down on today's card:

Follow Your Art - The Follow Your Art Suite is perfect for creatives and crafty types. With stamps, co-ordinating dies and papers featuring stamps, ink, reinkers, glue guns, buttons, ribbons and more, there are so many ways to follow your own art with this set. My card features a background piece of Follow Your Art Designer Series Paper and a fun reel of ribbon with heart detail that I coloured with my Stampin' Blends to anchor my sentiment.

A Great Little Gift - One of the other fun items in this suite is the Follow your Art Embellishment kit. With pretty coloured clips, embellishments, twine and four sheets of pretty stitched felt shapes, there are lots of great embellishments for your handcrafted projects. They come in this gorgeous little box too, which you could use to store or gift cards in or give the kit to someone as a gift in itself. Check it out:


I used a felt border beneath my sentiment and added some twine to the centre of a couple of my diecut buttons for a fun touch.

Buttons, Buttons and More Buttons - Buttons feature in this set in more ways than one: I added some diecut paper ones and for the vertical panel I embossed a panel using the new Button Button Embossing folder for additional texture and dimension.

Here is the visual summary of the key products used on today's project for you to pin for easy reference:


You can see all of my Product and 'How To' summaries on my 'How To - Tips and Techniques' Pinterest board in case you've missed any. 

Before you reach for your ink and papers, check out what our amazing team has created to inspire you this week:

Here's a quick recap of our challenge rules:
 
1.  Create a new paper project
2.  Upload your creation to your blog with a link back to us and provide a direct link to the post featuring your challenge submission.
3.  Please link your card to no more than four challenges, TOTAL.
4.  Have FUN!

You can see all of my 'How To' summaries on my 'How To - Tips and Techniques' Pinterest board in case you've missed any. 

Enjoy your day; we have a long Spring Bank holiday weekend to look forward to so I'm hoping the sun will be shining and allow me some gardening time. I'll be back tomorrow with another project. Until then, happy stampin'!


Stampin' Up! Supplies Used: 

Table built using Product Table Builder by The Crafty Owl - Independent Stampin' Up! Demonstrator.

Just Because 2019-21 In Color Embossed Frame Cards for PP442

by Joanne James19. May 2019 09:00

Today it's Sunday and time for this week's new challenge over at The Paper Players! It's the turn of the fabulous Laurie to host this week and she has a clean and simple challenge for you to work with:


I was inspired by Nance's challenge badge this week so decided to go down the houseplant route and ink up another soon-to-be retired stamp set, but with a sneak peek of something new too - take a look:


Here's the low-down on today's card:

Goodbye Just Because - The houseplant on today's card is from one of the hostess sets in the Spring-Summer seasonal catalogue, 'Just Because'. These exclusive sets are sometimes overlooked, but they are a great perk for party hostesses who can claim them with Stampin' Rewards for a special price when they host a qualifying party. They can also be claimed if you place one large qualifying order and are always worth a look. I can confirm that the new annual catalogue has some fabulous hostess sets, so if you would like to host a party post the new catalogue launch, then do get in touch with me now to book a suitable date.

An Embossed Frame - The houseplant on today's card is rather green and uninteresting on its own, so I needed something that would add interest whilst still keeping to Laurie's 'clean and simple' theme. I decided on a stitched embossed frame, placed at a jaunty angle. I used my rectangle stitched framelits to cut a frame that I then ran through my Layered Leaves Dynamic Textured Embossing Folder; an easy way to draw the eye to the image and sentiment.  

Hello New 2019-21 In-Colours - My jaunty frame also gave me an opportunity to give you a sneak peek of the new 2019-21 in-colours. My main card showcases my favourite, Purple Posy, and I created a set with a frame in each new in-colour: left to right you can just see Terracotta Tile, Pretty Peacock, Rococo Rose, Seaside Spray and Purple Posy. 


My cards are a little 'unfinished' in as much as I wanted to add one of the new in-colour faceted dots to the right of my sentiment on each card, but alas we are having shipping issues here in the UK and mine hadn't arrived in time to make my card. For anyone local to me that is attending my Open House catalogue launch event on 5th June, you will be able to see the 'completed' card.

Here is the visual summary of the key products used on today's project for you to pin for easy reference:


You can see all of my Product and 'How To' summaries on my 'How To - Tips and Techniques' Pinterest board in case you've missed any. 

Before you reach for your ink and papers, check out what our amazing team has created to inspire you this week:

Here's a quick recap of our challenge rules:
 
1.  Create a new paper project
2.  Upload your creation to your blog with a link back to us and provide a direct link to the post featuring your challenge submission.
3.  Please link your card to no more than four challenges, TOTAL.
4.  Have FUN!
 

Also remember: this is clean and simple week. What do we mean by 'clean and simple' ? Create a card that has:

  • Minimal layers and embellishments
  • Plenty of open space, also known as 'white space'
  • Is simple and uncluttered

Enjoy your day; I am hoping to spend some time pottering in my garden and enjoying the sunshine. I'll be back tomorrow with another project. Until then, happy stampin'!


Stampin' Up! Supplies Used: 

Table built using Product Table Builder by The Crafty Owl - Independent Stampin' Up! Demonstrator.

Jar of Love Birthday Card For PP441

by Joanne James12. May 2019 09:00

Today it's Sunday and time for this week's new challenge over at The Paper Players! It's my turn to host this week and I have a cheery colour challenge for you to work with:


I decided to use my chosen colours with the current Mojo Monday sketch and create a fresh and colourful tribute to a stamp set that will be leaving us with the end of this annual catalogue - Jar of Love. This is what I came up with:


Here's the low-down on today's card:

When I originally chose this colour palette, I had intended to do something floral using the 'All That You Are' stamp set, but in the meantime I created this card using these colours with that set, so instead decided to focus on 'Jar of Love' since it is soon to retire and deserved at least one last swansong!

There really isn't much to say about this card as the layout is simple, with some pastel Subtles DSP for the outer mat and some stitched detailing courtesy of the stitched rectangle framelits for the inner panels. The effort is all in the flowers: I stamped lots of flowers in each of the colours and then arranged them in my jar, overlapping until I achieved the look I was after. For some of the greenery I stamped off first, to allow for a lighter green and did the same for the two-step stamping on the pink and yellow flowers, to achieve depth with the tone-on-tone effect.

I coloured a few pearls yellow with my Stampin' Blends then added a birthday greeting to my banner, courtesy of the 'Beautiful Bouquet' stamp set - this set has great sentiments for floral cards. I love the dimension the layering of the flowers adds, even though the card itself isn't that bulky at all and would still be post-friendly.

Here is the visual summary of the key products used on today's project for you to pin for easy reference:


You can see all of my Product and 'How To' summaries on my 'How To - Tips and Techniques' Pinterest board in case you've missed any. 

Before you reach for your ink and papers, check out what our amazing team has created to inspire you this week:

Here's a quick recap of our challenge rules:
 
1.  Create a new paper project
2.  Upload your creation to your blog with a link back to us and provide a direct link to the post featuring your challenge submission.
3.  Please link your card to no more than four challenges, TOTAL.
4.  Have FUN!

You can see all of my 'How To' summaries on my 'How To - Tips and Techniques' Pinterest board in case you've missed any. 

Enjoy your day - Happy Mother's Day wishes to all my non-UK readers today! We have a busy day of sport in the James household, with one James Junior taking part in regional hockey finals and the other in a short-course swimming gala, so we will be out and about all day. I'll be back tomorrow with another project. Until then, happy stampin'!


Stampin' Up! Supplies Used: 

Table built using Product Table Builder by The Crafty Owl - Independent Stampin' Up! Demonstrator.

Butterfly Beauty Inlaid Foil Diecut Birthday Card

by Joanne James9. May 2019 20:30

Today I'm sharing a card for the current challenge over at Stamps Ink Paper where they are all about winged things this week:

After I made this card for our challenge over at The Paper Players on Sunday, the frugal crafter in me couldn't bear to throw away the rectangle of foil that I cut my butterflies for the pop-up out of, so I save it, along with the inset pieces, and diecut more black butterflies using the large die in the Butterfly Beauty Thinlits set and created a second card by piecing together my offcuts - take a look:


Once I'd pieced the whole thing together, I added some ribbon and sequins beneath my sentiment banner then decorated the inside of my card with the co-ordinating Beauty Abounds stamp set:


The paper-piecing here was something of a labour of love, but that Lovely Lipstick foil is just too pretty to allow any of it to go to waste!

Here is the visual summary of the key products used on today's project for you to pin for easy reference:


You can see all of my 'How To' summaries on my 'How To - Tips and Techniques' Pinterest board in case you've missed any. 

I'll be back tomorrow with another project. Until then, happy stampin'!


Stampin' Up! Supplies Used:

Table built using Product Table Builder by The Crafty Owl - Independent Stampin' Up! Demonstrator.

Beauty Abounds Butterfly Pop Up Birthday Card for PP440

by Joanne James5. May 2019 09:00

Today it's Sunday and time for this week's new challenge over at The Paper Players! It's the turn of the fabulous Jaydee to host this week and she has a fun theme challenge for you to work with:


Cards for friends are the best kind to make and I had a few different cards made that fitted this theme, but decided to share a special card that I made for one of my best friends who is celebrating a milestone birthday next month. This card is also perfect for the #SUOC222 celebratory theme over at SUO Challenges this week. My card is is bright, sparkly and features one of her favourite things - butterflies. First of all, here's the outside:


A selection of butterflies, loosely watercoloured in Melon Mambo and Lovely Lipstick and painted with Wink of Stella, along with the bokeh stamp from the Beauty Abounds stamp set, were flicked with ink and white shimmer paint, along with a liberal sprinkle of white metallic sequins form the basis for the background to my extra-large cardfront (it measure 15cm x 21cm) which provide a colourful background for my focal sentiment, which I accented with some layered diecut butterflies cut using pieces of the main large die in the Butterfly Beauty Thinlits set.

The Beauty Abounds stampset has such great sentiments for friendship cards; this one is completed on the inside of my card along with a fun pop-up surprise:


My simple pop-up includes the whole of the large butterfly thinlit, layered in black over Lovely Lipstick foil (ssaved from Sale-A-Bration). Difficult to photograph well, but it's really impressive in real life and I know my friend will love it! I added the second part of the sentiment; ours is indeed a friendship over many years, that started with the birth of our first babies but has grown in to something much more - it is not that one thing but a million little things that keep it going as the years go by.  I included some sparkly numbers (there comes a time when a milestone birthday is worth celebrating but does not necessarily need to be seen on the front of the card in my view!) along with a little more decoration and a birthday sentiment from the 'Beautiful Day' set that the watercoloured butterfly on the front also came from. 

Here is the visual summary of the key products used on today's project for you to pin for easy reference:


You can see all of my Product and 'How To' summaries on my 'How To - Tips and Techniques' Pinterest board in case you've missed any. 

Before you reach for your ink and papers, check out what our amazing team has created to inspire you this week:

Here's a quick recap of our challenge rules:
 
1.  Create a new paper project
2.  Upload your creation to your blog with a link back to us and provide a direct link to the post featuring your challenge submission.
3.  Please link your card to no more than four challenges, TOTAL.
4.  Have FUN!

You can see all of my 'How To' summaries on my 'How To - Tips and Techniques' Pinterest board in case you've missed any. 

Enjoy your day; we had a busy day yesterday with sport and a quick shopping trip for new school shoes for the youngest of the James Juniors who seems to be having a major growth spurt this year, (no blog post as I got too engrossed in a movie about Ted Bundy that I was watching last night and struggled to multi-process) so are looking forward to a slightly quieter one today, which will culminate with the final episode of the current season of 'Line of Duty' on TV tonight; any of my UK readers also looking forward to this 'who dunnit?' finale? We are also lucky to have a public holiday here in the UK this weekend, so will be making the most of the extra day tomorrow even though the weather is no great shakes - it's cold and showery and we even had hail yesterday! I'll be back then with another project. Until then, happy stampin'!


Stampin' Up! Supplies Used: 

Table built using Product Table Builder by The Crafty Owl - Independent Stampin' Up! Demonstrator.

2019-20 Annual Catalogue Sneak Peak - Introducing Mosaic Mood PP439

by Joanne James28. April 2019 09:00


Today it's Sunday and time for this week's new challenge over at The Paper Players! It's the turn of the fabulous Claire to host this week and she has my favourite, a sketch challenge, for you to work with:


I decided today that I'd make a card with something old (my stamp set is the retiring 'Eastern Beauty') but mostly something new and share a sneak peek of some of the specialty designer series paper that will be coming along in the new annual catalogue - take a look:


Here's the low-down on today's card:

So today's card really is all about the paper! Due to ongoing EU Customs issues, European demonstrators who attended Stampin' Up!'s recent Onstage event were unable to place an early pre-order, so our only new goodies to play with were the products we came come with. One of those was a pack of the new Mosaic Mood Specialty Designer Series Paper though, which is perfect for backgrounds, borders and more! It has some gorgeous printed pages with roses, butterflies and hummingbirds that can be fussy cut to add as embellishments too and what's more they have some amazing UV detail that gives a great glossy, soft sheen - check it out on the rose below:

This detail really makes this paper shine! Since I featured my sentiment on the circle element of my sketch, I used a butterfly from the paper in place of the sentiment on the sketch to keep the whole thing balanced. I liked this card so much that I cut into a few more sheets and changed my base colour to create another card using the sketch that features a hummingbird that I cut from a different sheet of paper:


Again, here's a close-up of that gorgeous glossy detailing, this time on the whole of the bird:


The colours are not as visible as the glossy finish is reflecting the light, but take my word for it this really makes these papers something special. 

Here is the visual summary of the key products used on today's projects for you to pin for easy reference:


And my second card:


You can see all of my Product and 'How To' summaries on my 'How To - Tips and Techniques' Pinterest board in case you've missed any. 

Before you reach for your ink and papers, check out what our amazing team has created to inspire you this week:

Here's a quick recap of our challenge rules:
 
1.  Create a new paper project
2.  Upload your creation to your blog with a link back to us and provide a direct link to the post featuring your challenge submission.
3.  Please link your card to no more than four challenges, TOTAL.
4.  Have FUN!

You can see all of my 'How To' summaries on my 'How To - Tips and Techniques' Pinterest board in case you've missed any. 

Enjoy your day; one of the James Juniors has a birthday party to attend today, but otherwise we have a sport-free day so are looking forward to lunch and an afternoon indoors escaping the storm-force gales we have experienced the last couple of days! I'll be back tomorrow with another project. Until then, happy stampin'!


Stampin' Up! Supplies Used: 

Table built using Product Table Builder by The Crafty Owl - Independent Stampin' Up! Demonstrator.

Hand Delivered Teacher Thank You Card For PP438

by Joanne James21. April 2019 09:00


Today it's Easter Sunday and time for this week's new challenge over at The Paper Players! It's the turn of the fabulous Anne-Marie to host this week and she has a clean and simple challenge for you to work with:


Remember: this is clean and simple week. What do we mean by 'clean and simple' ? Create a card that has:

  • Minimal layers and embellishments
  • Plenty of open space, also known as 'white space'
  • Is simple and uncluttered

I struggled initially with Anne-Marie's challenge this week; I think not getting into my craft room all week hasn't helped! I had an idea for a card and then once I'd made it I really wasn't sure about it; I'll share that card tomorrow and would love you to come by and take a look and tell me what you think. Meanwhile, after a break and a change of stamp set, along with this week's CAS(E) This Sketch layout and the CAS Colours and Sketches colour palette, I created a second card and felt much happier about the whole thing! So here's that card:


Here's the low-down on today's card:

Paper Piecing - Not to be confused with 'paper piercing', paper piecing is the technique of stamping an image and then stamping either the whole or partial image again on coloured or patterned paper and fussy cutting it to piece it together on the main base image. I used it for both the skirt that my teacher is wearing (Blueberry Bushel in-colour DSP) and the pile of books she is carrying (a mix of Wood Textures DSP and solid colour cardstock). This is a fun way to add pattern to areas of your stamped image and can be used with a wide variety of stamps - those with larger areas suitable for colouring, such as those in the Hand Delivered hostess set, are particularly good. 

Primary Brights - I love this colour combination; the trio of primary colours is very bright and also seemed appropriate for a teacher thankyou card. I added further interest to my books by using a couple of different scraps of Wood Textures DSP for additional subtle detail. 

A Teacher Thank You - The sentiments in the 'Hand Delivered' stamp set suggest that the pile of books is intended to make a graduate congratulations card, yet I think they are perfect for a teacher card too. There is a thank you sentiment in this set, but I opted to use the words from the 'Picked For You' set instead, so that I could use a teacher-specific greeting on my front banner (both of the banner elements come from the Lakeside framelits set) and continued this theme with the wording on the inside too:

This card is sure to brighten someone's teacher's day! Both of the James Juniors have male form tutors this year, but Ben has plenty of female subject teachers who are worthy of a little end-of-year gift, so I think it might be heading to one of those. Both of these stamp sets are so useful for teachers cards, and both are set to retire with the current annual catalogue so if they're on your wishlist make sure you put them in your shopping basket before it's too late.

Here is the visual summary of the key products used on today's project for you to pin for easy reference:


You can see all of my Product and 'How To' summaries on my 'How To - Tips and Techniques' Pinterest board in case you've missed any. 

Before you reach for your ink and papers, check out what our amazing team has created to inspire you this week:

Here's a quick recap of our challenge rules:
 
1.  Create a new paper project
2.  Upload your creation to your blog with a link back to us and provide a direct link to the post featuring your challenge submission.
3.  Please link your card to no more than four challenges, TOTAL.
4.  Have FUN!

You can see all of my 'How To' summaries on my 'How To - Tips and Techniques' Pinterest board in case you've missed any. 

Enjoy your day; we will be having an Easter egg hunt, followed by a roast for lunch and then an afternoon in the garden making the most of the wonderfully warm weather we have been blessed with the last couple of days - we need to make the most of it as I'm sure it won't last! Wishing you a pleasant Easter bank holiday weekend however you choose to spend it. I'll be back tomorrow with another project. Until then, happy stampin'!


Stampin' Up! Supplies Used: 

Table built using Product Table Builder by The Crafty Owl - Independent Stampin' Up! Demonstrator.

Fable Friends Stitched Frame Friendship Card PP437

by Joanne James14. April 2019 09:00

Today it's Sunday and time for this week's new challenge over at The Paper Players! It's the turn of the fabulous Ann to host this week and she has a fresh colour challenge for you to work with:


What a pretty trio of spring colours Ann has for us this week! I knew exactly how I was going to use these colours. As I have been busy at Stampin' Up!'s Onstage event these last few days I needed a straightforward layout and the sketch over at Fab Friday was perfect for what I had in mind (I rotated it through 180 degrees) - take a look:


Here's the low-down on today's card:

Fable Friends - Having resisted it for many months, I eventually caved and purchased the adorable collection of farmyard animals that is the 'Fable Friends' stamp set. I have seen one too many examples of loveliness as far as this set is concerned and decided I 'needed' to add it to my stamp collection. The mama duck and her trio of ducklings seemed just perfect for a spot of colouring with this week's colours.

A Trio of Blends - I used the combo packs of Balmy Blue, Calypso Coral and Daffodil Delight to colour my little duckiest, along with a little Ivory for feather detail and light Smoky Slate to ground them. So super-cute is the little trio of ducklings, I had to repeat them on the inside of my card too. I added a close-up here so that you could see how I had coloured them and to show that you don't have to be a colouring expert to get a good result:


Frame It - I used a simple frame made from two Rectangle Stitched Framelits and a piece of Daffodil Delight cardstock to provide the border outline for my picture, along with some Gingham Gala check to add to the theme. My greeting is from the same set and I stamped it on Balmy Blue to make it stand out from the white space surrounding my image.

I really love this fresh, spring-inspired card - now I just need to decide who to send it to!

Here is the visual summary of the key products used on today's project for you to pin for easy reference:


You can see all of my Product and 'How To' summaries on my 'How To - Tips and Techniques' Pinterest board in case you've missed any. 

Before you reach for your ink and papers, check out what our amazing team has created to inspire you this week:

Here's a quick recap of our challenge rules:
 
1.  Create a new paper project
2.  Upload your creation to your blog with a link back to us and provide a direct link to the post featuring your challenge submission.
3.  Please link your card to no more than four challenges, TOTAL.
4.  Have FUN!

You can see all of my 'How To' summaries on my 'How To - Tips and Techniques' Pinterest board in case you've missed any. 

Enjoy your day; mine will be a quiet one as I feel I need to recover from the last 2 days of Onstage, which were long and hectic, whilst also fun and a great opportunity to catch up with friends. I'll be back tomorrow with another project. Until then, happy stampin'!


Stampin' Up! Supplies Used: 

Table built using Product Table Builder by The Crafty Owl - Independent Stampin' Up! Demonstrator.


A Good Day Gingham Gala Card Trio

by Joanne James7. April 2019 09:00

Today it's Sunday and time for this week's new challenge over at The Paper Players! It's the turn of the fabulous LeAnne to host this week and she has a fun theme challenge for you to work with:
I decided to get making with my Gingham Gala designer series paper and made not one, not two but three cards for today's challenge - all of which use this week's Fusion sketch too (turned through 90 degrees):

I didn't get overly creative with my gingham panels as I wanted to use them as backgrounds in their own right and really let them shine.

So, to my cards! Each of them also coincidentally features a stamp from the stamp set, 'A Good Day', for my feature circles.  Here is the first one:
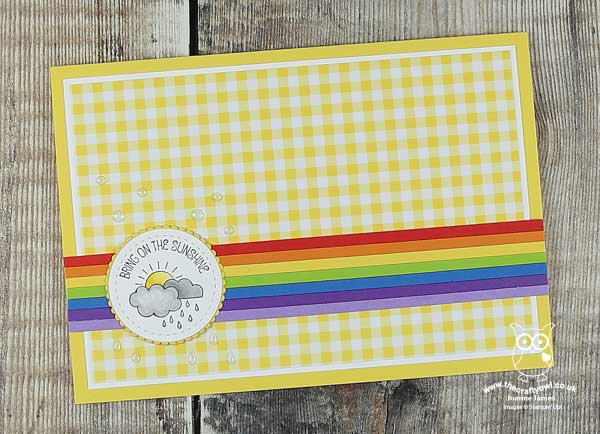
 

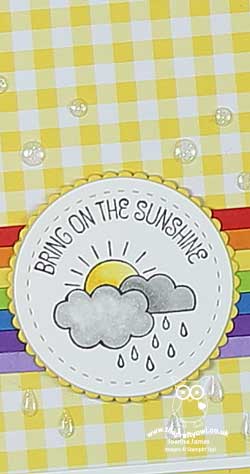
This card is my favourite from a creative point of view, as I love the sun/rain rainbow idea and the bright yellow check just makes this such a happy card!

For my second card I created one that uses not only the Fusion sketch but the theme too - no Easter eggs sure, but the cutest of Easter bunnies:
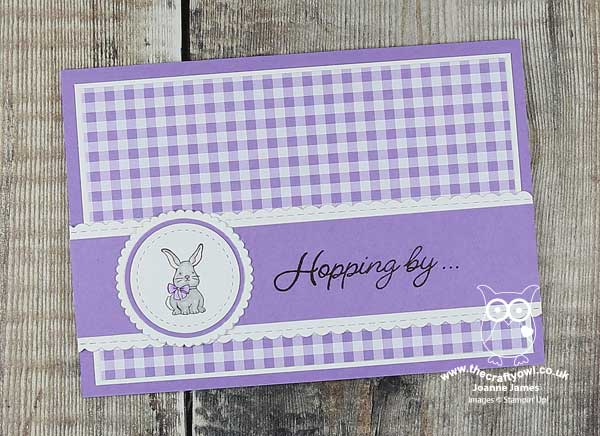
 

I stamped part of my sentiment on the banner. which I also bordered with one of the the edgelits in the Be Mine Stitched Framelits set and continued it on the inside of my card. I forgot to take a photo of my 'corrected' inside, but if you're interested and fancy a giggle you can pop over to my Facebook page to see the original one!

For my final card, I was inspired by this week's Global Design Project #GDP183 theme of 'A Day At The Park':

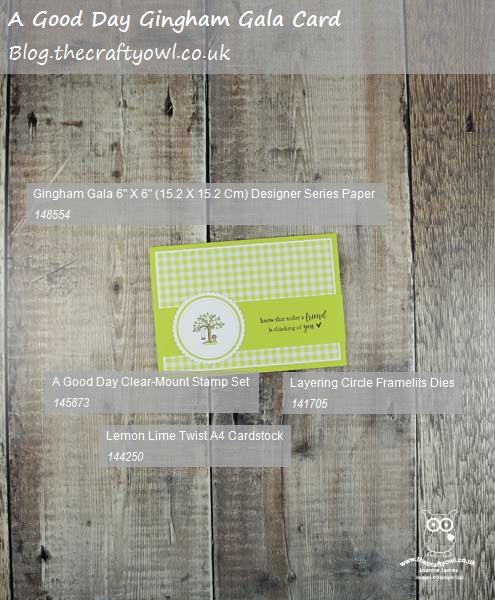
For me a day at the park is not complete without a ride on the swings, so this sweet little tree swing was perfect to fit this theme and paired with a sentiment from the Sale-A-Bration set 'Part of My Story' and the fresh green gingham makes for a sweet, uplifting card:
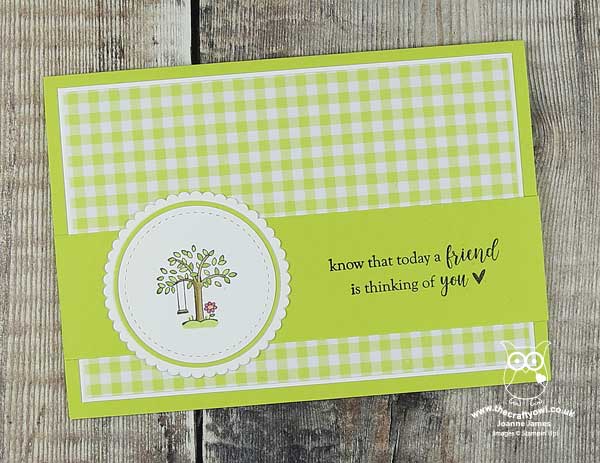
 

This is the card that I like most in terms of layout - whilst each of the images needs a different sized circular element, this is the one that I like the most in terms of overall proportion. 

Here are the visual summaries of the key products used on today's project for you to pin for easy reference:
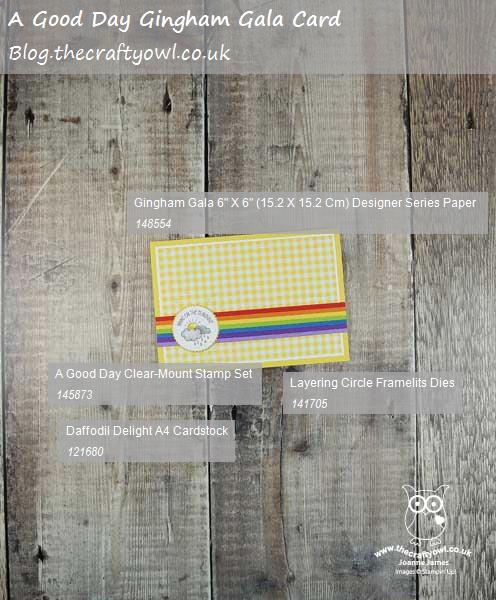
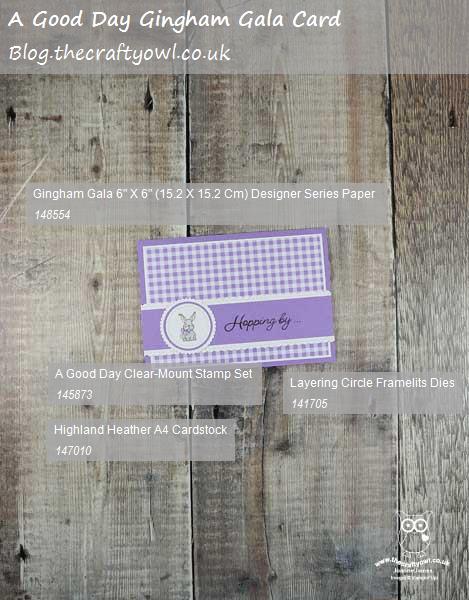


You can see all of my Product and 'How To' summaries on my 'How To - Tips and Techniques' Pinterest board in case you've missed any. 

I hope you like my gingham trio; I also created a 'bonus' card using plaid as the main feature of my design so do pop back later in the week to see another example using this week's theme.

Before you reach for your ink and papers, check out what our amazing team has created to inspire you this week:

Here's a quick recap of our challenge rules:
 
1.  Create a new paper project
2.  Upload your creation to your blog with a link back to us and provide a direct link to the post featuring your challenge submission.
3.  Please link your card to no more than four challenges, TOTAL.
4.  Have FUN!

You can see all of my 'How To' summaries on my 'How To - Tips and Techniques' Pinterest board in case you've missed any. 

Enjoy your day; we are having a restful one with a roast dinner with all the trimmings for lunch and then we'll be watching the Oxford-Cambridge boat race on TV in the afternoon - armchair sportsmen for once! I'll be back tomorrow with another super-fun project that you are not going to want to miss. Until then, happy stampin'!


Stampin' Up! Supplies Used: 

Table built using Product Table Builder by The Crafty Owl - Independent Stampin' Up! Demonstrator.

Shop Online

Access my online shop 24 x 7, 365 days of the year:

Current May hostess code:

3NR3FB9W

Shop Online

2024-25 Annual Catalogue

BROWSE THE CATALOGUE

Click on the image to download your copy of the 2024-25 annual catalogue. For a full list of current SU! supplies, go to my online store. If you would like any help or advice, please drop me a line at [email protected] or give me a call on 07773 421446 - I'd be happy to help.

Join My Team

It's always a great time to join Stampin’ Up but during May it's even better! New team members can get £78.25 of new In Color products for FREE! That's in addition to another £130 worth of products of your choice for only £99 + free business supplies + free shipping + all the fun being a part of Stampin’ Up! Stampin' Up! has something for everyone: join my growing team and benefit from my support to enjoy Stampin' Up! however you choose.

If you're interested, call me for a chat to understand how I can help you realise your goals. Alternatively, if you have already decided to sign up and you just can't wait, please click here for the link to the online form where you can sign up and order your starter kit right away! 

Latest Kits!

Stampin Cut and Emboss

The City Sights Kit has all you need to make 8 cards with coordinating envelopes for £20. Along with the new Happy Hollyhocks Kit, a no stamping kit including 9 cards for just £14, both are available from May 1st - get yours here!

New Online Exclusives

There are new products available exclusively in the online store from 5 March - check them out here.

About Me

Hi I'm Joanne and live in Northampton and when I'm not looking after my husband and two beautiful children, am an avid crafter with a passion for all things Stampin' Up!

I must confess that I have never been a big rubber stamper - until I discovered Stampin' Up! that is. I love the fact that I can get such great results with co-ordinating stamps, inks, papers and punches - the possibilities are endless! Join me on my stamping journey as I share the things I love and be inspired to create amazing things yourself!

Follow Me

Monthly Newsletter

Box Builder

Click the button above to use Box Buster to create your custom box design using the Envelope Punch Board!

Kits Collection Now Available!

Stampin Cut and Emboss

The new Kits Collection from Stampin' Up! is now available!

Click here to see the current kits available and order yours online today.

I Design For


Mini Catalogue


The next mini catalogue will be live in September! 

Stampin' Up Stuff

This is my personal blog and is not endorsed by Stampin’ Up! I hope you find it a plentiful source of ideas and personal inspiration but please don't copy my designs for contest submission or use for classes, publication or sale without express permission.