Penguin Playmates Trio Sneak Peek FMS493

by Joanne James12. July 2021 18:40

Hi everyone - happy Monday! A super quick post from me this evening as I'm squeezing in an entry over at Freshly Made Sketches (no really squeezing!) this week where Karren has a great sketch:

I didn't think I'd get a chance to play along, but I spent a few minutes this afternoon fussy cutting some of my new Sale-A-Bration Penguin Playmates designer series paper so thought I'd share a sneak peek with you! Check out this sweet trio:


These papers co-ordinate with a stamp set in the new seasonal catalogue called 'Penguin Place' and there is also a co-ordinating penguin punch that also cuts penguins out of the DSP - win, win! I added some retired adhesive-backed snowflakes for a little added sparkle:


How cute! Hope you like it. The new seasonal catalogue and Sale-A-Bration brochure launch on 3rd August, so not long to wait. I am starting to send out catalogues to my customers this week - if you'd like a copy, email me with your contact details and I can send you one too!

Here is the visual summary of the key products used on today's project for you to pin for easy reference:

 To follow

You can see all of my 'How To' summaries on my 'How To - Tips and Techniques' Pinterest board in case you've missed any. 

Enjoy your evening and I'll be back tomorrow with another project. Until then, happy stampin'!


Save 15% on In The Wild Designer Series Paper and More AYSI254

by Joanne James9. July 2021 12:00

Today I'm sharing my design team card for our new challenge over at As you See It where it's time for a sketch challenge:


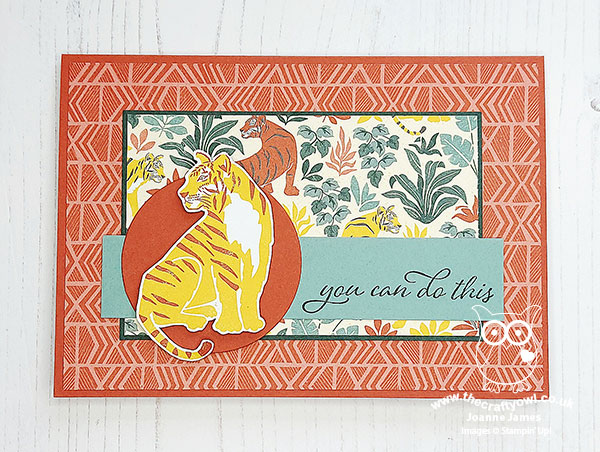
I thought the layered rectangles of this sketch provided the perfect opportunity to showcase some designer series paper - especially since lots of those in the annual catalogue are currently available at 15% off - so I had a look through my collection and settled on something wild for you today - take a look:


Here's the low-down on today's card:

In The Wild And A DSP Paper Sale - Between July 1st and August 2nd, a number of the designer series papers in the annual catalogue are available at 15% off. As a reminder, here's a snapshot of all those that are discounted:


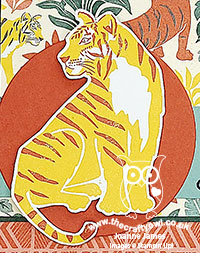
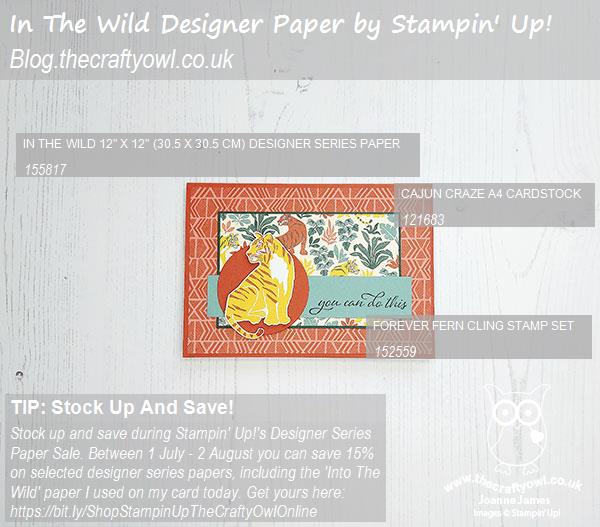
Lots to choose from! I chose to feature the 'In The Wild' papers on my card today. I don't have any of the other products in this suite, but I think the papers are great for snipping. I used two different patterns for my rectangles and then fussy-cut a co-ordinating tiger for my feature shape - isn't he so majestic-looking? 


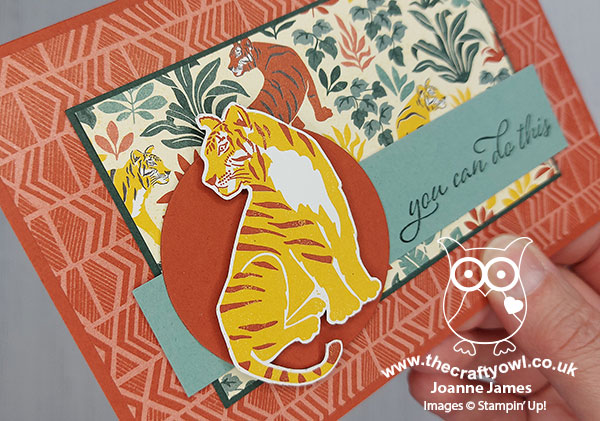
You Got This - I decided my brave tiger would make a good thinking of you/encouragement card, so paired it with the sentiment 'You can do this' from the stamp set 'Forever Fern'. I think it works. When perusing my stamp shelf, I found a few other stamps that would work well with the animals in this set too; you don't always need all of the items in a suite to complete a card, you just need to get creative!

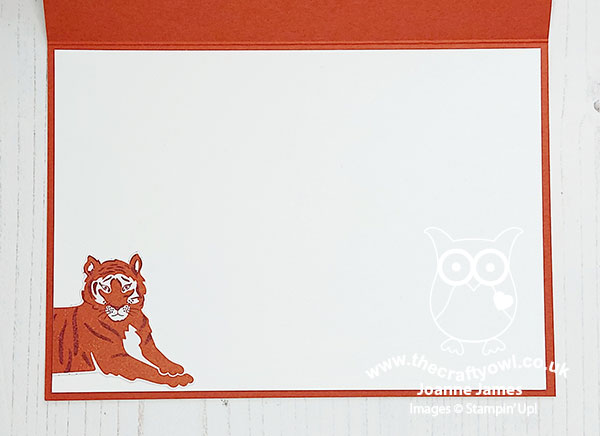
A Paper Trick - I have one last trick to share with you on my card today: when fussy-cutting shapes from designer series paper, don't disgard any shapes that are incomplete. I used one of the tigers on the edge of my paper to decorate the inside of my card; his position looks just like I intended him to be 'off the page', whereas the reality was my tiger only had half a body in the first place!


This is a great #SimpleStamping card that uses stamps, ink, cardstock and makes a feature of the designer series paper in a number of creative ways. 

Here is the visual summary of the key products used on today's project for you to pin for easy reference:


You can see all of my 'How To' summaries on my 'How To - Tips and Techniques' Pinterest board in case you've missed any. 

 So what will you make with our sketch this week? Will you be stocking up on designer series paper whilst you can save - for those paper-addicts among us (yes, I'm one!) there's no better time than the present!

Here's a summary of our challenge rules:

  • Create any card, scrapbooking page, 3D project or packaging project that fits the challenge.
  • Please include the challenge graphic and link back to the challenge in your blog post. Turn off word verification so we can leave you lots of lovely comments. Make sure you link the post not the whole blog to the Linky. Use #AYSIXXX when uploading to a public gallery.
  • If you’re unsure about ‘the rules’, check the details under the Challenge Guidelines tab on the As You See It Challenge homepage.
  • In a sketch challenge, you are welcome to rotate or flip a sketch. You can replace shapes used such as substituting a circle panel for a square panel. However, we must be able to still see the basis of the original sketch in your finished product.
We look forward to seeing your creations in the AYSI gallery.

Enjoy your day and I'll be back tomorrow with another project. Until then, happy stampin'!


Stampin' Up! Supplies Used:

Table built using Product Table Builder by The Crafty Owl - Independent Stampin' Up! Demonstrator.

Colour Block Celebrate Sunflowers Thank You Card Trio CASC&S 427

by Joanne James6. July 2021 12:00

It's Tuesday and time for a new challenge over at CAS Colours & Sketches. It's a new month and Holly is hosting and our first challenge is a colour challenge: 


These colours made me think of autumn so for my card today I pulled out an old favourite and set to work - take a look:


Here's the low-down on today's card:

Celebrate Sunflowers - These colours really reminded me of sunflowers so I pulled my 'Celebrate Sunflowers' set from the shelf and set to work. I didn't want to have any leaves on my flower, so I decided to focus on the large image and stamp it in a neutral Early Espresso. I couldn't decide whether to go with white or a more natural Crumb Cake for my base, so I made one of each.  I love the detail on this large bloom and also added a partial stamp in Crushed Curry to decorate the inside of my card too: 


Colour Blocking - I used a technique called 'colour blocking' on my card today. I stamped the sunflower once onto cardstock in each of the three challenge colours, then using my rectangle stitched framelits I cut each image into three identical rectangles and then mixed the pieces to create three, pieced images using one piece of each of the three blocks of colour, hence the name. This is a great technique for clean and simple cards. 

Added Texture - Since I had three more pieces, I created a third card, this time using a Crumb Cake base and this time I added some dry embossing using my Tasteful Textile embossing folder to the base of my card - you can hopefully see the subtle added detail below:


Here's a photo of all three versions together - which one is your favourite?

I'm also linking my cards up over at Inspire.Create today where they are looking for thank you cards. I will be sending these cards out in the post to my Stampin' Up! customers - so if you'd like to receive one, head on over to my Stampin' Up! store by clicking on the links below!

Here is the visual summary of the key products used on today's project for you to pin for easy reference:


You can see all of my 'How To' summaries on my 'How To - Tips and Techniques' Pinterest board in case you've missed any. 

As a reminder, for our colour challenges, you must use all of the stated challenge colours. You may also use neutral colours; however, the challenge colours should be the most noticeable ones featured on your card. We use Stampin' Up! color names for reference, but you are welcome to use any other companies' products as long as you match the challenge colours as closely as possible.

Enjoy your day and I'll be back tomorrow with another project. Until then, happy stampin'!

Stampin' Up! Supplies Used:

Table built using Product Table Builder by The Crafty Owl - Independent Stampin' Up! Demonstrator.

Rainbow Blended Daisy Garden Anniversary Card TTT120

by Joanne James1. July 2021 17:00

It's Thursday and time for a new challenge over at TicTacToe! It's the turn of Team X to host this week and the lovely Ashwini is our featured designer this week. This is the fun board that we are playing along with: 


I went across the middle row with embossing/flowers/anniversary and taking my inspiration from the rainbow of colours of the feathers on the fabulous peacock in the Color Dare challenge inspiration photo I decided to break out a new stamp set and have some fun with my background - take a look:


Here's the low-down on today's card:

Daisy Garden - I'm not usually one for background stamps, but there are two in the current annual catalogue that I absolutely love. One is 'Festive Foliage' that I shared with you for the first time last week in this post here; the second one I'm sharing with you today and it's called 'Daisy Garden'. A field of daisies - so pretty! Today I heat-embossed them in white and then used by blending brushes to create a rainbow background (colours detailed below), adding some water droplets flicked with my aquapainter for added detail. Another great way to add colour to a background stamp!

Daisy Lane - One of the reasons I like the new Daisy Garden stamp is because it co-ordinates beautifully with the existing 'Daisy Lane' stamp set. Having used this set in my card on Tuesday (you can scroll back if you missed it), it occurred to me that the sentiment I used would make a wonderful feature on an anniversary card - so I used it again today too.

Tasteful Labels - I stamped my sentiment on a label cut with the Tasteful Labels Dies, and added some clear sequins and frosted enamel dots along with some sparkly white ribbon to finish my card:


What do you think - do you like to use background stamps? Do leave me a comment below - I'd love to hear your thoughts.

Here is the visual summary of the key products used on today's project for you to pin for easy reference:


You can see all of my Product and 'How To' summaries on my 'How To - Tips and Techniques' Pinterest board in case you've missed any. 

A tictactoe board offers so many creative possibilities - how does this week's board inspire you? Why not have a go? We would love to see you in the gallery and who knows - you might be selected for Designer's Choice and be eligible to be a guest designer on a future challenge. 

Enjoy your day; I'll be back tomorrow with another project. Until then, happy stampin'!


Stampin' Up! Supplies Used: 

Table built using Product Table Builder by The Crafty Owl - Independent Stampin' Up! Demonstrator.


Designer Series Paper Sale - Stock Up And Save!

by Joanne James1. July 2021 09:00

A Party Puffins Pair For The Double CCS 426

by Joanne James29. June 2021 12:00

It's Tuesday and time for a new challenge over at CAS Colours & Sketches. It's Shannon's last challenge this month and since it's the fifth Tuesday of the month we have a double - a trio of retired colours and an old sketch to be used together:


I was struggling to work out what to do with this trio of colours this week, then I had a brainwave - and ended up making not one but two cards! Both of which feature some cute party puffins - here's the first one: 


I substituted Peekaboo Peach for Peach Parfait, as I don't have this colour. I used the peach for my base and added Tangerine Tango banners on both cards, then stamped my puffin and cake onto a scalloped edge diecut piece, incorporating the pink into the icing on my cake and added a heat-embossed sentiment:


I chose another of the puffin images for my second card:


How cute is that little goldfish present he's holding?!


I also added a little detail to the inside of both cards:


So which one of these is your favourite? Here's a photo of them together:


Here is the visual summary of the key products used on today's project for you to pin for easy reference:


You can see all of my 'How To' summaries on my 'How To - Tips and Techniques' Pinterest board in case you've missed any. 

As a reminder, for our colour challenges, you must use all of the stated challenge colours. You may also use neutral colours; however, the challenge colours should be the most noticeable ones featured on your card. We use Stampin' Up! color names for reference, but you are welcome to use any other companies' products as long as you match the challenge colours as closely as possible.

I'm a little late posting today; I have spent the last couple of days recovering form my second Covid jab, which truly knocked me for six. I'm thankfully feeling much better today and am now fully vaccinated, so it was worth it! Enjoy your day and I'll be back tomorrow with another project. Until then, happy stampin'!


Stampin' Up! Supplies Used:

Table built using Product Table Builder by The Crafty Owl - Independent Stampin' Up! Demonstrator.

Festive Foliage Shaded Spruce Monochrome Christmas Card AYSI 253

by Joanne James25. June 2021 12:00

Today I'm sharing my design team card for our new challenge over at As you See It where it's time for our speed-stamping challenge:


I usually have to spend a long time planning for a speed challenge, however my idea this week came together in a jiffy - take a look:


I went all-out for Christmas with my card today! Here's the low-down:

Festive Foliage - My favourite new background stamp in the new annual catalogue is the Festive Foliage stamp I've used on my card today - so perfect for festive Christmas backgrounds and featuring holly, pine, mistletoe and more. Using my Stamparatus, I stamped it tone-on-tone in Shaded Spruce on the same colour cardstock - this is one of my favourite Christmas greens. 

Playful Alphabet - I added the word 'NOEL' in gold foil and cut with my Playful Alphabet dies, raised on foam adhesive sheets, across my card front for a simple sentiment. I added a liberal sprinkling of (retired) gold glitter enamel dots in place of some of the dots in the stamped design.

Keep It Simple - The key to a speed challenge is always to 'keep it simple' and this card definitely does: the stamping took no time at all using my Stamparatus and I stamped it on a panel to make it easy to cut to an even size afterwards, a simple gold foil diecut sentiment and a liberal sprinkling of glittery enamel dots. My card was completed in 9 minutes 8 seconds - and most of that time was taken peeling and placing my enamel dots! They add a nice touch of sparkle amongst the green though, don't you think?


After I'd completed today's card, I went back to my Stamparatus and stamped another bunch of these green panels to make a few more stepped-up cards; I'll share those with you another day.

Here is the visual summary of the key products used on today's project for you to pin for easy reference:


You can see all of my 'How To' summaries on my 'How To - Tips and Techniques' Pinterest board in case you've missed any. 

Here's a summary of our challenge rules:

  • Create any card, scrapbooking page, 3D project or packaging project that fits the challenge.
  • Please include the challenge graphic and link back to the challenge in your blog post. Turn off word verification so we can leave you lots of lovely comments. Make sure you link the post not the whole blog to the Linky. Use #AYSIXXX when uploading to a public gallery.
  • If you’re unsure about ‘the rules’, check the details under the Challenge Guidelines tab on the As You See It Challenge homepage.
  • In a speed stamping challenge, please time yourself and say in your post how long your card took to complete. 
We look forward to seeing your creations in the AYSI gallery.
 
It just so happens that today is the 25th of the month so the perfect time to link up with this month's Rudolf Days Challenge where their latest Christmas card challenge goes live today. There is something quite satisfying not only about creating a card in under 10 minutes, but a Christmas card for my stash to boot! 

Enjoy your day and I'll be back tomorrow with another project. Until then, happy stampin'!


Stampin' Up! Supplies Used:

Table built using Product Table Builder by The Crafty Owl - Independent Stampin' Up! Demonstrator.

FREE SHIPPING For 24 Hours Only On 24 June

by Joanne James23. June 2021 08:00

STOP PRESS for an important announcement: For 24 hours only, starting at 11pm UK time this evening, Stampin' Up! are offering FREE shipping on orders of £35 or more.

The key information is as follows:

  • Free shipping applies after the qualifying order amount has been met.
  • The minimum qualifying amount to receive free shipping is £35 or more.
  • Free shipping only applies during the 24-hour period the promotion is live in each market; this means that the order must be opened and closed between 23 June 2021, at 11p.m. and 24 June 2021, at 11:00 p.m (UK).

This is a great time to stock up on last-chance items, to pick up one of the new all-inclusive papercrafting kits or to treat yourself to something from your wishlist for the the new annual catalogue. So start making those lists and head off to the online Stampin' Up! store or message me with your order - I will be placing an order tomorrow evening if you are local to me and would like to add anything to it.

Happy shopping!

Flowers of Friendship Punched Floral Trio CCS425

by Joanne James22. June 2021 12:00

It's Tuesday and time for a new challenge over at CAS Colours & Sketches. This week's challenge is a sketch challenge and Shannon has asked that we add three similar shapes to a panel across the centre of our card. Feel free to flip or rotate the sketch when making your card.


For my card today I decided to go pastel with pale blue and yellow which is the current colour challenge over at Less Is More and I created a pretty row of punched flowers backed with gingham - take a look:


Here's the low-down on today's card:

The flowers on today's card are courtesy of the new 'Flowers of Friendship' stamp set. I stamped them in Basic Grey onto So Saffron cardstock and added a little extra tone-on-tone shading with my So Saffron Blends. I punched the two different-sized flowers with the co-ordinating Flowers & Leaves Punch and layered a row of three against a simple stitched rectangle of Balmy Blue gingham, finishing the centre of each with pale blue pearls. I added a sentiment from the same set to complete my card.

Here is the visual summary of the key products used on today's project for you to pin for easy reference:


You can see all of my 'How To' summaries on my 'How To - Tips and Techniques' Pinterest board in case you've missed any. 

As a reminder, for our colour challenges, you must use all of the stated challenge colours. You may also use neutral colours; however, the challenge colours should be the most noticeable ones featured on your card. We use Stampin' Up! color names for reference, but you are welcome to use any other companies' products as long as you match the challenge colours as closely as possible.

Enjoy your day and I'll be back tomorrow with another project. Until then, happy stampin'!


Stampin' Up! Supplies Used:

Table built using Product Table Builder by The Crafty Owl - Independent Stampin' Up! Demonstrator.

Sweet Strawberry Thank You Card FMS490

by Joanne James19. June 2021 20:37

Happy Saturday - it's the weekend! Today I'm sharing a card inspired by Jen B's layout over at Freshly Made Sketches:

I had the Sweet Strawberry bundle out on my desk, so thought I'd combine a little something old with something new for today's card - take a look:


Here's the low-down on today's card:

Sweet Strawberries - I used the Sweet Strawberry stamp set and Strawberry Builder Punch as the focus for my card today, retaining Jen's circle and using it as a base for a couple of punched strawberries and leaves.  I also added a little additional decoration inside my card:

Something Old - My 'something old' is the Berry Blessings DSP that I used, that was one of the free gifts with Sale-A-Bration earlier this year. I used if for my card base and stitched rectangle, and also punched my strawberries from the paper. Don't you just love this bold red and green combo?

Something New - My 'something new' is the checked embossing folder I used on my white panel. This check reminds me of picnic baskets so I thought would work well with the summery strawberries! Not that there's much chance of a picnic here at the moment - our beautiful sunny weather has been replaced with torrential rain all day yesterday!

Here is the visual summary of the key products used on today's project for you to pin for easy reference:


You can see all of my 'How To' summaries on my 'How To - Tips and Techniques' Pinterest board in case you've missed any. 

Enjoy your evening and I'll be back tomorrow with another project. Until then, happy stampin'! 

Stampin' Up! Supplies Used:

Table built using Product Table Builder by The Crafty Owl - Independent Stampin' Up! Demonstrator.

Mini Catalogue

BROWSE THE CATALOGUE

The mini catalogue is now live! Read and download your copy here.

Shop Online

Access my online shop 24 x 7, 365 days of the year:

Current April hostess code:

VDKNV7BH

Shop Online

Join My Team

It's always a great time to join Stampin’ Up! New team members can get £130 worth of products for only £99 + free business supplies + free shipping + all the fun being a part of Stampin’ Up! Stampin' Up! has something for everyone: join my growing team and benefit from my support to enjoy Stampin' Up! however you choose.

If you're interested, call me for a chat to understand how I can help you realise your goals. Alternatively, if you have already decided to sign up and you just can't wait, please click here for the link to the online form where you can sign up and order your starter kit right away! 

Latest Kit!

Stampin Cut and Emboss

The Rock Legend Kit has all you need to make 8 cards with coordinating envelopes. Along with the new Panda Friends Kit, both are available from January 4th for just £14 each - get yours here!

2023-24 Annual Catalogue

BROWSE THE CATALOGUE

Click on the catalogue for a full list of current SU! supplies - if you would like to order any of the items featured, please drop me a line at [email protected] or give me a call on 07773 421446 - I'd be happy to help.

New Online Exclusives

There are new products available exclusively in the online store from 5 March - check them out here.

About Me

Hi I'm Joanne and live in Northampton and when I'm not looking after my husband and two beautiful children, am an avid crafter with a passion for all things Stampin' Up!

I must confess that I have never been a big rubber stamper - until I discovered Stampin' Up! that is. I love the fact that I can get such great results with co-ordinating stamps, inks, papers and punches - the possibilities are endless! Join me on my stamping journey as I share the things I love and be inspired to create amazing things yourself!

Follow Me

Monthly Newsletter

Box Builder

Click the button above to use Box Buster to create your custom box design using the Envelope Punch Board!

Kits Collection Now Available!

Stampin Cut and Emboss

The new Kits Collection from Stampin' Up! is now available!

Click here to see the current kits available and order yours online today.

I Design For


Stampin' Up Stuff

This is my personal blog and is not endorsed by Stampin’ Up! I hope you find it a plentiful source of ideas and personal inspiration but please don't copy my designs for contest submission or use for classes, publication or sale without express permission.