Time For Confetti Birthday Card

by Joanne James25. February 2020 09:00

Today I'm sharing a card that uses both the CAS(E) This Sketch layout and the theme over at Time Out this week:


I have a combination of old and new for my card today! I've been desperately trying to increase my stash of on-hand birthday cards and use up some of my stash of retired designer series paper so the above challenges gave me the perfect opportunity - take a look:


Here's the low-down on today's card:

So Sentimental - I used the 'This calls for confetti!' stamp from the new 'So Sentimental' stamp set as the starting point for today's card, picking up on the theme over at Time Out and paired this with some retired Picture Perfect Party DSP that has a fun scattered confetti photographic print for a fun birthday party vibe - which just so happened to perfectly fit the CAS(E) This Sketch layout too.

Label Me Fancy - I heat embossed my sentiment into silver onto some Pool Party cardstock and punched it out with the new Label Me Fancy punch, and backed it with one in a contrasting colour that I'd split in half so that you can just see a border. I added a tiny piece of retired ribbon from my scrapbox for a little extra detail (this ribbon is currently available on the Clearance Rack if you would like to stock up on a ribbon bargain!). 

Sending You Thoughts - I used the Sale-A-Bration free stamp set, Sending You Thoughts, for the inside of my card, along with a little sprinkle of stamped confetti to finish off my celebratory card:

I also added the offcut of my DSP to the envelope flap for a little extra envelope decoration. So a super simple card that meant I could run off a few to add to my stash of birthday cards for when the James Juniors need one for a friend in a hurry!

Here is the visual summary of the key products used on today's project for you to pin for easy reference:


You can see all of my 'How To' summaries on my 'How To - Tips and Techniques' Pinterest board in case you've missed any. 

So it's Shrove Tuesday today - hands up who's having pancakes for dinner this evening? I have been badgered all the way to school today to make some this evening - but just to whet your appetite, here are some American-style ones I had for brunch at the weekend - can you spot the 'hidden Mickey' (or Minnie, with the bacon bow!) - fellow Disney fans, this one is for you!


They were delicious! Enjoy your day and I'll be back tomorrow with another project. Until then, happy stampin'!


Stampin' Up! Supplies Used:

Table built using Product Table Builder by The Crafty Owl - Independent Stampin' Up! Demonstrator.

Picture Perfect Birthday Box In A Card

by Joanne James18. May 2018 08:00

Hello - I'm back! I know that some of you have missed me; I exhibited at Kirstie Allsop's Handmade Fair at Ragley Hall in Warwick last weekend and seem to have spent most of this week recovering and getting family life back on track. It was a great weekend and I met many wonderful people, however it did wipe me out! Hopefully I'm recovered enough to get back to blogging properly. Here goes!

I have a number of projects that I've made and not shared using retiring products and need to get them shared sooner rather than later so thought I'd share a fun 'box in a card' make that I made a couple of weeks ago featuring the Picture Perfect stamp set and Picture Perfect Paper - take a look:


These cards are easier to make than they look: you simply cut a 2" wide section out of a folded A6 card and make a 2" square box from a sheet of 6x6" paper with a lid and slot it into the space - perfect for a little treat:


A little stamping on my card and to finish I topped my box with a mini bow to tie in with the party theme. 

Here is the visual summary of the key products used on today's project for you to pin for easy reference:


You can see all of my 'How To' summaries on my 'How To - Tips and Techniques' Pinterest board in case you've missed any. 

I'll be back tomorrow with another project. Until then, happy stampin'!


Stampin' Up! Supplies Used:

Table built using Product Table Builder by The Crafty Owl - Independent Stampin' Up! Demonstrator.

A Picture Perfect Party Birthday Celebration PP386

by Joanne James25. March 2018 09:00

It's Sunday and time for this week's new challenge over at The Paper Players! It's the turn of my amazing friend Claire to host this week and she has my favourite, a sketch challenge, for you to work with:


I could have gone so many ways with this sketch! I have not one, but two cards, to share with you today - both with a fun party theme. Here's the first one - take a look:


Here's the low-down on today's card:

Picture Perfect Party - Both of my cards today feature papers with the bold, photographic images featured in the Picture Perfect Party DSP Stack. In bright, celebratory colours, these papers are perfect for a large expanse of background and work really well as the background for my fun, party-themed cards. I used the offcut from my card panel to continue the decoration through to my envelope to with a colourful envelope liner.

Picture Perfect Birthday - I used the co-ordinating Picture Perfect Birthday stamp set to decorate the sentiment circles on the front of my card. I was lucky to receive this set free when I attended Onstage last November, which really was fortunate for me as I think this is a set I might otherwise have overlooked. It contains some great, scripted fonts that work for birthdays and more general celebrations and has some fun confetti, candle, tooter and ribbon bow images too. In addition to using it to decorate the outside of my card, I added a little colour to the inside too:


Finishing Touches - To finish my cards, I added some gold tinsel trim and a strip of fringed cardstock to the one above and some silver baker's twine and mini silver sequin trim with a strip of fringed cardstock to the card below:


And here's the inside of this card too:

Two cards using the same layout and supplies, each with a different pattern and sentiment. The Picture Perfect Party Suite is perfect for creating batches of birthday cards with a minimum of supplies. Here is the visual summary of the key products used on today's project for you to pin for easy reference:


You can see all of my Product and 'How To' summaries on my 'How To - Tips and Techniques' Pinterest board in case you've missed any. 

Before you reach for your ink and papers, check out what our amazing team has created to inspire you this week:

Here's a quick recap of our challenge rules:
 
1.  Create a new paper project
2.  Upload your creation to your blog with a link back to us and provide a direct link to the post featuring your challenge submission.
3.  Please link your card to no more than four challenges, TOTAL.
4.  Have FUN!

I can't wait to see what you create with this week's sketch and look forward to visiting your blogs this week! Enjoy the rest of your weekend as it will be over all too quickly. We are minus one James Junior who is away on a short hockey tour for a few days, so will be spending the day researching hurricanes with James Junior number 2 for a geography project in between a little crafting too I hope!

I'll be back tomorrow with another project that also uses this same sketch but has a totally different feel, so do come back and take a look at that card; until then, happy stampin'!


Stampin' Up! Supplies Used: 

Table built using Product Table Builder by The Crafty Owl - Independent Stampin' Up! Demonstrator.

Celebrate The Good Stuff - Guest Designer With Inspired By All The Little Things

by Joanne James9. December 2017 13:00

Today I've been invited by my good friend and team leader over at The Paper Players, the lovely Nance Leedy, to be the Guest Designer over at Inspired By All The Little Things - what an honour!
I love this challenge, also set up originally by the creative powerhouse that is the lovely Lesley Croghan, and although I don't get to play along as often as I would like I can often be found browsing the gallery each week, for inspiration from the awesome team of designers, the challenge for the week and also to have a little nosey at the invited guest - you see they have a fun feature where they do a little interview  and you get to find out what inspires them, along with some interesting things that you might not know about the featured designers. Yes, that includes me - I included one or two fun things that even my regular readers might not know about me too, so hop on over and have a read if you'd like to find out more! You could even have a go at this week's challenge - I would love to see what you make of it!

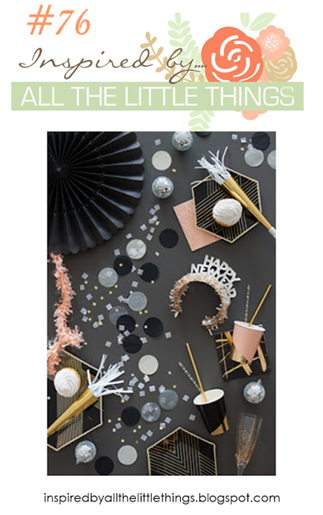
And so to my card! Here is the inspiration photo for this week's challenge:
 

Now I must confess, I thought long and hard about this card and had a false attempt too before I produced something that I felt embodied the feeling of 'party' evoked in the inspiration picture. Here's what I came up with:
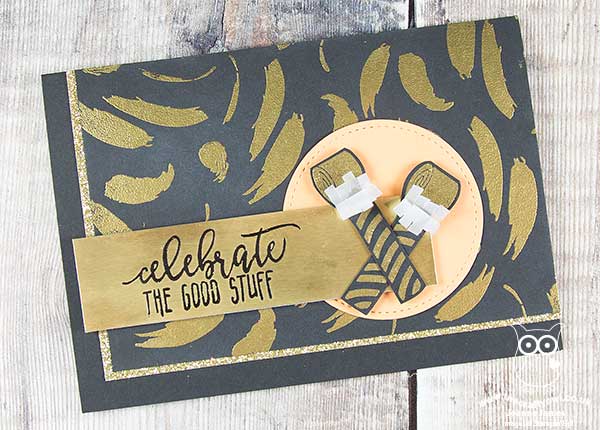
 

Here's the low-down on today's card:

Inspired By All The Little Things - I thought I would give you a little insight into how I used the inspiration photo to get to my final card design today, as I often get asked "where do you start?" when making a card. The photo has lots of elements: black, gold, peach, vellum, white, confetti, hexagons, squares, circles, art deco, party blowers, glitter balls, happy new year, a rosette, a champagne glass to name just some -  and whilst I could have used any or all of them on my card, I chose to zone in on a few. I decided to major in on the black and gold colours for my colour scheme, with just a pop of peach, and create a card with a party theme that could be used for new year but would also work for any other kind of party celebration. Then I browsed my stamp sets and accessories to see what would work and set to work.

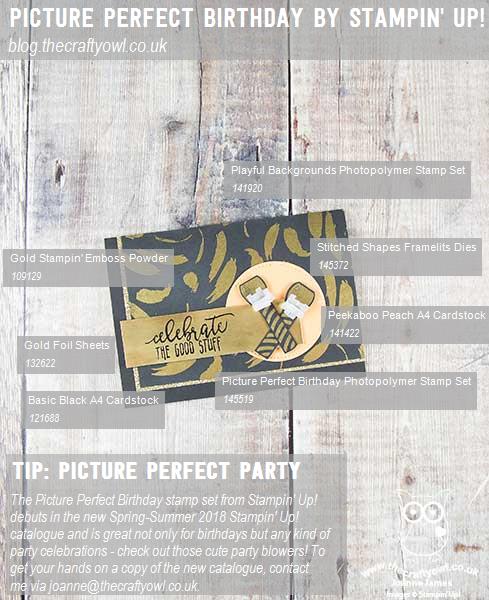
A Playful Background - I originally set about creating some rather fancy art deco-inspired hexagons using gold washi tape and black cardstock, but eventually decided these were too busy on my card so they are now waiting in my scrap box for another project! I decided to go with something less geometrical and create a background using one of the stamps in the Playful Backgrounds stamp set that mimicked the mat beneath the peach party cup in the photo (I selectively inked it so that the little dots on the stamp are omitted from my design) and heat embossed it in gold. I then did the reverse colour combination for my sentiment, i.e. black heat embossed on gold foil, so that it provides contrast yet is still in keeping with my theme.

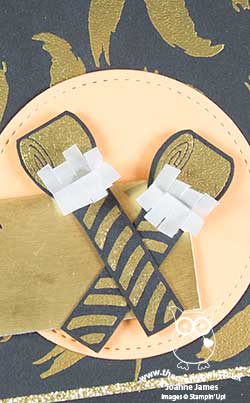
A Picture Perfect Party - My card needed a focal point, so what better than a couple of party blowers? And a new stamp set that I acquired at Stampin' Up!'s Onstage event recently provided just the thing - the 'Picture Perfect Birthday' set has ribbon bows, candles, confetti and party sentiments galore, but also has the bits to construct a party blower - how fun! I made two and gave them each a vellum frill that I cut with my fringe scissors, as another nod to the inspiration photo. I wanted to make them stand out from the rest of the card, hence to addition of my Peekaboo Peach stitched circle behind; I didn't want peach to be a major feature of my design yet it serves a useful purpose here to highlight my blowers and ensure they don't get lost against the busyness of the background pattern. Picture Perfect Birthday is in the new Spring-Summer Stampin' Up! catalogue out on January 3rd - be sure to get in touch with me if you'd like a copy.

And that's how I did it! I'm also linking my card up with the team over at Freshly Made Sketches - what can I say, I love a good sketch :-)


Here is the visual summary of the key products used on today's project for you to pin for easy reference:
 

You can see all of my 'How To' summaries on my 'How To - Tips and Techniques' Pinterest board in case you've missed any. 

Enjoy your day and I'll be back tomorrow with another project for the last challenge of the year (gulp!) over at The Paper Players. Until then, happy stampin'!


Stampin' Up! Supplies Used:

Table built using Product Table Builder by The Crafty Owl - Independent Stampin' Up! Demonstrator.

New Online Exclusives

There are new products available exclusively in the online store from 5 November - check them out here.

Latest Kits!

Stampin Cut and Emboss

The Layered Landscapes Kit and Nature's Paintings Kit are the latest kits in the online store - get yours here!

Shop Online

Access my online shop 24 x 7, 365 days of the year:

Current November hostess code:

9NKXDTTR

Shop Online

Mini Catalogue

BROWSE THE CATALOGUE

'Tis The Season - the new Stampin' Up! Mini Catalogue is here! For more details and to download your copy click here

Scrapbooking

Stampin' Up! has introduced a new range of 12x12" scrapbooking product and kit - the full range is now available to purchase online. To download a copy of the new digital Scrapbooking Catalogue click here.

2024-25 Annual Catalogue

BROWSE THE CATALOGUE

Click on the image to download your copy of the 2024-25 annual catalogue. For a full list of current SU! supplies, go to my online store. If you would like any help or advice, please drop me a line at joanne@thecraftyowl.co.uk or give me a call on 07773 421446 - I'd be happy to help.

Join My Team

It's always a great time to join Stampin’ Up! New team members can get £130 worth of products for only £99 + free business supplies + free shipping + all the fun being a part of Stampin’ Up! Stampin' Up! has something for everyone: join my growing team and benefit from my support to enjoy Stampin' Up! however you choose.

If you're interested, call me for a chat to understand how I can help you realise your goals. Alternatively, if you have already decided to sign up and you just can't wait, please click here for the link to the online form where you can sign up and order your starter kit right away! 

About Me

Hi I'm Joanne and live in Northampton and when I'm not looking after my husband and two beautiful children, am an avid crafter with a passion for all things Stampin' Up!

I must confess that I have never been a big rubber stamper - until I discovered Stampin' Up! that is. I love the fact that I can get such great results with co-ordinating stamps, inks, papers and punches - the possibilities are endless! Join me on my stamping journey as I share the things I love and be inspired to create amazing things yourself!

Follow Me

Monthly Newsletter

Box Builder

Click the button above to use Box Buster to create your custom box design using the Envelope Punch Board!

Kits Collection Now Available!

Stampin Cut and Emboss

The new Kits Collection from Stampin' Up! is now available!

Click here to see the current kits available and order yours online today.

I Design For


Stampin' Up Stuff

This is my personal blog and is not endorsed by Stampin’ Up! I hope you find it a plentiful source of ideas and personal inspiration but please don't copy my designs for contest submission or use for classes, publication or sale without express permission.