Ornate Layers Meets All Things Fabulous AYSI272

by Joanne James8. April 2022 12:00

Happy Friday everyone - the end of the week is here! This also means I'm sharing my design team card for our new challenge over at As you See It where it's time for a fun sketch challenge:


I paired our sketch full of horizontals with this week's Color Throwdown colours and set to work. Initially this sketch had me stumped; my 'go to' would normally be designer series paper but I just wasn't inspired (check out what some of my teamies did with DSP though - amazing!) I perused my catalogue and then happened upon a retiring die that I thought would make a pretty repeating design - take a look at what I came up with:


Here's the low-down on today's card:

Do you recognise this die? Or actually dies, as it uses two? Both the stitched rectangle and the floral line are from the retiring Ornate Layers Dies. In addition to the fancy frames in this set, there are two pretty floral diecut elements too and this is one of them. What this card lacks in supplies - you need literally just a handful of items to recreate it - it more than makes up for in time: all of the tiny floral elements have been paper-pieced into the negative of the white rectangles and yes it took a while! It's so worth it though; I considered leaving the panels white with the negative space unfilled and also considered cutting the panels from coloured cardstock, but they just didn't look as good. Instead I cut five rectangles with the negative die inset, then diecut the floral band an additional five times each in Coastal Cabana and Soft Sea Foam and using some Press 'n' Seal and the putty end of my Take Your Pick Tool, paper-pieced the pieces into each white panel (having first adhered it to a piece of cardstock using an adhesive sheet. 

For the gold elements, instead of using gold foil I rubbed the remaining areas with gold gilded leafing; this stuff gets everywhere, but I love the bright shine and slightly textured effect that it gives - you can see it more closely below:

I finished with a sentiment from the retiring 'All Things Fabulous' which has sadly already sold out here in the UK (love this set!) So what do you think? This card took a while but was so worth it - I love it! I'm also linking today's card up over at The Flower Challenge where they want us to add a heart to our floral cards; is it me, or are those not 'hidden' gold hearts on their sides either side of the central flower? For all you Walt Disney World fans out there, think of it like a hunt for 'hidden Mickey's' - you see them, right?!

Here is the visual summary of the key products used on today's project for you to pin for easy reference:


You can see all of my 'How To' summaries on my 'How To - Tips and Techniques' Pinterest board in case you've missed any. 

Here's a summary of our challenge rules:

  • Create any card, scrapbooking page, 3D project or packaging project that fits the challenge.
  • Please include the challenge graphic and link back to the challenge in your blog post. Turn off word verification so we can leave you lots of lovely comments. Make sure you link the post not the whole blog to the Linky. Use #AYSIXXX when uploading to a public gallery.
  • If you’re unsure about ‘the rules’, check the details under the Challenge Guidelines tab on the As You See It Challenge homepage.
  • In a sketch challenge, you are welcome to rotate or flip a sketch. You can replace shapes used such as substituting a circle panel for a square panel. However, we must be able to still see the basis of the original sketch in your finished product.
We look forward to seeing your creations in the AYSI gallery.

Enjoy your day; I have my usual list of Friday chores to complete today, including amongst other things trying to line-dry my washing in between the April showers (so far this week the score is 'Weather 2 - Joanne 0'!) but I'm hoping since I have a helper or two I met get done quicker and be able to squeeze in a little crafty time too. I'll be back tomorrow with another project. Until then, happy stampin'!


Stampin' Up! Supplies Used:

Table built using Product Table Builder by The Crafty Owl - Independent Stampin' Up! Demonstrator.
 

Whimsy and Wonder Mint Macaron Christmas Tree for FMS500

by Joanne James26. August 2021 10:00

Today will be a two post day! I will be back later with my TicTacToe inspiration for our new challenge, but first I'm sharing a card that I made for a very special occasion: the fabulous team over at Freshly Made Sketches are celebrating their 500th challenge and a decade of sketch inspiration - how amazing is that?! These wonderful ladies are a constant source of challenge and inspiration and I play along whenever I can and certainly couldn't miss out on the opportunity to play with Linda's fabulous sketch this week!


I decided to pair with the new mini catalogue inspiration over at TGIF Challenges, which I had been mulling over as I have been playing with a CASE of one of the cards in their inspiration photo. It wasn't really working for me so instead I decided to take that vertical panel of the FMS sketch and instead take my inspiration from the featured Whimsy & Wonder Suite - take a look at what I came up with:


Here's the low-down on today's card:

All About The Layers - Linda's card has five layers, one for each of the decades the challenge team are celebrating. I wanted to feature the beautiful tree print in the Whimsy & Wonder specialty designer paper for my third layer, but didn't want to obscure it completely with layer 4, as I wanted the tree that is layer 5 to feel 'part' of it. So I used vellum to create my layer 4 panel, cut with one of the Ornate Layers Dies. It provides a distinct background for my focal point diecut tree, but ensures my background whilst softened can still be seen.

Trimming The Tree - I diecut the largest tree in the Christmas Tree Dies set in Mint Macaron, then added a garland cut from (retired) sparkly white glimmer paper and added tiny baubles cut from the silver holographic striped paper in the Whimsy & Wonder pack, to tie in with the holographic stars on the background paper design. I almost didn't add the baubles, but the tree definitely looks better with than without! 


Finishing Touches - I added a simple 'joy' sentiment and underpinned this with a piece of white glittered organdy ribbon tied with some silver twine. I love the addition of the subtle sparkle to complete the final element of my design.

This is my first outing with the Whimsy and Wonder Suite but I think I'll be using it again very soon!

Here is the visual summary of the key products used on today's project for you to pin for easy reference:


You can see all of my 'How To' summaries on my 'How To - Tips and Techniques' Pinterest board in case you've missed any. 

Enjoy your day and I'll be back tomorrow with another project. Until then, happy stampin'!


Stampin' Up! Supplies Used:

Table built using Product Table Builder by The Crafty Owl - Independent Stampin' Up! Demonstrator.

Harvest Die Rudbeckias Sneak Peek AYSI 255

by Joanne James23. July 2021 12:00

Today I'm sharing my design team card for our new challenge over at As you See It where it's time for a colour challenge:


I was inspired not just by the colours but also the picture Jane chose for this week's challenge and decided these colours would be perfect for another sneak peek of new products from the upcoming mini catalogue - take a look:


Here's the low-down on today's card:

Harvest Dies - These colours are perfect for some autumnal colour so I decided I would use them to sponge some rudbeckias that I cut out with my new Harvest Dies. If you like the Meadow Dies in the annual catalogue, then you'll definitely love these! Including grasses and flowers, these work well with the co-ordinating stamp set and stand alone too. I cut out some ears of corn in Crushed Curry cardstock, then cut two rudbeckias in white and used my sponges to add and build colour to them, finishing with a few dots to the centre added with a Stampin' Write marker. The leaves and petals also have a faint embossed detail, which I accentuated by adding colour with markers.

Ornate Layers Panel - I also used another die on my card today - the long panel piece was cut using my favourite in the Ornate Layers set from the annual catalogue. I love the subtle diecut and stitched detail it has.

Painted Texture - I used a piece of retired ombre paper that I had in my bits box for my panel, but you could easily recreate this with some Crushed Curry ink and a blending brush. Before adding to my card, I ran it through my Painted Texture Embossing Folder for a little extra texture. You can see that more closely here:


A sentiment from the Quiet Meadow stamp set and twine bow finish my card.

Don't worry I am not done with summer yet, but these warm colours were perfect for today's more autumnal project. A fun fact for you - rudbeckias, or cone flowers or black-eyed susans as they are sometimes called, are pioneer plants and some of the first to grow following a natural disaster, such as fire. In the language of flowers they also represent encouragement - I'm thinking I should have read up on these before I made my card, I might have to switch out that sentiment now! Maybe next time ...

Here is the visual summary of the key products used on today's project for you to pin for easy reference:


You can see all of my 'How To' summaries on my 'How To - Tips and Techniques' Pinterest board in case you've missed any. 


Here's a summary of our challenge rules:

  • Create any card, scrapbooking page, 3D project or packaging project that fits the challenge.
  • Please include the challenge graphic and link back to the challenge in your blog post. Turn off word verification so we can leave you lots of lovely comments. Make sure you link the post not the whole blog to the Linky. Use #AYSIXXX when uploading to a public gallery.
  • If you’re unsure about ‘the rules’, check the details under the Challenge Guidelines tab on the As You See It Challenge homepage.
  • In a colour challenge, black or other neutral can be used in outlines and sentiments but no other colours should be included. Stampin’ Up colours are used for reference but colours that are a close match are welcome.
We look forward to seeing your creations in the AYSI gallery.

It's forecast a little cooler here in the UK today with a chance of thunderstorms across the weekend. I had a new garden parasol delivered yesterday - I hope that wasn't me tempting fate! Enjoy your day and I'll be back tomorrow with another project. Until then, happy stampin'!


Stampin' Up! Supplies Used:

Table built using Product Table Builder by The Crafty Owl - Independent Stampin' Up! Demonstrator.

Hydrangea Haven Slimline Card

by Joanne James17. April 2021 18:42

Today I'm sharing a card using this week's sketch over at The Spot that was inspired by the gorgeous inspiration photo over at The Card Concept this week:


I thought the sketch layout would be perfect for a slimline card and whilst I don't have any lavender stamps in my collection currently, I was totally inspired by the purple tones for my hydrangea - take a look:


Here's the low-down on today's card:

The lavender purple tones were perfect for a hydrangea - I actually stamped my stem but diecut the flower head from a piece of the Hydrangea Hill DSP, adding a few extra pieces that I centred with some Gorgeous Grape coloured rhinestones for a little extra sparkle:

I mounted my hydrangea on a white panel diecut with one of the Ornate Layers Dies and used another piece of Hydrangea Hill DSP for the background that incorporated some blue tones, picking up on the blues from the gingham bow of the inspiration photo. I heat-embossed my sentiment onto a Misty Moonlight stitched banner and added a blue twine bow as per the sketch, with a piece of galvanised metal cardstock that I ran through a corrugated embossing folder beneath it - a nod to the lavender vase in the photo. I also added an outline hydrangea from the Suite Sampler hostess set to the inside of my card to finish:


And that, in summary, is how I created today's clean and layered card!

Here is the visual summary of the key products used on today's project for you to pin for easy reference:


You can see all of my 'How To' summaries on my 'How To - Tips and Techniques' Pinterest board in case you've missed any. 

Enjoy your day and I'll be back tomorrow with another project. Until then, happy stampin'!


Stampin' Up! Supplies Used:

Table built using Product Table Builder by The Crafty Owl - Independent Stampin' Up! Demonstrator.

Timeless Tulips Easter Card PP535

by Joanne James4. April 2021 09:00

Today it's Easter Sunday and time for this week's new challenge over at The Paper Players! It's the turn of the fabulous Jaydee to host this week and she has a timely theme challenge for you to work with:


For me tulips, along with daffodils, are the epitome of spring flowers.I don't have any current daffodil stamps so I decided to go with tulips. I used the sketch layout over at Inspire.Create and the Easter colour inspiration over at Color Dare, choosing bright Magenta tulips with green leaves and a subtle So Saffron spots and stripes background, inspired by those yellow marshmallow bunnies in the photo. Here's my card:


Here's the low-down on today's card:

Timeless Tulips - I used the 'Timeless Tulips' stamp set for my flowers, stamping the stems in Granny Apple Green directly onto my panel and the either punching or fussy cutting my flower heads and leaves. I also added a couple of frosted epoxy droplets to mimic raindrops:


Ornate Layers - I mounted my bunch of tulips onto a white panel cut with one of the Ornate Layers Dies; I like the small amount of detail around the panel - just enough to add interest without detracting from my flowers. I heat-embossed my sentiment, also from the Timeless Tulips stamp set, and snipped it into pieces, adding the first two pieces to the front of my card then stamping the remainder inside with a small tulip bud for decoration:


Raffia Ribbon - You may not recognise the ribbon that I used to tie a bow around my bunch of blooms; it's actually a strip of In Colour Magenta Madness 1/4" Ribbon. I cut the edge off and stripped the vertical strands away to create a soft, raffia-like bunch of threads to make my bow. I love to try and use our ribbons in different ways - do you ever do things like this with items in your stash?

Here is the visual summary of the key products used on today's project for you to pin for easy reference:


You can see all of my Product and 'How To' summaries on my 'How To - Tips and Techniques' Pinterest board in case you've missed any. 

Before you reach for your ink and papers, check out what our amazing team has created to inspire you this week:

Here's a quick recap of our challenge rules:
 
1.  Create a new paper project
2.  Upload your creation to your blog with a link back to us and provide a direct link to the post featuring your challenge submission.
3.  Please link your card to no more than four challenges, TOTAL.
4.  Have FUN!

You can see all of my 'How To' summaries on my 'How To - Tips and Techniques' Pinterest board in case you've missed any. 

Enjoy your day; today I am looking forward to a delicious Sunday roast and the obligatory traditional Easter egg hunt, amongst other things - I'm not sure my children will ever outgrow this activity, especially not when there's chocolate involved! I'll be back tomorrow with another project. Until then, happy stampin'!


Stampin' Up! Supplies Used: 

Table built using Product Table Builder by The Crafty Owl - Independent Stampin' Up! Demonstrator.


Flowers For Every Season - Spring Butterfly Panel Card

by Joanne James7. March 2021 09:00

Today it's Sunday and time for this week's new challenge over at The Paper Players! It's the turn of the amazing Claire to host this week and she has a seasonal theme challenge for you to work with:
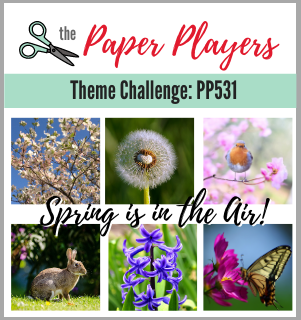
    

Whilst it has been a little chillier again here in the UK this week, there are still so many wonderful signs that spring is in the air. The daffodils are starting to open, the first lambs have been born on a neighbouring farm so today's card is full of spring colour - take a look:
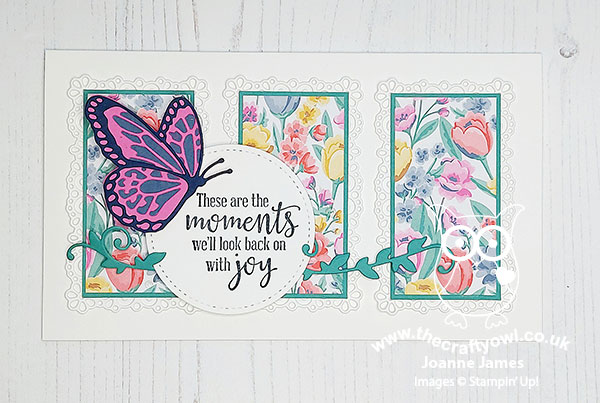
 

Here's the low-down on today's card:

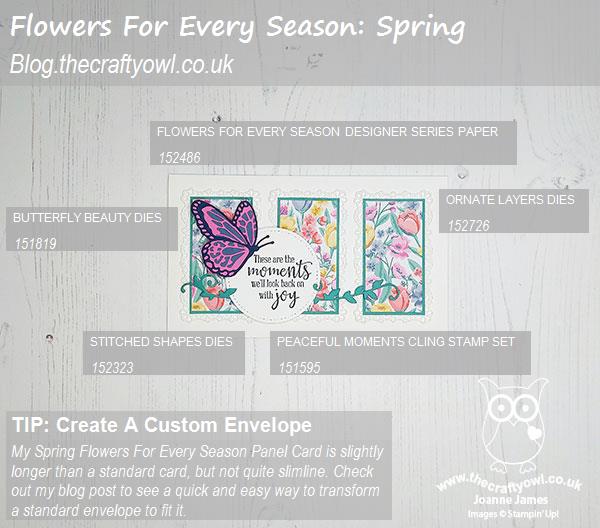
Flowers For Every Season - I decided that for today's card I wanted to see an injection of spring colour, so reached for the Flowers For Every Season designer paper pack. This pack contains some very bold, bright florals and the one I chose, with its tulips amongst other flowers, is just perfect for spring. I used the three panel layout over at Paper Craft Crew so that the pattern didn't become too overwhelming, and backed each one with a thin border of Just Jade and a fancy frame diecut with the Ornate Layers Dies in Whisper White.

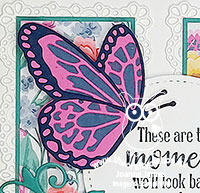
Butterfly Beauty - I chose a sentiment that I thought reflects the optimism that comes with the spring season, and embellished it with a layered butterfly cut using the Butterfly Beauty dies (I snipped this one away from the larger die):
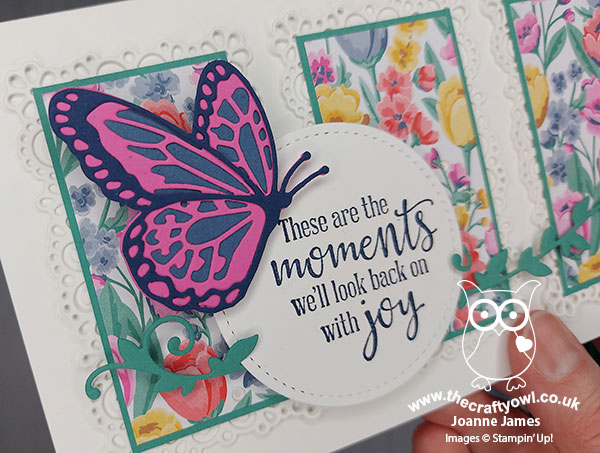
 

I also used another of the dies in the same set to create my horizontal pieces of greenery. 

Elongated Envelope - In order to comfortably accommodate my three panels, I made my card slightly longer than a standard card front (it measures 18cm instead of 14.9cm). The photo below shows the difference in sizes:
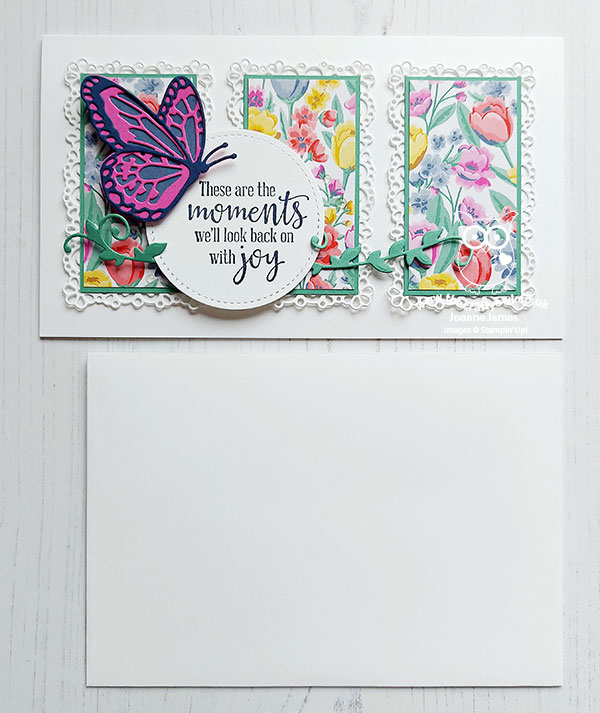
 

This meant I needed to create a custom envelope. Rather than start from scratch though, I thought I'd share with you a quick trick that you can use to convert a standard envelope to fit a larger card. All you need to do is glue the envelope closed, then slice off the end on the short side and add some some designer paper to create a new closure:
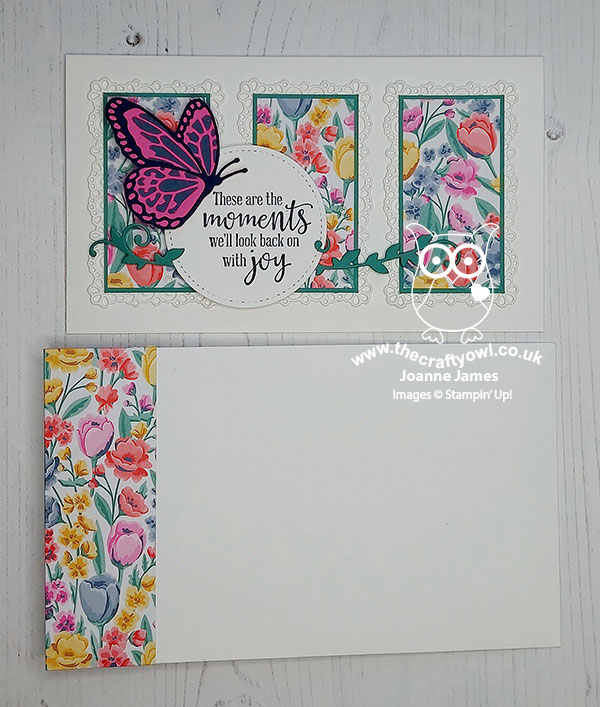
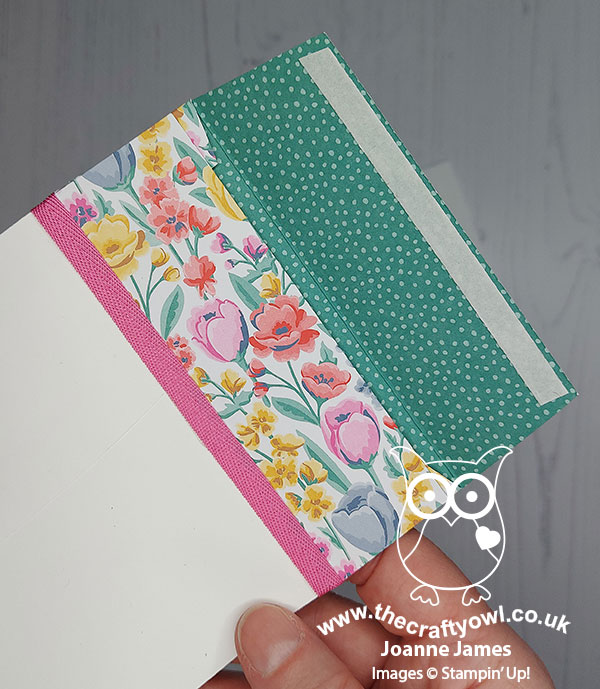
It's really straightforward: Take two strips of coordinating DSP, one measuring 4cm x 30.5cm (1 1/2" x 6") and one 4cm x 10.5cm and attach the longer one to the cut edge of the front of the envelope, with an even overhang top and bottom. Measure 18cm from the end of the envelope and score a line along your DSP, cut away the corners to create your flap then flip your envelope over to the reverse. Fold over the overhangs and glue those in place then align the shorter piece across the back of the envelope and glue to the base. Add tear and tape to the envelope flap and you're done. Here's a photo of the reverse of the envelope extension which hopefully makes some sense of my instructions above:
 

 I also added some Magenta Madness ribbon to cover my seam as my card will be hand delvered rather than posted - you can always leave this off if you need to be able to post your card.
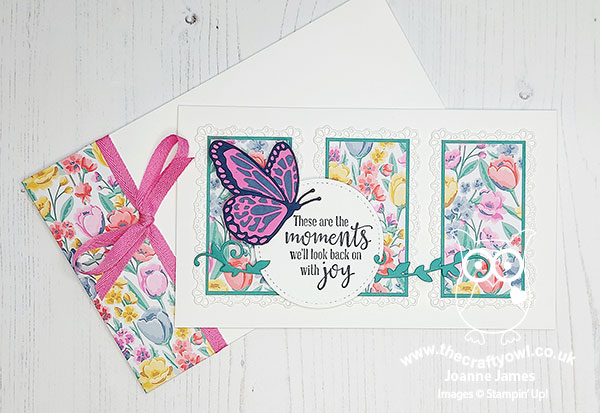
 

What do you think? I hope you found the envelope instructions useful and you like my card full of spring colour and flowers. I'm also linking up today over at SUO Challenges, where the theme is 'things that fly' - I think my butterfly qualifies on that front!

Here is the visual summary of the key products used on today's project for you to pin for easy reference:
 

You can see all of my Product and 'How To' summaries on my 'How To - Tips and Techniques' Pinterest board in case you've missed any. 

Before you reach for your ink and papers, check out what our amazing team has created to inspire you this week:

Here's a quick recap of our challenge rules:
 
1.  Create a new paper project
2.  Upload your creation to your blog with a link back to us and provide a direct link to the post featuring your challenge submission.
3.  Please link your card to no more than four challenges, TOTAL.
4.  Have FUN!

You can see all of my 'How To' summaries on my 'How To - Tips and Techniques' Pinterest board in case you've missed any. 

Enjoy your day; I am hoping to spend some time in the garden today and will be making the most of my last day at home with the James Juniors before they head back to school next week on Monday and Tuesday respectively. I'll be back tomorrow with another project. Until then, happy stampin'!


Stampin' Up! Supplies Used: 

Table built using Product Table Builder by The Crafty Owl - Independent Stampin' Up! Demonstrator.

Lovely You Ornate Layers Pastels Card

by Joanne James6. July 2020 21:05

I've had a busy day today with an online class this morning so I'm late blogging and an just squeezing in a card for this week's challenge over at CAS Colours and Sketches

I usually shy away from 'the double' but I still had my 'Lovely You' stamp set on my desk from this morning's class and saw an opportunity to combine something that featured in this morning's class - making our own patterned paper - with something we are looking at in our demonstration session on Thursday later this week - using our Stampin' Write markers to colour stamps - to create a card. Here's what I came up with:


Here's the low-down on today's card:

I changed the colours to the closest current ones and used one of the Ornate Layers Dies to frame my two-colour marker inked image, and paired my randomly stamped panel with a plain green one to ground it. I added a soft white ribbon bow; in hindsight, this along with the frame makes this card a little less 'CAS' than I would usually consider a card to be, but I do like the end result.

If you would like to join me for a free 30 minute demonstration session later this week that demonstrates the techniques I used on today's card, then do leave me a comment below or send me an email and I will send you the joining details - everyone is welcome.

Here is the visual summary of the key products used on today's project for you to pin for easy reference:


You can see all of my 'How To' summaries on my 'How To - Tips and Techniques' Pinterest board in case you've missed any. 

Enjoy your evening and I'll be back tomorrow with another project. Until then, happy stampin'!


Stampin' Up! Supplies Used:

Table built using Product Table Builder by The Crafty Owl - Independent Stampin' Up! Demonstrator.


Ornate Garden Suite Early Release From Today

by Joanne James1. April 2020 10:00


Sale-A-Bration may be over for another year, but that's no reason for the excitement to end! From today you can get blooming with an exclusive early release from our new annual catalogue that is due to launch at the beginning of June - the Ornate Garden Suite.

This vintage, floral suite with beautiful spring theme contains two stamp and die bundles, a 3D embossing folder, ribbon combo pack, specialty designer series paper with gold foil detailing and gilded gems. Here are some pictures of the items within the suite:


And here are just some of the lovely samples provided by Stampin' Up! to show it's potential:


There is also a video that you might find useful too:

I will be sharing lots of samples using the suite in due course. In the meantime, head on over to my newly updated Stampin' Up! store that also launches today! 

Back tomorrow with a project (or two!) Until then, happy shopping!


New Online Exclusives

There are new products available exclusively in the online store from 5 November - check them out here.

Latest Kits!

Stampin Cut and Emboss

The Layered Landscapes Kit and Nature's Paintings Kit are the latest kits in the online store - get yours here!

Shop Online

Access my online shop 24 x 7, 365 days of the year:

Current November hostess code:

9NKXDTTR

Shop Online

Mini Catalogue

BROWSE THE CATALOGUE

'Tis The Season - the new Stampin' Up! Mini Catalogue is here! For more details and to download your copy click here

Scrapbooking

Stampin' Up! has introduced a new range of 12x12" scrapbooking product and kit - the full range is now available to purchase online. To download a copy of the new digital Scrapbooking Catalogue click here.

2024-25 Annual Catalogue

BROWSE THE CATALOGUE

Click on the image to download your copy of the 2024-25 annual catalogue. For a full list of current SU! supplies, go to my online store. If you would like any help or advice, please drop me a line at joanne@thecraftyowl.co.uk or give me a call on 07773 421446 - I'd be happy to help.

Join My Team

It's always a great time to join Stampin’ Up! New team members can get £130 worth of products for only £99 + free business supplies + free shipping + all the fun being a part of Stampin’ Up! Stampin' Up! has something for everyone: join my growing team and benefit from my support to enjoy Stampin' Up! however you choose.

If you're interested, call me for a chat to understand how I can help you realise your goals. Alternatively, if you have already decided to sign up and you just can't wait, please click here for the link to the online form where you can sign up and order your starter kit right away! 

About Me

Hi I'm Joanne and live in Northampton and when I'm not looking after my husband and two beautiful children, am an avid crafter with a passion for all things Stampin' Up!

I must confess that I have never been a big rubber stamper - until I discovered Stampin' Up! that is. I love the fact that I can get such great results with co-ordinating stamps, inks, papers and punches - the possibilities are endless! Join me on my stamping journey as I share the things I love and be inspired to create amazing things yourself!

Follow Me

Monthly Newsletter

Box Builder

Click the button above to use Box Buster to create your custom box design using the Envelope Punch Board!

Kits Collection Now Available!

Stampin Cut and Emboss

The new Kits Collection from Stampin' Up! is now available!

Click here to see the current kits available and order yours online today.

I Design For


Stampin' Up Stuff

This is my personal blog and is not endorsed by Stampin’ Up! I hope you find it a plentiful source of ideas and personal inspiration but please don't copy my designs for contest submission or use for classes, publication or sale without express permission.