Christmas Rosette Door Wreath

by Joanne James4. August 2013 19:36

As I mentioned earlier this week, yesterday I held an all-day Christmas workshop with a lovely bunch of ladies and we made a good start with our preparations for the festive season with a number of 3D projects. I'm going to share the first of these with you today: a door wreath made out of paper rosettes and featuring the sadly recently retired Be Of Good Cheer Christmas DSP. After much scoring, gluing and decorating, this was the finished article:
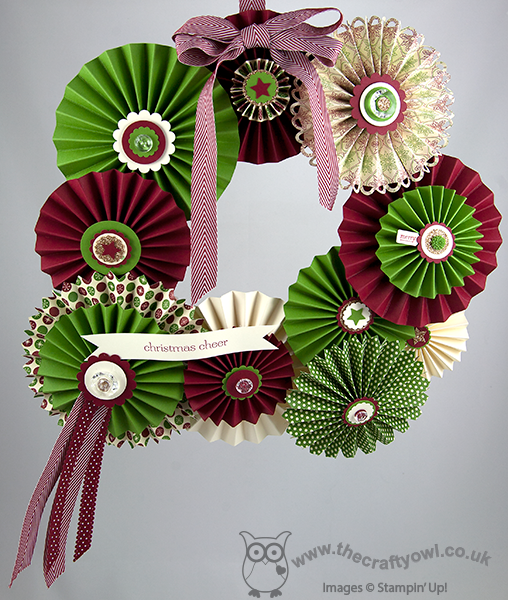
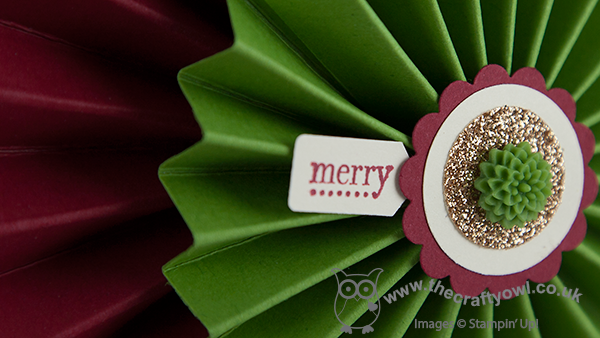
This picture shows my version of the wreath suspended. In hindsight, I should have photographed it in situ on my front door, although then my neighbours would have thought me completely mad (they already think I'm part way there, as I grow potatoes and pumpkins in my front garden, but that's a story for another time!!) The rosettes made from the patterned paper were cut using the Designer Rosette Bigx XL die, which is great for fast and easy cutting and scoring; unlike the ones made from the plain cardstock, which we scored using the Simply Scored scoreboard so they took a little longer. We used a variety of circle and scallop punches to create the centres; here's a close up of a couple of mine:
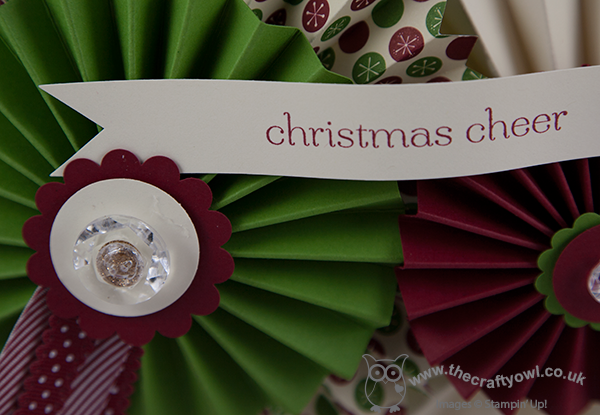
The one below was our focal point rosette, complete with ribbon trim - did you spot the lovely new Cherry Cobbler chevron ribbon in there? - and we also included a banner sentiment in keeping with the season:
The nice thing about a project like this though is that whilst everyone starts out with the same materials, each person has their own 'take' on what theirs should look like, so you end up with lots of similar but slightly different outputs. To illustrate, here is one of the finished wreaths of one of the ladies who attended:
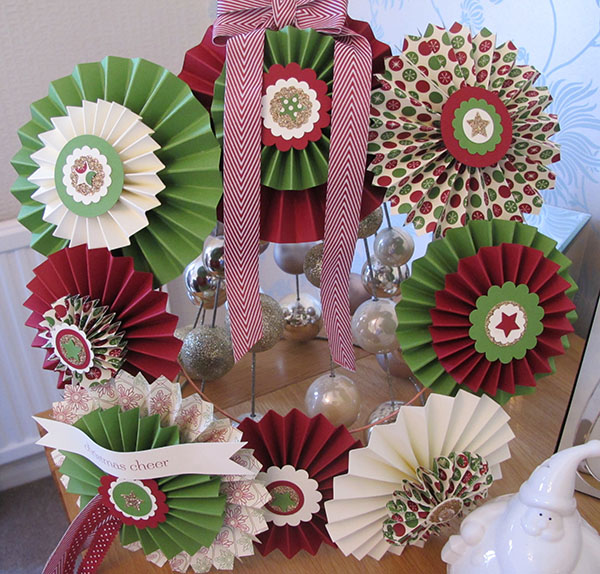
Isn't Maureen's wreath just lovely? I'll share the other projects we made with you later this week. I'm off now to recover from the party excesses of my day - my downline Barbara and I held a joint party for our 6 year old sons this afternoon: swimming party followed by birthday picnic in the park. I will share the invitations and thank you notes we made tomorrow; meanwhile, time for a nice quiet glass of wine and to put my feet up, I think!

Back tomorrow with another project; until then, happy stampin'!


Stampin' Up Supplies:

Stamps: Sweet Essentials, Tiny Tags (retired)

Cardstock: Very Vanilla, Gumball Green, Cherry Cobbler, Be of Good Cheer Designer Series Paper (retired)

Ink/Stampin' Write Markers: Cherry Cobbler

Tools: Simply Scored, Big Shot, Rosette Bigz XL Die, 1", 1 1/4", 1 3/8" Circle Punches, 7/8", 1 1/4" 1 3/4" Scallop Circle Punches, Itty Bitty Punches (circle), Merry Minis Punch Pack (star), Jewellery Tag Punch (retired)

Finishing Touches: Champagne Glimmer Paper, Vintage Faceted Designer Buttons, In Colour Dahlias, 3/4" Cherry Cobbler Chevron Ribbon,  Cherry Cobbler 1/2" Scallop Dots Ribbon


The Colours of the Rainbow - Filter Paper Technique

by Joanne James20. May 2013 20:36

I thought today I would share a card I made at my last training session which showcases a very cool technique using ink, alcohol and filter paper. Here is the finished card: 

The real focal point of this card, designed by the lovely Monica Gale, is the central rainbow panel, which is so easy to achieve. All you need to do is colour an acetate window sheet using Stampin' Write markers in sections - for this card we used Real Red, Pumpkin Pie, Daffodil Delight, Gumball Green, Midnight Muse and Rich Razzleberry - then spray this liberally with water, or isopropyl alcohol if you want it to dry more quickly, until the ink blends. Once this happens, you simply lay your filter paper (rough side down) onto the ink until it's absorbed, then peel away from the acetate and leave to dry. Once dry, the filter paper can be glued to a piece of white card and cut to size to fit your project.

The result varies depending on the colours used and the shapes drawn onto the acetate, but that's the great thing with a technique like this - a unique output every time. I will be using this on other cards for sure and may even record a short video to demostrate just how easy it is to achieve - watch this space!

Back tomorrow with another project. Until then, happy stampin'!


Stampin' Up Supplies:

Stamps: Rain or Shine, En Francais, Tiny Tags

Cardstock: Basic Grey, Whisper White

Ink/Stampin' Write Markers: Real Red, Pumpkin Pie, Daffodil Delight, Gumball Green, Midnight Muse and Rich Razzleberry

Tools: Jewellery Tag Punch, Creped Filter Paper

Finishing Touches: Basics Rhinestones, 1/4" Stitched Grosgrain Ribbon Basic Grey, Alcohol Shimmer Mist

Tags: , , , , , , , ,

Cards | Stamping

Dotty Dress Up Lip Balm Boxes

by Joanne James7. May 2013 17:51

Another dress up project today, but today I'm going 3D with these cute boxes, the perfect size to hold a lip balm. I actually made a couple of these as quick gifts, but then couldn't resist making a third one for myself! I got busy with my polka Dot Parade paper; here they are - guess which one is mine?

The first one is in Marina Mist polka dots with taffeta ribbon:

The second one is in Real Red with some of the flower trim: 

Lastly, Rich Razzleberry with some stitched grosgrain ribbon:


I think there's something very 'Pretty Woman' about these and they really are so easy to make. They make great little treat boxes, or would make lovely table favours for a leavers prom too, perhaps with a couple of chocolates inside. Another great use for this versatile set (oh, and in case you were wondering - the red one is mine!).

One last thing - further to my post last week about Stampin' Up!'s new This and That Journal and the discounted bundle offer that can be purchased in May (see the 'Special Offers' section in the side bar for more details), I will be posting a 'This and That' journal tip on my Facebook page each day for the rest of the month, with lots of thoughts and ideas on how you can get great use from your journal. Click the 'follow me on Facebook' icon on the right-hand side to make sure you see these tips in your daily news feed and do drop me a line when you're ready to purchase yours!

Back tomorrow with another project - until then, happy stampin'!

Stampin' Up Supplies:

Cardstock: Marina Mist, Real Red, Rich Razzleberry, Whisper White, Polka Dot Parade DSP

Ink: Marina Mist, Real Red, Rich Razzleberry

Tools: Dress Up Framelits, Big Shot, Jewelry Tag Punch

Finishing Touches: Taffeta Ribbon Marina Mist, 1/4" Stitched Grosgrain Ribbon Rich Razzleberry, Flower Trim, Baker's Twine

Tags: , , , , , , , ,

3D Projects | Boxes

New Online Exclusives

There are new products available exclusively in the online store from 5 November - check them out here.

Latest Kits!

Stampin Cut and Emboss

The Layered Landscapes Kit and Nature's Paintings Kit are the latest kits in the online store - get yours here!

Shop Online

Access my online shop 24 x 7, 365 days of the year:

Current November hostess code:

9NKXDTTR

Shop Online

Mini Catalogue

BROWSE THE CATALOGUE

'Tis The Season - the new Stampin' Up! Mini Catalogue is here! For more details and to download your copy click here

Scrapbooking

Stampin' Up! has introduced a new range of 12x12" scrapbooking product and kit - the full range is now available to purchase online. To download a copy of the new digital Scrapbooking Catalogue click here.

2024-25 Annual Catalogue

BROWSE THE CATALOGUE

Click on the image to download your copy of the 2024-25 annual catalogue. For a full list of current SU! supplies, go to my online store. If you would like any help or advice, please drop me a line at joanne@thecraftyowl.co.uk or give me a call on 07773 421446 - I'd be happy to help.

Join My Team

It's always a great time to join Stampin’ Up! New team members can get £130 worth of products for only £99 + free business supplies + free shipping + all the fun being a part of Stampin’ Up! Stampin' Up! has something for everyone: join my growing team and benefit from my support to enjoy Stampin' Up! however you choose.

If you're interested, call me for a chat to understand how I can help you realise your goals. Alternatively, if you have already decided to sign up and you just can't wait, please click here for the link to the online form where you can sign up and order your starter kit right away! 

About Me

Hi I'm Joanne and live in Northampton and when I'm not looking after my husband and two beautiful children, am an avid crafter with a passion for all things Stampin' Up!

I must confess that I have never been a big rubber stamper - until I discovered Stampin' Up! that is. I love the fact that I can get such great results with co-ordinating stamps, inks, papers and punches - the possibilities are endless! Join me on my stamping journey as I share the things I love and be inspired to create amazing things yourself!

Follow Me

Monthly Newsletter

Box Builder

Click the button above to use Box Buster to create your custom box design using the Envelope Punch Board!

Kits Collection Now Available!

Stampin Cut and Emboss

The new Kits Collection from Stampin' Up! is now available!

Click here to see the current kits available and order yours online today.

I Design For


Stampin' Up Stuff

This is my personal blog and is not endorsed by Stampin’ Up! I hope you find it a plentiful source of ideas and personal inspiration but please don't copy my designs for contest submission or use for classes, publication or sale without express permission.