Easter Promise Heat Embossed Crocus – PP480

by Joanne James1. March 2020 10:00

Today it's Sunday and it's also the first of March - happy St David's Day to all my fellow Welsh men and women! It's time for this week's new challenge over at The Paper Players! It's the turn of the wonderful Anne Marie to host this week and she has a theme challenge for you to work with:


 I am in a bit of a clean and simple card making groove of late - and today I have another CAS creation for you. I decided to take this week's sketch over at CAS Colours & Sketches and make another Easter card - take a look:


Here's the low-down on today's card:

Turn Up The Heat - Do you remember the first time you practised heat embossing? It's one of those techniques that is always a real 'wow' as you turn on your heat gun and see the powder turn into molten metallic magic on your stamped image. It adds such a great shine to projects and a raised edge that makes it easy to colour inside too. If you look at the close up photo below you can see the dimension and shine that it adds:


My top tip for a neat effect and minimal splatter when heat embossing is to always rub your cardstock with an embossing buddy before you stamp your image in Versamark and sprinkle with your embossing powder; this will keep the powder where you want it and not cause it to stick in areas where it isn't required.

Crocus Colours - The colour scheme on today's card is inspired by the most common traditional crocus colours: a warm honey yellow, bright purple and pale yellow. I used a Highland Heather base - I embossed the front using my Subtles Embossing Folder - and coloured my flowers using Highland Heather, Mango Melody and So Saffron Stampin' Blends markers to compliment my gold heat embossing.

Easter Promise - The stamp set I used today is called 'Easter Promise' and has both sentiments and these gorgeous crocus flowers that are perfect for celebrating Easter. I heat embossed the trio of crocus and then used my largest Stitched Circle Die to create a partial diecut around them (that's the 'hat' shape on the sketch!) and I then heat embossed my sentiment and fussy cut it so that I could position it where I wanted it. I also decorated the envelope front and back and the inside of my card and continued with the heat embossing and colouring theme:

For a CAS card it took a little while with all of the heat embossing and colouring, but it was so worth it - this card is so, so pretty! Here is the visual summary of the key products used on today's project for you to pin for easy reference:


You can see all of my Product and 'How To' summaries on my 'How To - Tips and Techniques' Pinterest board in case you've missed any. 

Before you reach for your ink and papers, check out what our amazing team has created to inspire you this week:

Here's a quick recap of our challenge rules:
 
1.  Create a new paper project
2.  Upload your creation to your blog with a link back to us and provide a direct link to the post featuring your challenge submission.
3.  Please link your card to no more than four challenges, TOTAL.
4.  Have FUN!

Enjoy your day; I will be spending the day at home escaping the winds and rain and hoping to get some quality time in my craft room in between catching up on household chores and making sure the youngest of the James Juniors is prepared for this week's mock Common Entrance examinations - not much then!  I'll be back tomorrow with another project. Until then, happy stampin'!


Stampin' Up! Supplies Used: 

Table built using Product Table Builder by The Crafty Owl - Independent Stampin' Up! Demonstrator.

Modern Heart Heat Embossed Black Card

by Joanne James20. August 2019 20:45

Today I'm sharing a card for the current challenge over at TGIF Challenges where they have an interesting challenge this week:


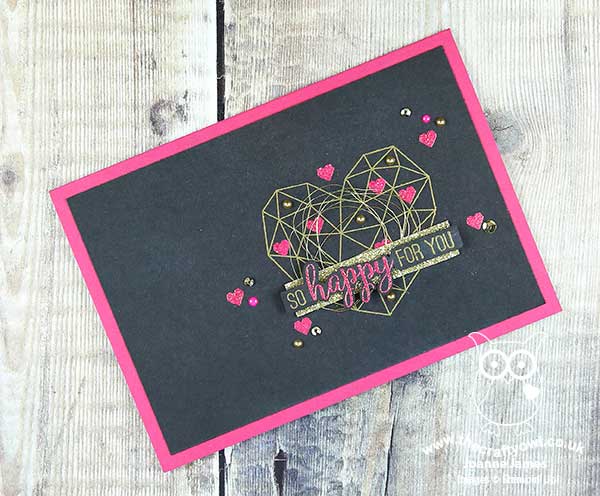
 All on black - now this was a challenge! After much thought, I decided to use a new stamp set and the (now retired) 2018-20 In Color Embossing powders for a pop of bright colour and ended up creating not one but two cards! Here's my favourite - take a look:
 

 Here's the low-down on today's card:

A Modern Heart - This stamp set was one that I picked up because my daughter loves it, so it seemed only fair I made a card with her in mind. This card would work as an engagement card I guess, but I made it with congratulations in mind; she works so hard both at school and in her extra-curricular sports and music activities and I know it won't be long before we have another exam pass or success of some kind to celebrate and she will appreciate the sparkle and grown-up feel of this clean and graphic design.

Double Heat Embossing - In order to achieve my gold and Lovely Lipstick design, I stamped and heat embossed in two stages: first I stamped and heat embossed the gold heart, then I added the red hearts later. For the sentiment, I stamped in one go, the dipped the ends in gold first then carefully masked the ends off to add the coloured embossing powder to the word 'happy' before heat embossing both together.

Touches of Gold - To finish my card, I added some gold metallic pearls and gold sequins, along with a touch of gold glimmer paper and some (retired) gold thread for some texture and to add a little sparkle. I also added a few Lovely Lipstick enamel dots to complete my card.

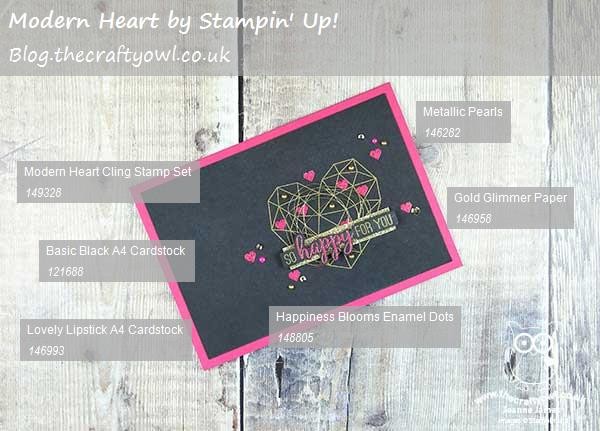
Here is the visual summary of the key products used on today's project for you to pin for easy reference:
 

You can see all of my 'How To' summaries on my 'How To - Tips and Techniques' Pinterest board in case you've missed any. 

I so liked the effect of the bright colours against the black, I also made a second card using the Accented Blooms stamp set and some Pineapple Punch embossing powder, ribbon and DSP for another super bright card:
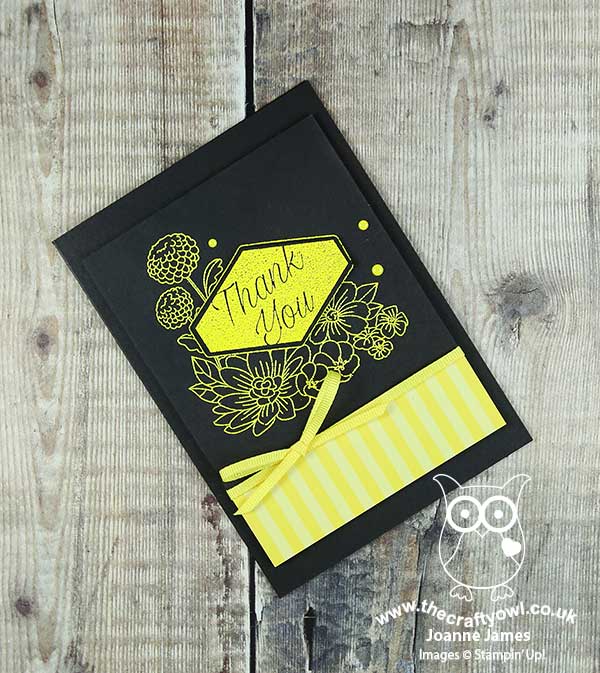
 

When the James Juniors wandered into my craft room to see what I'd been making, they declared the heart much nicer and the one that I should share here, but I thought I'd share this one too as I rather like it and if you have some coloured embossing powders in the back of your craft drawer, you may like to try it too!

Having braved the sports shop for rugby boots and hockey shoes yesterday, today we ventured further afield and braved the shops for new school shoes, trousers and other items of uniform needed in readiness for the return to school in a couple of weeks time. Thankfully we didnt need much and our trip was successful. We are rewarding ourselves tomorrow with a trip to the cinema! Enjoy your evening and I'll be back tomorrow with another project. Until then, happy stampin'!


Stampin' Up! Supplies Used:

Table built using Product Table Builder by The Crafty Owl - Independent Stampin' Up! Demonstrator.

Sorry For Everything and Hedgehugs - The Perfect Pair

by Joanne James17. September 2018 10:00

This is already my second post today - if you missed my earlier post about the updated clearance rack then you can read all about it here. Now for today's creative post and I'm sharing a card for the current challenge over at CASology where the code word is 'heal':


The cue word can be interpreted in a number of ways; the most obvious one perhaps as 'get well soon', however I decided to go with the theme of forgiveness and healing a relationship rift - take a look:


Here's the low-down on today's card:

I'm Sorry - Ok, so we all make mistakes - no-one is perfect. They aren't intentional otherwise they wouldn't be a mistake, right? The important thing is though, to say sorry. Sometimes we don't even realise the impact our actions have had on the feelings of others until the damage has been done. Apologising is an important part of the cycle of forgiveness that allows a relationship to heal and move forward and the 'Sorry For Everything' stamp set from Stampin' Up! is just perfect for putting it down on paper - this set really does cover everything from get well wishes, to a thinking of you on divorce or relationship breakdown, on the loss of a loved one or pet, job farewell or retirement, a missed birthday or even just a plain old-fashioned 'sorry for that thing I did'. I use it a lot for missed birthdays (yes, i might make a lot of cards but I'm often late at posting!) but like that it offers lots of other options too. 

Embossed Colour - I was chatting with one of my customers recently who was really taken with the new in-colour embossing powders that feature on page 202 of the annual catalogue but had asked me for some ideas on how she could use them - here's a picture of them in case you're wondering what I'm talking about:

In Color 2018–2020 Stampin' Emboss Powder

I don't have these new colours but did have some old coloured embossing powders in my drawer, so thought I'd make a couple of cards to give her a few ideas. I used two different shades of pink to create a two-tone 'sorry', allowing them to mix where they meet, whilst embossing my hedgehog in Early Espresso powder onto Crumb Cake cardstock. You could of course create a similar effect by stamping your images in the respective ink colours and then heat embossing them with clear embossing powder to create a textured shine.

Who Can Resist A Hedgehug? - The front of this clean and simple card is only part of the sentiment - inside I stamped the second part along with another hedgehog:


Isn't this just the perfect pairing of stamp sets - who could resist a hedgehug from this little chap with his floral peace offering?

Here is the visual summary of the key products used on today's project for you to pin for easy reference:


You can see all of my 'How To' summaries on my 'How To - Tips and Techniques' Pinterest board in case you've missed any. 

Enjoy your day. I am off to my craft room - lots to achieve this week! - and I'll be back tomorrow with another project. Until then, happy stampin'!


Stampin' Up! Supplies Used:

Table built using Product Table Builder by The Crafty Owl - Independent Stampin' Up! Demonstrator.

New Online Exclusives

There are new products available exclusively in the online store from 5 November - check them out here.

Latest Kits!

Stampin Cut and Emboss

The Layered Landscapes Kit and Nature's Paintings Kit are the latest kits in the online store - get yours here!

Shop Online

Access my online shop 24 x 7, 365 days of the year:

Current November hostess code:

9NKXDTTR

Shop Online

Mini Catalogue

BROWSE THE CATALOGUE

'Tis The Season - the new Stampin' Up! Mini Catalogue is here! For more details and to download your copy click here

Scrapbooking

Stampin' Up! has introduced a new range of 12x12" scrapbooking product and kit - the full range is now available to purchase online. To download a copy of the new digital Scrapbooking Catalogue click here.

2024-25 Annual Catalogue

BROWSE THE CATALOGUE

Click on the image to download your copy of the 2024-25 annual catalogue. For a full list of current SU! supplies, go to my online store. If you would like any help or advice, please drop me a line at joanne@thecraftyowl.co.uk or give me a call on 07773 421446 - I'd be happy to help.

Join My Team

It's always a great time to join Stampin’ Up! New team members can get £130 worth of products for only £99 + free business supplies + free shipping + all the fun being a part of Stampin’ Up! Stampin' Up! has something for everyone: join my growing team and benefit from my support to enjoy Stampin' Up! however you choose.

If you're interested, call me for a chat to understand how I can help you realise your goals. Alternatively, if you have already decided to sign up and you just can't wait, please click here for the link to the online form where you can sign up and order your starter kit right away! 

About Me

Hi I'm Joanne and live in Northampton and when I'm not looking after my husband and two beautiful children, am an avid crafter with a passion for all things Stampin' Up!

I must confess that I have never been a big rubber stamper - until I discovered Stampin' Up! that is. I love the fact that I can get such great results with co-ordinating stamps, inks, papers and punches - the possibilities are endless! Join me on my stamping journey as I share the things I love and be inspired to create amazing things yourself!

Follow Me

Monthly Newsletter

Box Builder

Click the button above to use Box Buster to create your custom box design using the Envelope Punch Board!

Kits Collection Now Available!

Stampin Cut and Emboss

The new Kits Collection from Stampin' Up! is now available!

Click here to see the current kits available and order yours online today.

I Design For


Stampin' Up Stuff

This is my personal blog and is not endorsed by Stampin’ Up! I hope you find it a plentiful source of ideas and personal inspiration but please don't copy my designs for contest submission or use for classes, publication or sale without express permission.