Welcome Noel Winter Dreams Landscape PP806

by Joanne James4. October 2026 08:00

Today it's Sunday and time for this week's new challenge over at The Paper Players! It's the turn of the fabulous Ann to host this week and she has a fun theme challenge for us to work with:


    

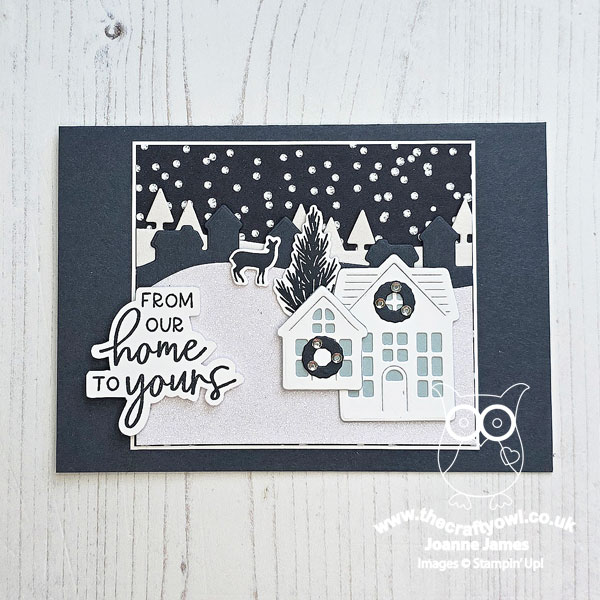
Nature's landscapes - these can take so many forms, the possibilities really are endless! I was tempted to go with some photographic papers, as I do have some with lovely autumn and winter landscapes, but in the end I decided to grab the sketch over at SUO Challenges and use that large square to create my own - take a look at what I came up with:
 

Here's the low-down on today's card:

Winter Dreams - My colour scheme is the same as the one I used for last week's Paper Players card (you can see that here if you missed it) as I used another of the patterns in the Winter Dreams specialty designer series paper pack on my card today. This time I went for the falling snow for my sky - perfect for my snowy landscape. The snowflakes are graduated across the sheet of paper and I have used the 'busy' end on my card so it is looking a little blizzard-like, but that's OK - I do like the texture of this paper.

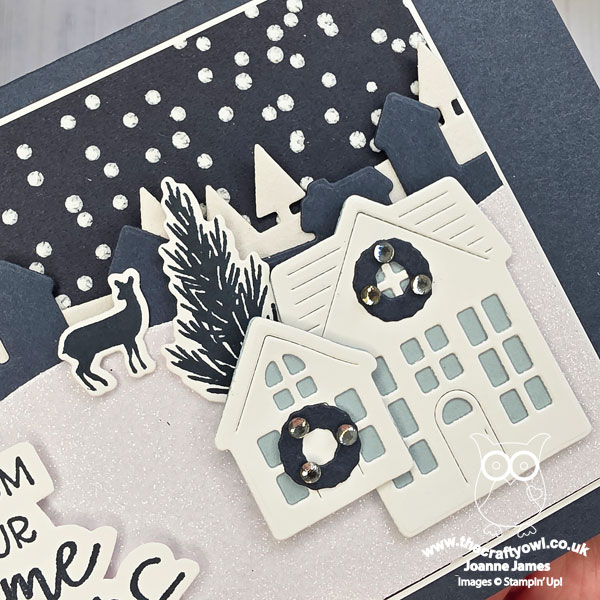
Welcome Noel - My landscape is made using the Welcome Noel bundle. There are rows of trees and houses, as well as a selection of standalone houses, trees and a deer. I've used a combination of all of them to build up the layers of my snowy landscape, using different papers, textures (I used white flocked velvet paper for the tree line and white glimmer paper for the foreground) to add even more texture and interest.

All The Layers - There are nine layers on today's card, each one adding more depth and detail than the next. I have taken some liberties: I added the run of houses in Secret Sea for contrast, whereas if it was a real landscape they would be white, given the falling snow. I also added the smaller diecut house on top of the larger one, whereas for a true sense of perspective it should sit behind the larger one, but that's creative licence, right? The photo below shows more of the detail of those layers and textures:
 I added a larger sentiment from the retired Framed & Festive stamp set to finish my card; I initially went with a skinny 'Merry Christmas' that was more in keeping with the sketch, but it just got lost amongst all the other detail, so I switched it out for something bigger. 

I really like this combination of dark blue and white for a snowy scene; those Welcome Noel dies would look great in lots of other colour combinations too.

Here is the visual summary of the key products used on today's project for you to pin for easy reference:
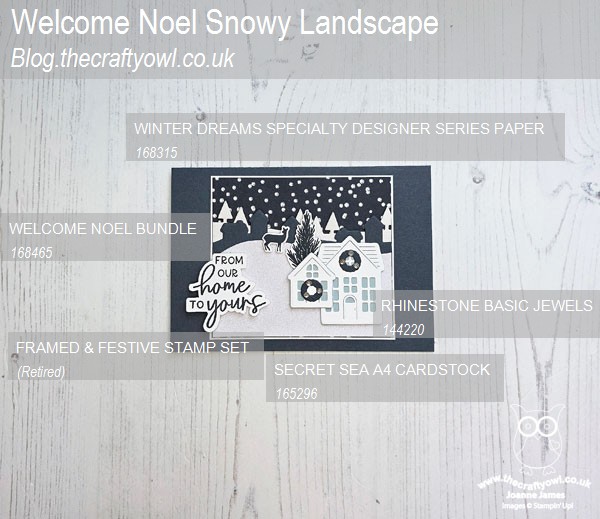
 

You can see all of my Product and 'How To' summaries on my 'How To - Tips and Techniques' Pinterest board in case you've missed any. 

Before you reach for your ink and papers, check out what our amazing team has created to inspire you this week:

Here's a quick recap of our challenge rules:
 
1.  Create a new paper project
2.  Upload your creation to your blog with a link back to us and provide a direct link to the post featuring your challenge submission.
3.  Please link your card to no more than four challenges, TOTAL.
4.  Have FUN!

Enjoy your day; it is the hubby's birthday today, so we will be paddleboarding this morning and then returning home for a late lunch of homemade Italian ragu and a restful afternoon - bliss! I'll be back tomorrow with another project. Until then, happy stampin'!


Stampin' Up! Supplies Used: 
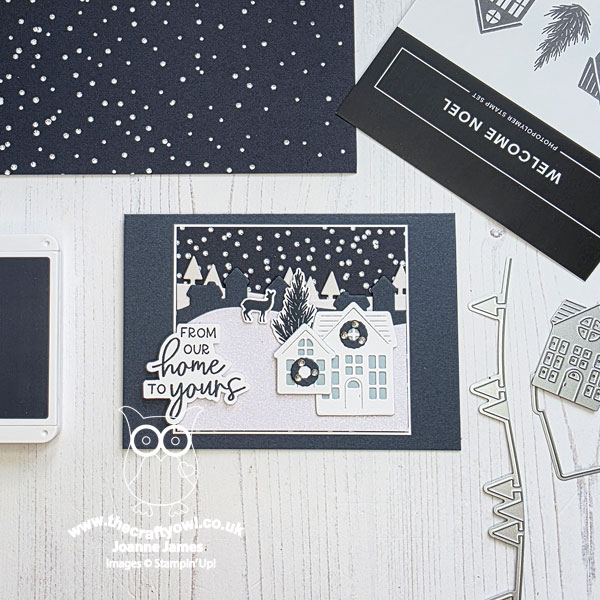
Table built using Product Table Builder by The Crafty Owl - Independent Stampin' Up! Demonstrator.

Festive And Fun With Spots and Stripes

by Joanne James21. August 2023 09:00

Another Monday, another week! I had a little time yesterday and I fancied a little colouring, so I decided to break out a new stamp set and create a couple of cards with Jen Mitchell's sketch layout over at Freshly Made Sketches this week. Here's her sketch:


Both my cards use the same layout: on the first one, I added the sentiment to the banner; on the second one I added my images to the banner and the sentiment on the panel. Both cards also feature the Merry Bold & Bright designer paper that will debut in the new mini catalogue - stripes on the first one, spots of the second one.

My first card I'm linking up over at 52 Christmas Card Throwdown where the theme is food - I thought this reindeer with his Christmas pudding would fit right in:


I made an extended banner for my sentiment using the Nested Essentials Dies and coloured the cute reindeer with my Blends markers for a smooth and streak-free finish:


My second card features a super colourful giraffe, decorating his tree for Christmas - take a look:


The sentiment is from the (retired) set 'Framed & Festive'. 

This is definitely the most colourful of the pair so I'm linking this one up over at TimeOut Challenges where their them is 'colourful' - I love the way the spots on the designer paper background mirror the spots on the giraffe too!


Nothing too fancy about these cards but they were definitely fun to make and great images to colour!

Here is the visual summary of the key products used on today's project for you to pin for easy reference:


You can see all of my 'How To' summaries on my 'How To - Tips and Techniques' Pinterest board in case you've missed any. 

The new Christmas products that you will see showcased on my blog this week will all be available to customers September 6th when the new mini catalogue goes live. I am currently packing up catalogues to send to my customers who have shopped with me in the last 12 months; if you aren't already on my mailing list and would like a copy of the new catalogue, do get in touch - I would be happy to help.

I have had a very productive start to the week - let's hope this continues! Enjoy the rest of your day and I'll be back tomorrow with another project. Until then, happy stampin'!


Stampin' Up! Supplies Used:

Table built using Product Table Builder by The Crafty Owl - Independent Stampin' Up! Demonstrator.

Celebrate Everything Speedy Spruced Up Ornament Christmas Card AYSI 289

by Joanne James2. December 2022 13:00

Today I'm sharing my design team card for our new challenge over at As you See It where it's time for a speed challenge chosen by Jan:


The dreaded speed challenge! I had both paper and dies featuring ornaments to hand, but no current stamps, so this week was definitely a case of 'go hard or go home', so I grabbed the Sketch Saturday layout and decided to go for it! This is what I came up with:


Here's the low-down on today's card:

Today's card was all about the planning! I designed my card and wrote a list of the sizes I needed to cut my layers to and gathered my scraps of coloured cardstock and paired them with each die ready for cutting. I put my sentiment stamp into my Stamparatus and once I had everything to hand, set my stopwatch and started cutting! The real highlight of today's card is the brightly coloured, ornament patterned paper from the 'Celebrate Everything' hostess paper pack - I cut a panel of this then diecut an ornament using my Spruced Up Outlines Dies for a co-ordinated focal point:


I added a simple sentiment from 'Framed & Festive' that I diecut at the same time as my ornament to save time and as I still had time I added a black twine bow for a final finishing touch just as my 10 minute timer went off - not a second to spare! My desk was an absolute bomb site - a true 'craftermath', but I did it! A stamped ornament would have made for a much quicker card and I did contemplate just using the designer paper and a sentiment, but where's the fun in that, right?! It's not a speed challenge if there's no pressure!

Here is the visual summary of the key products used on today's project for you to pin for easy reference:


You can see all of my 'How To' summaries on my 'How To - Tips and Techniques' Pinterest board in case you've missed any. 

Here's a summary of our challenge rules:

  • Create any card, scrapbooking page, 3D project or packaging project that fits the challenge.
  • Please include the challenge graphic and link back to the challenge in your blog post. Turn off word verification so we can leave you lots of lovely comments. Make sure you link the post not the whole blog to the Linky. Use #AYSIXXX when uploading to a public gallery.
  • If you’re unsure about ‘the rules’, check the details under the Challenge Guidelines tab on the As You See It Challenge homepage.
  • In a speed stamping challenge, please time yourself and say in your post how long your card took to complete. 
What can you create using ornaments in 10 minutes or less? We look forward to seeing your creations in the AYSI gallery.

Enjoy your day; I have a day of housework and errands and I'll be back tomorrow with another project. Until then, happy stampin'!


Stampin' Up! Supplies Used:

Table built using Product Table Builder by The Crafty Owl - Independent Stampin' Up! Demonstrator.

Framed and Festive Country Wreaths Slimline Christmas Card

by Joanne James24. November 2022 12:00

Today I'm sharing a card using the sketch layout over at Sunday Stamps and the Hand Stamped Sentiments colour palette:


This is one of those cards that ended up looking nothing like it started out! I had a trio of stamped and diecut wreaths leftover from another project, so thought they would work nicely with the Sunday Stamps sketch. They were too large on a standard cardfront and I couldn't find a background I liked to accompany them, so in the end changed my colour scheme and went slimline and eventually came up with something I rather like - take a look:


Here's the low-down on today's card:

Country Wreaths - I initially restamped my wreaths green-on-green instead of green-on-white, but the stamped detail just got lost so instead I went for a layered wreath using the dicuts only and I like this much more. I added some Cherry Cobbler Festive Pearls and a gold glimmer bow to each, to tie in with my ribbon banner and central sentiment element. I did add some stamped detail to the envelope and inside of my card though:


Framed & Festive - Instead of three wreaths, I opted to add a circle with my main sentiment to the centre. My sentiment comes from the limited-time stamp set 'Framed & Festive' that co-ordinates with the Framed Florets bundle currently on early release from the new mini catalogue - I love the big, bold font. I heat embossed it in gold onto Cherry Cobbler cardstock and added a sprig of greenery and some gold pearls to decorate: 


I almost ignored the banner detail on the original sketch, but there was the perfect stamp in the set to add a second sentiment part, so I added 'from all of us' heat embossed in gold directly onto the cardbase - you can just see it on the corner of the photo above.

A Neat Lights Aglow Trick - The eagle-eyed amongst you may have recognised that the background pattern I used comes from the Lights Aglow designer series paper pack. This is a 6"x6" paper pack - which is not wide enough for a slimline cardfront. The solution? I actually made my cardfront from two pieces of DSP, with the join running down the centre behind my red sentiment circle. I was careful to cut and line up the pattern perfectly and the presence of the circle means it is super difficult to see the join - if I hadn't just told you it was there, you wouldn't notice ;-). 

Here is the visual summary of the key products used on today's project for you to pin for easy reference:


You can see all of my 'How To' summaries on my 'How To - Tips and Techniques' Pinterest board in case you've missed any. 

Enjoy your day; the bitter cold winds of winter seem to have arrived in force this week so I am hibernating! I hope you are warm and cosy wherever you are - and to all my American friends and readers, I wish you a wonderful Thanksgiving celebration today. I'll be back tomorrow with another project. Until then, happy stampin'!


Stampin' Up! Supplies Used:

Table built using Product Table Builder by The Crafty Owl - Independent Stampin' Up! Demonstrator.

2026 Sept-Dec Catalogue

The Stampin' Up! 2026 Sept-Dec Catalogue is now live! Click on the image to download your copy.

Product of The Month

Stampin Cut and Emboss

The exclusive Product of the Month can be yours for only £5 when you spend £70 or more in a single order. Make sure you purchase ASAP because once it's sold out, it's gone for good! See this month's exclusive product here.

Shop Online

Access my online shop 24 x 7, 365 days of the year:

Shop Online

New Online Exclusives

There are new products available exclusively in the online store from 1 September - check them out here.

Stampin' Up! Craft Classes

The Advent-ures in Christmas Craft Class class to make the 24 box advent calendar will be held on 17 September and is available to purchase from 1 September; get the full details here.

Paper Pumpkin

Paper Pumpkin is now here in the UK! The monthly subscription window is from 11th of the month. Sign up for yours here!

Latest Kits!

Stampin Cut and Emboss

Floral Promenade and Merry Manor are the latest kit additions to the online store - get yours here!

Join My Team

It's always a great time to join Stampin’ Up! New team members can get a coupon for £125 worth of products for only £95 + 8 free catalogues + free shipping + all the fun being a part of Stampin’ Up! Stampin' Up! has something for everyone: join my growing team and benefit from my support to enjoy Stampin' Up! however you choose. 

If you're interested, call me for a chat to understand how I can help you realise your goals. Alternatively, if you have already decided to sign up and you just can't wait, please click here for the link to the online form where you can sign up and order your starter kit right away! 

About Me

Hi I'm Joanne and live in Northampton and when I'm not looking after my husband and two beautiful children, am an avid crafter with a passion for all things Stampin' Up!

I must confess that I have never been a big rubber stamper - until I discovered Stampin' Up! that is. I love the fact that I can get such great results with co-ordinating stamps, inks, papers and punches - the possibilities are endless! Join me on my stamping journey as I share the things I love and be inspired to create amazing things yourself!

Follow Me

Monthly Newsletter

Box Builder

Click the button above to use Box Buster to create your custom box design using the Envelope Punch Board!

I Design For


Stampin' Up Stuff

This is my personal blog and is not endorsed by Stampin’ Up! Stampin' Up! is a registered trademark of Stampin' up! Inc. I hope you find my blog a plentiful source of ideas and personal inspiration but please don't copy my designs for contest submission or use for classes, publication or sale without express permission.