Picnic With You Basket of Flowers Exploding Box Card

by Joanne James1. April 2018 18:00

No, it's no April Fools - it's another two-post day today! I have spent a relaxing day being treated to Sunday lunch, along with my fair share of chocolate eggs following this morning's obligatory Easter egg hunt and I wanted to share an exploding box card that I made recently that is just perfect for this week's challenge over at Stamps Ink Paper before it closes this evening:

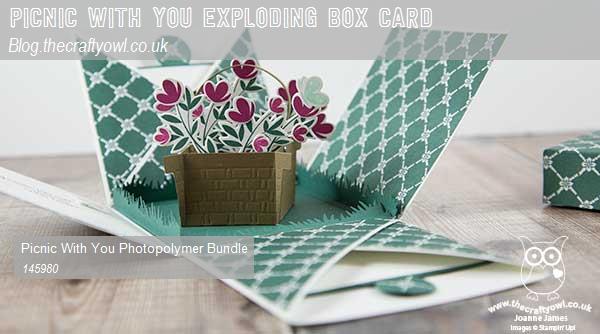
My card looks rather inconspicuous from the outside, just like a simple lidded box. Yet when the lid is removed, my unassuming card 'explodes' and opens up to reveal a 3 dimensional basket of flowers - take a look at this top-down view, showing all of the flaps and pockets - you can also see the layering within my basket:
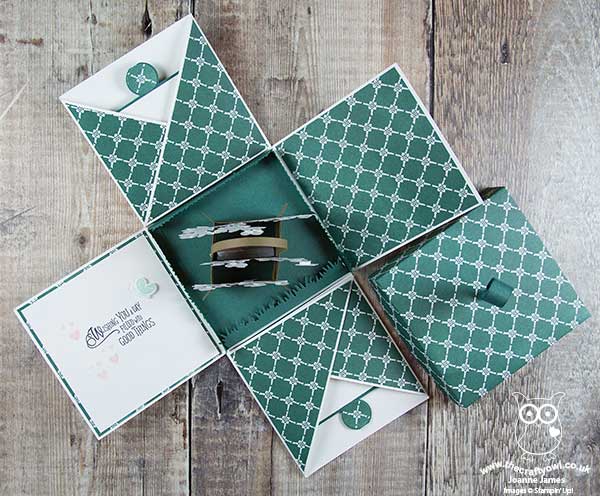
 

And here you can see properly what the flower basket centrepiece looks like:
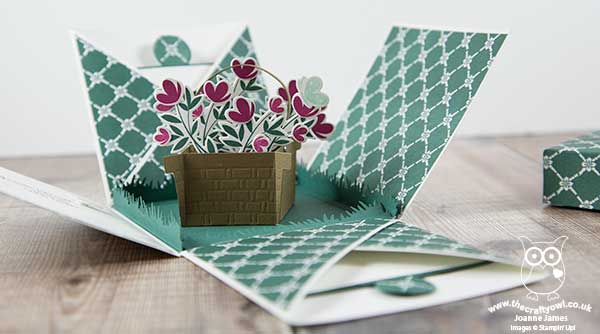
A sweet basket of flowers, complete with butterfly, on a base edged with grass. Isn't that fun?! Here's the low-down on today's card:

Picnic With You - I used the stamps and framelits from the Picnic With You bundle to create my basket, cutting four basket pieces scoring and glueing at the corners to create a 3 dimensional basket to hold my flowers. I love the embossed basket weave detail that is added with the speciality piece in the Picnic Basket Builder Framelit set - it adds great detail and interest.  

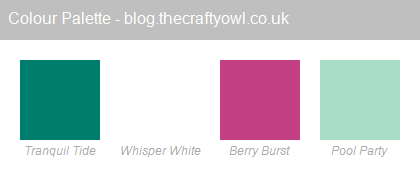
In-Colour Colour Combo - My card features Berry Burst flowers and makes a real feature of the In Color designer series paper in Tranquil Tide. Whilst my main box is made out of Whisper White, the lid is made from Tranquil Tide DSP and I've carried this through for the pockets and mats for the inside of my card. I added a little Pool Party butterfly for an unexpected pop of contrasting colour. I love this deep, yet fresh colour combo - feel free to save it if you would like to use it for your future project inspiration:
 

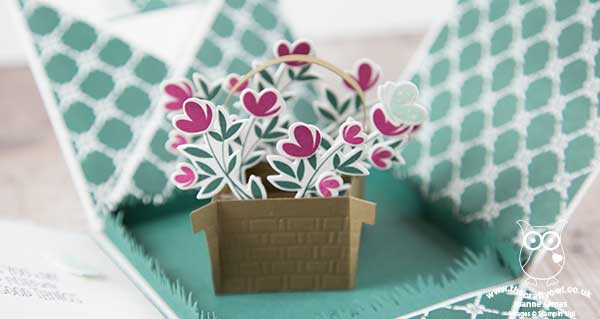
Pockets and Tabs - I added a generic message from the Picnic With you stamp set on one of the inner flaps of my card, and another on the right hand side after I took this photo that displayed a 'Happy Mother's Day' message (this card was for my Mother-In-Law for Mother's Day - I knew she would appreciate something a little different and it I could deliver by hand, another bonus!) In addition, the pockets contained two simple slide out cards, with simple tabs courtesy of the Circle Tab Punch (such a useful punch!) - we wrote messages on ours but they would also be a great place to add some photos or even some Memories & More cards perhaps.

Here's another photo showing the centre of my card in detail: 
Here is the visual summary of the key products used on today's project for you to pin for easy reference:
 

You can see all of my 'How To' summaries on my 'How To - Tips and Techniques' Pinterest board in case you've missed any. 

I hope you have all enjoyed your day and I'll be back on Tuesday with another project. Until then, happy stampin'!


Stampin' Up! Supplies Used:

Table built using Product Table Builder by The Crafty Owl - Independent Stampin' Up! Demonstrator.

Snow Day Snowman Exploding Box

by Joanne James26. December 2013 20:29

Today I'm going to share another of my Christmas projects, this time a fun packaging solution for a cute chocolate snowman that I bought at my local supermarket. From the outside, it looked like a fairly straightforward nicely packaged box, complete with bow:

It's when the box is opened that the 'reveal' happens - the snowman is sitting in the middle with the inside of the box decorated with four co-ordinating stamped 'snow day' snowmen:


I love the snowman stamp set in the 'Snow Day' set and as soon as I saw the chocolate snowman I knew the two belonged together. The box base uses one 12" x 12" sheet of Crumb Cake cardstock and is a great way to turn a simple chocolate gift into something extra-special.

Today is going to be an early night for me I think; after all the food and excesses of the last few days and a lovely long walk in the fresh air this afternoon, I am absolutely shattered! Back tomorrow with another project; until then, happy stampin'!


Stampin' Up! Supplies Used:


Table built using Stampin' Up! Product Table Builder from The Crafty Owl.


Tags: , , , , , , , , , ,

3D Projects | Boxes | Stamping

New Online Exclusives

There are new products available exclusively in the online store from 5 November - check them out here.

Latest Kits!

Stampin Cut and Emboss

The Layered Landscapes Kit and Nature's Paintings Kit are the latest kits in the online store - get yours here!

Shop Online

Access my online shop 24 x 7, 365 days of the year:

Current November hostess code:

9NKXDTTR

Shop Online

Mini Catalogue

BROWSE THE CATALOGUE

'Tis The Season - the new Stampin' Up! Mini Catalogue is here! For more details and to download your copy click here

Scrapbooking

Stampin' Up! has introduced a new range of 12x12" scrapbooking product and kit - the full range is now available to purchase online. To download a copy of the new digital Scrapbooking Catalogue click here.

2024-25 Annual Catalogue

BROWSE THE CATALOGUE

Click on the image to download your copy of the 2024-25 annual catalogue. For a full list of current SU! supplies, go to my online store. If you would like any help or advice, please drop me a line at joanne@thecraftyowl.co.uk or give me a call on 07773 421446 - I'd be happy to help.

Join My Team

It's always a great time to join Stampin’ Up! New team members can get £130 worth of products for only £99 + free business supplies + free shipping + all the fun being a part of Stampin’ Up! Stampin' Up! has something for everyone: join my growing team and benefit from my support to enjoy Stampin' Up! however you choose.

If you're interested, call me for a chat to understand how I can help you realise your goals. Alternatively, if you have already decided to sign up and you just can't wait, please click here for the link to the online form where you can sign up and order your starter kit right away! 

About Me

Hi I'm Joanne and live in Northampton and when I'm not looking after my husband and two beautiful children, am an avid crafter with a passion for all things Stampin' Up!

I must confess that I have never been a big rubber stamper - until I discovered Stampin' Up! that is. I love the fact that I can get such great results with co-ordinating stamps, inks, papers and punches - the possibilities are endless! Join me on my stamping journey as I share the things I love and be inspired to create amazing things yourself!

Follow Me

Monthly Newsletter

Box Builder

Click the button above to use Box Buster to create your custom box design using the Envelope Punch Board!

Kits Collection Now Available!

Stampin Cut and Emboss

The new Kits Collection from Stampin' Up! is now available!

Click here to see the current kits available and order yours online today.

I Design For


Stampin' Up Stuff

This is my personal blog and is not endorsed by Stampin’ Up! I hope you find it a plentiful source of ideas and personal inspiration but please don't copy my designs for contest submission or use for classes, publication or sale without express permission.