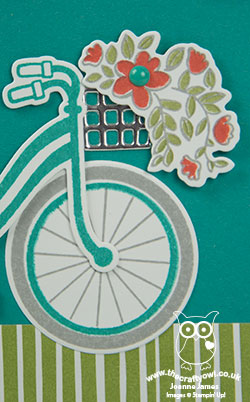
A Bermuda Bay Bike Ride For The Paper Players

by Joanne James13. August 2017 10:00

It's Sunday and time for this week's new challenge over at The Paper Players! Firstly, thanks to everyone who left such lovely comments on my High Tide square pop out swing card last week; I have a few more cards made using the same design and will be sharing a more detailed 'how to' for this fun fold, so stay tuned for more information on this one. Back to today: it's the turn of the awesomely-inspiring Sandy to host this week and she has a colour challenge for us to work with:
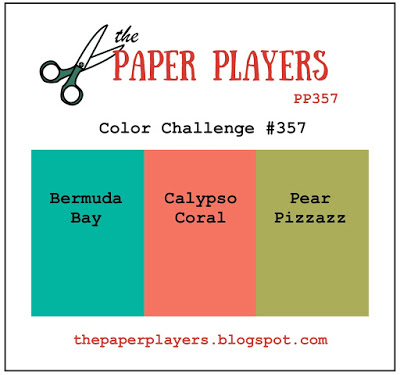
    

I must say I did find this colour palette rather challenging; the green got me thinking of flowers, but I was struggling to make the three colours work together. Instead I chose to focus on the blue and I took the opportunity to get out my Bike Ride stamp set and create a fun birthday card - take a look:
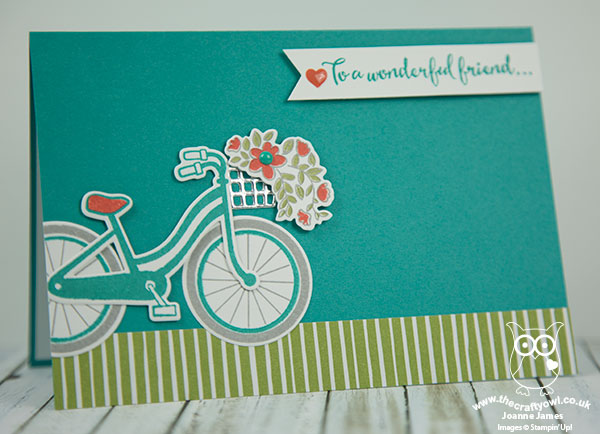
 

Here's the low-down on today's card:

Build A Bike Made Simple - This is the first time I've use my Bike Ride stamp set with the co-ordinating Build A Bike Framelits, as the cards I made with it previously were having returned from Onstage in Amsterdam where we received the stamp set only as an all-attendee giveaway but not the framelits. What a difference they make - I pieced together the pieces of my bicycle with ease and got to use the little wire basket too - love it!

Flip The Sketch And Chop The Bike - I used the sketch over at CAS Colours & Sketches for my layout today (I figured a bike is about as non-rectangular a shape as you can get!), rotating it through 180 degrees as I wanted my bike to be riding onto my card rather than off it. Patricia's sketch shows the shape appearing to hang off the edge of the card so there was nothing else for it - I chopped off the end of my bicycle! I think it works though - if anything, it adds to the sense of movement I think. 

Coffee Break Border - My card is predominantly blue, with the Pear Pizzazz and Calypso Coral featuring only in small quantities: the flowers in the basket, a heart enamel dot. I almost left it there, but I felt like I wanted to ground my bicycle and include a little more of one of the colours so added a strip of Coffee Break designer series paper with a subtle green and white stripe.


Here is the visual summary of the key products used on today's project for you to pin for easy reference:
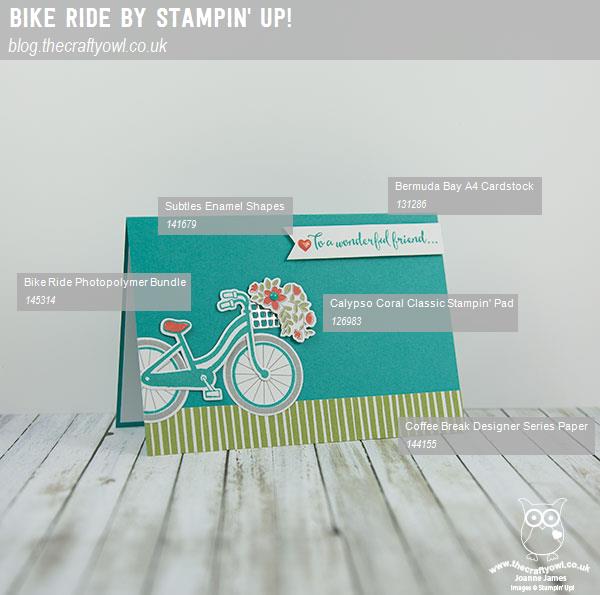
 

You can see all of my Product and 'How To' summaries on my 'How To - Tips and Techniques' Pinterest board in case you've missed any. 

Before you reach for your ink and papers, check out what our amazing team has created to inspire you this week:

The Paper Players Design Team
 
 
Here's a quick recap of our challenge rules:
 
1.  Create a new paper project
2.  Upload your creation to your blog with a link back to us and provide a direct link to the post featuring your challenge submission.
3.  Please link your card to no more than four challenges, TOTAL.
4.  Have FUN! 

I look forward to seeing what you create with this week's colour palette. Enjoy the rest of your weekend - we are continuing with Ben's weekend of birthday celebrations, so lots of fun to be had here! I'll be back tomorrow with another project; until then, happy stampin'!


Stampin' Up! Supplies Used: 

Table built using Product Table Builder by The Crafty Owl - Independent Stampin' Up! Demonstrator.

Dragonfly Dreams Layered Dragonfly Card for #GDP083 And A New Class To Go

by Joanne James20. April 2017 20:54

Today I'm sharing a card for this week's challenge over at The Global Design Project where it's all about the sparkle and bling:

I immediately thought 'glimmer paper' for this challenge, but ended up creating a card that had plenty of shine from the copper elements and my glimmer sparkle was somewhat understated - take a look:


Here's the low-down on today's card:

Copper Trio - Most of the shine on my card comes from the trio of copper elements I've used for the mat, dragonfly and sentiment: copper foil, copper embossing powder and copper metallic thread. These co-ordinate beautifully with the white and Blushing Bride elements elsewhere on my card and definitely add a luxurious feel.

A Glimmer Of Dragonflies - I created a collection of silhouetted dragonflies by using one of the Detailed Dragonfly Thinlits to create a stencil that I then used to sponge my central panel with some Blushing Bride ink. Did you know that the collective term for a group of dragonflies is generally acknowledged to be a 'cluster', but in some circles it is also believed to be a 'glimmer' or a 'beauty'? How lovely is that?

Farewell, Blushing Bride Glimmer - Finally I layered my large diecut dragonfly, using a base of Blushing Bride Glimmer Paper, then vellum and finally copper foil. The angle of the photo doesn't reveal much of the soft pink glimmer paper and it is much easier to see all three layers distinctly in real life - it adds a subtle sparkle that ties in with the sponged panel perfectly. Blushing Bride Glimmer Paper is another of those products on the retirement list that will be leaving us by the end of May but would be easy to overlook, so if you need to stock up be sure to do so whilst stocks last.

This is one of the cards that I designed for my recent Dragonfly Dreams Technique class that featured a variety of ink techniques using this set and I think has to be my favourite of the trio. I'm so glad that this stamp set and framelits are carrying over into the new annual catalogue, although this will be without the 10% bundle saving for purchasing both items together. I will be running this technique class again in person on Monday 3rd July if you live in or around Northampton and would like to attend; however I also have a special offer for anyone who purchases the Dragonfly Dreams bundle through my online store before the 31st May - you will receive this class as a 'Class To Go' with the materials, full written instructions and accompanying step-by-step video tutorials FOR FREE in the post following your purchase (please remember to quote the current hostess code in the sidebar in order to qualify).

Here is the visual summary of the key products used on today's project for you to pin for easy reference:


You can see all of my 'How To' summaries on my 'How To - Tips and Techniques' Pinterest board in case you've missed any. 

I'll be back tomorrow with another project. Until then, happy stampin'!


Stampin' Up! Supplies Used:

Table built using Product Table Builder by The Crafty Owl - Independent Stampin' Up! Demonstrator.


Bees and Honeycomb To A Wonderful Friend

by Joanne James11. March 2017 14:12

I've a busy day today - out for a netball match this morning, then school Spring fair and a swimming gala for both James Juniors this evening, so I'm squeezing in my blog post whilst everyone else is doing homework before heading out the front door again for the next activity of the day!

Today I'm sharing a card that I made whilst preparing for this month's technique class featuring the Dragonfly Dreams bundle. In addition to featuring a particular technique in these classes, I also try and use each of the stamps in the set. My technique classes are product-based and always feature one particular stamp set or product bundle and I like to give my class attendees as many ideas as possible for how they can continue to create with their sets long after the class has finished. The techniques in this month's class are all around sponging in various forms and as this card doesn't have any sponging, it didn't make the class cut. I still love it though and since I'm always encouraging my ladies to check out my blog for additional ideas, it's right and proper that I share it with you today - take a look:


 Here's the low-down on today's card:

Dragonfly Dreams of Bees - I chose to use the bee stamp from the Dragonfly Dreams stamp set for my card today, stamping and fussy cutting two of them to frame my circle of honeycomb. I could have just as easily cut these bees out with their coordinating thinlit, however I didn't want to loose the detail on the wings for my card. I left the bee bodies matt black with just a little yellow coloured in, but their wings in real life are so pretty: I brushed each liberally with clear Wink of Stella then when dry covered that with a further layer of fine tip glue and left it to dry. The result is some beautifully glossy, shimmery wings - just like the real thing.

Hexagonal Honeycomb - I placed my bees either side of a 1 3/4" punched circle, with a layer of Daffodil Delight behind that I had embossed with my Hexagons Dynamic Textured Impressions Embossing Folder (TIEF). This is one of the new embossing folders that gives a deep, dimensional embossed impression - just like real honeycomb!

Pollen Border - To finish, I added a border of dots using the border stamp in the Dragonfly Dreams stamp set, along the bottom of my card. This is one of those really useful stamps that will work both with the stamps in the same set and others; here it reminded me of pollen, given that my bees were not too far away! It's also perfect for the new challenge over at As You See It - check out their 'seeing spots' sketch inspiration this week:

Here is the visual summary of the key products used on today's project for you to pin for easy reference:


You can see all of my 'How To' summaries on my 'How To - Tips and Techniques' Pinterest board in case you've missed any. 

If you like this card and would be interested in my Technique Class featuring the Dragonfly Dreams Bundle, do get in touch. I will be offering this as a 'Class to Go' free with a purchase of the Dragonfly Dreams Bundle from my online store and will be featuring further cards from this set later this week, so stay tuned.

Enjoy the rest of your day and I'll be back tomorrow with another project for this week's new colour challenge over at The Paper Players. Until then, happy stampin'!


Stampin' Up! Supplies Used:

Table built using Product Table Builder by The Crafty Owl - Independent Stampin' Up! Demonstrator.

Clean and Simple Dragonfly Dreams

by Joanne James30. January 2017 07:00

Today I'm sharing a card that uses the sketch over at CAS(E) This Sketch and the clean and simple challenge over at CASology:


I'm a big fan of the sketches over at CAS(E) This Sketch and had quite a few interpretations on this one and for today chose to combine with the codeword over at CASology: Glisten. I love how a single word can really make you think creatively and sometimes takes your cardmaking into unexpected directions - here's my card:


Here's the low-down on today's card:

All That Glistens - When I consider the word 'glistens', I think of shining light, usually on water or frost, or maybe something transparent or translucent. I decided this sketch would be perfect to showcase a lone dragonfly, with sparkly, translucent wings. I stamped my dragonfly in Versamark onto vellum and heat embossed it in gold, then coated the wings with a liberal dose of clear Wink of Stella. I used Shimmer White cardstock which also has a subtle lustre and added some clear accents to act as raindrops and tie in with the theme. It is so difficult to capture the shimmer in a photograph - here's a close up:


Here's a further close-up of the dragonfly's wings, where you can just about see the sparkle from the clear Wink of Stella - it really looks so beautiful in real life:

A Dragonfly Dream - The single dragonfly is from the Dragonfly Dreams set in the Spring-Summer catalogue and was easily cut out using the co-ordinating Detailed Dragonfly Thinlit Dies. This is one of a number of bundles in the seasonal catalogue - if you buy both items you will save 10%. A great baargain - add a little something to it and you can benefit from a free Sale-A-Bration item too (with an order of £45 or more).

A Trick Of The Light - I added a panel of Serene Scenery designer series paper to the base of my card, to add a little colour and tie in with the theme with this 'bokeh' effect, which is often the resulting effect when light is photographed as it glistens on water or rain. Patterned paper can still feature in a 'clean and simple' design; the trick is to use sparingly; a good rule of thumb is to restrict its use to no more than one third of the overall card design.

Here is the visual summary of the key products used on today's project for you to pin for easy reference:


You can see all of my 'How To' summaries on my 'How To - Tips and Techniques' Pinterest board in case you've missed any. 

Enjoy your day and I'll be back tomorrow with another project. Until then, happy stampin'!


Stampin' Up! Supplies Used:

Table built using Product Table Builder by The Crafty Owl - Independent Stampin' Up! Demonstrator.

New Online Exclusives

There are new products available exclusively in the online store from 5 November - check them out here.

Latest Kits!

Stampin Cut and Emboss

The Layered Landscapes Kit and Nature's Paintings Kit are the latest kits in the online store - get yours here!

Shop Online

Access my online shop 24 x 7, 365 days of the year:

Current November hostess code:

9NKXDTTR

Shop Online

Mini Catalogue

BROWSE THE CATALOGUE

'Tis The Season - the new Stampin' Up! Mini Catalogue is here! For more details and to download your copy click here

Scrapbooking

Stampin' Up! has introduced a new range of 12x12" scrapbooking product and kit - the full range is now available to purchase online. To download a copy of the new digital Scrapbooking Catalogue click here.

2024-25 Annual Catalogue

BROWSE THE CATALOGUE

Click on the image to download your copy of the 2024-25 annual catalogue. For a full list of current SU! supplies, go to my online store. If you would like any help or advice, please drop me a line at joanne@thecraftyowl.co.uk or give me a call on 07773 421446 - I'd be happy to help.

Join My Team

It's always a great time to join Stampin’ Up! New team members can get £130 worth of products for only £99 + free business supplies + free shipping + all the fun being a part of Stampin’ Up! Stampin' Up! has something for everyone: join my growing team and benefit from my support to enjoy Stampin' Up! however you choose.

If you're interested, call me for a chat to understand how I can help you realise your goals. Alternatively, if you have already decided to sign up and you just can't wait, please click here for the link to the online form where you can sign up and order your starter kit right away! 

About Me

Hi I'm Joanne and live in Northampton and when I'm not looking after my husband and two beautiful children, am an avid crafter with a passion for all things Stampin' Up!

I must confess that I have never been a big rubber stamper - until I discovered Stampin' Up! that is. I love the fact that I can get such great results with co-ordinating stamps, inks, papers and punches - the possibilities are endless! Join me on my stamping journey as I share the things I love and be inspired to create amazing things yourself!

Follow Me

Monthly Newsletter

Box Builder

Click the button above to use Box Buster to create your custom box design using the Envelope Punch Board!

Kits Collection Now Available!

Stampin Cut and Emboss

The new Kits Collection from Stampin' Up! is now available!

Click here to see the current kits available and order yours online today.

I Design For


Stampin' Up Stuff

This is my personal blog and is not endorsed by Stampin’ Up! I hope you find it a plentiful source of ideas and personal inspiration but please don't copy my designs for contest submission or use for classes, publication or sale without express permission.