Miss You, Just Sayin CCS593

by Joanne James1. September 2026 12:00

It's Tuesday and time for a new challenge over at CAS Colours & SketchesThis week's challenge is a sketch challenge and Amanda has asked that we feature four staggered elements, one of which should feature a sentiment. Feel free to flip or rotate the sketch when making your card.


For my card today I knew exactly what I was going to do when I saw the sketch - those 4 elements immediately reminded me of speech bubbles so I grabbed some scraps of card stock (perfect for the current challenge over at Inspire.Create) and my retired Word bubble framelits and 'Just Sayin'' stamp set and set to work. Take a look at what I came up with:


Here's the low-down on today's card:

I diecut a trio of blank speech bubbles and a third which I first stamped with my sentiment in Night of Navy, to which I added a pink enamel heart:


I added a colour-coordinated border and realised in hindsight I could have cut the three speech bubbles directly out of my white layer and allowed the colour beneath to show through the negative space - next time! This card will make a cute card for the James Junior once he is back at uni. Not long to go now - it feels like his summer at home has lasted forever!

So how will you interpret this week's sketch? Join us in the gallery with your interpretations, we would love to see them.

As a reminder, for our colour challenges, you must use all of the stated challenge colours. You may also use neutral colours; however, the challenge colours should be the most noticeable ones featured on your card. We use Stampin' Up! colour names for reference, but you are welcome to use any other companies' products as long as you match the challenge colours as closely as possible.

Enjoy your day and I'll be back tomorrow with another project. Until then, happy stampin'!


Stampin' Up! Supplies Used:


Life Is Sweet With Sweetest Cherries For AYSI380

by Joanne James28. August 2026 13:00

Today I'm sharing my design team card for our new challenge over at As you See It where it's time for a sketch challenge chosen by Heather H:


This panelled sketch is a great one to showcase some beautiful patterned paper that you've been hoarding or maybe a pretty embossing folder. I decided that it was a great opportunity to use some designer paper and when I saw the inspiration photo over at Hand Stamped Sentiments I knew I had just the thing - take a look:


Here's the low-down on today's card:

The larger than life cherry stem on a subtle patterned background caught my eye immediately when I saw the HSS inspiration photo and I knew I had some cherry-patterned DSP in my stash that would work. The Sunny Days DSP design has a faint Smoky Slate diagonal line background pattern to it, so I used a grey mat layer then added my DSP panels. I wanted a large swirly sentiment that would pick up on the over-the-top green bow that the cherry is tied with in the inspo photo and initially diecut the word 'sending' from the retired Sending Dies, but then decided that the word 'sweet' from the retired 'Sweetest Cherries' stamp set would also work, so I stamped it in Shaded Spruce and fussy cut that instead, along with a cherry stem as an accent:


I completed the sentiment inside my card with 'with you in it', the perfect card to accompany a gift that I need to send out to a dear friend this week.

Here is the visual summary of the key products used on today's project for you to pin for easy reference:


You can see all of my 'How To' summaries on my 'How To - Tips and Techniques' Pinterest board in case you've missed any. 

Here's a summary of our challenge rules:

  • Create any card, scrapbooking page, 3D or packaging project that fits the challenge.
  • Please include the challenge graphic and link back to the challenge in your post.
  • Make sure you link the specific post and not the whole blog to the Linky. Use AYSI#(insert challenge number) when uploading to a public gallery
  • Please turn off word verification so that we can send you lots of feedback.
  • You can combine our challenge with up to 3 other compatible challenges. 
  • We do reserve the right to delete, or not consider for Top Pick and Featured Artist, entries that do not comply with these guidelines.
We look forward to seeing your creations in the AYSI gallery.

Enjoy your day and I'll be back soon with another project. Until then, happy stampin'!

A Birthday Highland Cow For CCS592

by Joanne James18. August 2026 12:00

It's Tuesday and time for a new challenge over at CAS Colours & Sketches. Amanda is hosting the next two challenges and her first one is a colour challenge: 


I wasn't sure about Amanda's chosen colours when I first saw them, but I had recently purchased the 'Highland Cows' set by Lawn Fawn and decided Pecan Pie would be great for a farmyard friend, so that was my starting point. Take a look at where I ended up:


Here's the low-down on today's card:

I cut and coloured one of the highland cows in Pecan Pie, using a neutral ivory Blend for his hair and decided to give him a striped party hat to incorporate the other two colours. Once I'd done this, I felt my base looked a little too plain, so I grabbed an old dot patterned stencil and added some of each colour, blended into a rough circle to go behind my cow:


 Everything was going swimmingly, until I realised I had a couple of black smudges on my white card base. I trimmed down my base, but had to take off more than was ideal to just sit it on another plain card base. I decided to add in another layer with a wider border top and bottom to balance the proportions and actually created a split layer from the same colours I used for the hat and dots. 

Since I'd used a fun, punny sentiment on the front of my card, I thought I would continue it to the inside of my card and added another partying highland cow for good measure:


Whilst my smudging resulted in me needing another layer that I would not ordinarily have included on a CAS card, I love the finished effect and the additional pop of colour. Great choice Amanda!

I'm also linking my card up over at Time Out Challenges where my 'choose 2' are CAS and birthday.

As a reminder, for our colour challenges, you must use all of the stated challenge colours. You may also use neutral colours; however, the challenge colours should be the most noticeable ones featured on your card. We use Stampin' Up! colour names for reference, but you are welcome to use any other companies' products as long as you match the challenge colours as closely as possible.

It has finally cooled a little here in the UK, so I am looking forward to spending some extra time in my craft room today whilst the furniture upholsterer is downstairs re-upholstering my dining room chairs! Enjoy your day and I'll be back tomorrow with another project. Until then, happy stampin'!


Stampin' Up! Supplies Used:

Table built using Product Table Builder by The Crafty Owl - Independent Stampin' Up! Demonstrator.
 

A Trio of Quick Crafty Cards AYSI379

by Joanne James14. August 2026 13:00

Today I'm sharing my design team card for our new challenge over at As you See It where it's time for a speed challenge with the theme chosen by Heather C:


Crafting - that's a theme close to all our hearts, right? And quick crafting at that - you have to make your cards in 10 minutes or less. I don't have any current product with a crafting theme, so dug out a whole bunch of retired bits and pieces and ended up making not one but three cards with a crafting theme - and 2 of them took less than 10 minutes to complete! I'm also playing along with a few challenges. So my first card uses the layout over at The Paper Craft Crew:
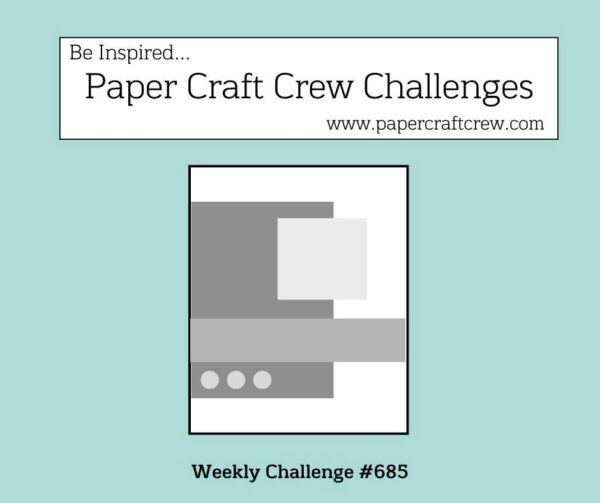
The sketch has lots of layers, however this doesn't have to mean time-consuming; take a look at what I came up with:


I embossed my card base with the Button Button Embossing Folder, then added a panel of Follow Your Art designer paper. A stamped sentiment from 'Crafting With You' cut with a scalloped stitched die is the next layer, followed by some co-ordinating twine and buttons to finish:


how long did it take? Just 4 minutes and 29 seconds!

This card was mostly cutting and gluing so didn't take long at all to construct. Since I still had all of my crafting paraphenalia out on my desk, I thought I'd make a second card - take a look:


This time much more clean and simple and using nothing more than a little stamping and colouring with my Stampin' Blends in the colours of the current challenge over at Color Dare:

I used a sentiment from 'It Starts With Art' and coloured the ribbons with my Stampin' Blends, before diecutting them and popping on dimensionals. I added a trio of coordinating enamel dots to finish:


At 8 minutes 12 seconds, his one still came in under the 10 minute mark:


Whilst there isn't much colouring, this does take more time - something to bear in mind when you are making a 'quick' card. My final card uses the sketch over at Sunday Stamps:

This layout was perfect to showcase this cute little hedgehog artist which I fussy cut from the Zoo Crew designer series paper:


There was the slightest hint of colour on the image, so I picked up the pale pink and heart motif and added some tone-on-tone stencilling to my card base using one of my Kristina Werner Jumble of Hearts stencils. along with a simple horizontal banner using Stacked with Love DSP and a sentiment from 'It Starts With Art':


This card did not come in under 10 minutes though:


I think the fussy cutting is just a little too challenging for a speed challenge! Good job Sunday Stamps are not counting lol!

If you would like to embrace creating at speed for our challenge over at As You See It this week, here's a summary of our challenge rules:

  • Create any card, scrapbooking page, 3D or packaging project that fits the challenge.
  • For a Speed Stamping Challenge you must tell us the time it took to make your project and it must be finished in under 10 min.
  • Please include the challenge graphic and link back to the challenge in your post.
  • Make sure you link the specific post and not the whole blog to the Linky. Use AYSI#(insert challenge number) when uploading to a public gallery
  • Please turn off word verification so that we can send you lots of feedback.
  • You can combine our challenge with up to 3 other compatible challenges. 
  • We do reserve the right to delete, or not consider for Top Pick and Featured Artist, entries that do not comply with these guidelines.
We look forward to seeing your creations in the AYSI gallery.

Enjoy your day and I'll be back tomorrow with another project. Until then, happy stampin'!


Clean And Simple Masculine Birthday Card CCS591

by Joanne James4. August 2026 12:00

It's Tuesday and time for a new challenge over at CAS Colours & Sketches Suzy is hosting this month and our first challenge is a sketch challenge consisting of a panel with a slightly overlapping sentiment: 


Feel free to flip or rotate the sketch when making your card.

For my card today I couldn't wait to use the new colour combo over at Color Hues along with some other new products for a clean and simple masculine birthday card - take a look:


Here's the low-down on today's card:

I recently won a Uniko gift voucher in the challenge over at Time Out and I used it towards some new stencils and I thought I'd give one of them a try on my card today. I used the MOD Background Builder Stencil, masking off the cross section to give me a broadly rectangular shape, and stencilled it onto my card using one of my favourite teals, (retired) Bermuda Bay. I then added a stamped and diecut sentiment using my Big Day Birthday Dies from Kristina Werner and Concord & 9th, popping the diecut piece up on dimensionals:


A sprinkle of shimmery Night of Navy enamel dots to accent the stencilled pattern and the sentiment complete my clean and simple masculine birthday card. Super simple, but effective - just the way I like a CAS card to be! 

Enjoy your day; I've already done my session at the gym today and I have some desk-based bits and pieces to deal with today and will hopefully manage to squeeze in a little crafty time too - it's still to hot here for a lot else! All being well I'll be back tomorrow with another project. Until then, happy stampin'!

A Sunny Splash and Relax For AYSI378

by Joanne James31. July 2026 12:00

Today I'm sharing my design team card for our new challenge over at As you See It where it's time for a seasonal theme challenge, chosen by Deborah:


Summer days - for me that means sunshine, vacations, pools and the beach! I took my inspiration from Kim's layout over at Freshly Made Sketches this week and used it to bring together the perfect collection of items for fun in the sun - take a look:


 Here's the low-down on today's card:

I used my (retired) Soft Waves 3D embossing folder on Balmy Blue cardstock for my background, then added a collection of items - a rubber ring, flip flops, a drinks beaker, sun visor and sunglasses - from the Splash & Relax bundle to represent the circles. Since I didn't choose an identical object/image to represent the circles, I decided to colour them all in yellow and white to still give the collection of items a homogenous feel. I added a stamped sentiment from the set, then decided to snip it into two pieces and eventually I replace the 'hello' with this swirly diecut using hte retired Hello You Thinlits as I wanted something larger:


 Once again I customised my flip flops with some cute flowers - and that completes my card for today! So what do summer days mean to you? Link your card up to the gallery and share your inspiration.

Here is the visual summary of the key products used on today's project for you to pin for easy reference:


You can see all of my 'How To' summaries on my 'How To - Tips and Techniques' Pinterest board in case you've missed any. 

Here's a summary of our challenge rules:

  • Create any card, scrapbooking page, 3D or packaging project that fits the challenge.
  • Please include the challenge graphic and link back to the challenge in your post.
  • Make sure you link the specific post and not the whole blog to the Linky. Use AYSI#(insert challenge number) when uploading to a public gallery
  • Please turn off word verification so that we can send you lots of feedback.
  • You can combine our challenge with up to 3 other compatible challenges. 
  • We do reserve the right to delete, or not consider for Top Pick and Featured Artist, entries that do not comply with these guidelines.
We look forward to seeing your creations in the AYSI gallery.

Enjoy your day and I'll be back tomorrow with another project. Until then, happy stampin'!


Stampin' Up! Supplies Used:

Table built using Product Table Builder by The Crafty Owl - Independent Stampin' Up! Demonstrator.

Dainty Delight For CCS590

by Joanne James21. July 2026 12:00

It's Tuesday and time for a new challenge over at CAS Colours & Sketches. I'm hosting this month and our second challenge is a colour challenge: 


There are lots of ways you can use these colours, although I did go with the rather predictable floral option! I'm also playing along over at CAS On Friday where they have a 'dies and stamped words only' challenge. For my card today I chose an old favourite - the Dainty Delight bundle:


Here's the low-down on today's card:

I love the pretty arc of dainty flowers that the dies in this set creates and the subtle embossed detail on the leaves and flower centres add a subtle detail that is perfect for a clean and simple card. Since I also had the bundled stamp set of the same name out on the desk, I added a thank you greeting to complete my card:


Super simple today - doing my best to keep things CAS! What will you create with this week's colours?

Here is the visual summary of the key products used on today's project for you to pin for easy reference:


You can see all of my 'How To' summaries on my 'How To - Tips and Techniques' Pinterest board in case you've missed any. 

As a reminder, for our colour challenges, you must use all of the stated challenge colours. You may also use neutral colours; however, the challenge colours should be the most noticeable ones featured on your card. We use Stampin' Up! colour names for reference, but you are welcome to use any other companies' products as long as you match the challenge colours as closely as possible.

Enjoy your day; I have a day of at home today catching up on my to-do list. I'll be back later in the week with another project. Until then, happy stampin'!


Stampin' Up! Supplies Used:

Table built using Product Table Builder by The Crafty Owl - Independent Stampin' Up! Demonstrator.
 

Get Well Soon Embossed Sunflowers AYSI377

by Joanne James17. July 2026 12:00

Today I'm sharing my design team card for our new challenge over at As you See It where it's time for a recipe challenge chosen by me:


I made a recipe including some of my favourite things, with no particular outcome in mind when I chose them ages ago. When it came to making my card though, I took my inspiration from one of the cards entered into our embossing folder challenge last week! Here's my card - take a look and I'll explain more below:


 Here's the low-down on today's card:

The first entrant into our gallery for our last challenge, Hilary, had made a number of cards using her favourite embossing folders and a technique that involved embossing cardstock with a vellum overlay. You can see Hilary's cards on her blog 'Fiddling About' here if you missed them, but I was so intrigued by the technique, I decided I would take the opportunity to give it a go. And since yellow and flowers were 2 of my recipe ingredients, I decided to use my Sunflowers 3D embossing folder and see what happened. I tried it a few different ways as I wasn't sure how Hilary had attached her vellum and cardstock and found the most effective result to be when I attached a sheet of vellum to my cardstock using an adhesive sheet that covered the whole surface, before putting the combined layers into the embossing folder and running through my Big Shot. By using an adhesive sheet, you get the white detail of the embossed vellum, but you can still see a vibrant yellow beneath; without the whole adhesive sheet, the yellow was more muted and the relief was much whiter because of the vellum. The close up below gives a more detailed view of the finished embossed pattern:


I paired by yellow sunflowers with a bright yellow diecut sentiment, get well soon, from Kristina Werner's Big Type 2 Greetings Dies. I cut 3 of them and stacked them together for added depth and used a retired circle framelit to cut away the corner of the embossed layer and added my greeting to the Night of Navy mat layer below in the negative space created. That accounted for both a diecut and a large, bold sentiment. All that was left still to use from my recipe were some enamel dot embellishments, so I added two glossy yellow ones from my stash to complete my card.

Here is the visual summary of the key products used on today's project for you to pin for easy reference:


You can see all of my 'How To' summaries on my 'How To - Tips and Techniques' Pinterest board in case you've missed any. 

Here's a summary of our challenge rules:

  • Create any card, scrapbooking page, 3D or packaging project that fits the challenge.
  • For a Recipe Challenge use all elements of the recipe - the possibilities within those parameters are endless.
  • Please include the challenge graphic and link back to the challenge in your post.
  • Make sure you link the specific post and not the whole blog to the Linky. Use AYSI#(insert challenge number) when uploading to a public gallery
  • Please turn off word verification so that we can send you lots of feedback.
  • You can combine our challenge with up to 3 other compatible challenges. 
  • We do reserve the right to delete, or not consider for Top Pick and Featured Artist, entries that do not comply with these guidelines.
We look forward to seeing your creations in the AYSI gallery.

Enjoy your day; mine's a busy one with gym, laundry and lunch out and a music concert at a local stately home this evening. I'll be back tomorrow with another project. Until then, happy stampin'!


Stampin' Up! Supplies Used:

Table built using Product Table Builder by The Crafty Owl - Independent Stampin' Up! Demonstrator.

Splash & Relax Lemon Refresher CCS589

by Joanne James7. July 2026 12:00

It's Tuesday and time for a new challenge over at CAS Colours & Sketches. I am hosting this month and our first challenge is a sketch challenge, with a layered cluster of images in the opposing corner to the sentiment: 


Feel free to flip or rotate the sketch when making your card.

For my card today I took my inspiration from the photo over at Inkspirational and raided my scraps box  for the bits and pieces I needed to make my card. Take a look:


Here's the low-down on today's card:

I knew I wanted the drinks beaker from Splash & Relax as my focal point, but wanted to incorporate the lemons and florals too. Some snippets of Best Dressed and Tea Boutique DSP, along with a banner in yellow and a stamped lemon slice (ret. Cute Fruit) gave me my other elements, which I balanced with a trio of enamel dots and a sentiment from the retired Sweet Citrus stamp set:


It's fun to layer lots of small pieces together in this way and whilst there is more than I would usually include on a CAS card, all of the detail is concentrated in one area leaving lots of open white space to keep the clean and simple feel. It's also a great way to use up scraps and bits and pieces left over from other projects. Please excuse today's photos; I was struggling with the super bright sunshine when I took them and there are a few light spots I didn't see on first glance and I didn't have time to retake them.

Here is the visual summary of the key products used on today's project for you to pin for easy reference:


You can see all of my 'How To' summaries on my 'How To - Tips and Techniques' Pinterest board in case you've missed any. 

Enjoy your day; I am actually driving to Oxford today to have lunch with my CAS Colours & Sketches teamie Rachel who is currently visiting the UK on vacation, so that will be fun! I'll be back tomorrow with another project. Until then, happy stampin'!


Stampin' Up! Supplies Used:

Table built using Product Table Builder by The Crafty Owl - Independent Stampin' Up! Demonstrator.

Christmas In Colour Charming Landscapes AYSI376

by Joanne James3. July 2026 12:00

Today I'm sharing my design team card for our new challenge over at As you See It where it's time for a fun 'fill in the blank' challenge chosen by LeAnne:


My favourite embossing folder - hmm! I have a large collection of embossing folders, but don't tend to use them all that much. I do have a few firm favourites though and one of my favourite Christmas ones is this retired one from the pair called 'Charming Landscapes - which I'm also sharing with 52 Christmas Card Throwdown for their embossing folder challenge this week. Here's my card:


Here's the low-down on today's card:

I love this cute row of quirky houses nestled amongst the snowy landscape and whilst it looks great in white, I also like to mask off the foreground, buildings and trees and add colour to the sky using ink and blending brushes. For today's card I used two of the new In Colours, Hydrangea Hue and Barely Blush, with a little retired Purple Posy in between: 


I painted in the embossed stars and snowflakes with a white gel pen and some clear Wink of Stella and added a few rhinestones, then grabbed a simple Merry Christmas sentiment from one of the sets on my shelf to complete my card. I use this embossing folder every year to add Christmas cards to my stash!

Here's a summary of our challenge rules:

  • Create any card, scrapbooking page, 3D or packaging project that fits the challenge.
  • For a Fill In The Blank Challenge complete the sentence - and use a project that demonstrates this.
  • Please include the challenge graphic and link back to the challenge in your post.
  • Make sure you link the specific post and not the whole blog to the Linky. Use AYSI#(insert challenge number) when uploading to a public gallery
  • Please turn off word verification so that we can send you lots of feedback.
  • You can combine our challenge with up to 3 other compatible challenges. 
  • We do reserve the right to delete, or not consider for Top Pick and Featured Artist, entries that do not comply with these guidelines.
We look forward to seeing your creations in the AYSI gallery.

Enjoy your day and I'll be back tomorrow with another project. Until then, happy stampin'!


Stampin' Up! Supplies Used:

Table built using Product Table Builder by The Crafty Owl - Independent Stampin' Up! Demonstrator.

2026 May-Aug Catalogue

The Stampin' Up! 2026 May-Aug Catalogue is now live! Click on the image to download your copy.

Product of The Month

Stampin Cut and Emboss

The exclusive Product of the Month can be yours for only £5 when you spend £70 or more in a single order. Make sure you purchase ASAP because once it's sold out, it's gone for good! See this month's exclusive product here.

Shop Online

Access my online shop 24 x 7, 365 days of the year:

Shop Online

New Online Exclusives

There are new products available exclusively in the online store from 5 May - check them out here.

Stampin' Up! Craft Classes

The Paper Mixer class featuring the Paper Medley Mix-In Designer Series Paper will be held on 21 May and is available to purchase from 5 May; get the full details here.

Paper Pumpkin

Paper Pumpkin is now here in the UK! The monthly subscription window is from 11th of the month. Sign up for yours here!

Latest Kits!

Stampin Cut and Emboss

Serene Scenes and Pretty Party are the latest kit additions to the online store - get yours here!

Join My Team

It's always a great time to join Stampin’ Up! New team members can get £130 worth of products for only £99 + free business supplies + free shipping + all the fun being a part of Stampin’ Up! Stampin' Up! has something for everyone: join my growing team and benefit from my support to enjoy Stampin' Up! however you choose. 

If you're interested, call me for a chat to understand how I can help you realise your goals. Alternatively, if you have already decided to sign up and you just can't wait, please click here for the link to the online form where you can sign up and order your starter kit right away! 

About Me

Hi I'm Joanne and live in Northampton and when I'm not looking after my husband and two beautiful children, am an avid crafter with a passion for all things Stampin' Up!

I must confess that I have never been a big rubber stamper - until I discovered Stampin' Up! that is. I love the fact that I can get such great results with co-ordinating stamps, inks, papers and punches - the possibilities are endless! Join me on my stamping journey as I share the things I love and be inspired to create amazing things yourself!

Follow Me

Monthly Newsletter

Box Builder

Click the button above to use Box Buster to create your custom box design using the Envelope Punch Board!

I Design For


Stampin' Up Stuff

This is my personal blog and is not endorsed by Stampin’ Up! Stampin' Up! is a registered trademark of Stampin' up! Inc. I hope you find my blog a plentiful source of ideas and personal inspiration but please don't copy my designs for contest submission or use for classes, publication or sale without express permission.