Paper Florist Meet Petal Patterns PP685

by Joanne James14. April 2024 08:00


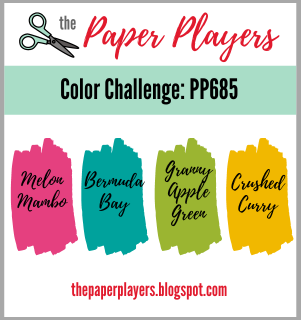
Today it's Sunday and time for this week's new challenge over at The Paper Players! It's the turn of the fabulous Claire to host this week and she has a bright colour challenge for us to work with:
          Tic Tac Toe Challenge #245

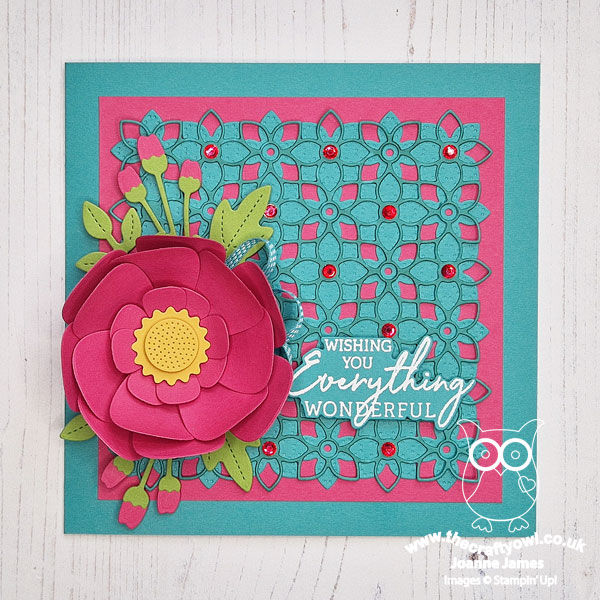
I love brights so was excited to get to work with Claire's chosen colours this week. I decided to go square this week and use the fabulous Jen T's sketch over at Freshly Made Sketches this week for the layout of my special birthday card - take a look:


Here's the low-down on today's card:

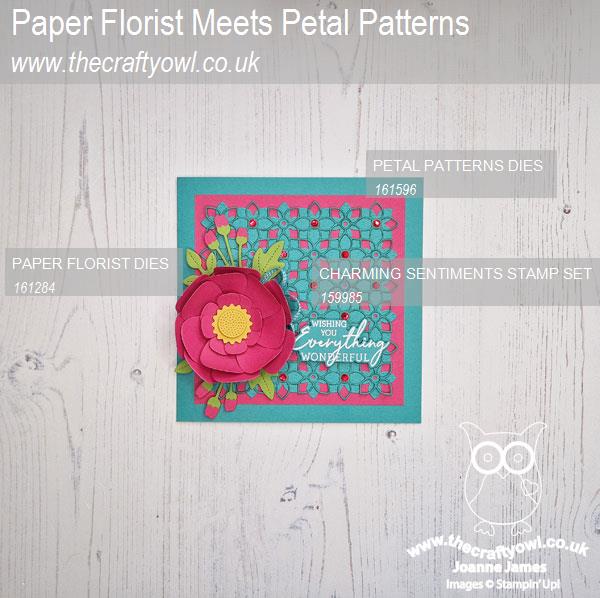
Petal Patterns Background - Since I was going with a square card today, I decided to use my Petal Patterns Dies for my background. I diecut them in Bermuda Bay and layered them onto a piece of Melon mambo onto my Bermuda Bay cardbase. I offset the top layer and before I glued it to the solid layer, I went over the outline die with my light Bermuda Bay Stampin' Blends marker to make it stand out more. I also added some rhinestones that I had coloured with my Melon Mambo Stampin' Blends marker to the centre of the flowers to highlight the pink. 

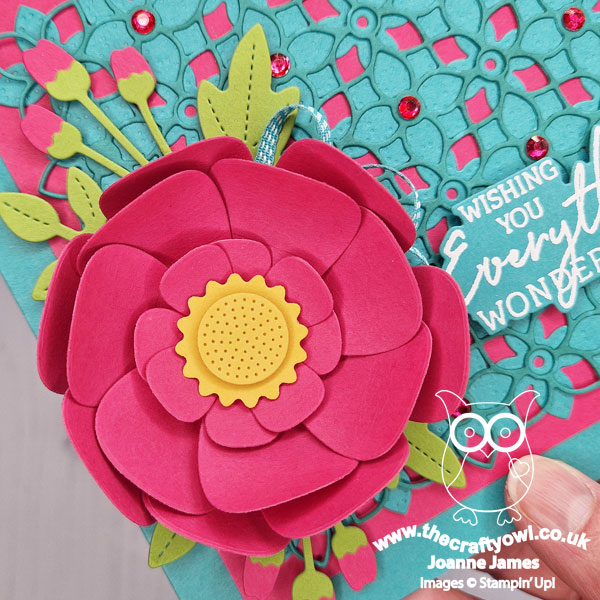
Paper Florist Dies Flower - The background would look pretty on its own, but the focal point of today's card is most certainly the over-the-top flower that I created using the Paper Florist Dies. I wanted to create a peony-type flower that was full of dimension, so I layered the centre then kept adding the outer petals until I was happy. I added some diecut leaves and flower buds behind it and a few loops of Bermuda Bay ribbon from my stash - isn't it pretty?

All those layers make this the perfect card to share with the team over at The Flower Challenge where their current challenge is to 'add layers'.

And A Charming Sentiment - I finished my card with a heat-embossed sentiment from the 'Charming Sentiments' stamp set, diecut with the co-ordinating Sentiment Silhouettes Dies. This is also the final part of my middle column for the challenge over at TicTacToe Challenge this week (square card/diecut/embossing)

Here is the visual summary of the key products used on today's project for you to pin for easy reference:


You can see all of my Product and 'How To' summaries on my 'How To - Tips and Techniques' Pinterest board in case you've missed any. 

Since this card won't fit into an envelope, I am going to make a co-ordinating box to present it in. This is a special card for someone with a milestone birthday later in the year, so it will be worth the effort. I really love the 3D effect of this card! Everything on this card is either retired (Bermuda Bay) or is due to retire at the end of the month; this will be the last opportunity to purchase any of the dies or the stamp set that I used on today's card, so if they are on your wishlist, you don't have long to act.

Before you reach for your ink and papers, check out what our amazing team has created to inspire you this week:

Here's a quick recap of our challenge rules:
 
1.  Create a new paper project
2.  Upload your creation to your blog with a link back to us and provide a direct link to the post featuring your challenge submission.
3.  Please link your card to no more than four challenges, TOTAL.
4.  Have FUN!

Enjoy your day; the hubby is off to Washington DC for the week today, so it will be just the youngest of the James Juniors and I at home. Since there is another week of school holiday to go, I am taking the opportunity to get some decorating done so my week will be a busy one. Never fear - I have some things to share here too though so be sure to pop by this week.  I'll be back tomorrow with another project. Until then, happy stampin'!


Stampin' Up! Supplies Used: 

Table built using Product Table Builder by The Crafty Owl - Independent Stampin' Up! Demonstrator.

Birds Eye View Trio PP682

by Joanne James24. March 2024 08:00

Today it's Sunday and time for this week's new challenge over at The Paper Players! It's the turn of the fabulous LeAnne to host this week and she has my favourite, a sketch challenge for us to work with:


You don't have to stick with the squares on LeAnne's sketch, but they worked for my card so I kept them. I wanted to play along with the Birds of a Feather challenge over at Just Us Girls, so I grabbed my Stampin' Blends (I went down the first column of Color Dare's TicTacToe board) and Bird's Eye view stamp set and this is what I came up with:


Here's the low-down on today's card:

I stamped three of the birds, adding spectacles to the first one (this is my favourite bird in the set!) onto some squares cut with the Stylish Shapes Dies and placed them around the fourth square, onto which I added a diecut sentiment from the 'Charming Sentiments' stamp set, anchored with a Crushed Curry enamel dot:

I used a Sweet Thoughts Memories & More card for my base; the Pretty Peacock pattern complimented the colours of my birds and I added a contrasting Calypso Coral envelope to finish.

This was an easy card to pull together and the colours make for a trio of colourful feathered friends. The 'Bird's Eye View' stamp set is great if you are new to colouring: the small images are just large enough to practice your skills without any complicated details.

Here is the visual summary of the key products used on today's project for you to pin for easy reference:


You can see all of my Product and 'How To' summaries on my 'How To - Tips and Techniques' Pinterest board in case you've missed any. 

Before you reach for your ink and papers, check out what our amazing team has created to inspire you this week:

Here's a quick recap of our challenge rules:
 
1.  Create a new paper project
2.  Upload your creation to your blog with a link back to us and provide a direct link to the post featuring your challenge submission.
3.  Please link your card to no more than four challenges, TOTAL.
4.  Have FUN!

Enjoy your day; I had a new bird box and camera for Mother's Day a couple of weeks ago and today is the day we are switching over. My oldest bird box has seen better days and since the blue tits have not yet moved in, I need to get the new box in place ready for them hopefully to pay a visit! My new camera is full colour and is solar-powered, so I'm very excited! It can take stills and video and there's an app to use it with my mobile phone, so if there's any activity I'll be sure to share in a future blog post. I'll be back tomorrow with another project. Until then, happy stampin'!


Stampin' Up! Supplies Used: 

Table built using Product Table Builder by The Crafty Owl - Independent Stampin' Up! Demonstrator.
 

Petal Patterns Square Card

by Joanne James23. March 2024 20:56

Today I've a quick post sharing a card for a couple of challenges:

   May be an image of text

The team over at the Flower Challenge want us to make a square card and I used the colours over at Colour Inkspiration for a bright and modern graphic floral design using a dieset that I've had for a while that hasn't been out of the packet yet - take a look:


Here's the low-down on today's card:

Petal Patterns - The Petal Patterns Dies are so clever and their shape makes the perfect for square cards. There are 2 dies in the pack; I added a third green layer for the leaves, rotating the solid die through 90 degrees and cutting one extra row to extend the pattern behind the flowers. You can use them as they are, paper-piece them or add sequins or enamel dots as I have for flower centres - lots of options. You can also use just a part of the die; I was experimenting with layering of the colours and added a small section with a trio of flowers to the reverse of my envelope too.

Pink and Purple - I'll be honest, Moody Mauve is not one of my most favourite colours and ordinarily I would never have paired it with Melon Mambo, but the combination intrigued me and I actually quite like the end result. the brightness of Melon Mambo lifts it so much. 

Charming Sentiments - I finished my card with a diecut sentiment from the 'Charming Sentiments set:


I love the embossed detail on the petals of the flowers and the square design suits these dies perfectly.

Here is the visual summary of the key products used on today's project for you to pin for easy reference:


You can see all of my 'How To' summaries on my 'How To - Tips and Techniques' Pinterest board in case you've missed any. 

Enjoy your evening and I'll be back tomorrow with another project. Until then, happy stampin'!


Stampin' Up! Supplies Used:

Table built using Product Table Builder by The Crafty Owl - Independent Stampin' Up! Demonstrator.

Jungle Pals Sloth Clean And Simple

by Joanne James12. February 2024 17:01

Today I'm sharing a quick clean and simple card that I made yesterday using this week's Color Throwdown colours and the current AAA Cards sketch:


My card showcases a couple of Sale-A-Bration freebies that I've yet to share take a look:


Here's the low-down on today's card:

 I thought these colours were perfect of a bright blue sky with a tree and tropical leaves, home to this adorable sloth. I used a stencil and a blending brush to add my sky and clouds, stamped and coloured my sloth with my Stampin' Blends, then diecut the tree and leaves with the Jungle Pals Dies and fussy cut the sloth as I didn't want a white border. Isn't he cute?!


A simple sentiment from the 'Charming Sentiments' stamp set completes my card. The Jungle Pals stamp set is free with a £45 purchase and has lots of fun jungle animals - perfect for children's cards. The Jungle Pals Dies are free with a £90 purchase and not only do they cut out the animals, there is a great tree, leaves and vines too. 

Here is the visual summary of the key products used on today's project for you to pin for easy reference:


You can see all of my 'How To' summaries on my 'How To - Tips and Techniques' Pinterest board in case you've missed any. 

Sloths are very on-trend so this card will be sent to the oldest of the James Juniors at university in the hope that it will be well-received!

Enjoy the remainder of your day and I'll be back tomorrow with another project. Until then, happy stampin'!


Stampin' Up! Supplies Used:

Table built using Product Table Builder by The Crafty Owl - Independent Stampin' Up! Demonstrator.

Flight And Airy Notecard CCS 529

by Joanne James23. January 2024 13:00

It's Tuesday and time for a new challenge over at CAS Colours & SketchesThis week's challenge is a sketch challenge and Jeanne has asked that we use a diagonal along with a central focal point:


Feel free to flip or rotate the sketch when making your card and the heart doesn't have to be a heart - you can choose an alternative shape too. For my card today I did that and I used a pair of birds that I fussy cut from the Flight & Airy designer series paper that is one of the gifts that can be yours FREE with an order of £45 during the current Sale-A-Bration promotion. Here's my card:


Here's the low-down on today's card:

I spent ages trying to decide how best to use the diagonal. I wanted to avoid using a piece of designer paper for half of the panel so instead used a piece of Boho Blue watercolour, also from the Flight & Airy pack, as a layer beneath a piece of white card, across which I diecut a diagonal line using one of the new Essential Details Dies. It doesn't quite go corner-to-corner, as I wanted to preserve the horizontal/vertical aspects, but it follows the intent of the sketch and allows some of that lovely blue paper to peek through:

Fussy cutting the birds was a labour of love but so worth it as they make a lovely centrepiece. I added a few sequins and a sentiment from the 'Charming Sentiments' stamp set to finish. This card is a notecard to send to someone I've not spoken to in a while, to share news and let them know I'm thinking of them. Sometimes a card is better than a text, right?

I'm also playing along with my old teamies over at TicTacToe with my card today; I followed the diagonal diecut/patterned paper/pink.

Here is the visual summary of the key products used on today's project for you to pin for easy reference:


You can see all of my 'How To' summaries on my 'How To - Tips and Techniques' Pinterest board in case you've missed any. 

As a reminder, for our colour challenges, you must use all of the stated challenge colours. You may also use neutral colours; however, the challenge colours should be the most noticeable ones featured on your card. We use Stampin' Up! color names for reference, but you are welcome to use any other companies' products as long as you match the challenge colours as closely as possible.

Enjoy your day and I'll be back tomorrow with another project. Until then, happy stampin'!


Stampin' Up! Supplies Used:

Table built using Product Table Builder by The Crafty Owl - Independent Stampin' Up! Demonstrator.

Abundant Beauty Sunflowers PPP657

by Joanne James10. September 2023 08:00

Today it's Sunday and time for this week's new challenge over at The Paper Players! It's the turn of the fabulous Jaydee to host this week and she has an interesting colour challenge for us to work with:


I paired Jaydee's colours with the sketch at Hand Stamped Sentiments and since I had a little more time this week decided I would have a little play with some new product - take a look:


Here's the low-down on today's card:

Exposed Brick Texture - First up is a new-to-me product, the Exposed Brick 3D embossing folder that I used to emboss not only a piece of Pebble Path-coloured designer paper from the Fresh As A Daisy pack, but also the solid coloured trio of panels that sit on top of the base. I don't use a lot of embossing as a rule, but isn't that texture just something? It is great for adding detail to backgrounds and I really love the effect.

Abundant Beauty Sunflowers - It will be no surprise to my regular readers that the Abundant Beauty masks were one of the first things onto my pre-order shopping list - I do love a good stencil! This is a great pack with a herringbone design, autumn and snowflake panels and a layering stencil that includes a trio of sunflowers. These are the stencils I used today - I used my blending brushes to apply colour to my flower trio - I used Crushed Curry as my additional colour to 'brighten' my sunflowers and allow for more graduated colour - and some additional leaves, then fussy cut them out and pieced them onto my frame/panel background. Check out the texture and detailing on the close up below:

Charming Sentiments - To finish I added a simple sentiment from the 'Charming Sentiments' set and diecut it with the coordinating die. I love that this stamp set has such a great variety of phrases for each and every occasion, and they can be diecut perfectly with no need to fussy cut - bonus!

I'll be honest I did find Jaydee's colour palette a challenge this week and I wasn't sure about this card once finished but having let it sit a while, I've decided it looks just fine, even if those leaves are a slightly unorthodox choice! What do you think? How would you use these colours? What do you have to be grateful for today? Leave me a comment below - I'd love to hear your thoughts.

Here is the visual summary of the key products used on today's project for you to pin for easy reference:
 

You can see all of my Product and 'How To' summaries on my 'How To - Tips and Techniques' Pinterest board in case you've missed any. 

Before you reach for your ink and papers, check out what our amazing team has created to inspire you this week:

Here's a quick recap of our challenge rules:
 
1.  Create a new paper project
2.  Upload your creation to your blog with a link back to us and provide a direct link to the post featuring your challenge submission.
3.  Please link your card to no more than four challenges, TOTAL.
4.  Have FUN!

Enjoy your day; we are still in the grips of the late summer heatwave we've been experiencing here in the UK this week, so as much as I'd love to type more posts and share more things with you, my craft room is a veritable sauna, so I am spending as little time in it as possible - the garden and BBQ beckons! I'll be back later in the week with another project. Until then, happy stampin'!


Stampin' Up! Supplies Used: 

Table built using Product Table Builder by The Crafty Owl - Independent Stampin' Up! Demonstrator.

Back To School With A Birds Eye View TTT 224

by Joanne James31. August 2023 18:00

It's Thursday and time for a new challenge over at TicTacToe! It's the turn of Team X to host this week and I am our featured designer this week. This is the fun board that we are playing along with: 


I went down the middle column with books/yellow/bird and using the sketch layout over at Sunday Stamps and the colours over at Color Dare (I went along the top row and used Toffee and Capri too) and created a good luck card for someone who is about to start the new school year at senior school - take a look:


Here's the low-down on today's card:

The Sunday Stamps layout is a favourite of mine and one I've used previously in other ways. Today I thought that panel in the corner would make the perfect old-fashioned classroom chalkboard to ground my colourful bird from the 'Bird's Eye View' stamp set. I love the birds in this set - they are so quirky and comical and the addition of spectacles just adds to the sense of whimsy. I added some white swishes of chalk to my blackboard and stamped my Starry Sky base with some tone-on-tone books to add to the back-to-school feel and finished with a sentiment from 'Charming Sentiments':


Isn't that fun?! Good luck wishes to anyone embarking on new educational adventures in the coming weeks; this includes both of the James Juniors, one of whom will be starting Sixth Form and studying for A Levels having passed his GCSEs this summer and the other will be heading to the University of Birmingham to study Biochemistry, having achieved a fantastic set of A Level results. Exciting times!

Here is the visual summary of the key products used on today's project for you to pin for easy reference:


You can see all of my Product and 'How To' summaries on my 'How To - Tips and Techniques' Pinterest board in case you've missed any. 

A tictactoe board offers so many creative possibilities - how does this week's board inspire you? Why not have a go? We would love to see you in the gallery and who knows - you might be selected for Designer's Choice and be eligible to be a guest designer on a future challenge. 

Enjoy your day; I'll be back tomorrow with another project. Until then, happy stampin'!

Hey There Zoo Crew Clean and Simple PP649

by Joanne James16. July 2023 08:00

Today it's Sunday and time for this week's new challenge over at The Paper Players! It's the turn of the fabulous Anne Marie to host this week and she has a fun clean and simple challenge for us to work with:


I used the sketch over at Try Stamping on Tuesday and also played along with their optional twist of camping/campfire and got fussy cutting with my paper snips and some Zoo Crew Designer Series Paper to come up with today's fun clean and simple notecard - take a look:


Here's the low-down on today's card:

Today's card is all about the designer paper! I had lots of images fussy cut from the Zoo Crew designer paper so I chose this one of the lion, added some additional colour to him with my Stampin' Blends markers and adhered him and some trees that I also fussy cut from the paper to a stitched oval, to which I'd added some Starry Sky and Parakeet Party inks with some blending brushes to ground my campfire scene (I also added a flick of clear Wink of Stella to give my sky a starry night feel, although it is difficult to see this on the photo). I anchored my oval with a trio of strips featuring some of the black and white patterns from the Zoo Crew papers and stamped a vertical sentiment from the 'charming Sentiments' stamp set:

Whilst you might be forgiven at first glance for thinking I missed the point of Anne Marie's challenge this week, you will see my lion is busy roasting his pink marshmallows over his open campfire. yum - s'mores, anyone?! Fussy cutting the individual images is such a fun way to use designer paper! A little goes a long way and this kind of minimalist layout is perfect for clean and simple cards. I'm also linking today's card up over at CAS on Friday where designer paper is the theme of their current challenge too.

Here is the visual summary of the key products used on today's project for you to pin for easy reference:


You can see all of my Product and 'How To' summaries on my 'How To - Tips and Techniques' Pinterest board in case you've missed any. 

Before you reach for your ink and papers, check out what our amazing team has created to inspire you this week:

Here's a quick recap of our challenge rules:
 
1.  Create a new paper project
2.  Upload your creation to your blog with a link back to us and provide a direct link to the post featuring your challenge submission.
3.  Please link your card to no more than four challenges, TOTAL.
4.  Have FUN!

Enjoy your day; it's sun loungers rather than campfires for me, but I'm not complaining! I'll be back on Tuesday with another project. Until then, happy stampin'!


Stampin' Up! Supplies Used: 

Table built using Product Table Builder by The Crafty Owl - Independent Stampin' Up! Demonstrator.

Zoo Crew Ballet Dancing Hippo Birthday Card PP646

by Joanne James25. June 2023 08:00

Today it's Sunday and time for this week's new challenge over at The Paper Players! It's the turn of the fabulous Claire to host this week and she has my favourite, a sketch challenge for us to work with:


I decided to share another of the fun animals from the Zoo Crew designer paper on my card this week; this time it's the turn of the ballet-dancing hippo for a sweet birthday card for a little girl - take a look:


Here's the low-down on today's card:

I used a base layered with some retired Country Floral Lane designer paper which picked up on the Petal Pink of the hippo's tutu, then inspired by the challenge over at SUO Challenges I decided I would delve into my ribbon stash and use the verticals for a double trim of beautiful Pool Party satin ribbon (the one I've used is retired but I've linked to a current equivalent below) and tied with a statement bow. I coloured my hippo with Smoky Slate Stampin' Blends then fussy cut her and added her to my card:

A diecut sentiment from the 'Charming Sentiments' stamp set completes my card. I just love this Zoo Crew paper for fussy cutting - you can create so many different cards with the characters featured.

Here is the visual summary of the key products used on today's project for you to pin for easy reference:


You can see all of my Product and 'How To' summaries on my 'How To - Tips and Techniques' Pinterest board in case you've missed any. 

Before you reach for your ink and papers, check out what our amazing team has created to inspire you this week:

Here's a quick recap of our challenge rules:
 
1.  Create a new paper project
2.  Upload your creation to your blog with a link back to us and provide a direct link to the post featuring your challenge submission.
3.  Please link your card to no more than four challenges, TOTAL.
4.  Have FUN!

Enjoy your day; it's forecast to be super hot here in the UK today, so I will be taking it easy I think! I'll be back tomorrow with another project. Until then, happy stampin'!


Stampin' Up! Supplies Used: 
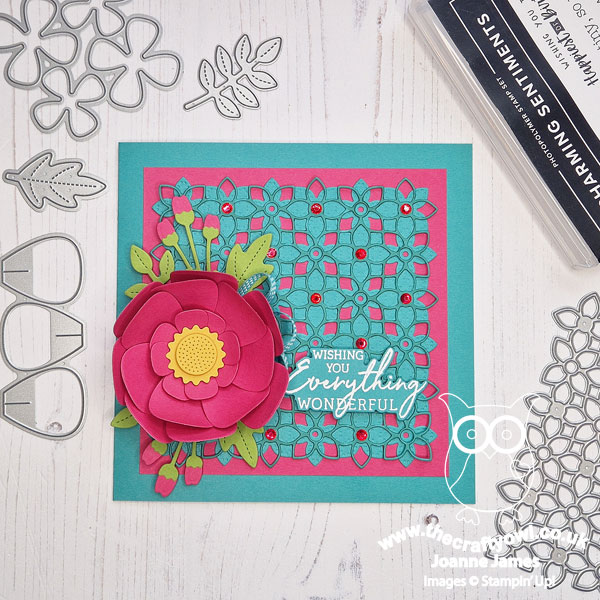
Table built using Product Table Builder by The Crafty Owl - Independent Stampin' Up! Demonstrator.

Hello Ladybug Good Luck Card CCS 532

by Joanne James20. June 2023 13:00

It's Tuesday and time for a new challenge over at CAS Colours & SketchesThis week's challenge is a sketch challenge and Shannon has asked that we add a square focal point. Feel free to flip or rotate the sketch when making your card.


For my card today I took my inspiration from the symmetrical focal point and decided to create a fun good luck card featuring a cute ladybird - take a look:


Here's the low-down on today's card:

A Confession - So first up, a confession! I actually made my card for today's challenge and it wasn't until I was writing up today's post that I realised I had my sentiment in the wrong place. I almost went with it - the sketch is a guideline, that's all - but in the end I decided to make a second version that was faithful to Shannon's layout and compare the two. So the card above is my 'take two' - my original card is the one below:


On this one I added my sentiment from the 'Charming Sentiments' stamp set to the card base, whereas on the sketch the sentiment in on the focal square. Here's a photo pf both cards together - which one works better for you? 

I must be honest, I'm on the fence; I like my second version more than I though I would - kudos to Shannon for her layout!

Ladybug Builder - I thought a ladybug - or ladybird as we call them here in the UK - would make a cute centrepiece for a good luck card. I wondered why ladybirds are considered lucky in many cultures and Google tells me it's simply that they are one of the chief insects to eat crop pests - the gardener's friend. The Ladybug Builder punch made light work of mine - a simple punching of the elements and some heat-embossed black dots for a little extra shine:

Remember The Inside - I designed this card with a child in mind, so couldn't resist adding another stamped comical smiling ladybird to the inside of my card with another sentiment from the 'Hello Ladybug' stamp set:


I love making good luck cards for children; so much of their lives seem to consist of exams and tests, it's nice to send some positive vibes and let you know you are wishing them every success! I am linking today's card up with the team over at Inspire.Create who are sharing cards for babies or children and at the Alphabet Challenge Blog where there are on 'F is for Flying' - my ladybird has her wings ready to go!

Here is the visual summary of the key products used on today's project for you to pin for easy reference:


You can see all of my 'How To' summaries on my 'How To - Tips and Techniques' Pinterest board in case you've missed any. 

Today is the last full study day for both James Juniors - we are at T-1 and T-3 respectively - the end of the exam season is nigh! We have experienced some torrential downpours this morning, so I am hoping to get ahead with my crafty endeavours - I even have a second card to share with you today - I'll be back with that shortly!

Enjoy your day and I'll be back tomorrow with another project. Until then, happy stampin'!


Stampin' Up! Supplies Used:

Table built using Product Table Builder by The Crafty Owl - Independent Stampin' Up! Demonstrator.

New Online Exclusives

There are new products available exclusively in the online store from 5 November - check them out here.

Latest Kits!

Stampin Cut and Emboss

The Layered Landscapes Kit and Nature's Paintings Kit are the latest kits in the online store - get yours here!

Shop Online

Access my online shop 24 x 7, 365 days of the year:

Current November hostess code:

9NKXDTTR

Shop Online

Mini Catalogue

BROWSE THE CATALOGUE

'Tis The Season - the new Stampin' Up! Mini Catalogue is here! For more details and to download your copy click here

Scrapbooking

Stampin' Up! has introduced a new range of 12x12" scrapbooking product and kit - the full range is now available to purchase online. To download a copy of the new digital Scrapbooking Catalogue click here.

2024-25 Annual Catalogue

BROWSE THE CATALOGUE

Click on the image to download your copy of the 2024-25 annual catalogue. For a full list of current SU! supplies, go to my online store. If you would like any help or advice, please drop me a line at joanne@thecraftyowl.co.uk or give me a call on 07773 421446 - I'd be happy to help.

Join My Team

It's always a great time to join Stampin’ Up! New team members can get £130 worth of products for only £99 + free business supplies + free shipping + all the fun being a part of Stampin’ Up! Stampin' Up! has something for everyone: join my growing team and benefit from my support to enjoy Stampin' Up! however you choose.

If you're interested, call me for a chat to understand how I can help you realise your goals. Alternatively, if you have already decided to sign up and you just can't wait, please click here for the link to the online form where you can sign up and order your starter kit right away! 

About Me

Hi I'm Joanne and live in Northampton and when I'm not looking after my husband and two beautiful children, am an avid crafter with a passion for all things Stampin' Up!

I must confess that I have never been a big rubber stamper - until I discovered Stampin' Up! that is. I love the fact that I can get such great results with co-ordinating stamps, inks, papers and punches - the possibilities are endless! Join me on my stamping journey as I share the things I love and be inspired to create amazing things yourself!

Follow Me

Monthly Newsletter

Box Builder

Click the button above to use Box Buster to create your custom box design using the Envelope Punch Board!

Kits Collection Now Available!

Stampin Cut and Emboss

The new Kits Collection from Stampin' Up! is now available!

Click here to see the current kits available and order yours online today.

I Design For


Stampin' Up Stuff

This is my personal blog and is not endorsed by Stampin’ Up! I hope you find it a plentiful source of ideas and personal inspiration but please don't copy my designs for contest submission or use for classes, publication or sale without express permission.