Just Add Color Card and Tea Bag Holder For The Paper Players PP392

by Joanne James6. May 2018 09:00

It's Sunday and time for this week's new challenge over at The Paper Players! It's the turn of our fearsome leader, the fabulous Nance, to host this week and she has a rather pretty theme challenge for you to work with:
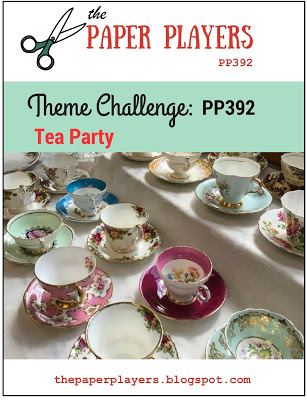
    

This challenge was made for me as I am a dedicated tea drinker! Coffee not so much, but I can drink as many as 10 cups of tea a day on average - definitely my drink of choice! I don't have much current product with a tea theme though, so wondered how I was going to tackle Nance's challenge this week, when I remembered the colouring paper in the current catalogue and voila - both my card and an accompanying little tea-related gift were created! First up, my card:


Here's the low-down on today's card:

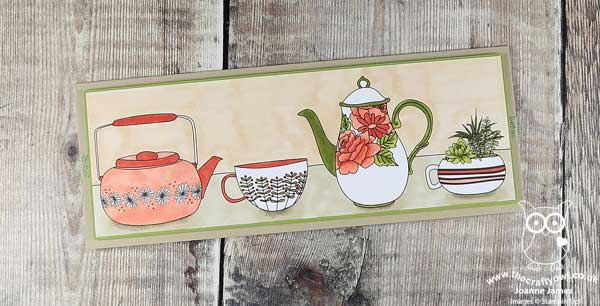
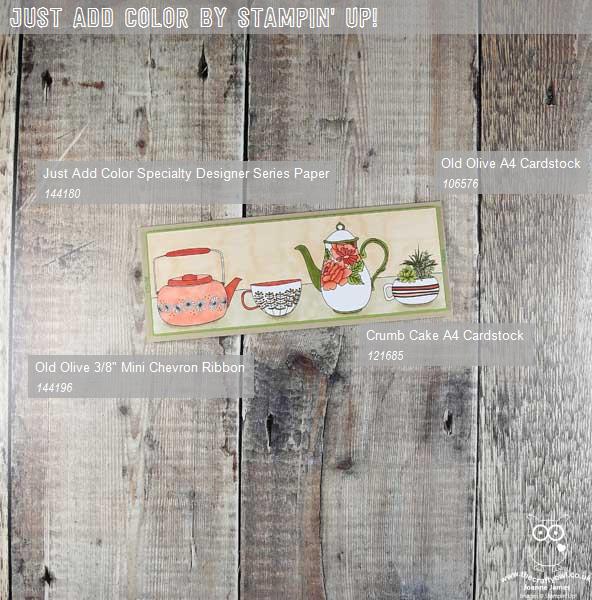
Just Add Color - One of the patterns in the Just Add Color Specialty Designer Series Paper pack is a sheet covered in all kinds of tea cups and teapots, so I cut a strip from the top of a sheet of paper, grabbed my Stampin' Blends and got to work. I went for a longer, thinner card this week and allowed the DSP pattern to dictate the dimensions for my card base.

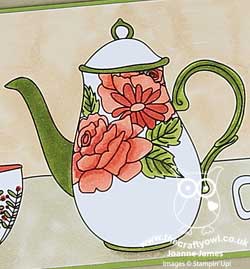
Get Blending - Given that some of the teacups contain succulents rather than tea, this week's colour palette over at The Color Throwdown was perfect for my project. I used my Calypso Coral, Old Olive and Crumb Cake Blends, with the top portion coloured in Ivory. This paper is both very thick and matt, so alcohol markers do not blend quite as well as they do on Whisper White. This is particularly noticable on the larger areas such as the table and wall behind the teaset, however I quite like the effect - it gives an almost chalk effect, like rough plaster, so certainly works on my card.

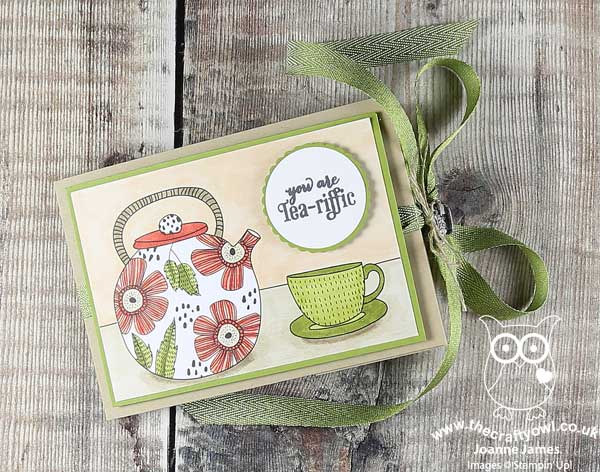
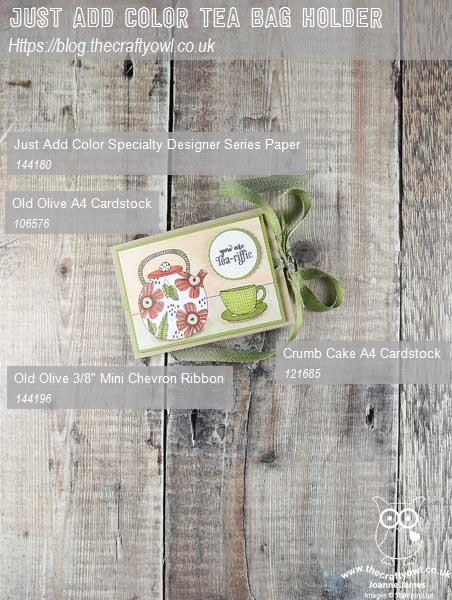
Anyone For Tea? - Having completed my card, I was left with an offcut of DSP with a teapot and teacup. Rather than put this in my scrap box never to be seen again, I decided to use it up so coloured it and made a little tea bag holder containing a few wrapped tea bags that I could gift with my card. I also added a sentiment from the retired set 'Have A Cuppa', mounted on a punched scallop circle - here it is:


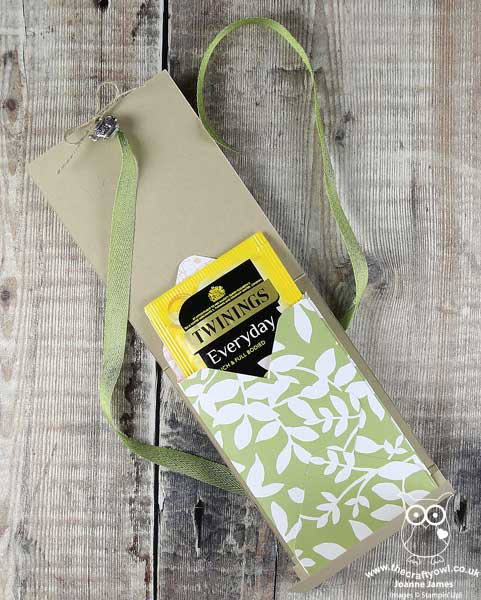
I cut my tea bag holder larger than was actually needed to accommodate the tea bags, as I didn't want to cut down the DSP; I just made my wrap and tea bag envelope holders, made with the Envelope Punch Board, slightly larger too. This is what it looks like on the inside - I used some Whole Lot of Lovely designer series paper for my little tea bag envelope pockets:


Did you spot the little tea pot trinket embellishment too? This is retired but it's at times like this I'm so glad I hoard these bits and pieces, as it finished off my package a treat :-) I love this fun set - I think I might send it to my Mum, as she is a keen tea drinker too.

Here is the visual summary of the key products used on today's project for you to pin for easy reference:


You can see all of my Product and 'How To' summaries on my 'How To - Tips and Techniques' Pinterest board in case you've missed any. 

Before you reach for your ink and papers, check out what our amazing team has created to inspire you this week:

Here's a quick recap of our challenge rules:
 
1.  Create a new paper project
2.  Upload your creation to your blog with a link back to us and provide a direct link to the post featuring your challenge submission.
3.  Please link your card to no more than four challenges, TOTAL.
4.  Have FUN!

I can't wait to see how you interpret this week's theme and look forward to visiting your blogs this week! Enjoy the rest of your weekend - we have a 3 day weekend here in the UK as it's a national Bank Holiday on Monday and for once the weather is glorious, so I will definitely be outside making the most of it. I'll be back tomorrow with another project; until then, happy stampin'!


Stampin' Up! Supplies Used: 

Table built using Product Table Builder by The Crafty Owl - Independent Stampin' Up! Demonstrator.

Flying Home Baby Card For The Paper Players PP391

by Joanne James29. April 2018 09:00

It's Sunday and time for this week's new challenge over at The Paper Players! It just so happens there are 5 Sundays in April, so we have an extra challenge week! It's my turn to host and as it's tic-tac-toe week there really are so many creative possibilities. Check out my board: 


Choices, choices! I decided to use this week's sketch over at Just Add Ink for my layout and grabbed my Blends again for a spot of colouring to share with the teams at Stamp Ink Paper and SUO Challenges and went across the bottom of my board - yellow, circle, bird (my card also works for the central column of die-cut, ribbon, circle too) - for a sweet baby card, take a look:


Here's the low-down on today's card:

Flying Home - I love the bird house designs in this set and will be sad to see this set retire next month. Perfect for welcome cards - new home, new baby or even new team member - the selection of images are perfect for colouring too. This is the first time I've used this sweet mama bird and her babies; I went with bright yellow for a unisex baby card and coloured with my Blends; I actually made a whole batch of these so that I have some blanks and can colour the other birds specifically pink or blue too if I need something a little more tailored. 

Circles, Circles - There are lots of different circle elements to my card: the Picture Perfect Party background paper has a fun circle pattern and my main image has been cut out with the largest of my Stitched Circle Framelits. Even the sprinkle of Pool Party sequins add to the theme.

What No Bear? - My sentiment comes from the 'Baby Bear' stamp set. split between the little front banner and finished on the inside of my card. No bears, just birds on today's baby card ;-). Here's a look at the inside, finished off with a couple of yellow birdies too:


Here is the visual summary of the key products used on today's project for you to pin for easy reference:


You can see all of my Product and 'How To' summaries on my 'How To - Tips and Techniques' Pinterest board in case you've missed any. 

Before you reach for your ink and papers, check out what our amazing team has created to inspire you this week:

Here's a quick recap of our challenge rules:
 
1.  Create a new paper project
2.  Upload your creation to your blog with a link back to us and provide a direct link to the post featuring your challenge submission.
3.  Please link your card to no more than four challenges, TOTAL.
4.  Have FUN!

I can't wait to see what you create with this week's board - there really are so many different combinations! I'm so looking forward to visiting your blogs this week! Enjoy the rest of your weekend as it will be over all too quickly. I'll be back tomorrow with another project; until then, happy stampin'!


Stampin' Up! Supplies Used: 

Table built using Product Table Builder by The Crafty Owl - Independent Stampin' Up! Demonstrator.

Goodbye Birthday Marquee Messages For The Paper Players PP390

by Joanne James22. April 2018 09:00

Apologies for the lack of blog posts this week but the weather has taken a turn for the better here in the UK so I have taken the opportunity to spend some time giving my garden some much-needed TLC and enjoying spending time outdoors with the youngest of my James Juniors who is still on Easter break until early next week. Today it's Sunday though and time for this week's new challenge over at The Paper Players! It's the turn of the wonderful Jaydee to host this week and she has my favourite, a sketch challenge, for you to work with:


So many ways I could have gone with this one! In the end I decided that having spent some time this week sorting through the old to make way for the new, it would be a great opportunity to share some retiring favourites with you  - take a look:


Here's the low-down on today's card:

A Birthday Marquee Message - I have had a lot of fun with this stamp set: great for invitations, birthdays and more general celebrations, Marquee messages works for clean and simple and more detailed and layered cards. Here I've heat-embossed the outlines in silver and paper-pieced the various elements together, stamping the central wording with my Cherry Cobbler Stampin' Blends. To finish I added a whole bunch of rhinestones to the arrow - it made a fair dent in a new packet, but it was so worth it for the finished effect - after all, who doesn't want their birthday message up in lights?! 

Pick A Neutral Pattern - I decided to use something with a little pattern for my background, but that wouldn't detract from my focal point sign and this black and white pattern from the Pick A Pattern designer series paper collection was the perfect choice. 

Colour Movers and Shakers - My card also features two colours that are about to retire and one that is about to move colour families as a result of the Colour Revamp. I will miss Island Indigo more than Tangerine Tango for sure, but am very exciting by the new colours that will be joining our new families in their place. My third colour, Real Red, is thankfully sticking around, but moving from Brights to Regals as part of the reshuffle. Here are today's colours should you wish to save this colour combo, but remember - you only have until May 7th to guarantee supplies of the retiring colours, so be sure to stock up before they're gone:


Here is the visual summary of the key products used on today's project for you to pin for easy reference:


You can see all of my Product and 'How To' summaries on my 'How To - Tips and Techniques' Pinterest board in case you've missed any. 

Before you reach for your ink and papers, check out what our amazing team has created to inspire you this week:

Here's a quick recap of our challenge rules:
 
1.  Create a new paper project
2.  Upload your creation to your blog with a link back to us and provide a direct link to the post featuring your challenge submission.
3.  Please link your card to no more than four challenges, TOTAL.
4.  Have FUN!

I can't wait to see what you create with this week's sketch and look forward to visiting your blogs this week! Enjoy the rest of your weekend as it will be over all too quickly. I am hoping to get out into the garden again and enjoy the rest of the nice weather before it departs and leaves us with cooler temperatures later this week. I'll be back tomorrow with another project; until then, happy stampin'!


Stampin' Up! Supplies Used: 

Table built using Product Table Builder by The Crafty Owl - Independent Stampin' Up! Demonstrator.

Unicorns Myths and Magic For The Paper Players PP389

by Joanne James15. April 2018 09:00

It's Sunday and time for this week's new challenge over at The Paper Players! It's the awesomely artistic Sandy's turn to host this week and she has a clean and simple challenge for you to work with and a fun 'magical' theme:


I used this week's sketch from Freshly Made Sketches again (Karren definitely came up trumps with this one!) and just had to go with unicorns for my card today - take a look:


Here's the low-down on today's card:

Myths And Magic - So I broke one of my 'clean and simple' rules with today's card in my use of designer series paper across the whole of my card front; this Myths and Magic DSP is to good to cut down though. I am happy to pass up my 'white space' for these sweet, sparkly unicorns - I love them! Each and every one of them shimmers with glitter. 

A Magical Unicorn Day - I stamped and coloured another unicorn to anchor my sentiment and covered the body of this one in Dazzling Diamonds glitter too - Wink of Stella wasn't enough for this one! I also added a trio of pearls that I coloured with my Pool Party Stampin' Blends. My unicorn had to be pink - this is headed for a girly girl, so nothing else would do.

Fairy Words - I added a solid banner of Melon Mambo to back my skinny sentiment, taken from the 'Fairy Celebration' set, as this suited the sketch better than those in Magical Day. 

Here is the visual summary of the key products used on today's project for you to pin for easy reference:


You can see all of my Product and 'How To' summaries on my 'How To - Tips and Techniques' Pinterest board in case you've missed any. 

I am so sad that this set is retiring at the end of May - it's one of my favourites in the current seasonal catalogue and I haven't used it nearly enough! Rebecca is obsessed with mermaids and unicorns, so I know I will get plenty more use from it yet; I definitely won't be parting with it anytime soon, for sure.

Before you reach for your ink and papers, check out what our amazing team has created to inspire you this week:

Here's a quick recap of our challenge rules:
 
1.  Create a new paper project
2.  Upload your creation to your blog with a link back to us and provide a direct link to the post featuring your challenge submission.
3.  Please link your card to no more than four challenges, TOTAL.
4.  Have FUN!

Don't forget the theme is clean and simple this week - so minimal layers and embellishments and aim for lots of white space. I can't wait to see what you create and look forward to visiting your blogs this week! Enjoy the rest of your weekend as it will be over all too quickly. We are finally getting some nice weather here in the UK so I will be aiming to spend as much time outdoors as possible; I think Spring may finally be on its way. I'll be back tomorrow with another project; until then, happy stampin'!


Stampin' Up! Supplies Used: 

Table built using Product Table Builder by The Crafty Owl - Independent Stampin' Up! Demonstrator.

A Purple Floral Sentiment for PP388

by Joanne James8. April 2018 09:00


I've been away at Stampin' Up!'s UK Onstage event for the last couple of days, having a ball with some of my team and lots of my fellow Stampin' Up! demonstrators. Today it's Sunday though, I'm back and it's time for this week's new challenge over at The Paper Players! It's the turn of my awesome friend LeAnne to host this week and she has a fun colour challenge for you to work with:


I love purples although was a little short on time to prepare my card for this week so I decided to go for a large focal sentiment to help me along the way this week. It was a good opportunity to open my as yet un-inked Floral Sentiments stamp set  - take a look:


Here's the low-down on today's card:

Floral Statements - I chose the feature the large 'Thanks' sentiment from the Floral Statements stampset and coloured it with a mix of markers: my 3 retired Wisteria Wonder Blandabilities for the petals and my Tranquil Tide Stampin' Write marker for the leaves. This stamp set is great as it really does much of the work for you - it doesn't leave room for much else! 

Layered Leaves - I backed my stamped panel with an offset panel of Elegant Eggplant that I embossed with my layered leaves Dynamic Textured Impressions Embossing Folder; I know you can't see much of it, yet the peeks of texture add a welcome added detail.

Drops of Glitter - I added a few of the Glitter and Clear epoxy dots, along with some clear Wink of Stella on the flower petals and a sliver of doily, to complete my card.

This card really was quick to put together with some built in de-stress as a result of the time it took to colour it in too - bonus! In hindsight, I wish I'd heat embossed the stamp in black for a little more shine and contrast; something to try next time.

Here is the visual summary of the key products used on today's project for you to pin for easy reference:


You can see all of my Product and 'How To' summaries on my 'How To - Tips and Techniques' Pinterest board in case you've missed any. 

Before you reach for your ink and papers, check out what our amazing team has created to inspire you this week:

Here's a quick recap of our challenge rules:
 
1.  Create a new paper project
2.  Upload your creation to your blog with a link back to us and provide a direct link to the post featuring your challenge submission.
3.  Please link your card to no more than four challenges, TOTAL.
4.  Have FUN!

I can't wait to see what you create with this week's colours and look forward to visiting your blogs this week! Enjoy the rest of your weekend; my day will hopefully be a quiet one as I relax with my new catalogue for the umpteenth time to drool over the new stamp sets and product coming our way. Do come  back tomorrow as I will have lots of important announcements with regard to this month's retirement list; until then, happy stampin'!


Stampin' Up! Supplies Used: 

Table built using Product Table Builder by The Crafty Owl - Independent Stampin' Up! Demonstrator.

Epic Celebration - You Rock for The Paper Players PP387

by Joanne James1. April 2018 09:00

Happy Easter Sunday wishes everyone! It's time for this week's new challenge over at The Paper Players! It's the turn of the amazingly talented Laurie to host this week and she has a fun theme challenge for you to work with:


I don't have much in the way of music-themed supplies in my collection and usually end up resorting to my e-cutter to create music-themed cards and gifts (you can see some of my previous examples here and here), so I was thrilled to see the Epic Celebrations set in this year's Sale-A-Bration promotion. As the wife of a guitarist and the other mother of two almost-teens, one of whom is in a band and both of whom are into either listening to or playing music in a big way, this set was a must-have for me. So whilst Sale-A-Bration has now ended, this set is a keeper and I just had to use it on today's card. I also used this week's sketch at Freshly Made Sketches for my layout - take a look:


Here's the low-down on today's card:

Epic Tone on Tone - I decided to use a simple tone-on-tone stamped background in Real Red using the guitar stamp to create some detail and to highlight my main focal image, which I stamped and heat embossed in black on watercolour paper, then coloured with my aqua painter. I added this to a collection of stars and bits and pieces to add a touch of 'glam rock' to my card. 

A LittleSheet Music - The border panel is a section of the background stamp 'Sheet Music', which I simply stamped onto Whisper White and cut out a section for added interest in keeping with the theme.

A Punny Sentiment - My punny sentiment is courtesy of the now-retired 'Crazy About You' set, which was perfect for this card. I also used the 'You're Awesome' sentiment from the Epic Celebrations set on the inside of my card:


Here is the visual summary of the key products used on today's project for you to pin for easy reference:
 

You can see all of my Product and 'How To' summaries on my 'How To - Tips and Techniques' Pinterest board in case you've missed any. 

This card is headed to my pile as a thank you for one of Rebecca's teachers; she will be performing the role of Brigitte in her whole school production of Rogers & Hammerstein's 'The Sound of Music' next term and there are an army of staff involved in making this happen, including her Maths teacher, who also plays electric guitar. The girls at school think he is super cool, so this card will be perfect for him!

Before you reach for your ink and papers, check out what our amazing team has created to inspire you this week:

Here's a quick recap of our challenge rules:
 
1.  Create a new paper project
2.  Upload your creation to your blog with a link back to us and provide a direct link to the post featuring your challenge submission.
3.  Please link your card to no more than four challenges, TOTAL.
4.  Have FUN!

I can't wait to see how you interpret this week's theme and look forward to visiting your blogs this week! Enjoy the rest of your weekend - enjoy your Easter egg hunts and eat as much chocolate as you can safely consume! I'll be back tomorrow with another project; until then, happy stampin'!


Stampin' Up! Supplies Used: 

Table built using Product Table Builder by The Crafty Owl - Independent Stampin' Up! Demonstrator.

A Picture Perfect Party Birthday Celebration PP386

by Joanne James25. March 2018 09:00

It's Sunday and time for this week's new challenge over at The Paper Players! It's the turn of my amazing friend Claire to host this week and she has my favourite, a sketch challenge, for you to work with:


I could have gone so many ways with this sketch! I have not one, but two cards, to share with you today - both with a fun party theme. Here's the first one - take a look:


Here's the low-down on today's card:

Picture Perfect Party - Both of my cards today feature papers with the bold, photographic images featured in the Picture Perfect Party DSP Stack. In bright, celebratory colours, these papers are perfect for a large expanse of background and work really well as the background for my fun, party-themed cards. I used the offcut from my card panel to continue the decoration through to my envelope to with a colourful envelope liner.

Picture Perfect Birthday - I used the co-ordinating Picture Perfect Birthday stamp set to decorate the sentiment circles on the front of my card. I was lucky to receive this set free when I attended Onstage last November, which really was fortunate for me as I think this is a set I might otherwise have overlooked. It contains some great, scripted fonts that work for birthdays and more general celebrations and has some fun confetti, candle, tooter and ribbon bow images too. In addition to using it to decorate the outside of my card, I added a little colour to the inside too:


Finishing Touches - To finish my cards, I added some gold tinsel trim and a strip of fringed cardstock to the one above and some silver baker's twine and mini silver sequin trim with a strip of fringed cardstock to the card below:


And here's the inside of this card too:

Two cards using the same layout and supplies, each with a different pattern and sentiment. The Picture Perfect Party Suite is perfect for creating batches of birthday cards with a minimum of supplies. Here is the visual summary of the key products used on today's project for you to pin for easy reference:


You can see all of my Product and 'How To' summaries on my 'How To - Tips and Techniques' Pinterest board in case you've missed any. 

Before you reach for your ink and papers, check out what our amazing team has created to inspire you this week:

Here's a quick recap of our challenge rules:
 
1.  Create a new paper project
2.  Upload your creation to your blog with a link back to us and provide a direct link to the post featuring your challenge submission.
3.  Please link your card to no more than four challenges, TOTAL.
4.  Have FUN!

I can't wait to see what you create with this week's sketch and look forward to visiting your blogs this week! Enjoy the rest of your weekend as it will be over all too quickly. We are minus one James Junior who is away on a short hockey tour for a few days, so will be spending the day researching hurricanes with James Junior number 2 for a geography project in between a little crafting too I hope!

I'll be back tomorrow with another project that also uses this same sketch but has a totally different feel, so do come back and take a look at that card; until then, happy stampin'!


Stampin' Up! Supplies Used: 

Table built using Product Table Builder by The Crafty Owl - Independent Stampin' Up! Demonstrator.

Sunshine and Rainbows For The Paper Players PP385

by Joanne James18. March 2018 09:00

It's Sunday and time for this week's new challenge over at The Paper Players! It's Nance's turn to host this week and she has a clean and simple challenge for you to work with:


I decided to take Nance's challenge literally and have a clean-and-simple rainbow card to share with you this week - take a look:


Here's the low-down on today's card:

Build A Rainbow The Easy Way - Today's card features a fun rainbow made using the Rainbow Builder Framelits Dies - these really do make building a rainbow super quick and easy. I ran all 7 pieces through the Big Shot at the same time and held them together with some washi tape across the back.

Myths and Magic - I don't usually use designer paper on a clean and simple card, but I couldn't resist a background of clouds and sky courtesy of this fun pattern fro the Myths and Magic Specialty DSP Pack. It makes the perfect backdrop for my bright rainbow and layered clouds.

Sunshine and Rainbows -  My card is mostly made up of diecuts and has very little stamping - just the sunshine and the sentiment. I decided to continue the rainbow theme into my sentiment stamp and coloured it with the colours of my rainbow using sponge daubers for a fun variegated effect.

Whilst my card is a little more layered than I usually go with for clean and simple, this card is really straightforward and super quick to put together and I love the pop of bright colour that the rainbow gives. Here is the visual summary of the key products used on today's project for you to pin for easy reference:


You can see all of my Product and 'How To' summaries on my 'How To - Tips and Techniques' Pinterest board in case you've missed any. 

Before you reach for your ink and papers, check out what our amazing team has created to inspire you this week:

Here's a quick recap of our challenge rules:
 
1.  Create a new paper project
2.  Upload your creation to your blog with a link back to us and provide a direct link to the post featuring your challenge submission.
3.  Please link your card to no more than four challenges, TOTAL.
4.  Have FUN!

Don't forget the theme is clean and simple this week - so minimal layers and embellishments and lots of white space. I can't wait to see what you create and look forward to visiting your blogs this week! Enjoy the rest of your weekend as it will be over all too quickly. I'm meeting an old school friend today and we are going on a course to brush up on our Copperplate Calligraphy skills, assuming the snow we are expecting here in the UK (again!) doesn't scupper our plans.

I'll be back tomorrow with another project; until then, happy stampin'!


Stampin' Up! Supplies Used: 

Table built using Product Table Builder by The Crafty Owl - Independent Stampin' Up! Demonstrator.

At Home With You Birthday Surprise Card PP384

by Joanne James11. March 2018 09:00

Firstly, an apology to my regular readers for my lack of blog posts this week; I was well and truly wiped out following the craft retreat I hosted last weekend! I had a fabulous time, but following my class at the start of this week I needed to take a few days out to catch up on some family things and get my office straight in order to start again.

As it's Sunday, I'm back with this week's new challenge over at The Paper Players! It's my turn to host this week and I have my personal nemesis, a colour challenge for you to work with:


Now since it's Mothering Sunday here in the UK today, you might think I would have a Mother's Day card to share with you, or maybe something floral - but no, instead I have a rather girly birthday card to share with you this week, with a fun surprise element too - take a look:


Here's the low-down on today's card:

Pretty In Pink - I chose to feature a combination of Pink Pirouette and Melon Mambo on my card today - who wouldn't love a pink house with a pink front door, right?! Using the stamps and framelits in the At Home With You bundle featured in the annual catalogue, I also added a pretty spring floral wreath and two flower pots, all coloured with my Stampin' Write markers to complete my doorstep scene.

A Birthday Surprise - The At Home Framelits Dies include a framelit that cuts and scores a hinged door, that allows for a fun feature and a hidden birthday surprise - take a look:


A birthday message and a gift too!

Textured Brick Wall - I continued the house theme by adding some textured bricks around the door using embossing paste and a stencil - I think it gives my card something of a cottage feel. I continued my stamping inside my card and onto my envelope for a finishing touch.

Here is the visual summary of the key products used on today's project for you to pin for easy reference:


You can see all of my Product and 'How To' summaries on my 'How To - Tips and Techniques' Pinterest board in case you've missed any. 

Before you reach for your ink and papers, check out what our amazing team has created to inspire you this week:

Here's a quick recap of our challenge rules:
 
1.  Create a new paper project
2.  Upload your creation to your blog with a link back to us and provide a direct link to the post featuring your challenge submission.
3.  Please link your card to no more than four challenges, TOTAL.
4.  Have FUN!

I can't wait to see what you create with this week's colours and look forward to visiting your blogs this week! Enjoy the rest of your weekend as it will be over all too quickly. I have had an early start today as I needed to be up at 4am to see one of my James Juniors off to school to board the coach for a week long school trip to Normandy, so I suspect that my day will involve a lot of caffeine and need to finish rather earlier than usual! I'll be back tomorrow with another project; until then, happy stampin'!


Stampin' Up! Supplies Used: 

Table built using Product Table Builder by The Crafty Owl - Independent Stampin' Up! Demonstrator.

Host A Party And Get Tranquil Tulips For Free PP383

by Joanne James4. March 2018 09:00

It's Sunday and time for this week's new challenge over at The Paper Players! It's the turn of the delightful Jaydee to host this week and she has a rather timely theme challenge for you to work with:


My card was totally inspired by the lovely inspiration photo Nance chose for Jaydee's challenge badge this week: those red tulips are just lovely so I had to feature some on my card today. We have been experiencing sub-zero temperatures here in the UK for the past week, along with significant snowfall and I for one am ready for Spring, even if only with my card today - take a look:


Here's the low-down on today's card:

Get Tranquil Tulips For Free - Tranquil Tulips is one of the hostess sets in the annual catalogue, that is available exclusive to those that host a Stampin’ Up! party or place a personal order of £150 or more. A gorgeous set with blooms that can be stamped directly or fussy cut and layered as I’ve done here. Sale-A-Bration is the best time of year to host a Stampin’ Up! party, as with qualifying sales you can earn an extra £20 in rewards on top of the usual levels. I’ve had lots of customers take advantage of this and earn this sets and lots of other free produc, whilst having a fun evening with friends into the bargain. If you would like to earn this set for free, then talk to me about hosting your own party - I still have a few slots left this month if you would like to squeeze one in before the end of the month, but you’ll have to be quick!

A Tutti Frutti Pattern - I paired my red tulips with some blue grape hyacinths and that inspired the colour scheme for the rest of my card. The background paper is from the Tutti Frutti paper stack - lots of bold fruit patterns here, but if these are not your thing there are some great patterns such as the one I’ve used today on the reverse of each sheet too.

A Spring Banner - I took the wording for my banner from the current ‘Hello Easter’ set and paired it with the banner from the Bunch of Banners set to fit my theme. Some navy crinkle seam binging ribbon finishes my card.

Here is the visual summary of the key products used on today's project for you to pin for easy reference:


You can see all of my Product and 'How To' summaries on my 'How To - Tips and Techniques' Pinterest board in case you've missed any. 

Before you reach for your ink and papers, check out what our amazing team has created to inspire you this week:

Here's a quick recap of our challenge rules:
 
1.  Create a new paper project
2.  Upload your creation to your blog with a link back to us and provide a direct link to the post featuring your challenge submission.
3.  Please link your card to no more than four challenges, TOTAL.
4.  Have FUN!

I can't wait to see how you interpret this week's theme and look forward to visiting your blogs this week! Enjoy the rest of your weekend as it will be over all too quickly.

I am spending today with a bunch of lovely ladies who braved the British weather to join me for my first residential luxury crafting retreat. Yesterday was a craft-packed day and theres just as much fun in store today. Wish you were here to join in the fun too!

I'll be back tomorrow with another project; until then, happy stampin'!


Stampin' Up! Supplies Used: 

Table built using Product Table Builder by The Crafty Owl - Independent Stampin' Up! Demonstrator.

Mini Catalogue

BROWSE THE CATALOGUE

The mini catalogue is now live! Read and download your copy here.

Shop Online

Access my online shop 24 x 7, 365 days of the year:

Current April hostess code:

VDKNV7BH

Shop Online

Join My Team

It's always a great time to join Stampin’ Up! New team members can get £130 worth of products for only £99 + free business supplies + free shipping + all the fun being a part of Stampin’ Up! Stampin' Up! has something for everyone: join my growing team and benefit from my support to enjoy Stampin' Up! however you choose.

If you're interested, call me for a chat to understand how I can help you realise your goals. Alternatively, if you have already decided to sign up and you just can't wait, please click here for the link to the online form where you can sign up and order your starter kit right away! 

Latest Kit!

Stampin Cut and Emboss

The Rock Legend Kit has all you need to make 8 cards with coordinating envelopes. Along with the new Panda Friends Kit, both are available from January 4th for just £14 each - get yours here!

2023-24 Annual Catalogue

BROWSE THE CATALOGUE

Click on the catalogue for a full list of current SU! supplies - if you would like to order any of the items featured, please drop me a line at [email protected] or give me a call on 07773 421446 - I'd be happy to help.

New Online Exclusives

There are new products available exclusively in the online store from 5 March - check them out here.

About Me

Hi I'm Joanne and live in Northampton and when I'm not looking after my husband and two beautiful children, am an avid crafter with a passion for all things Stampin' Up!

I must confess that I have never been a big rubber stamper - until I discovered Stampin' Up! that is. I love the fact that I can get such great results with co-ordinating stamps, inks, papers and punches - the possibilities are endless! Join me on my stamping journey as I share the things I love and be inspired to create amazing things yourself!

Follow Me

Monthly Newsletter

Box Builder

Click the button above to use Box Buster to create your custom box design using the Envelope Punch Board!

Kits Collection Now Available!

Stampin Cut and Emboss

The new Kits Collection from Stampin' Up! is now available!

Click here to see the current kits available and order yours online today.

I Design For


Stampin' Up Stuff

This is my personal blog and is not endorsed by Stampin’ Up! I hope you find it a plentiful source of ideas and personal inspiration but please don't copy my designs for contest submission or use for classes, publication or sale without express permission.