
Greenery Embossed Christmas Card

by Joanne James17. March 2022 19:52

Happy St Patrick's Day! Today's card was inspired by the following challenges: 


You might have expected today's card to feature green in a big way, although instead of the luck of Irish I had an altogether different festive occasion in mind - take a look:


Here's the low-down on today's card:

The team over at Just Us Girls are trending with embossing folders this week and I decided that a partial emboss using my Greenery Embossing Folder would lend itself to a Christmas card, when embossed on Shaded Spruce with some touches of gold - perfect for the current Color Dare Challenge. I embossed it on a panel onto which I also heat-embossed a simple sentiment in gold and added a sliver of gold glimmer paper to one edge before adhering to my card base. With a final touch of sparkle from some gold glitter enamel dots added to the berry detail of the embossed section, it is also my entry for Less Is More's current challenge to add a 'Bit of Bling' to our clean and simple cards. The enamel dots are SO sparkly - I'm not sure the photos really do it justice, but here's another close up:


Here is the visual summary of the key products used on today's project for you to pin for easy reference:


You can see all of my 'How To' summaries on my 'How To - Tips and Techniques' Pinterest board in case you've missed any. 

Enjoy your evening and I'll be back tomorrow with another project. Until then, happy stampin'!


Stampin' Up! Supplies Used:

Table built using Product Table Builder by The Crafty Owl - Independent Stampin' Up! Demonstrator.

Relax In The Moment

by Joanne James16. March 2022 11:30

Today I'm sharing a card that I made using the current sketch over at TGIF Challenges:

Today's card features the 'In The Moment' stamp set and is also a sneak peek of things to come for the ladies attending my class next week that centres around this set. So many creative possibilities with this one in addition to straightforward colouring and this card showcases just one of them - take a look:


Here's the low-down on today's card:

I stretched the sketch as I needed my panel to be horizontal rather than vertical, to accommodate my stamped image and tag element and stamped my image onto a scalloped rectangle. I added a strip of Hand-Penned designer series paper to the left hand side, and having stamped and coloured my image using Stampin' Blends, I stamped the image a second time onto a piece of Hand-Penned paper and fussy cut both the blanket and pillows and paper-pieced them onto my coloured image to bring in some extra pattern. You can see the detail more closely on the image below:


I think this is quite a fun way to add extra interest to a coloured image. Some co-ordinating twine and a sentiment on a coloured tag completes my card.

I used one of the 2020-22 In Colors, Misty Moonlight, for the base of my card today and this is a good time to remind you that Misty Moonlight, along with the other 2020-22 In Colors Cinnamon Cider, Just Jade, Bumblebee and Magenta Madness, will all be retiring soon when the current annual catalogue retires. The retiring lists for the Annual Catalogue will be announced next week on Wednesday 23rd March and that is usually the point at which in-color products sell out, so if you need to stock up on ink, cardstock, reinkers or accessories, now is the time to get your order in!

Here is the visual summary of the key products used on today's project for you to pin for easy reference:


You can see all of my 'How To' summaries on my 'How To - Tips and Techniques' Pinterest board in case you've missed any. 

I'm looking forward to making a version of this card along with a couple of others at my card class next week. As a reminder, all of my classes are delivered online via Zoomm these days so if you're reading this and think you would like to join us do get in touch - you would be most welcome!

Enjoy your day; following yesterday's sunshine today it's pouring with rain, grey and freezing cold - clearly spring has not quite yet sprung!! I'll be keeping warm in my craft room and will be back tomorrow with another project. Until then, happy stampin'!


Stampin' Up! Supplies Used:

Table built using Product Table Builder by The Crafty Owl - Independent Stampin' Up! Demonstrator.

Daffodil Daydream Birthday Card PP582

by Joanne James13. March 2022 08:00

Today it's Sunday and time for this week's new challenge over at The Paper Players! It's my turn to host this week and I have chosen a sunny trio of colours for our colour challenge this week


I combined my colours with Amy's great sketch over at Freshly Made Sketches this week and used that central panel to showcase some spring daffodils - take a look:


Here's the low-down on today's card:

I used two pieces of Brights designer paper each with the same pattern, one in Daffodil Delight and one in Mango Melody, to cover my card base and added a scalloped stitched rectangle to the centre. I stamped and coloured the trio of daffodils from the Daffodil Daydream stamp set with my Stampin' Blends in the challenge colours and then diecut them with the co-ordinating Daffodil Dies and popped them up on dimensionals onto the diecut panel. A trio of yellow opaque sequins completes my card:


I also added a single daffodil to both the inside of my card and a co-ordinating envelope:


I love yellows and at this time of year daffodils were an obvious choice for me. The daffodils in my front garden border came into bloom this week and they looks so bright and cheery - like a little 'welcome home' party each time I pull my car onto the driveway!

Here is the visual summary of the key products used on today's project for you to pin for easy reference:


You can see all of my Product and 'How To' summaries on my 'How To - Tips and Techniques' Pinterest board in case you've missed any. 

So what will you create with this sunny colour palette? Before you reach for your ink and papers, check out what our amazing team has created to inspire you this week:

Here's a quick recap of our challenge rules:
 
1.  Create a new paper project
2.  Upload your creation to your blog with a link back to us and provide a direct link to the post featuring your challenge submission.
3.  Please link your card to no more than four challenges, TOTAL.
4.  Have FUN!

Enjoy your day; I am hoping that the weather will be as nice as it was here yesterday and that I will get to spend some time in the garden as there are lots of odd jobs that need doing. Otherwise, no special plans here in the James household this week. I'll be back tomorrow with another project. Until then, happy stampin'!


Stampin' Up! Supplies Used: 

Table built using Product Table Builder by The Crafty Owl - Independent Stampin' Up! Demonstrator.

Lucky You Flowers of Friendship For St Patrick's Day

by Joanne James12. March 2022 09:00

Happy Saturday everyone - hurrah for the weekend! Today I'm sharing a card that uses the current sketch layout over at Try Stamping on Tuesday that was inspired by the fabulous photo over at The Card Concept:


With St Patrick's Day coming up next Thursday, it's easy to see where the team at The Card Concept are coming from with their 'Wearing O' The Green' theme this week. I took a ton of inspiration from the cushion in their photo to create my clean and layered card - take a look:


Here's the low-down on today's card:

Lucky You - First up - all those shamrocks definitely needed a 'lucky' sentiment! I chose to use the watercolour effect stamp with the words 'lucky to know you' from the 'Lucky You' stamp set and stamped it onto a label cut using the Painted labels Dies (and trimmed slightly to it). I love the subtle watercolour effect of the sentiment stamps in this set and they are great when you want to make a feature of the words themselves.  

Flowers of Friendship - I'm sure I have the perfect clover/shamrock in my retired stamp sets, but when I came to make this card I couldn't find one anywhere so I had to get creative! I wanted to include some shamrocks - or in my case my lucky four-leaf clover substitute! - so turned to the punch I used on this card to make my stencil yesterday, this time to stamp and punch a row of leaves in So Saffron and Granny Apple Green. The colours on my card today were also influenced by the inspiration photo - I like the mix of pale yellow and vanilla in with the greens, I think they really lift and elevate the card. I added Just Jade enamel dots to the centres of the leaves to tie them in with my card base.


A Carpet of Clover - I originally left my card base blank, but my clean and simple heart still felt it was a little plain, so instead I created a carpet of clover by stamping little leaves all over to give a tone-on-tone effect. This stamp is actually a border stamp from the 'Flowers of Friendship' set - you can see it here stamped on the inside of my card:


To achieve the random effect on my cardfront I simply inked only the end two leaves each time I stamped, rather that the whole row.

How often do you find yourself getting properly creative with the items in your craft collection when you can't find the exact thing you're looking for? Do leave me a comment below - I'd love to hear how you've repurposed stamps or tools to create something different. 

Here is the visual summary of the key products used on today's project for you to pin for easy reference:


You can see all of my 'How To' summaries on my 'How To - Tips and Techniques' Pinterest board in case you've missed any. 

Both of the James Juniors are out on the hockey pitch today: one playing a single match, but miles away and the other with a full day of 3 back-to-back matches with both playing an dumpiring commitments. Last week's injury in our house to add to the tally was bruised hand, complete with ball dimple pattern - and a medical emergency involving another parent that had nothing to do with the play and which thankfully was dealt with swiftly by a trip to A&E. I'm hoping tomorrow will be less eventful! Enjoy your day and I'll be back tomorrow with another project where I am hosting this week's new challenge over at the Paper Players and I have a fresh colour challenge for you. Until then, happy stampin'!


Stampin' Up! Supplies Used:

Table built using Product Table Builder by The Crafty Owl - Independent Stampin' Up! Demonstrator.

Jewelled Trellis Thank You Card

by Joanne James7. March 2022 14:30

Happy Monday everyone! After a weekend out of action, I am feeling slightly better today and this morning had time to finish my card for this week's Freshly Made Sketches challenge:


I love Karren's sketch this week - wide open to interpretation. So much so, the eagle-eyed amongst you will have noticed I used the same layout for my Paper Players card that I posted yesterday (you can see that card here if you missed it). I didn't link that one up as whilst I loved the end result I felt it wasn't really 'clean' enough to do Karren's sketch justice. Not the case for today's card though - take a look:


Here's the low-down on today's card:

Slim Card Dies Trellis - The central panel of the sketch is perfect to showcase diecut detail; I used one of the Slim Card Dies in gold foil to create something that reminds me of a Moroccan trellis, cut down though to fit a standard sized card front. Just because the dies are made for slimline cards, doesn't mean they can't be used in this way too.  

Jewels of Colour - The colour scheme for today's card comes from the palette over at TGIF Challenges this week. This is not a trio of colours I would usually use together, but I thought they would make a rich blended backgound of graduated colour - the perfect backdrop for my trellis. As a bonus, I wanted to pick out elements of the trellis design with rhinestones or similar, and following a perusal of my collection found that the 2020-22 In Color Enamel Dots were perfect; two of the colours were spot on, and the Cinnamon Cider ones worked for the Soft Suede portion of my card where I only needed a couple because of my sentiment position (which I chose with this in mind). I think the addition of the enamel dots really makes a feature of the design:


Amazing Thanks - This is one of those rather rare no-stamping cards; I chose to use a layered 'thanks' diecut from the Amazing Thanks dies for my sentiment, layering gold foil onto Magenta madness layered with vellum to tone down the pink. These dies really are a keeper - so very useful! There will be some stamping on the inside of this card, but for the time being it's blank as I might use it for a specific type of thank you card. 

I really like this card and whilst this isn't a colour combo I would ordinarily have chosen (and in fact I originally made this card in an alternative colourway) I think it really makes it. I think it has a  very Aladdin and Arabian Nights vibe!

Here is the visual summary of the key products used on today's project for you to pin for easy reference:


You can see all of my 'How To' summaries on my 'How To - Tips and Techniques' Pinterest board in case you've missed any. 

Right - I'm off to squeeze in a few jobs before heading out on the school run. Enjoy the rest of your day and I'll be back tomorrow with another project. Until then, happy stampin'!


Stampin' Up! Supplies Used:

Table built using Product Table Builder by The Crafty Owl - Independent Stampin' Up! Demonstrator.

You Are Amazing Daffodil and Tulip Spring Bouquet PP581

by Joanne James6. March 2022 08:00

Today it's Sunday and time for this week's new challenge over at The Paper Players! It's the turn of the fabulous Jaydee to host this week and she has a timely seasonal theme challenge for you to work with:


Nothing says spring to me more than daffodils and tulips, so I decided to go all out and diecut a spring bouquet for the front of my card that have these as the centrepiece - take a look:


Here's the low-down on today's card:

I added a panel of (retired) Sale-A_Bration Friendly Hello DSP to the centre of my card and overlaid this with a slimline die coverpiece, leaving the long inset pieces intact, then built up my bouquet from Daffodil Delight and So Saffron daffodils and Fresh Freesia tulips:


I finished with an over-the-top ribbon bow and a layered 'you are amazing' diecut sentiment cut with my Amazing Thanks Dies. This card is larger than usual (15cm x 21cm) to accommodate my spring blooms. I'm afraid I succumbed to the most dreadful cold this week, so I haven't finished decorating the inside of this card. Hence no inside photos - a job for another day.

Here is the visual summary of the key products used on today's project for you to pin for easy reference:


You can see all of my Product and 'How To' summaries on my 'How To - Tips and Techniques' Pinterest board in case you've missed any. 

Before you reach for your ink and papers, check out what our amazing team has created to inspire you this week:

Here's a quick recap of our challenge rules:
 
1.  Create a new paper project
2.  Upload your creation to your blog with a link back to us and provide a direct link to the post featuring your challenge submission.
3.  Please link your card to no more than four challenges, TOTAL.
4.  Have FUN!

Enjoy your day; I will be hiding under my blanket with a box of tissues feeling sorry for myself! Hope normal service will resume soon! Until then, happy stampin'!


Stampin' Up! Supplies Used: 

Table built using Product Table Builder by The Crafty Owl - Independent Stampin' Up! Demonstrator.

Quiet Meadow Honeybee Home Card FF104

by Joanne James4. March 2022 09:00

Today I have my card for the new challenge over at Festive Friday:


The challenge that we are celebrating this week is 'World Planting Day' which is on 20th March. Remember the fun thing is that at Festive Friday you do not need to actually celebrate the occasion; your goal is to simply use three or more items from the inspiration list on your project. This week I used flowers, green, brick and bugs/insects and this is what I came up with:

Here's the low-down on today's card:

Quiet Meadow Honeybee - This card is something of a departure from my usual style, as I don't tend to go in for collage-style stamping, but I think the images in both the 'Quiet Meadow' and 'Honeybee Home' stamp sets really lend themselves to this style. I used a Bumblebee coloured cardbase and added some tone-on-tone stamping in the same colour, along with some bees and splatter in black and used a blender brush to add colour to the outer edges. I also stamped a single flower on one circle, and for my main focal point I used my markers to add a buttercup in Bumblebee with a Just Jade stem. I also added a little extra collage-style stamping to the inside of my card: 


Layers and Textures - This card is all about textures and layers. In addition to my stamping, I added layered circles and diecut flower stems to build up my design. The circles were a combination of hive embossed gold vellum, some embossed brick and some (retired) Harvest Meadow designer series paper, along with a few in-colour enamel dots. This give lots of visual interest, despite the limited colour palette. 

A Trinket To Finish - Even though I added stamped bees to my background, I couldn't resist adding a gold bumblebee trinket to my stamped circle focal point:

A sentiment from the 'Honeybee Home' set completes my card. So what do you think? Not my usual style, but I had a lot of fun putting it together and stepping outside my comfort zone for a while. I've had a head cold this week and have definitely found myself being drawn to yellow - I think I've subconsciously been cheering myself up! It's also perfect for the current challenge over at The Alphabet Blog, where they are on the letter 'X is for xanthic' - which apparently means 'relating to the colour yellow' - who knew?! I am a bit of a logophile (that means lover of words if it's not a word you are familiar with) so I am delighted to add this one to my collection!

Here is the visual summary of the key products used on today's project for you to pin for easy reference:


You can see all of my 'How To' summaries on my 'How To - Tips and Techniques' Pinterest board in case you've missed any. 

How does our board inspire you? I can’t wait to see what YOU create! For more inspiration, be sure to visit the rest of the  Festive Friday Challenge Design team:

Ann Schach - out this week
Beth McCullough
Sharon Hashimoto Burkert
Melanie Hungerford
Helen Jennings
Stephanie Lanzalotto
Melva Peters
Jaydee
Diane Evans
Joanne James

Enjoy your day and I'll be back tomorrow with another project. Until then, happy stampin'!


Stampin' Up! Supplies Used:

Table built using Product Table Builder by The Crafty Owl - Independent Stampin' Up! Demonstrator.


Windmill Flowering Tulip Fields Mother's Day Card With Belly Band PP580

by Joanne James27. February 2022 09:00

Today it's Sunday and time for this week's new challenge over at The Paper Players! It's the turn of the fabulous Anne Marie to host this week and she has my favourite, a sketch challenge, for you to work with:
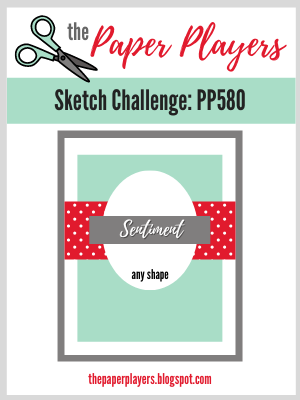
    

I do love a good sketch and this week I really went to town! I have been making lots of cards with the 'Tulip Fields' bundle as it was the feature bundle for my online class last week and I decided that the layout of Anne Marie's sketch was perfect for a diecut windmill for the central focal point and the beginnings of what turned out to be a rather special card - take a look:
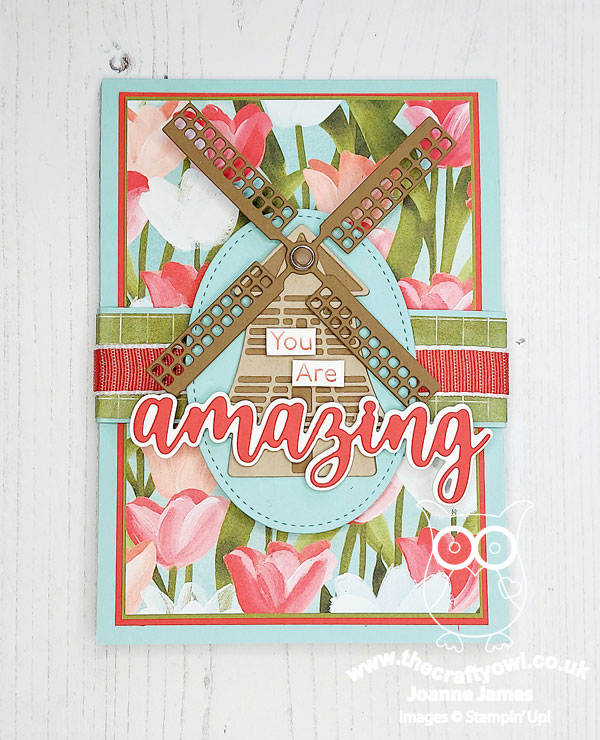
 

Here's the low-down on today's card:

Many Layers - This is a card of many layers - which means I'm also playing along with the ladies at Just Add Ink this week where I chose 'layers' and patterned paper as my two things. More on patterned paper in a moment, but firstly those layers! I can count 13 on the front of my card alone (not including the band of ribbon!) - and there are even more inside! I used a (retired) stitched oval diecut as a base for my windmill cut using the Windmill dies and added a sentiment combining stamped words taken from 'Art Gallery' and a layered 'amazing' cut using the Amazing Thanks Dies. I attached these to a horizontal band as the focal point for the front of my card.You can see the layered loveliness in more detail below:
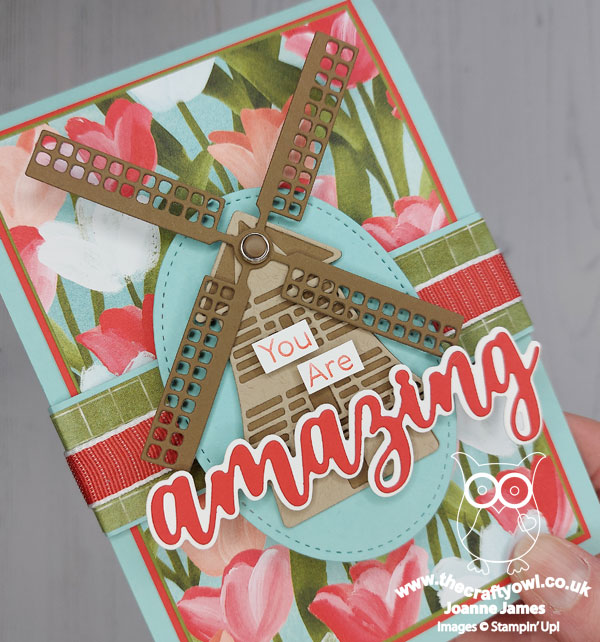
A Belly Band Surprise - The layered windmill is in fact attached to a belly band decorated with a strip of DSP, which when removed reveals the beautiful red, pink and white tulips of the Flowering Fields DSP in all it's glory, along with a sentiment made from a combination of some partial stamping from a stamp in the 'Flowering Tulips' stamp set and the word 'Mother's' cut using the Word Wishes Dies:
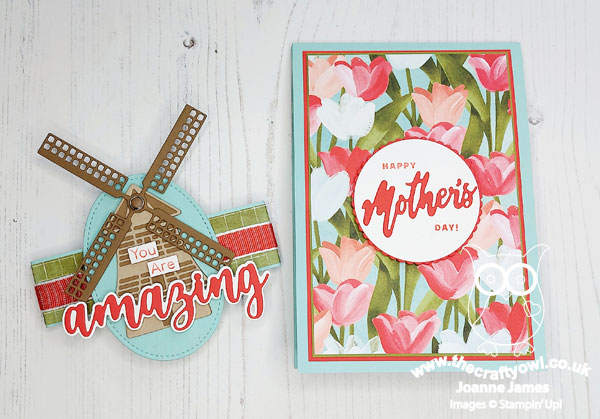
 

With Mother's Day here in the UK only a few weeks away, this was a great opportunity to get ahead and make my Mother's Day card. I love that the layered circle greeting sits below the windmill oval of the belly band and is only revealed when the belly band is removed. 

Mother's Day Details - The surprises don't end there though. My card has an additional flap, so when it's opened you see this panel, also decorated with another piece of Flowering Fields DSP and a trio of tulips cut with the Tulips Dies:
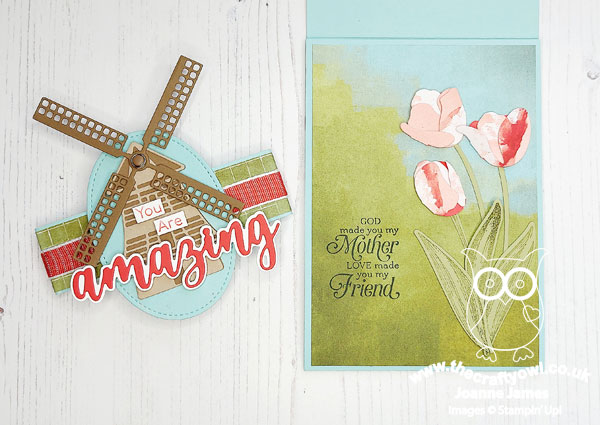
 

 These Tulips Dies are amazing - they create the most amazing dimensional tulips! I cut mine from another pattern in the Flowering Fields DSP pack; it is actually a Petal Pink sky with white and red clouds, but I like the mottled effect that it gives the tulips and they compliment the pattern on the front of the card:
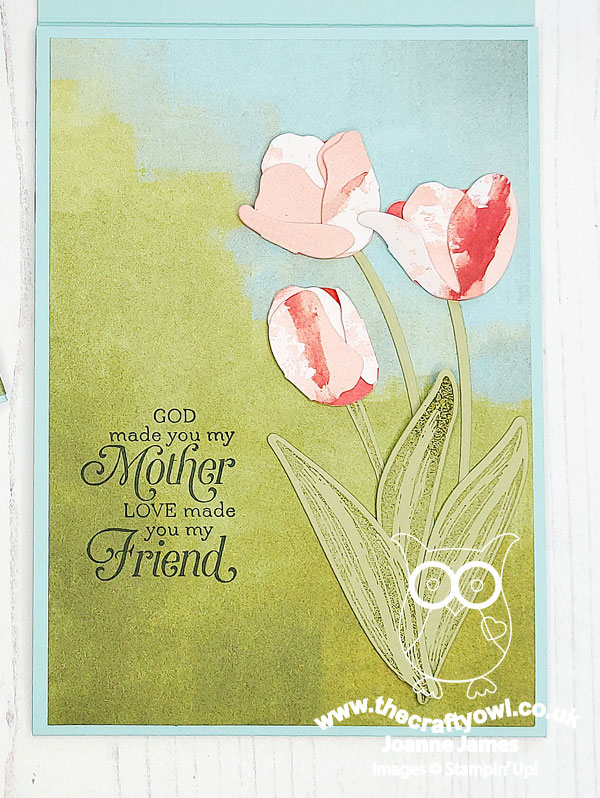
 

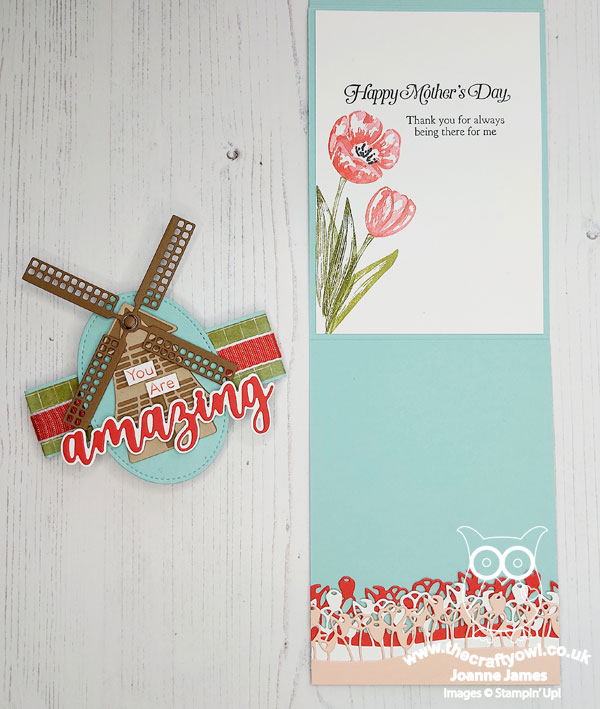
The sentiment, along with the one on the inside of the card is from the retired stamp set 'Strong and Beautiful'. This set is a keeper - the words in this set are so perfect for special female cards. when you open the next flap, the inside panel is revealed. I bordered the edge of the bottom panel with a trio of tulip border dies (I might add another diecut windmill behind these tulips - now that I am looking at it again this panel is a little light on decoration compared to the others):
 

 And here's a close-up of the innermost panel, decorated with some layered tulips stamped with the 'flowering Tulips' stamp set:
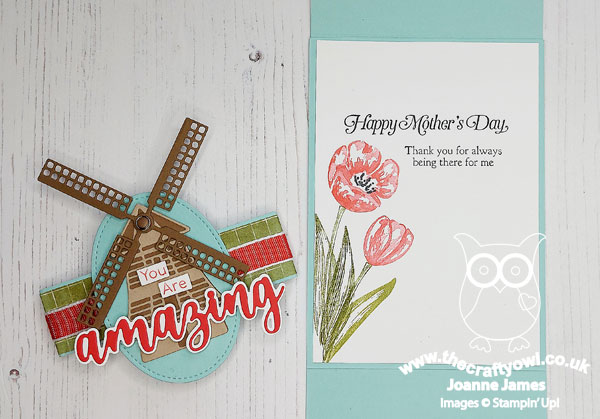
 

As you can imagine, all those layers make for a bulkier than usual card, so I will be making a custom box-envelope to enclose it in. That's a job for another day though! This kind of card does take a long time to make, but it is worth it - I love the end result and know my Mum will appreciate it too.

Here is the visual summary of the key products used on today's project for you to pin for easy reference:
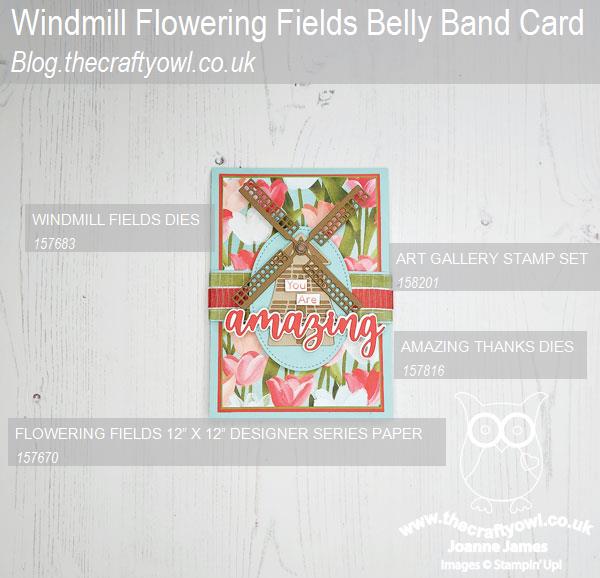
 

You can see all of my Product and 'How To' summaries on my 'How To - Tips and Techniques' Pinterest board in case you've missed any. 

Before you reach for your ink and papers, check out what our amazing team has created to inspire you this week:

Here's a quick recap of our challenge rules:
 
1.  Create a new paper project
2.  Upload your creation to your blog with a link back to us and provide a direct link to the post featuring your challenge submission.
3.  Please link your card to no more than four challenges, TOTAL.
4.  Have FUN!

Enjoy your day; we are hoping for another restful Sunday, mainly centred around cooking and eating - we are cooking a Turkish recipe for dinner today for the first time, so that should be fun! I'm also hoping to squeeze in another movie this afternoon - last week's 'Encanto' proved a big hit so this week we might go for 'Sing 2' - hope it's as good as the first one!

I'll be back tomorrow with another project. Until then, happy stampin'!


Stampin' Up! Supplies Used: 
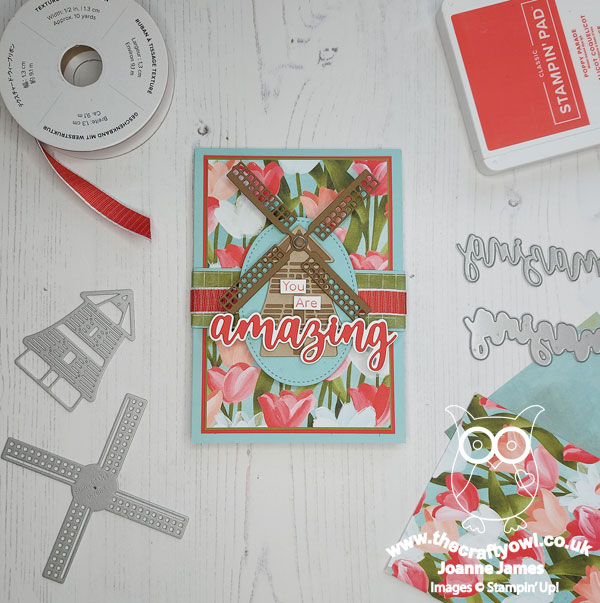
Table built using Product Table Builder by The Crafty Owl - Independent Stampin' Up! Demonstrator.

Catch You Later Monkey Clean and Simple PP579

by Joanne James20. February 2022 09:00

Today it's Sunday and time for this week's new challenge over at The Paper Players! It's the turn of the fabulous Ann to host this week and she has a clean and simple challenge for you to work with:


I decided to use the sketch over at Just Add Ink for my layout this week and used two overlappping hexagons, negative and positive, cut with the Beautiful Shapes Dies for my central shapes and chose to feature the two cute monkeys from the 'Catch You Later' stamp set for my wildlife - take a look:


Here's the low-down on today's card:

I stamped my monkeys onto some white cardstock and coloured them with my new skin tone Blends markers, then masked them off and used some Balmy Blue ink and a stencil I made using my Basic Borders Dies to create a soft and subtle background of clouds with my blender brush behind them:

I added this to my Shaded Spruce card base and then added my top panel, which I ran through my diecutting machine with the Stitched Greenery Die before cutting out the hexagon shape and popping this panel up on dimensionals to frame my little jungle scene. I added a sentiment to another popped-up hexagon and finished my sentiment on the inside, with another stamped-off image of the monkeys too:


So what do you think? Cute, right?! It's my 23rd wedding anniversary today and whilst this didn't start out as a card for my DH, it may well be the one I send as he would appreciate the humour over sweet and smushy love hearts any day!

Here is the visual summary of the key products used on today's project for you to pin for easy reference:


You can see all of my Product and 'How To' summaries on my 'How To - Tips and Techniques' Pinterest board in case you've missed any. 

Before you reach for your ink and papers, check out what our amazing team has created to inspire you this week:

Here's a quick recap of our challenge rules:
 
1.  Create a new paper project
2.  Upload your creation to your blog with a link back to us and provide a direct link to the post featuring your challenge submission.
3.  Please link your card to no more than four challenges, TOTAL.
4.  Have FUN!

Enjoy your day; one of the James Juniors had a friend stay for a sleepover yesterday, so apart from taking him home, we are having a quiet day indoors. The James girls definitely deserve it; as my regular readers know it is not uncommon for us to be out in all weathers either playing or watching hockey at the weekend. Well, despite storm Eunice and the incredible high winds and driving rain we've had here over the past few days, yesterday's match wasn't cancelled. We all turned up and despite a seriously waterlogged pitch, the umpires decided it was safe to play. The end result? Players and parents soaked to the skin and frozen to the bone - and just to give you a flavour of what I'm talking about, here's a photo I managed to snap during 'warm up' before the game started: 


I have genuinely never known anything like it! To make things worse the girls lost 4-2, despite their best efforts. So today we are staying warm - I think we might actually huddle under a blanket and watch 'Encanto' - it's about time we discovered why no-one talks about Bruno!

I'll be back tomorrow with another project. Until then, happy stampin'!


Stampin' Up! Supplies Used: 

Table built using Product Table Builder by The Crafty Owl - Independent Stampin' Up! Demonstrator.

Nothing's Better Than Cookies Card FF103

by Joanne James18. February 2022 09:00

Happy Friday everyone! Today I have my card for the new challenge over at Festive Friday:


The challenge that we are celebrating this week is 'National Peanut Butter Lovers Day' which is on 24th January each year. Remember the fun thing is that at Festive Friday you do not need to actually celebrate the occasion; your goal is to simply use three or more items from the inspiration list on your project. This week I used baked goods, brown and enamel dots for my clean and simple cookie card today - check it out:


Here's the low-down on today's card:

Nothing's Better Than ... - I love the sentiment combinations in the 'Nothing's Better Than' stamp set - I mean, coffee, chocolate, cookies and cocktails!! I'm a tea drinker over coffee, but that would disrupt the 'c's, so I'm good with it! Today's card of course features cookies as my baked goods; the fun thing about the sentiments in this set is that they can be used inside and outside to make fun combinations - this is how I finished the inside of today's card:


... Cookies - I used a simple layered square for the sentiment on the front of my card, backed with a strip of (retired) pink plaid paper, and accented my sentiment with a couple of diecut cookies, complete with crumbs:


A trio of pink enamel dots complete today's card.

Here is the visual summary of the key products used on today's project for you to pin for easy reference:


You can see all of my 'How To' summaries on my 'How To - Tips and Techniques' Pinterest board in case you've missed any. 

How does our board inspire you? I can’t wait to see what YOU create! For more inspiration, be sure to visit the rest of the  Festive Friday Challenge Design team:

Ann Schach
Beth McCullough
Sharon Hashimoto Burkert
Melanie Hungerford
Helen Jennings
Stephanie Lanzalotto
Melva Peters
Jaydee
Diane Evans
Joanne James

Enjoy your day; it's the last day of half-term today however with the impending storm the James Juniors and I shall be battonning down the hatches and spending the day indoors! and I'll be back tomorrow with another project. Until then, happy stampin'!


Stampin' Up! Supplies Used:

Table built using Product Table Builder by The Crafty Owl - Independent Stampin' Up! Demonstrator.


Mini Catalogue

BROWSE THE CATALOGUE

The mini catalogue is now live! Read and download your copy here.

Shop Online

Access my online shop 24 x 7, 365 days of the year:

Current April hostess code:

VDKNV7BH

Shop Online

Join My Team

It's always a great time to join Stampin’ Up! New team members can get £130 worth of products for only £99 + free business supplies + free shipping + all the fun being a part of Stampin’ Up! Stampin' Up! has something for everyone: join my growing team and benefit from my support to enjoy Stampin' Up! however you choose.

If you're interested, call me for a chat to understand how I can help you realise your goals. Alternatively, if you have already decided to sign up and you just can't wait, please click here for the link to the online form where you can sign up and order your starter kit right away! 

Latest Kit!

Stampin Cut and Emboss

The Rock Legend Kit has all you need to make 8 cards with coordinating envelopes. Along with the new Panda Friends Kit, both are available from January 4th for just £14 each - get yours here!

2023-24 Annual Catalogue

BROWSE THE CATALOGUE

Click on the catalogue for a full list of current SU! supplies - if you would like to order any of the items featured, please drop me a line at [email protected] or give me a call on 07773 421446 - I'd be happy to help.

New Online Exclusives

There are new products available exclusively in the online store from 5 March - check them out here.

About Me

Hi I'm Joanne and live in Northampton and when I'm not looking after my husband and two beautiful children, am an avid crafter with a passion for all things Stampin' Up!

I must confess that I have never been a big rubber stamper - until I discovered Stampin' Up! that is. I love the fact that I can get such great results with co-ordinating stamps, inks, papers and punches - the possibilities are endless! Join me on my stamping journey as I share the things I love and be inspired to create amazing things yourself!

Follow Me

Monthly Newsletter

Box Builder

Click the button above to use Box Buster to create your custom box design using the Envelope Punch Board!

Kits Collection Now Available!

Stampin Cut and Emboss

The new Kits Collection from Stampin' Up! is now available!

Click here to see the current kits available and order yours online today.

I Design For


Stampin' Up Stuff

This is my personal blog and is not endorsed by Stampin’ Up! I hope you find it a plentiful source of ideas and personal inspiration but please don't copy my designs for contest submission or use for classes, publication or sale without express permission.