Punch Art Underwear Gift Card

by Joanne James20. July 2013 21:14

I've been taking advantage of the cooler temperatures today and spending some time in my craft room working on some punch art cards. I'll share these with you in due course, but today wanted to share a punch art card I made to accompany a lingerie gift voucher I gifted a good friend of mine on her birthday a little while ago. So here is my card:

There are lots of examples of how to create this kind of card on the internet and this is my take on it. The colour combo was inspired by the gift voucher itself, which you can just see inside the card: Rich Razzleberry on Pool Party. I then used my scoreboard to add the patterned edges to my layer with some pearls to finish off.

I love the fun nature of this card, which was shared by its recipient. Above all, so much nicer than the plain card I received from the shop when I purchased the gift voucher!

Back tomorrow with another project. Until then, happy stampin'!


Stamps: Tea Shoppe (retired)

Cardstock: Rich Razzleberry, Pool Party, Blushing Bride, Brights DSP

Ink/Stampin' Write Markers: Rich Razzleberry, Pool Party

Tools: Heart Punch, Scallop Edge Border Punch, Simply Scored Borders Plate

Finishing Touches: Basics Pearls

Father's Day Card

by Joanne James14. June 2013 22:04

So today I can share the card I've made for my own Dad in readiness for Father's Day on Sunday. I've had the card made for over a week, but I couldn't be sure he wouldn't check out my blog as he does every once in a while and see it, so I've had to wait until I knew there was no chance of this happening. As he's at my house with my Mum visiting for the weekend, ready to celebrate Rebecca's birthday tomorrow, I know he won't be on the internet so there will be no chance he will see it before he receives it in person. Here is the finished card:

The layout is very similar to the Mother's Day card I made for my Mother-in-law which you can see here. For my Father's Day card, I used Island Indigo and the retiring Baja Breeze (these blues go so well together) and used some First Edition Designer Series Paper to highlight my typeset raised letters of the word 'Dad'. I also scored some border lines to each side of the panel for added definition. I offset this panel so that I could add some co-ordinating baker's twine and one of the large brushed nickel Basics Designer Buttons to finish off the card. I then created a Very Vanilla insert panel that I stamped with the 'Happy Father's Day' stamp from the Delightful Dozen stamp set.

I really like this card and have also made a version in red for a commission - a clean and classic style. I do have one last Father's Day card to share with you: the one I've made for my own husband from the James juniors, but for obvious reasons I won't be sharing this one until Sunday, although if we manage another two days without him seeing it or my youngest giving the game away it will be nothing short of a miracle!

Back tomorrow with a special birthday card to share. Until then, happy stampin'!


Stampin' Up Supplies:

Stamps: Delightful Dozen (inside card)

Cardstock: Island Indigo, Baja Breeze, Very Vanilla, First Edition DSP

Ink/Stampin' Write Markers: Island Indigo

Tools: Typeset Alphabet Die, Simply Scored

Finishing Touches:  Island Indigo Baker's Twine, Basics Designer Buttons

Tags: , , , , , , , ,

Cards

Number One Dad Card

by Joanne James6. June 2013 22:00

Keeping with the Father's Day theme, another quick Dad card from me today. This time I went with a rosette for a Number One Dad:

I went with a Cherry Cobbler base to match my designer paper. The striped paper actually comes from the Christmas Be of Good Cheer paper stack (retiring this month), but it is neutral enough to work well on a masculine card. I made a rosette in double-quick time using my Simply Scored score board, then layered my 'Number One' stamp with a couple of scalloped circles to balance the size. I quite like this card, although if I made it again I would substitute the green scalloped circle with a vanilla one; I don't know whether it's psychological or not, but adding the green into the colour combo makes it look more 'Christmassy', which isn't quite the effect I was after!

Back tomorrow with another project; until then, happy stampin'!


Stampin' Up Supplies:

Stamps: Ciao Baby!, For My Family

Cardstock: Cheery Cobbler, Very Vanilla, Be of Good Cheer DSP

Ink/Stampin' Write Markers: Cherry Cobbler

Tools: Simply Scored, 7/8" Scallop Circle Punch, 1 1/4" Scallop Circle Punch, 1 3/4" Scallop Circle Punch

Finishing Touches: Cherry Cobbler Baker's Twine

Help For Heroes Part One - Best of Flowers

by Joanne James2. June 2013 19:42

What a lovely weekend! Today I spent the whole afternoon outside and enjoyed a lovely cycle ride with the rest of the family - I felt like we had to make the most of it; if it's like last weekend, it could be raining cats and dogs tomorrow! As promised yesterday, I have a couple of cards to share with you today featuring one of the stamps from this month's 25th anniversary 'Best of Flowers' stamp set.

In case you're wondering why I headed up this post 'Help the Heroes', these cards, along with two more that I will share tomorrow, were designed in answer to a request from a fellow crafter and member of my wider Stampin' Up! team, whose husband is serving in the RAF and will shortly be departing for another tour of duty to Afghanistan. Our brave serving forces have little or no access to nice cards to send whilst away and so she always sends a box or two so that they can have something a little different to plain paper to write their notes home and wondered if her fellow crafters would be prepared to help out too. All our forces do such a great job and events such as the recent killing of a soldier in Woolwich show just what a dangerous life they lead, both in battle and unfortunately sometimes at home too. I was happy to help, so set to work creating a selection of cards that I could make lots of, but also were post-friendly and didn't have glitter, gems or anything else that could transfer to the sender and potentially make them a target.

So, for the first design, I used the silhouetted daisy stamp from the 'Best of Flowers' set and created two identical cards in different colourways - one pink, one yellow. Here's the card in pink: 

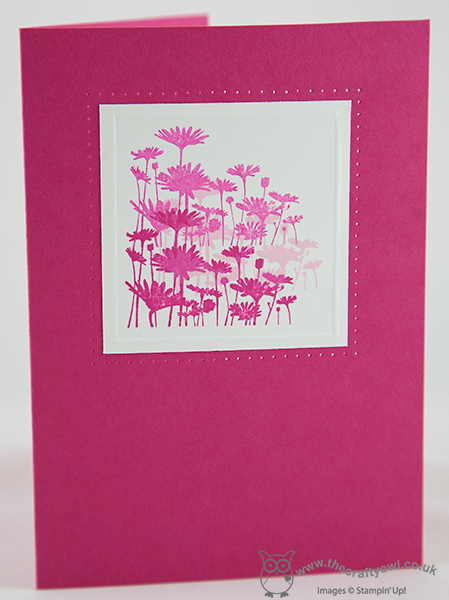
I used the stamp to create a simple 'field of flowers' look by stamping in Melon Mambo and Pink Pirouette and stamping off to create degrees of colour and give the image a sense of depth of field. I then created a scored border and paper-pierced around the image for added interest. I then created a batch of the same card in yellow, using Daffodil Delight and So Saffron inks:

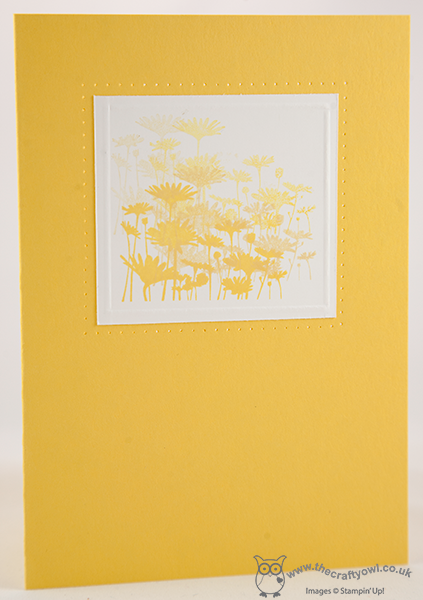
So which colour way do you prefer? I think I prefer the yellow one, just because it is so cheery and bright. I really love this little stamp and can think of lots more ways that I will be using it. I will be making other projects with the stamps in this set, so if the stamps in this set appeal to you, do pop back and see what else I make with them. If you would like to order this set, it costs £13.95 and you can check out the full set of stamps on the image in the side bar of my blog.

Tomorrow I will be sharing the other two cards I made for my Help For Heroes card bundle - two new designs, both using the Summer Silhouettes stamp set. Until then, happy stampin'!


Stampin' Up Supplies:

Stamps: Best of Flowers

Cardstock: Melon Mambo, Whisper White, Daffodil Delight

Ink/Stampin' Write Markers: Melon Mambo, Pink Pirouette, Whisper White, Daffodil Delight, So Saffron

Tools: Essentials Paper Piercing Pack, Piercing Tool, Simply Scored

Tags: , , , , , ,

Cards | Stamping

Clockworks Notepad

by Joanne James26. May 2013 20:28

What a lovely Bank Holiday weekend this is turning out to be, with surprisingly glorious weather! I struggled to tear myself away from the garden to blog today, but wanted to share with you another project using the same Clockworks stamp set I used on the boxed notelets set yesterday, this time a covered notebook:

To create the notebook cover, I first scored a sheet of Basic Grey cardstock in a grid pattern, then took a piece of Whisper White card and randomly stamped it all over with the Clockworks stamps, using a Stamp-a-ma-jig to ensure the numerals on the clockfaces lined up correctly with the wider at the top. The coral stamp pattern was also lightly scored for texture and the whole thing sprayed with a Gumball Green coloured spritzer mist. A large Vintage Faceted Button was added to the centre of the complete clockface, whilst a second smaller one was added to a flower made from 3 flowers punched with the Fancy Flower punch, spritzed with water then scrunched and left to dry. The flags were also hand-crimped and finished with one stamped with another partial stamp from the 'One in a Million' stamp set.

I really like the finished effect and wonder if this notepad would make a nice Father's Day gift (maybe minus the flower?!). More masculine projects to come in the next couple of weeks, so do pop back if you're in need of some Father's Day inspiration. Just a reminder too that this months 15% discount offer on the This and That journal bundle ends on Friday this week, so if you'd like to take advantage of this, do drop me a line in advance of this date to place your order. Whilst the items will still be available after this date, the bundle will be available at the full price of £ not at £29.24 with the 15% discount.

Back tomorrow with another project, assuming I can tear myself away from the sunshine! Until then, happy stampin'!


Stampin' Up Supplies:

Stamps: One in a Million, Clockworks

Cardstock: Basic Grey, Whisper White, Gumball Green, Calypso Coral, More Mustard, Pool Party

Ink/Stampin' Write Markers: Calypso Coral, Gumball Green, Pool Party, More Mustard, Basic Grey

Tools: Simply Scored, Stamp-a-ma-jig, Fancy Flower Punch, Spritzer

Finishing Touches: Vintage Faceted Buttons, Calypso Coral Baker's Twine

Tags: , , , , , ,

3D Projects | Stamping

Oh Baby Washing Line

by Joanne James23. May 2013 21:26

Busy day revolving around my little ones today with music recitals, class assemblies, ballet lessons and visiting friends for tea - I swear my two have a better social life than me! Anyway, finally sitting down to share another card from this month's class with you - today, a cute baby card, complete with washing line:

I used the lovely Twitterpated designer paper for the dresses and dungarees, as the largely pastel colours suit a new baby card. I must confess to using some now retired ribbon that was lurking at the back of my drawer to edge the dresses because the pleated edge was perfect for the dress edge. The dresses and dungarees are all made from the 'waistcoat' section of the owl punch, with a few nips and tucks here and there. My most favourite thing about this card is the mini-brad dungaree buttons - I love them!

I've added a pink 'oh baby' sentiment circle to this card, but in class we made two: one pink and one blue, so that they could be added at a later stage when the recipient was known; now that's what you call organised! Back tomorrow with my last class card - until then, happy stampin'!


Stampin' Up Supplies:

Stamps: Ciao Baby!

Cardstock: Whisper White, Old Olive, Island Indigo, Baja Breeze, Pink Pirouette, Twitterpated DSP

Ink/Stampin' Write Markers: Baja Breeze, Pink Pirouette

Tools: Owl Punch, Cloudy Day Textured Impressions Embossing Folder, Simply Scored Borders Scoring Plate, 7/8" Scallop Circle Punch, 1" Circle Punch

Finishing Touches: 1/8" Mini Brads, Island Indigo Baker's Twine, Ruffled Ribbon (retired)

Up, Up and Away!

by Joanne James6. April 2013 13:42

Back to blog normality to day after all the excitement of the last few days - with an earlier post than usual, as my daughter is in a swimming gala this evening so I won't be at my laptop this evening as usual. I've got a pair of cards to share with you today, both of which are one layer cards. I really struggle with one layer cards - with all the lovely cardstock, designer paper, ribbon and embellishments that Stampin' Up! offers, just to use one sheet of card is often impossible! Anyway, I challenged myself to come up with some one layer designs and so using my Spring Sampler set again - LOVE this set! - I came up with this:

I'm really quite pleased with the result - the clouds give the image lots of interest, even though it's one layer. If you look closely, you'll see that I also scored around the masked image to add depth and definition, allowing the sentiment to 'flow' over the top. The words are from a retired birthday hostess set, but were perfect for this card - they added movement and I think make it look as if the words are being carried on the wind with the balloon. Spurred on by this card, I then made a second one to the same design but using the kite stamp in the Spring Sampler set:

The scored line is more difficult to see on this one - photographing almost wholly white cards also presents something of a challenge, but you get the idea I'm sure. You could also use the Bitty Banners set for a wavy sentiment, although when I tried one I couldn't resist cutting it out and putting it on a dimensional - so no longer a one but two layer card!

Hope you like this pair of cards - I really like them and they spurred me on to consider other one layer options and not be put off by one layer cards in the future. I'm off to get ready for the gala; back tomorrow with more stamping loveliness, but until then - happy stampin'!


Stampin' Up Supplies:

Stamps: Spring Sampler, Happiest Birthday Wishes (hostess - retired)

Cardstock: Whisper White

Ink/Stampin' Write Markers: Rose Red, Wild Wasabi, Bashful Blue

Tools: Simply Scored

Tags: , , , , , ,

Cards | Stamping

Easter Bunny Punch Art Card and Gift Box

by Joanne James31. March 2013 21:43

I hope everyone has been enjoying a lovely Easter day, with plenty of chocolate eggs thrown in! This is my last Easter offering to share with you all and was inspired by one of my other hobbies - biscuit making. I recently enjoyed a fun day out with a friend at the Biscuiteers Icing Cafe in Notting Hill, where we spent a pleasant morning icing Easter bunnies in various poses, spring lambs and Easter eggs. My favourite was a lovely pale brown bunny with floppy ears, that shows him from behind with an iced bunny tail - he inspired this punch art bunny card, which shows him with a couple of friends:


I love the simple design with the polka dot paper and oval framelits, with just a touch of colour to each bunny tail to make them 'pop'. I didn't add a sentiment because although this card was for Easter, I wanted it to be able to use it for any occasion. My biscuits from that day are all long gone but I have the same cutter to make more at home and so designed a co-ordinating gift box, which is just the right size for a similar biscuit to fit in and would make a lovely gift for someone special:

I just made a simple shallow box with a Whisper White base and Marina Mist lid using my Simply Scored, then attached the punched bunny oval to a belly band made from the reverse side to the spots on the card, which just holds the box securely together. Next time I make one of these I'll try and include a photo of the biscuit too, although they don't hang around for long in our house, it has to be said!

Back tomorrow with thoughts of spring - until then, eat lots of chocolate and happy stampin'!


Stampin' Up Supplies:

Cardstock: Marina Mist, Whisper White, Certainly Celery, Pretty in Pink, So Saffron, Crumb Cake, Polka Dots Parade DSP

Tools: Owl Punch, 3/4" Circle Punch, 1" Circle Punch, 1 1/4" Circle Punch, Ornament Punch, Itty Bitty Shapes punch (flower), Oval Framelits, Simply Scored

Finishing Touches: 1/8" Taffeta Ribbon Marina Mist, Basics Pearls

Easter Chicks Simply Scored

by Joanne James17. March 2013 21:50

So I thought it was about time I started with some Easter cards, otherwise it will be here before we know it and I won't have shared any ideas with you. I took the opportunity to play with my Simply Scored Borders scoring plate today and used it to decorate some Easter eggs for my newly hatched chicks:


It's taken me a while to get used to the new scoring plate, but now that I have I'm finding it useful for all kinds of things. Stampin' Up! have made a great video tutorial showing how to use the new plate, which does work differently to the other plates as it has an overlay guide too - click on the video link here if you'd like to know more.

In case you're wondering where the chicks came from - they are the bird from the two-step bird punch, sponged around the edges to add definition. I love punches like this that have multiple uses!

The children had a Spring Fayre at school yesterday and won a runner-up prize in the Easter Egg Hunt of a chocolate egg and a chocolate rabbit - they were delighted and as they devoured the egg this afternoon, decided Easter has officially begun! I'll be back tomorrow with another Easter card; until then, happy stampin'!


Stampin' Up Supplies:

Stamps: Wacky Wishes

Cardstock: Crumb Cake, Wisteria Wonder, Island Indigo, Calypso Coral, Lucky Limeade, Daffodil Delight

Ink: Daffodil Delight, Island Indigo

Tools: Simply Scored Borders Scoring Plate, Ovals Framelits, Two-Step Bird Punch

Finishing Touches: Linen Thread

Tags: , , , , , , , , ,

Cards | Punch Art

More Cups of Tea!

by Joanne James10. March 2013 22:01

More cups of tea today - now I've started with this stamp set, I can't put it down! Today an altogether more modern take on afternoon tea compared to the last couple of blog posts. This is a case of a card designed by Mary Fish - you can see her original card here. I've stamped mine in a slightly different colourway as I had some retired DSP that I wanted to use for the envelope and changed the card colours to coordinate. My finished card looks like this:

This card measures 4 1/4" square and I think the colours bring a really fresh look to this stamp set. The small tea cups are on a single stamp, but it's easy to colour them individually using marker pens, stamp them and trim them to fit on a card of this size. The pearls, heart and flower just add a few interesting details to finish the card.

The co-ordinating envelope was a breeze to make with my Simply Scored scoreboard - sometimes it's easier to make an envelope for an unusally sized card and a patterned paper can really finish things off. I'm thinking of making a short video on how to make envelopes with your scoreboard - let me know if this is something you would find useful and I will get on to it!

Lastly today, I promised an update on the Mother's Day activities in the James household: well, I awoke to my very own cup of tea in bed, but didn't have time to drink it today as it was accompanied by a hand-drawn treasure map and a trail of carefully cut out footprints the size of my offspring leading me downstairs to my lovely pile of cards. The handmade ones from school were very glittery (must remember to introduce Rebecca's teacher to our no-shed Glimmer Paper before this academic year is out!!) but all cards thoughtful and sent with love and written with the very best handwriting! A lovely roast dinner and afternoon of crafting, with the best still to come: my gift is a course at the Biscuiteers School of Icing learning to ice Easter biscuits in a couple of weeks time - I'm so excited! So all in all, I end today feeling loved and appreciated - makes being a Mum so worthwhile! So to mothers everywhere - I hope you too enjoyed your day.

Until next time, happy stampin'!


Stampin' Up Supplies:

Stamps: Tea Shoppe

Cardstock: Whisper White, Basic Black, Tempting Turquoise, Pear Pizzazz (retired), Poppy Parade (retired), Everyday Enchantment Designer Series Paper (retired)

Ink/Stampin' Write Markers: Basic Black, Tempting Turquoise, Pear Pizzazz (retired), Poppy Parade (retired)

Tools: Itty Bitty Punches, Small Heart Punch, Stampin' Dimensionals, Simply Scored, Trimmer

Finishing Touches: Pearl Basic Jewels

Tags: , , , , ,

Cards | Stamping

Mini Catalogue

BROWSE THE CATALOGUE

The mini catalogue is now live! Read and download your copy here.

Shop Online

Access my online shop 24 x 7, 365 days of the year:

Current April hostess code:

VDKNV7BH

Shop Online

Join My Team

It's always a great time to join Stampin’ Up! New team members can get £130 worth of products for only £99 + free business supplies + free shipping + all the fun being a part of Stampin’ Up! Stampin' Up! has something for everyone: join my growing team and benefit from my support to enjoy Stampin' Up! however you choose.

If you're interested, call me for a chat to understand how I can help you realise your goals. Alternatively, if you have already decided to sign up and you just can't wait, please click here for the link to the online form where you can sign up and order your starter kit right away! 

Latest Kit!

Stampin Cut and Emboss

The Rock Legend Kit has all you need to make 8 cards with coordinating envelopes. Along with the new Panda Friends Kit, both are available from January 4th for just £14 each - get yours here!

2023-24 Annual Catalogue

BROWSE THE CATALOGUE

Click on the catalogue for a full list of current SU! supplies - if you would like to order any of the items featured, please drop me a line at [email protected] or give me a call on 07773 421446 - I'd be happy to help.

New Online Exclusives

There are new products available exclusively in the online store from 5 March - check them out here.

About Me

Hi I'm Joanne and live in Northampton and when I'm not looking after my husband and two beautiful children, am an avid crafter with a passion for all things Stampin' Up!

I must confess that I have never been a big rubber stamper - until I discovered Stampin' Up! that is. I love the fact that I can get such great results with co-ordinating stamps, inks, papers and punches - the possibilities are endless! Join me on my stamping journey as I share the things I love and be inspired to create amazing things yourself!

Follow Me

Monthly Newsletter

Box Builder

Click the button above to use Box Buster to create your custom box design using the Envelope Punch Board!

Kits Collection Now Available!

Stampin Cut and Emboss

The new Kits Collection from Stampin' Up! is now available!

Click here to see the current kits available and order yours online today.

I Design For


Stampin' Up Stuff

This is my personal blog and is not endorsed by Stampin’ Up! I hope you find it a plentiful source of ideas and personal inspiration but please don't copy my designs for contest submission or use for classes, publication or sale without express permission.