Have A Hoot Halloween Card

by Joanne James27. October 2020 08:00

Today I'm sharing a card inspired by the photo inspiration over at Fusion that is also well timed for the last-minute Halloween crafting over at TGIF Challenges:


I couldn't get to grips with the angled line of the sketch, but I love that inspiration photo and whilst I don't really send Halloween cards, I wanted to get some use out of the Halloween owls in the 'Have A Hoot' stamp set so set to work:


Here's the low-down on today's card:

I decided to have a go at another sponged background, so took a variety of purple inks and gradually built up the layers to create my spooky night sky. I splattered it with water and then white frosted shimmer paint to complete. I used the tree from the  'Life is Beautiful' for my woods, stamping from both sides, then stamped my owl onto a partial circle and aligned the trees so that it looks as if the owl is in the trees, highlighted by the moon.

A heat embossed 'boo!' completes the outside of my card, with a further greeting on the inside:


So what do you think of today's card? Even if Halloween isn't your thing, I'd love to hear what you think of my sponged background. 


Here is the visual summary of the key products used on today's project for you to pin for easy reference:


You can see all of my 'How To' summaries on my 'How To - Tips and Techniques' Pinterest board in case you've missed any. 

Enjoy your day and I'll be back tomorrow with another project. Until then, happy stampin'!


Stampin' Up! Supplies Used:

Table built using Product Table Builder by The Crafty Owl - Independent Stampin' Up! Demonstrator.

Warm and Toasty Reindeer and Polar Bear

by Joanne James26. October 2020 19:30

Happy Monday everyone! I've had a super busy and productive day and am finally getting to today's blog post! Today I've a couple of cards to share with you for a couple of challenges, both featuring the Warm and Toasty stamp set. My first card features this week's Color Throwdown colours:


And the first animal to feature is the reindeer, resplendent with his red bow:

I've coloured the reindeer in the challenge colours with my Stampin' Blends and my card also features a couple of sneak peeks: the sentiment is from a new stamp set called 'Curvy Christmas' and is paired with a fabulous die from the Curvy Die set, both of which will be available to customers from the 1st November as a special release - exciting stuff! I couldn't resist adding a large red enamel dot to christen my reindeer Rudolf:


My second card uses the polar bear from the 'Warm and Toasty' stamp set, this time using this week's CAS Colours and Sketches colour palette:


I've seen some great examples of sponging recently, so wanted to have a go at creating a sponged background and decided that the blues would make a great backdrop for my iceskating polar bear:


I added a snow drift using my Freezin' Friends Dies and cut an ice rink freehand from vellum and coated it with a liberal dose of clear Wink of Stella for an icy sparkle, before adding my polar bear to the finished scene.


I did a little extra stamping on the inside of this one too:


So what do you think? I think creating sponged backgrounds, whilst messy, is also quite addictive; and to that end, I have another one for you tomorrow!

Here are the visual summaries of the key products used on today's projects for you to pin for easy reference:


And for the second one:


You can see all of my 'How To' summaries on my 'How To - Tips and Techniques' Pinterest board in case you've missed any. 

Enjoy your day and I'll be back tomorrow with another project. Until then, happy stampin'!


Stampin' Up! Supplies Used - Card 1:

Table built using Product Table Builder by The Crafty Owl - Independent Stampin' Up! Demonstrator.
 
Stampin' Up! Supplies Used - Card 2:
Table built using Product Table Builder by The Crafty Owl - Independent Stampin' Up! Demonstrator.

Sweetest Time Christmas Candles PP514

by Joanne James25. October 2020 09:00

Today it's Sunday and time for this week's new challenge over at The Paper Players! It's the turn of the amazing Jaydee to host this week and she has my favourite, a sketch challenge for you to work with:


Jaydee's sketch has three vertical images; it's a great sketch that is wide open to interpretation. I considered something that incorporated three panels but in the end decided on a much more liberal interpretation and decided on three candles - take a look:


Here's the low-down on today's card:

Sweetest Time - I've used the 'Sweetest Time' stamp and co-ordinating borders dies before (here if you missed it), but had yet to combine with the candles. I went all-out on today's card, layering a piece of Feels Like Frost foiled designer paper (it has a pines pattern but that is obscured by the main panels), followed by the panel with the stamped candles, followed by the integrated holly border.

Borders in Blue - Whilst this border looks great in traditional reds and greens, I thought I would ring the changes and make a blue card today. I know that you don't get blue holly and berries but it's the cardmaker's prerogative to get creative with colour, right? That's my story anyway and I'm sticking to it! 

Foil, Frost and Sparkle - The challenge over at Just Add Ink this week is to add two of foil, ribbon and sequins to your card. I did use some foil-embossed designer paper for my background layer to compliment my silver heat-embossed flames and sentiment, but I also added some loops of Seaside Spray/Silver metallic ribbon behind my paper-pieced holly border and since the diecut berries are obscured by my sentiment banner, I added a selection of clear epoxy droplets and a few Seaside Spray sequins for some added sparkle; you can see them better on the photo below:

So I inadvertently ended up incorporating all three - and I love the finished effect!

Here is the visual summary of the key products used on today's project for you to pin for easy reference:


You can see all of my Product and 'How To' summaries on my 'How To - Tips and Techniques' Pinterest board in case you've missed any. 

Before you reach for your ink and papers, check out what our amazing team has created to inspire you this week:

Here's a quick recap of our challenge rules:
 
1.  Create a new paper project
2.  Upload your creation to your blog with a link back to us and provide a direct link to the post featuring your challenge submission.
3.  Please link your card to no more than four challenges, TOTAL.
4.  Have FUN!

You can see all of my 'How To' summaries on my 'How To - Tips and Techniques' Pinterest board in case you've missed any. 

Enjoy your day. We have no specific plans; if the weather is as poor as it has been these last few days, we may hunker down for a movie afternoon. We watched Disney's live remake of 'Mulan' last week; have you seen it? We thoroughly enjoyed it. I'll be back tomorrow with another project. Until then, happy stampin'!


Stampin' Up! Supplies Used: 

Table built using Product Table Builder by The Crafty Owl - Independent Stampin' Up! Demonstrator.

Beautiful Boughs and Pine Cones AYSI 237

by Joanne James23. October 2020 12:00

Today I'm sharing my design team card for our new challenge over at As You See It where it's time for my favourite, a sketch challenge:


For my card today I paired an old favourite with some new Christmas papers - a look:


Here's the low-down on today's card:

Beautiful Boughs - The Beautiful Boughs Dies are in the annual catalogue as a carryover from the last Autumn-Winter seasonal catalogue and whilst I don't have the bundled stamp set (hence choosing a greeting from 'Itty Bitty Christmas' for today's card, that most useful of Christmas sentiment sets!) I do love the dies; their beautiful layered detail is great to add bold festive greenery to a project.

Pine Cone Poinsettias - The starting point for today's card was most definitely the designer series paper (no surprises there then!) I decided to use one of the papers that is on offer as part of this month's designer series paper sale (you can read all about that here) so I chose the Poinsettia Place paper pack and a pattern that I haven't yet used featuring pine cones, hence the fit with the Beautiful Boughs dies.

A Slight Confession - Whilst the layout of today's sketch is clearly visible on my card, I chose not to follow the suggested sentiment placement, instead making mine a feature of the circle. This is in part because I was originally going to use an alternative paper and use a diecut flower as the focal point, but in the end changed my mind at the last minute as I wanted to play with a new paper design. Either way, the sketch is a suggestion and does not have to be followed to the absolute letter; as long as the broad elements are visible, artistic licence is welcome!

Here is the visual summary of the key products used on today's project for you to pin for easy reference:


You can see all of my 'How To' summaries on my 'How To - Tips and Techniques' Pinterest board in case you've missed any. 

Here's a summary of our challenge rules:

  • Create any card, scrapbooking page, 3D project or packaging project that fits the challenge.
  • Please include the challenge graphic and link back to the challenge in your blog post. Turn off word verification so we can leave you lots of lovely comments. Make sure you link the post not the whole blog to the Linky. Use #AYSIXXX when uploading to a public gallery.
  • If you’re unsure about ‘the rules’, check the details under the Challenge Guidelines tab on the As You See It Challenge homepage.
We look forward to seeing your creations in the AYSI gallery.

Both of the James Juniors are now officially on half-term for a week; I've spent the last few days enjoying some quality mother-daughter time with Rebecca as Ben was still at school, and tidying up some odds and ends, hence my lack of blog posts. They are both having a 'lazy day' today though so once I've battled my way slowly through the ironing pile, I am hoping to make a card or too later :-) Enjoy your day and I'll be back tomorrow with another project. Until then, happy stampin'!


Stampin' Up! Supplies Used:

Table built using Product Table Builder by The Crafty Owl - Independent Stampin' Up! Demonstrator.

Cake and Cookies For PP513

by Joanne James18. October 2020 09:00

Today it's Sunday and time for this week's new challenge over at The Paper Players! It's the turn of the queen of diecuts, the lovely Laurie, to host this week and she has a Clean and Simple challenge for you to work with:


REMEMBER THIS IS CLEAN AND SIMPLE WEEK 
 
What do we mean by Clean and Simple?
 
Minimal layers and embellishments
Plenty of open space, aka "white" space
Simple and uncluttered 

I actually have a few cards for you today! First up - cake! A quick review of my stamp collection told me I had no current cake or cupcake stamps - go figure! So I decided to use Linda's sketch over at Freshly Made Sketches this week:

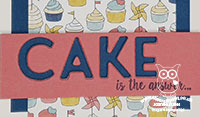
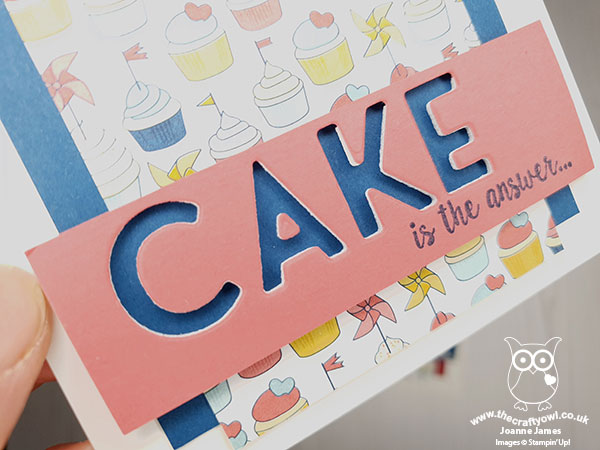
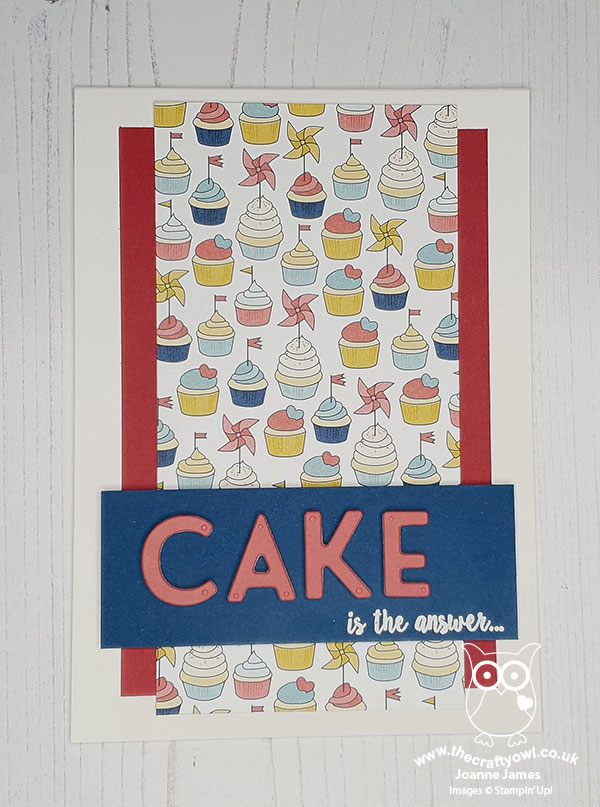
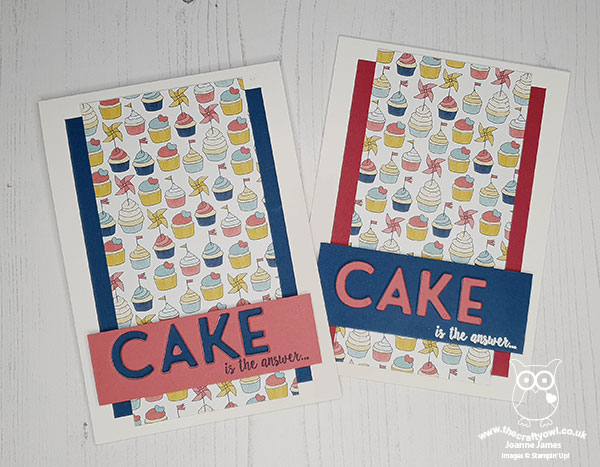
 myI used my current Playful Alphabet Dies, along with some retired Patio Party designer series paper and last year's 'Piece of Cake' stamp set to create a couple of clean and simple cake-themed cards. Here's the first one using the negative space of the diecut letters:


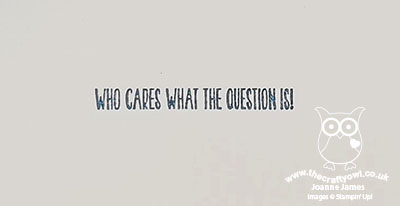
And a close up of that fun sentiment:


And here's the second card, using the same paper and alternative colour base with the actual diecut letters, popped up on foam adhesive sheets:


Both cards finish with this sentiment on the inside:


Perfect for birthdays or other occasions! Here's a picture of them both together:


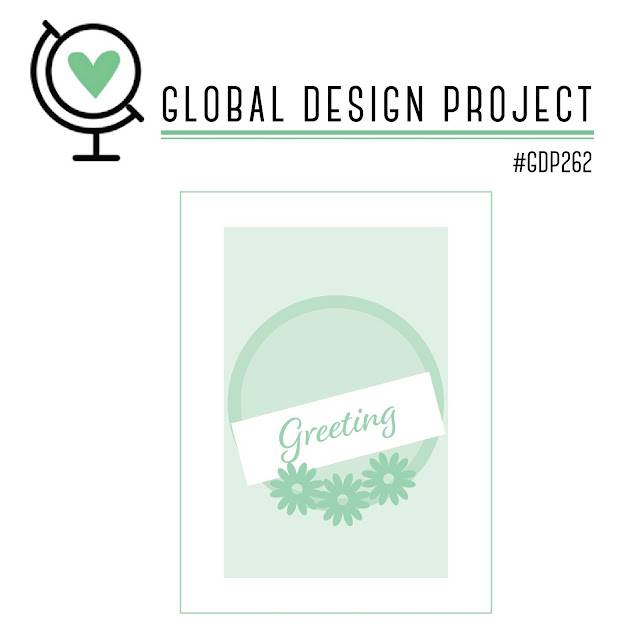
The Patio Party paper actually dates back to 2013 so I'm thinking there won't be many of you with some of this on your shelves (unless you are a paper hoarder like me!!) so I also made a third card using current products and this week's Global Design Project sketch:

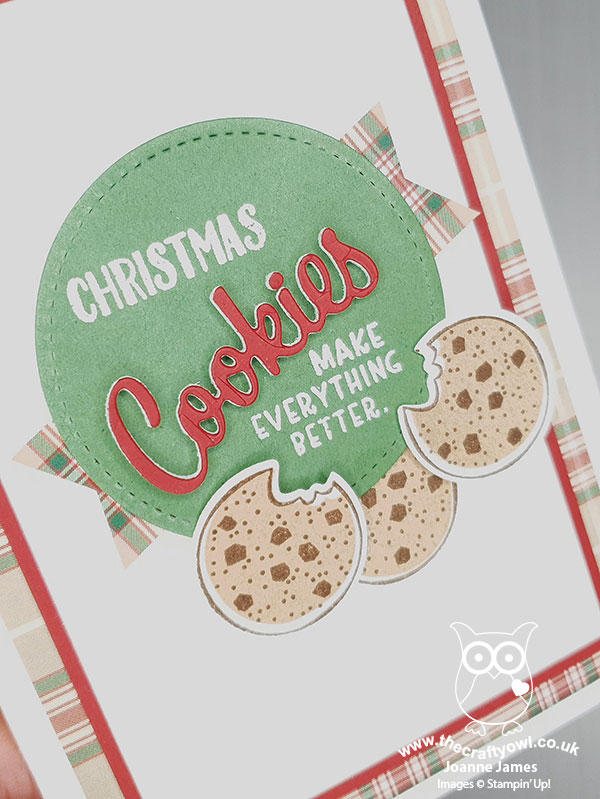
For this card I reached for my 'Nothing's Better Than' bundle and tweaked my sentiment to create a festive cookie card:


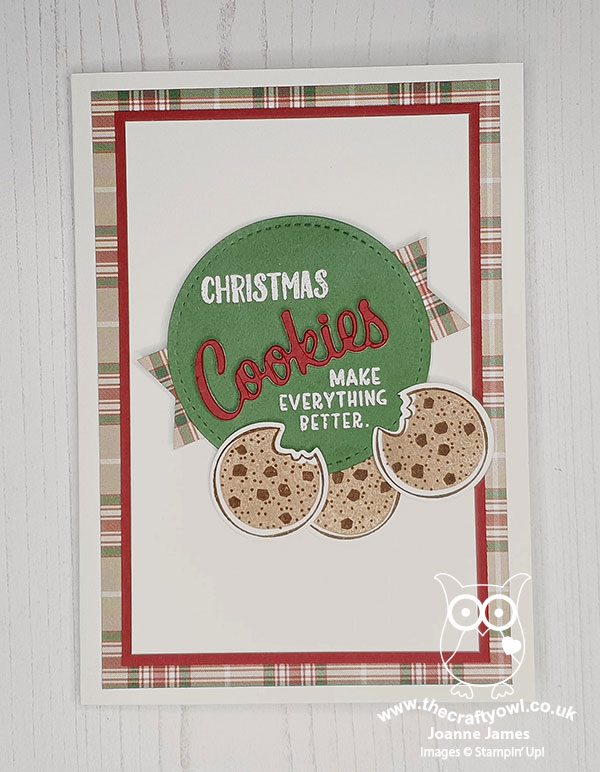
I paired my cookies with some festive plaid from the Plaid Tidings DSP pack (15% off in this month's DSP sale!); having photographed my card, I wish I'd added a sprig of holly too (maybe I'll go back and add one on before I send it!) but to be fair this card is less clean and simple than the first two, with a few more layers and elements so probably best I quit when I did!


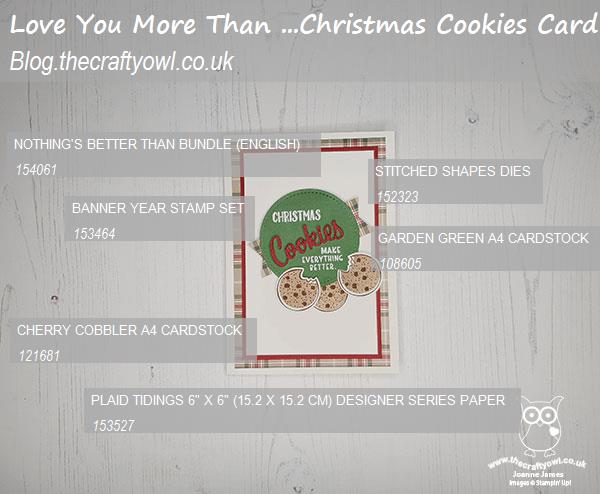
Here is the visual summary of the key products used on the above project for you to pin for easy reference:


You can see all of my Product and 'How To' summaries on my 'How To - Tips and Techniques' Pinterest board in case you've missed any. 

Before you reach for your ink and papers, check out what our amazing team has created to inspire you this week:

Here's a quick recap of our challenge rules:
 
1.  Create a new paper project
2.  Upload your creation to your blog with a link back to us and provide a direct link to the post featuring your challenge submission.
3.  Please link your card to no more than four challenges, TOTAL.
4.  Have FUN!

You can see all of my 'How To' summaries on my 'How To - Tips and Techniques' Pinterest board in case you've missed any. 

Enjoy your day; we will be having a quiet family day today as we head into the start of the half-term holiday for one of the James Juniors at least (the other has another 4 days of school to go!). I managed to get some crafting done yesterday so will definitely be back tomorrow with another project. Until then, happy stampin'!


Stampin' Up! Supplies Used: 

Table built using Product Table Builder by The Crafty Owl - Independent Stampin' Up! Demonstrator.

Foiled Autumn Leaves TTT86

by Joanne James15. October 2020 18:00

It's Thursday and time for a new challenge over at TicTacToe! It's the turn of Team X to host this week and the lovely LeAnne is our featured designer this week. This is the fun board that we are playing along with: 


My card works for either of the diagonals: stitching, circle, diecut or gold foil, circle, designer paper today! I decided to CASe Sharon's card over at Less Is More with a trio of punched autumn leaves for a card for someone special today - take a look:


Here's the low-down on today's card:

I featured a small area of the vanilla foiled Gilded Autumn designer paper between some curvy stitched borders (courtesy of the snowdrifts in the Freezin' Friends Dies!) and then punched a trio of leaves and mounted these on a selection of gold and copper foil and glimmer paper stitched circles at the meeting point. A gold heat-embossed fussy cut sentiment from 'Rooted In Nature' on the front was paired with this sentiment on the inside of my card:


Foil is always difficult to photograph, so I hope you can see how pretty this card is! I must say having seen some of the other cards from the design team this week, I now have a desire to go and make this card in burgundy too!

Here is the visual summary of the key products used on today's project for you to pin for easy reference:

You can see all of my Product and 'How To' summaries on my 'How To - Tips and Techniques' Pinterest board in case you've missed any. 

One more look at that pretty glittery leaf trio:


A tictactoe board offers so many creative possibilities - how does this week's board inspire you? Why not have a go? We would love to see you in the gallery and who knows - you might be selected for Designer's Choice and be eligible to be a guest designer on a future challenge. 

Enjoy your evening; I am still resting up and will be spending my evening attending a 6th Form Virtual Open Evening with Rebecca from the comfort of the sofa whilst recovering from today's physiotherapy session. I'll be back tomorrow with another project. Until then, happy stampin'!


Stampin' Up! Supplies Used: 

Table built using Product Table Builder by The Crafty Owl - Independent Stampin' Up! Demonstrator.

Let Faith Be Your Biggest Fear Meets Artistry Blooms

by Joanne James12. October 2020 07:00

It's Monday and to start the week I have a short post to share a couple of cards I made with this week's Freshly Made Sketches layout:


They are both encouragement cards, this time with the optional addition of pink, perfect for the current Time Out challenge. One of my cards also features an ombre background which is the trend over at Just Us Girls this week. Here's the first one:


And here's the second one, featuring another of the papers in the Artistry Blooms paper pack: 


Both cards feature a wonderful encouraging sentiment from the 'Ridiculously Awesome' stamp set, that is rather appropriate today as I am headed off for shoulder surgery. I am putting all my faith on my surgeon, that's for sure!

So which one is your favourite? I love them both and will be making a few more with these papers this month whilst they are on offer in the DSP sale :-)

Here is the visual summary of the key products used on today's project for you to pin for easy reference:


You can see all of my 'How To' summaries on my 'How To - Tips and Techniques' Pinterest board in case you've missed any. 

Enjoy your day and I'll be back tomorrow with another project. Until then, happy stampin'!


Stampin' Up! Supplies Used:

Table built using Product Table Builder by The Crafty Owl - Independent Stampin' Up! Demonstrator.

Life is Beautiful Autumn Leaves PP512

by Joanne James11. October 2020 09:00

It's Sunday and time for this week's new challenge over at The Paper Players! I'm back following a break last week as I was running my first virtual Creative Escapes Weekend Craft Retreat. More news on that later this week; today it's the turn of the amazing Ann to host this week and she has a seasonal colour challenge for you to work with:


These colours are just perfect for autumn; as I've been driving through the countryside on the school run this week, I have marvelled at just how wonderful the trees are looking with their blends of colour, so armed with my ink pads, some sponge daubers and the current Fusion sketch, I grabbed my 'Life is Beautiful' stamp set and set about recreating the look. This is what I came up with:


Super simple, with a couple of punched banners and stapled ribbon decoration, but oh so pretty with those variegated autumn leaves.

Here is the visual summary of the key products used on today's project for you to pin for easy reference:


You can see all of my Product and 'How To' summaries on my 'How To - Tips and Techniques' Pinterest board in case you've missed any. 

Before you reach for your ink and papers, check out what our amazing team has created to inspire you this week:

Here's a quick recap of our challenge rules:
 
1.  Create a new paper project
2.  Upload your creation to your blog with a link back to us and provide a direct link to the post featuring your challenge submission.
3.  Please link your card to no more than four challenges, TOTAL.
4.  Have FUN!

You can see all of my 'How To' summaries on my 'How To - Tips and Techniques' Pinterest board in case you've missed any. 

Enjoy your day; I will be busy finishing up some bits and pieces before going in to hospital tomorrow for surgery on my shoulder. This will be my fourth visit in 14 months and I'm hoping this will be the last! I will still be sharing here though and will be back tomorrow with another project. Until then, happy stampin'!


Stampin' Up! Supplies Used: 

Table built using Product Table Builder by The Crafty Owl - Independent Stampin' Up! Demonstrator.

Positive Thoughts For AYSI 236

by Joanne James9. October 2020 12:00

Today I'm sharing my design team card for our new challenge over at As you See It where it's time for a speed stamping challenge:


I've been so short on time this week that a speed challenge was just what I needed! I grabbed some supplies in this week's Color Throwdown colours (what can I say - they chose my favourite - purple!) along with my 'Positive Thoughts' stamp set and this is what I came up with:


Here's the low-down on today's card:

Positive Thoughts - Hmm, butterflies! I don't use them all that often but I have so many stamps and dies that feature them! I decided to go with 'Positive Thoughts', because I was persuaded to buy it having seen the wonderful makes of my As You See It teamie and Artisan friend, the lovely Jan Clothier, and yet I haven't used if much at all, but this is a great set for both simple and speedy stamping - with or without the co-ordinating Nature's Thoughts Dies. I love the slightly speckled nature of the stamps and as you would expect from the name, this set also has some wonderful uplifting sentiments - perfect for the current Time Out challenge too, who are all about cards with words of encouragement this week (I didn't go with the optional pink, but may come back for a second go to include this!)

Speedy Stamping - As always, the key to speedy stamping is keeping it simple. I had designed my card in my head and had everything out ready on my desk before I started the timer. Some quick cuts of my card and designer paper (from the 'Heartwarming Hugs' Christmas designer paper pack that is on offer this month - bargain!), only two colours to stamp and then one run through the diecutting machine to cut the edged panel and the butterfly and I was ready to start sticking together.

Time To Step Up -  As I had glued on everything but my sentiment, I glanced at my stopwatch - 5 minutes and 33 seconds - a personal record and almost finished! I decided to spend a few more minutes to step things up a little, so grabbed some Gorgeous Grape cardstock and added an offset strip behind my sentiment before attaching to my card. I added some clear Wink of Stella to my butterfly, to blur the lines and add a little sparkle, a linen bow and a few clear epoxy drops to finish my card. Final time: 7 minutes, 59 seconds - still something of a record for me, maybe I should work with butterflies more often!

Here is the visual summary of the key products used on today's project for you to pin for easy reference:


You can see all of my 'How To' summaries on my 'How To - Tips and Techniques' Pinterest board in case you've missed any. 

Here's a summary of our challenge rules:

  • Create any card, scrapbooking page, 3D project or packaging project that fits the challenge.
  • Please include the challenge graphic and link back to the challenge in your blog post. Turn off word verification so we can leave you lots of lovely comments. Make sure you link the post not the whole blog to the Linky. Use #AYSIXXX when uploading to a public gallery.
  • If you’re unsure about ‘the rules’, check the details under the Challenge Guidelines tab on the As You See It Challenge homepage.
  • In a speed stamping challenge, time yourself and tell us how long it took you to complete your card.

We look forward to seeing your creations in the AYSI gallery.

Enjoy your day and I'll be back tomorrow with another project. Until then, happy stampin'!


Stampin' Up! Supplies Used:

Table built using Product Table Builder by The Crafty Owl - Independent Stampin' Up! Demonstrator.

Always Grateful With Celebration Tidings TTT84

by Joanne James1. October 2020 18:00

It's Thursday and time for a new challenge over at TicTacToe! It's the turn of Team X to host and I am the featured designer this week. I chose lots of autumnal elements for my board: 


I used the same layout on today's card as the one I used for Monday's Christmas card (you can see that card here if you missed it). I went across the first row of the tictactoe board, with Plaid-Pumpkin-Thankful and I embraced those fresh Color Dare colours to make a bright autumnal thank you card - take a look:


Here's the low-down on today's card:

I stamped the pumpkin image from the 'Celebration Tidings' stamp set in Memento Tuxedo Black onto a stitched rectangle and coloured this image with my Stampin' Blends, using a panel of bright Plaid Tidings designer paper for my background and some retired Old Olive ribbon from my box to add in a little more green. I used Mango Melody cardstock for my cardbase and Pumpkin Pie for my mat layer - I love how bright this card looks, compared to if I'd used darker, richer colours. Good news on that Plaid Tidings paper too - it, along with many other designs, is on sale for the whole of the month of October as part of Stampin' Up!'s Designer Series Paper sale - more details to follow on that in another post later!

Here is the visual summary of the key products used on today's project for you to pin for easy reference:


You can see all of my Product and 'How To' summaries on my 'How To - Tips and Techniques' Pinterest board in case you've missed any. 

A tictactoe board offers so many creative possibilities - how does this week's board inspire you? Why not have a go? We would love to see you in the gallery and who knows - you might be selected for Designer's Choice and be eligible to be a guest designer on a future challenge. 

Enjoy your day; I'll be back tomorrow with another project. Until then, happy stampin'!


Stampin' Up! Supplies Used: 

Table built using Product Table Builder by The Crafty Owl - Independent Stampin' Up! Demonstrator.

Mini Catalogue

BROWSE THE CATALOGUE

The mini catalogue is now live! Read and download your copy here.

Shop Online

Access my online shop 24 x 7, 365 days of the year:

Current April hostess code:

VDKNV7BH

Shop Online

Join My Team

It's always a great time to join Stampin’ Up! New team members can get £130 worth of products for only £99 + free business supplies + free shipping + all the fun being a part of Stampin’ Up! Stampin' Up! has something for everyone: join my growing team and benefit from my support to enjoy Stampin' Up! however you choose.

If you're interested, call me for a chat to understand how I can help you realise your goals. Alternatively, if you have already decided to sign up and you just can't wait, please click here for the link to the online form where you can sign up and order your starter kit right away! 

Latest Kit!

Stampin Cut and Emboss

The Rock Legend Kit has all you need to make 8 cards with coordinating envelopes. Along with the new Panda Friends Kit, both are available from January 4th for just £14 each - get yours here!

2023-24 Annual Catalogue

BROWSE THE CATALOGUE

Click on the catalogue for a full list of current SU! supplies - if you would like to order any of the items featured, please drop me a line at [email protected] or give me a call on 07773 421446 - I'd be happy to help.

New Online Exclusives

There are new products available exclusively in the online store from 5 March - check them out here.

About Me

Hi I'm Joanne and live in Northampton and when I'm not looking after my husband and two beautiful children, am an avid crafter with a passion for all things Stampin' Up!

I must confess that I have never been a big rubber stamper - until I discovered Stampin' Up! that is. I love the fact that I can get such great results with co-ordinating stamps, inks, papers and punches - the possibilities are endless! Join me on my stamping journey as I share the things I love and be inspired to create amazing things yourself!

Follow Me

Monthly Newsletter

Box Builder

Click the button above to use Box Buster to create your custom box design using the Envelope Punch Board!

Kits Collection Now Available!

Stampin Cut and Emboss

The new Kits Collection from Stampin' Up! is now available!

Click here to see the current kits available and order yours online today.

I Design For


Stampin' Up Stuff

This is my personal blog and is not endorsed by Stampin’ Up! I hope you find it a plentiful source of ideas and personal inspiration but please don't copy my designs for contest submission or use for classes, publication or sale without express permission.