Snowflake Wishes Thank You Card TTT92

by Joanne James26. November 2020 17:00

It's Thursday and time for a new challenge over at TicTacToe! It's the turn of Team X to host this week and the lovely Betty is our featured designer this week. This is the fun board that we are playing along with: 


I decided to use the lovely Julee's Mojo Monday sketch along with the Paper Craft Crew inspiration photo (no red presents on this one but I did love that snowy blue sky) - take a look:


Here's the low-down on today's card:

Snowflake Splendor - The paper I used for the background on today's card is another of the Snowflake Splendor patterns. It has a really atmospheric effect that reminds me of the sky when it snows and blends from navy through to seaspray blue.

So Many Snowflakes - I decorated my card with lots of snowflakes: some diecut from (retired) white glimmer paper, a sprinkling of snowflake sequins and then a few holographic self-adhesive snowflakes for good measure. They are all so sparkly:

I added some extra sparkle with a twist of Snowflake Splendor ribbon behind the sentiment circle too.

Snowflake Wishes Thank You - I used the 'Snowflake Wishes' stamp set for my greeting, and decided to use the thank you as opposed to a Christmas one for a (brief!) change - after all, we still need thank you cards at this time of year so it's nice to have one that is seasonally themed. And I'm always up for a good pun, so this one's perfect! 

Here is the visual summary of the key products used on today's project for you to pin for easy reference:


You can see all of my Product and 'How To' summaries on my 'How To - Tips and Techniques' Pinterest board in case you've missed any. 

A tictactoe board offers so many creative possibilities - how does this week's board inspire you? Why not have a go? We would love to see you in the gallery and who knows - you might be selected for Designer's Choice and be eligible to be a guest designer on a future challenge. 

Enjoy your evening; I'll be back tomorrow with another project. Until then, happy stampin'!


Stampin' Up! Supplies Used: 

Table built using Product Table Builder by The Crafty Owl - Independent Stampin' Up! Demonstrator.

Curvy Christmas Buffalo Check Christmas Card

by Joanne James24. November 2020 21:57

Today I'm sharing a card using the current sketch over at Paper Craft Crew in a card that was inspired by the fabulous photo over at The Card Concept to create my clean and layered card:

 Vertical Sketch Challenge   

I was inspired by the red and black buffalo check pillow, green ribbon-tied foliage and the white of the rocking chair of the Card Concept photo; this is what I came up with:


Here's the low-down on today's card:

I used the foliage stamps in the 'Curvy Christmas' set to create my tied foliage and stamped this on a stitched scallop square; no curves on the front of the card, but I did use one of the curved stamps to decorate my envelope and the inside of my card:


I paired this with a panel of Real Red cardstock stamped in black with the Buffalo Check background, a banner of green gingham ribbon and some rhinestones and pearls to decorate, along with a sentiment snipped from one of the stamps in the 'Itty Bitty Christmas' stamp set.

Here is the visual summary of the key products used on today's project for you to pin for easy reference:


You can see all of my 'How To' summaries on my 'How To - Tips and Techniques' Pinterest board in case you've missed any. 

I absolutely love that inspiration photo and combined with the sketch am really pleased with how this card turned out.

Enjoy your evening and I'll be back tomorrow with another project. Until then, happy stampin'!

Stampin' Up! Supplies Used:

Table built using Product Table Builder by The Crafty Owl - Independent Stampin' Up! Demonstrator.

Feels Like Frost Split Panel Christmas Card PP518

by Joanne James22. November 2020 09:00

Today it's Sunday and time for this week's new challenge over at The Paper Players! It's the turn of the amazing LeAnne to host this week and she has my favourite, a sketch challenge for you to work with:


My card is all about the winter blues today - perfect for the Double D challenge (thanks for the heads up on this one LeAnne!) I really liked LeAnne's sketch layout this week and decided to use those panels to highlight one of the photographic images in the Feels Like Frost designer series paper pack - take a look:

Here's the low-down on today's card:

I chose a lovely image of frosty seed heads against a blue background and cut out the panels using my Rectangle Stitched Dies before piecing back together to create the finished layout:

I brushed the frosty elements with my clear Wink of Stella brush which is difficult to see in the photo but give it a lovely subtle sparkle in real life. I added a sentiment from 'Snowflake Wishes' and a mat border of silver glimmer paper and finished off the inside with a sentiment from the same set:


The most tricky part of today's card was cutting the stitched rectangles and aligning them to the image. Otherwise, a pretty straightforward card!

Here is the visual summary of the key products used on today's project for you to pin for easy reference:

 I 

You can see all of my Product and 'How To' summaries on my 'How To - Tips and Techniques' Pinterest board in case you've missed any. 

Before you reach for your ink and papers, check out what our amazing team has created to inspire you this week:

Here's a quick recap of our challenge rules:
 
1.  Create a new paper project
2.  Upload your creation to your blog with a link back to us and provide a direct link to the post featuring your challenge submission.
3.  Please link your card to no more than four challenges, TOTAL.
4.  Have FUN!

You can see all of my 'How To' summaries on my 'How To - Tips and Techniques' Pinterest board in case you've missed any. 

Enjoy your day; today is officially 'Stir up Sunday', an old tradition when home cooks spend the last Sunday before advent 'stirring up' their Christmas pudding and in modern times their Christmas cake and homemade mincemeat too.  The day gets its name from the beginning of the collect for the day in the Book of Common Prayer, which begins with the words, "Stir up, we beseech thee, O Lord, the wills of thy faithful people". We had a day of preparation yesterday and made a batch of mincemeat and some mince pies; today we are making Christmas puddings and cake - yum! I'll be back tomorrow with another project. Until then, happy stampin'!


Stampin' Up! Supplies Used: 

Table built using Product Table Builder by The Crafty Owl - Independent Stampin' Up! Demonstrator.

Press On With A Purple Coffee Cup AYSI 239

by Joanne James20. November 2020 12:00

Today I'm sharing my design team card for our new challenge over at As you See It where it's time for an interesting 'fill in the blank' challenge:


I'll confess I found this a big challenge! There aren't many colours I actively avoid using, although there are definitely some I use far less than others! Orange only features during pumpkin season (or for snowman carrot noses!) but a review of my back catalogue showed me there was another colour that I rarely use - and it might surprise you! I don't often use colour as a starting point on a project either - so making one languishing at the bottom of the pile and making it the focus of my card was a real challenge! I still had a helping hand, in the form of the current Fusion sketch and this week's hot drink theme over at Global Design Project to create my card - take a look:


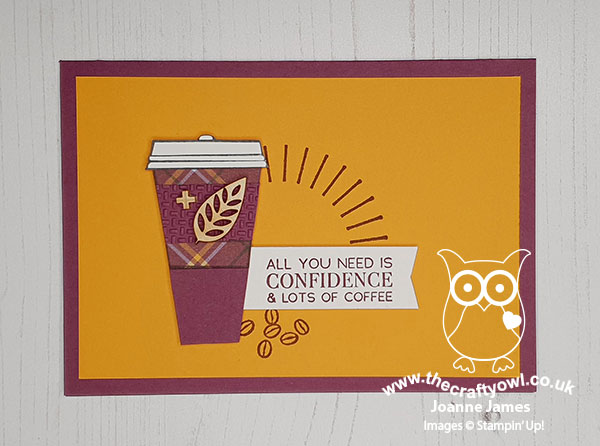
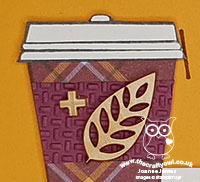
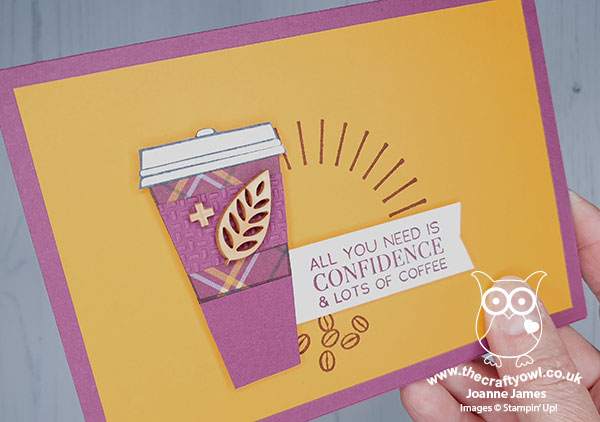
So did you spot it? Yes, it's Rich Razzleberry! I love purple and often feature it in my creations, however this particular purple is not a favourite for me. But I went for it! Here's the low-down on today's card:

Plaid Tidings - I knew that Rich Razzleberry was one of the colours that featured in the Plaid Tidings designer paper (and that I had all of this particular pattern left!), so I decided I would do something that featured this paper as a starting point. I decided to wrap a purple coffee cup and pair the card base with a mat layer in Mango Melody, one of the other colours that feature in the plaid pattern and do all my stamping in Rich Razzleberry too.

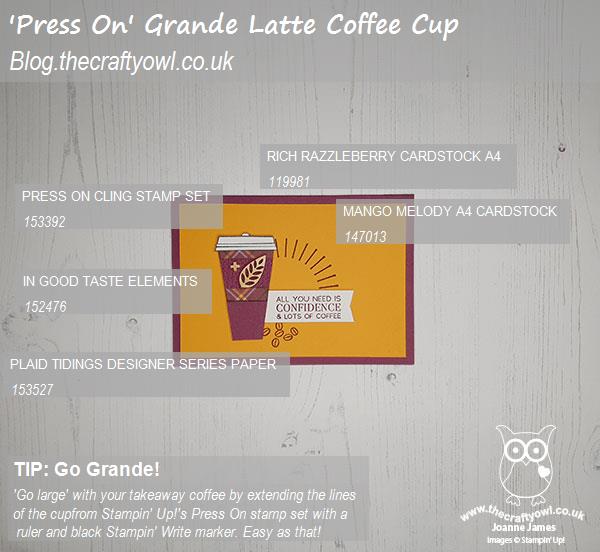
Go Large - In order to fit the proportions of the sketch, I needed to 'go large' with my takeaway coffee. With the coffee cup in the 'Press on' stamp set, this is actually really easy to do: take your black Stampin' Write marker and extend the sides and add another horizontal line for the base. Simple!

Added Texture - I added a little extra texture to my cup by adding a textured coffee collar and a couple of wooden elements, for some added detail since the whole thing has a kind-of autumn feel I think:


So what do you think? I like the end result, but I don't love it. When my discerning teenager saw the finished result, she declared that whilst she loved both colours separately, she did not care to see them used together! Perhaps I should have gone monochrome ...

Here is the visual summary of the key products used on today's project for you to pin for easy reference:


You can see all of my 'How To' summaries on my 'How To - Tips and Techniques' Pinterest board in case you've missed any. 

Here's a summary of our challenge rules:

  • Create any card, scrapbooking page, 3D project or packaging project that fits the challenge.
  • Please include the challenge graphic and link back to the challenge in your blog post. Turn off word verification so we can leave you lots of lovely comments. Make sure you link the post not the whole blog to the Linky. Use #AYSIXXX when uploading to a public gallery.
  • If you’re unsure about ‘the rules’, check the details under the Challenge Guidelines tab on the As You See It Challenge homepage.
  • In a Fill in the Blank challenge, complete the sentence in the Challenge Banner with the phrase that is true for you and create your project using the words you used. Tell us what you said in your blog or on your site.
 
We look forward to seeing your creations in the AYSI gallery.

Enjoy your day. I for one is glad it's Friday and I'm looking forward to a slightly quieter evening than I've had for the rest of this week. I'll be back tomorrow with another project. Until then, happy stampin'!


Stampin' Up! Supplies Used:

Table built using Product Table Builder by The Crafty Owl - Independent Stampin' Up! Demonstrator.

Have a Hoot Christmas Owl Collection

by Joanne James19. November 2020 09:31

Thursday already - where does the week go?! Today I'm sharing a card that I meant to blog yesterday, but simply ran out of time! It uses this week's CAS(E) This Sketch layout and the current Colour Inkspiration colour palette:


Firstly, I would like to say an big 'thank you' to the CAS(E) This Sketch team for choosing my entry last week as their winner - always an honour as the competition is stiff, with so many notable entries! If you missed it, you can see that card here. Now onto my card for this week! I thought long and hard about this sketch, especially because I couldn't come up with a design solely with words that I liked. I did come up with one non-Christmas idea that I am still playing around with, but as my challenge entry I decided to settle on creating the overall shape and mix some images in with my sentiments - after all, a sketch is for inspiration as a starting point, right? Take a look at what I came up with:


Here's the low-down on today's card:

I used the various festive owls in the 'Have A Hoot' stamp set and created my pyramid of owls and sentiments to follow the sketch layout. I used my Stamparatus to help with positioning and stamped the whole thing onto my card (minus the mistletoe above the pair) and then stamped the owls again and diecut them, so that I could pop them up on dimensionals. This was largely because my card is otherwise one layer, and I didn't want my Blends to bleed through to the reverse. I added a few snowflake sequins, and my card was complete - a #simplestamping Christmas card, save for the diecutting of the owls!


Here is the visual summary of the key products used on today's project for you to pin for easy reference:


You can see all of my 'How To' summaries on my 'How To - Tips and Techniques' Pinterest board in case you've missed any. 

Enjoy your day and I'll be back tomorrow with another project. Until then, happy stampin'!


Stampin' Up! Supplies Used:

Table built using Product Table Builder by The Crafty Owl - Independent Stampin' Up! Demonstrator.


Reindeer Clip Clean And Simple Christmas Cards

by Joanne James17. November 2020 17:30

Today I'm sharing a card for the current challenge over at CASology where I haven't played in a while that also uses the sketch over at Paper Craft Crew:

    Vertical Sketch Challenge PCC401   

  I loved the sketch over at PCC this week and knew it would be perfect for me to use up some fun reindeer paper clips that I had lurking in my embellishment drawer - take a look:


Cute, right?! Here's the low-down on today's card:

I loved these little reindeer clips when they came out a few years ago and must confess to having hoarded a few containers of them when they retired. The sketch was just perfect to add one to a square of Soft Suede and embellish with some gold twine, a strip of brushed metallic cardstock and some gold gilded gems - oh and an 'All The Trimmings' red enamel dot to make my stag a Rudolf ;-) I paired it with a simple block 'MERRY' sentiment from the super-useful 'Peace and Joy' stamp set for for an additional pop of festive colour:


I added some simple stamping to the inside using other words from the same stamp set: 


And I was done! Quite simple really but I think the reindeer paper clip makes a fun focal point in and of itself.

Here is the visual summary of the key products used on today's project for you to pin for easy reference:


You can see all of my 'How To' summaries on my 'How To - Tips and Techniques' Pinterest board in case you've missed any.

When I'd finished my card, I liked it so much I made a couple more - I also used glitter enamel dots on one of them:

I'm now building my Christmas card stash at a pace - hoping to get them all in the post nice and early this year for a change, I figure we could all do with a little early festive cheer!

Enjoy the rest of your day; I'm off to watch the Great British Bake Off semi-final tonight, so looking forward to drooling over their makes and bakes, especially as it's patisserie week! I'll be back tomorrow with another project. Until then, happy stampin'!


Stampin' Up! Supplies Used:

Table built using Product Table Builder by The Crafty Owl - Independent Stampin' Up! Demonstrator.

Gilded Autumn Thanksgiving Cajun Craze Pumpkins

by Joanne James15. November 2020 21:00


A lockdown weekend with pouring rain gave me extra crafting time today so I thought I'd squeeze in a second post with a thanksgiving card that I made for a friend of mine, that was inspired by a number of challenges:


I used Julee's fabulous-as-always Mojo Monday sketch and the Card Concept inspiration photo with its rich oranges and browns and pumpkins galore inspired me to use the gold-embossed pumpkin paper from the Gilded Autumn paper pack for my clean and layered card. I decided to pair it with one of my favourite sentiments from 'Country Home' for a Cajun Craze monochromatic card - take a look:


Here's the low-down on today's card:

My Gilded Autumn embossed paper was the starting point for today's card. I just love it! I added a stitched gold foil border and a layered pumpkin, made from one of my retired Patterned Pumpkin Dies and then with the pumpkin coloured with Cajun Craze Blends and splattered with gold shimmer paint, before adding some die cut leaves and vines:


I finished my sentiment banner with a double bow of Cajun Craze metallic ribbon and gold twine for some extra shine. So what do you think? I don't use Cajun Craze that often and there's a lot of it on this card, but I think the gold really takes things up a notch and compliments it beautifully. This almost feels like a Cinderella-esque rags to riches card, metaphorically speaking! I'm also linking this card up over at SUO Challenges where the theme is thanksgiving.

Here is the visual summary of the key products used on today's project for you to pin for easy reference:


You can see all of my 'How To' summaries on my 'How To - Tips and Techniques' Pinterest board in case you've missed any. 

Enjoy your evening and I'll be back tomorrow with another project. Until then, happy stampin'!


Stampin' Up! Supplies Used:

Table built using Product Table Builder by The Crafty Owl - Independent Stampin' Up! Demonstrator.


Sounds of the Season CAS Christmas Bells PP517

by Joanne James15. November 2020 09:00

Today it's Sunday and time for this week's new challenge over at The Paper Players! It's the turn of the amazing Ann to host this week and she has a timely Clean and Simple challenge for you to work with:


Our theme this week is 'Hooray For The Holidays'. With Christmas just around the corner I decided to go with another card to add to my growing pile, but you could choose Thanksgiving or any holiday you like - as long as your card is clean and simple.  So what do we mean by Clean and Simple?

  • Minimal layers and embellishments
  • Plenty of open space, aka "white" space
  • Simple and uncluttered

I decided to use the Sounds of the Season jingle bells again on my card this week, this week changing from silver to gold and pairing with red for the challenge over at Less Is More. I also used the sketch over at CAS Colours and Sketches which gave me the perfect opportunity to use a die from the Dove of Hope Dies that I haven't been able to find a good use for until now - take a look:


 The die was just perfect to create a couple of lengths of holes to show the gold foil below, to compliment my diecut bells and gold heat embossed sentiment. You can see the detail a little better on the angled shot below - the weather has been so poor here in the UK that I've struggled to photograph the foil without artificial light, which is never as clear as daylight:


A quick clean and simple check:
  • Minimal layers and embellishments with one main focal point - yes
  • Lots of open 'white' (or in my case red!) space - yes
  • Simple and uncluttered - yes
I'd call that a result! 
 
Here is the visual summary of the key products used on today's project for you to pin for easy reference:


You can see all of my Product and 'How To' summaries on my 'How To - Tips and Techniques' Pinterest board in case you've missed any. 

Before you reach for your ink and papers, check out what our amazing team has created to inspire you this week:

Here's a quick recap of our challenge rules:
 
1.  Create a new paper project
2.  Upload your creation to your blog with a link back to us and provide a direct link to the post featuring your challenge submission.
3.  Please link your card to no more than four challenges, TOTAL.
4.  Have FUN!

You can see all of my 'How To' summaries on my 'How To - Tips and Techniques' Pinterest board in case you've missed any. 

Enjoy your day; my day will definitely be spent indoors today, so I'm thinking cooking, crafting and a movie could be the order of the day! I'll be back tomorrow with another project. Until then, happy stampin'!


Stampin' Up! Supplies Used: 

Table built using Product Table Builder by The Crafty Owl - Independent Stampin' Up! Demonstrator.

Snowflake Splendor Sparkling Snowflake Wishes TTT90

by Joanne James12. November 2020 17:00

A busy couple of days but it's Thursday and time for a new challenge over at TicTacToe! It's the turn of Team X to host this week and the lovely Ashwini is our featured designer this week. This is the fun board that we are playing along with: 


I decided to go down the centre column with blue, holiday and sparkle/shine and am sharing a clean and layered snowflake card with you today - take a look:


Here's the low-down on today's card:

True Blue - The main blue that I chose to feature on my card today is Pacific Point - one of the first three ink pads I ever purchased when I started stamping (along with Real Red and Old Olive, in case you're interested!) and whilst, like my other initial purchases, this is a colour that is still going strong, it's also one I don't use as frequently in my general crafting. So you can imagine how pleased I was when I saw it feature as one of the colours in the Snowflake Splendor patterned paper - I knew it would be the perfect opportunity to give it some love!

Snowflake Splendor - There are so many beautiful patterns in the Snowflake Splendor papers it's difficult to choose just two, but choose I did! I went with a couple of complimentary patterns, both of which feature Pacific Point, to bring out the bold blue colour. I used white mats on my project, which is something I don't often do but is a great way to showcase a stronger colour such as Pacific Point. 

Glimmer and Sparkle - Pacific Point is not the only blue that I showcase on today's card though; the Balmy Blue glimmer paper is so full of sparkle I couldn't resist adding some to my festive snowflake showcase and I think it compliments the other elements beautifully. I also added a sprinkling of sequins for a little more shimmer; along with my sparkle-filled sentiment I think this card is perfect for the current Time Out challenge too, where the challenge word is 'festivals' with the option of added shimmer/glitter - yes please!

Here is the visual summary of the key products used on today's project for you to pin for easy reference:


You can see all of my Product and 'How To' summaries on my 'How To - Tips and Techniques' Pinterest board in case you've missed any. 

A tictactoe board offers so many creative possibilities - how does this week's board inspire you? Why not have a go? We would love to see you in the gallery and who knows - you might be selected for Designer's Choice and be eligible to be a guest designer on a future challenge. 

Enjoy your day; I'll be back tomorrow with another project. Until then, happy stampin'!


Stampin' Up! Supplies Used: 

Table built using Product Table Builder by The Crafty Owl - Independent Stampin' Up! Demonstrator.

Enjoy The Moment CAS Watercolour Sneak Peek

by Joanne James9. November 2020 19:50


So here it is - the card that I actually intended to blog today! This card was inspired by a number of challenges: the colours over at CAS Colours and Sketches, along with this week's CAS(E) This Sketch layout. It's also a great example of #SimpleStamping as it uses nothing more than stamps ink and paper which also just happens to be the theme of the challenge over at Just Add Ink this week:


What's more, this card is a sneak peek of a brand new Stampin' Up! stamp set that will debut in the 2021 Spring-Summer seasonal catalogue - take a look:


Here's the low-down on today's card:

For those of you that follow me on social media, you will know that I attended the bi-annual Stampin' Up! Onstage event this past weekend, which because of Covid, was held virtually online, with some of my team #OnstageAtHome2020. We had a great time and as always it was still exciting to get a first view of the new catalogue and play with some of the new products. I received a new stamp set called 'Enjoy The Moment' in my Onstage swag bag and whilst I don't usually blog cards with new sets this far in advance of catalogue launch (I don't like to be too much of a tease!) I really like this stamp set and I thought it was perfect for the above challenges. I simply watercoloured 4 ovals using the challenge colours onto some Fluid 100 watercolour paper and then using my Stamparatus, I stamped four of the seed pods over the top of each one, stamping a few times to get them nice and black. I stamped my sentiment in black onto a strip of Bumblebee cardstock and added it to my card with dimensionals to finish. A great example of #SimpleStamping - sometimes stamps, ink and paper is all you need!


So what do you think? Have I wet your appetite for the new catalogue?! There are still a couple of months before it launches, so rest assured won't be tempting you too much at this stage. The only way you can get it sooner is to join my team - do get in touch if you really can't wait! Either way, I will be firmly back to Christmas cards tomorrow!

Here is the visual summary of the key products used on today's project for you to pin for easy reference:


You can see all of my 'How To' summaries on my 'How To - Tips and Techniques' Pinterest board in case you've missed any. 

I'll be back tomorrow with another project. Until then, happy stampin'!


Stampin' Up! Supplies Used:

Table built using Product Table Builder by The Crafty Owl - Independent Stampin' Up! Demonstrator.
 

Mini Catalogue

BROWSE THE CATALOGUE

The mini catalogue is now live! Read and download your copy here.

Shop Online

Access my online shop 24 x 7, 365 days of the year:

Current April hostess code:

VDKNV7BH

Shop Online

Join My Team

It's always a great time to join Stampin’ Up! New team members can get £130 worth of products for only £99 + free business supplies + free shipping + all the fun being a part of Stampin’ Up! Stampin' Up! has something for everyone: join my growing team and benefit from my support to enjoy Stampin' Up! however you choose.

If you're interested, call me for a chat to understand how I can help you realise your goals. Alternatively, if you have already decided to sign up and you just can't wait, please click here for the link to the online form where you can sign up and order your starter kit right away! 

Latest Kit!

Stampin Cut and Emboss

The Rock Legend Kit has all you need to make 8 cards with coordinating envelopes. Along with the new Panda Friends Kit, both are available from January 4th for just £14 each - get yours here!

2023-24 Annual Catalogue

BROWSE THE CATALOGUE

Click on the catalogue for a full list of current SU! supplies - if you would like to order any of the items featured, please drop me a line at [email protected] or give me a call on 07773 421446 - I'd be happy to help.

New Online Exclusives

There are new products available exclusively in the online store from 5 March - check them out here.

About Me

Hi I'm Joanne and live in Northampton and when I'm not looking after my husband and two beautiful children, am an avid crafter with a passion for all things Stampin' Up!

I must confess that I have never been a big rubber stamper - until I discovered Stampin' Up! that is. I love the fact that I can get such great results with co-ordinating stamps, inks, papers and punches - the possibilities are endless! Join me on my stamping journey as I share the things I love and be inspired to create amazing things yourself!

Follow Me

Monthly Newsletter

Box Builder

Click the button above to use Box Buster to create your custom box design using the Envelope Punch Board!

Kits Collection Now Available!

Stampin Cut and Emboss

The new Kits Collection from Stampin' Up! is now available!

Click here to see the current kits available and order yours online today.

I Design For


Stampin' Up Stuff

This is my personal blog and is not endorsed by Stampin’ Up! I hope you find it a plentiful source of ideas and personal inspiration but please don't copy my designs for contest submission or use for classes, publication or sale without express permission.