Love In The Scrap Bin For TTT 98

by Joanne James28. January 2021 17:00

It's Thursday and time for a new challenge over at TicTacToe! It's the turn of Team X to host this week and the lovely Felicita is our featured designer this week. This is the fun board that we are playing along with: 


When I was sorting through my scrap bin the other week for our Speed Stamping Scrap Bin Challenge over at As You See It (you can see those cards in my previous post here), I had a whole bunch of black, red and gold bits and pieces, lots of which were heart shaped, so I thought I would use them for my TicTacToe card today. Here's what I came up with:


Here's the low-down on today's card:

I went both down the first column and across the third row of our TicTacToe grid with today's card, completing both 'red-free-sentiment' and 'sentiment-embellishment-diecut' I had a red tone-on-tone stamped heart, a row of black diecut hearts (Stitched Be Mine Dies), some leftover strips of foiled DSP and gold glimmer paper and a gold foil diecut from the 'Joy To The World' Paper Pumpkin kit from before Christmas; I held onto the French 'amour' pieces as I thought they would be perfect for a Valentine's card too. I layered all of my pieces together then added a trio of Real Red resin hearts to compliment my large red heart and add a little additional pop of red. You can see the dimension on my simple layered cluster better below:


No product summary or supply list for today's card as it contains lots of retired bits and pieces. It does feel good to get a few more things used up though! I'm linking today's card up over at Festive Friday as it uses red, gold and foil paper and at The Spot where they are all about getting your heart on this week. 

A tictactoe board offers so many creative possibilities - how does this week's board inspire you? Why not have a go? We would love to see you in the gallery and who knows - you might be selected for Designer's Choice and be eligible to be a guest designer on a future challenge. 

Enjoy your day; I'll be back tomorrow with another project. Until then, happy stampin'!


Sale-A-Bration Paper Blooms CAS Layered Cards

by Joanne James27. January 2021 21:19

Today I'm sharing a couple of cards I made using the first sketch of the year over at Fab Friday:


It's definitely a keeper, and is a sketch with lots of possibilities - I would definitely suggest you check out the DT cards and those in this week's gallery, as there are some great crafty creations. I considered a few options, but ended up going super simple and making a couple of cards to showcase some of my favourite FREE Sale-A-Bration papers - take a look:


Here's the low-down on today's card:

I just love the colours and bold floral patterns of the Paper Blooms paper, so decided to make a couple of cards with two of the patterns. A simple Night of Navy offset mat, sentiment in a Stitched Rectangle and added a loop of denim ribbon to each:


Here's the second one that I made where I flipped the colours:


And a shot of both cards together:


Here is the visual summary of the key products used on today's project for you to pin for easy reference:


You can see all of my 'How To' summaries on my 'How To - Tips and Techniques' Pinterest board in case you've missed any. 

Enjoy your evening and I'll be back tomorrow with another project. Until then, happy stampin'!


Stampin' Up! Supplies Used:

Table built using Product Table Builder by The Crafty Owl - Independent Stampin' Up! Demonstrator.

Curvy Flower and Field CAS Birthday Card CCS 404

by Joanne James26. January 2021 13:00

It's Tuesday and time for a new challenge over at CAS Colours & Sketches. Today we have a sketch challenge and Jeanne has asked that we incorporate a curve into our design. Feel free to flip or rotate the sketch when making your card.


Following last week's inner wrestling, for my card today I went uber clean and simple - just 4 items make today's card:


Here's the low-down on today's card:

Curvy Dies - Jeanne's sketch was a gift to Curvy Dies this week! A swift run through the diecutting machine with the simple dotted edge die and my Seaside Spray panel had the necessary curve I was looking for. 

Quite Curvy - I added a birthday sentiment from the co-ordinating Quite Curvy stamp set in Tuxedo Black to my panel; it aligns to the contour of the diecut perfectly and has the bonus of being photopolymer, so is super easy to line up too.

Flower and Field - Having chosen to keep my top layer completely 'clean' (remember, 'white space' doesn't have to white in colour, just free from detail), I decided to add a little detail to the edge of my card base below with a strip of designer paper. This pattern is one of the designs in the Flower & Field Designer Series Paper pack, one of the items that can be yours FREE with a purchase of £45 during Stampin' Up!'s Sale-A-Bration promotion. The patterns in the pack are a collection of bold florals, perfect for all kinds of projects.

Here is the visual summary of the key products used on today's project for you to pin for easy reference:


You can see all of my 'How To' summaries on my 'How To - Tips and Techniques' Pinterest board in case you've missed any. 

Enjoy your day and I'll be back tomorrow with another project. Until then, happy stampin'!


Stampin' Up! Supplies Used:


Table built using Product Table Builder by The Crafty Owl - Independent Stampin' Up! Demonstrator.

Sweet Strawberry and Berry Blessings Birthday Wishes For PP525

by Joanne James24. January 2021 09:00

Today it's Sunday and time for this week's new challenge over at The Paper Players! It's my turn to host this week and I have my favourite, a sketch challenge for you to work with:


I chose a simple layout for my sketch so that it give lots of creative licence. I decided to take the opportunity to break out another new bundle, or two bundles in fact. Today's card is all about the berries - take a look:


Here's the low-down on today's card:

Sweet Strawberry - Today's starting point was the strawberry that I used to anchor my sentiment - courtesy of the Sweet Strawberry stamp set. The set comes complete with two-step stamps for a berry, flower, leaf and stem, in addition to a selection of varied sentiments. Interesting fact for you: did you know that technically, a strawberry is not actually a berry at all? Botanists call the strawberry a "false fruit," or a pseudocarp. A strawberry is actually a multiple fruit which consists of many tiny individual fruits embedded in a fleshy receptacle. Who knew?! I also used the stamps to decorate the inside of my card:


Strawberry Builder Punch Tip - A stamp set with a co-ordinating punch is always great for quick embellishments and whilst I've shared this tip with you before, I thought it worth reminding you of a great way to save even more time with a builder-type punch. Create a mask using a piece of cardstock with all of the pieces punched out as a guide to stamp the individual pieces. This way, when you put the stamped cardstock into the punch, all of the images are aligned and punch out perfectly - check out the photo below to see what I mean:


Berry Blessings - What could be better than one berry bundle? Well, two of course! One of this year's Sale-A-Bration freebies with a £90 purchase is the Berry Blessings bundle, comprising the Berry Blessings stamp set that features the sentiment on the front of my card along with the Berry Delightful DSP, full of great berry patterns and coloured ginghams and plaids. These bundles co-ordinate perfectly with each other and if you have one, you are probably going to want the other too - check out the hand-painted look below:


This is the first card I've made with these bundles, but they won't be the last - there lots more berries, patterns and colours to choose from!

Here is the visual summary of the key products used on today's project for you to pin for easy reference:


You can see all of my Product and 'How To' summaries on my 'How To - Tips and Techniques' Pinterest board in case you've missed any. 

Before you reach for your ink and papers, check out what our amazing team has created to inspire you this week:

Here's a quick recap of our challenge rules:
 
1.  Create a new paper project
2.  Upload your creation to your blog with a link back to us and provide a direct link to the post featuring your challenge submission.
3.  Please link your card to no more than four challenges, TOTAL.
4.  Have FUN!

You can see all of my 'How To' summaries on my 'How To - Tips and Techniques' Pinterest board in case you've missed any. 

IEnjoy your day; we are forecast snow here in the UK today; the James Juniors are very excited, although I'm not sure it will be enough to build a snowman - I'll update you tomorrow! I'll be back then with another project. Until then, happy stampin'!


Stampin' Up! Supplies Used: 

Table built using Product Table Builder by The Crafty Owl - Independent Stampin' Up! Demonstrator.

Foiled Floral Hearts For AYSI 242

by Joanne James22. January 2021 13:00

Friday already? Where did that week go?! Today I'm sharing my design team card for our new challenge over at As you See It where it's time for my favourite, a sketch challenge:
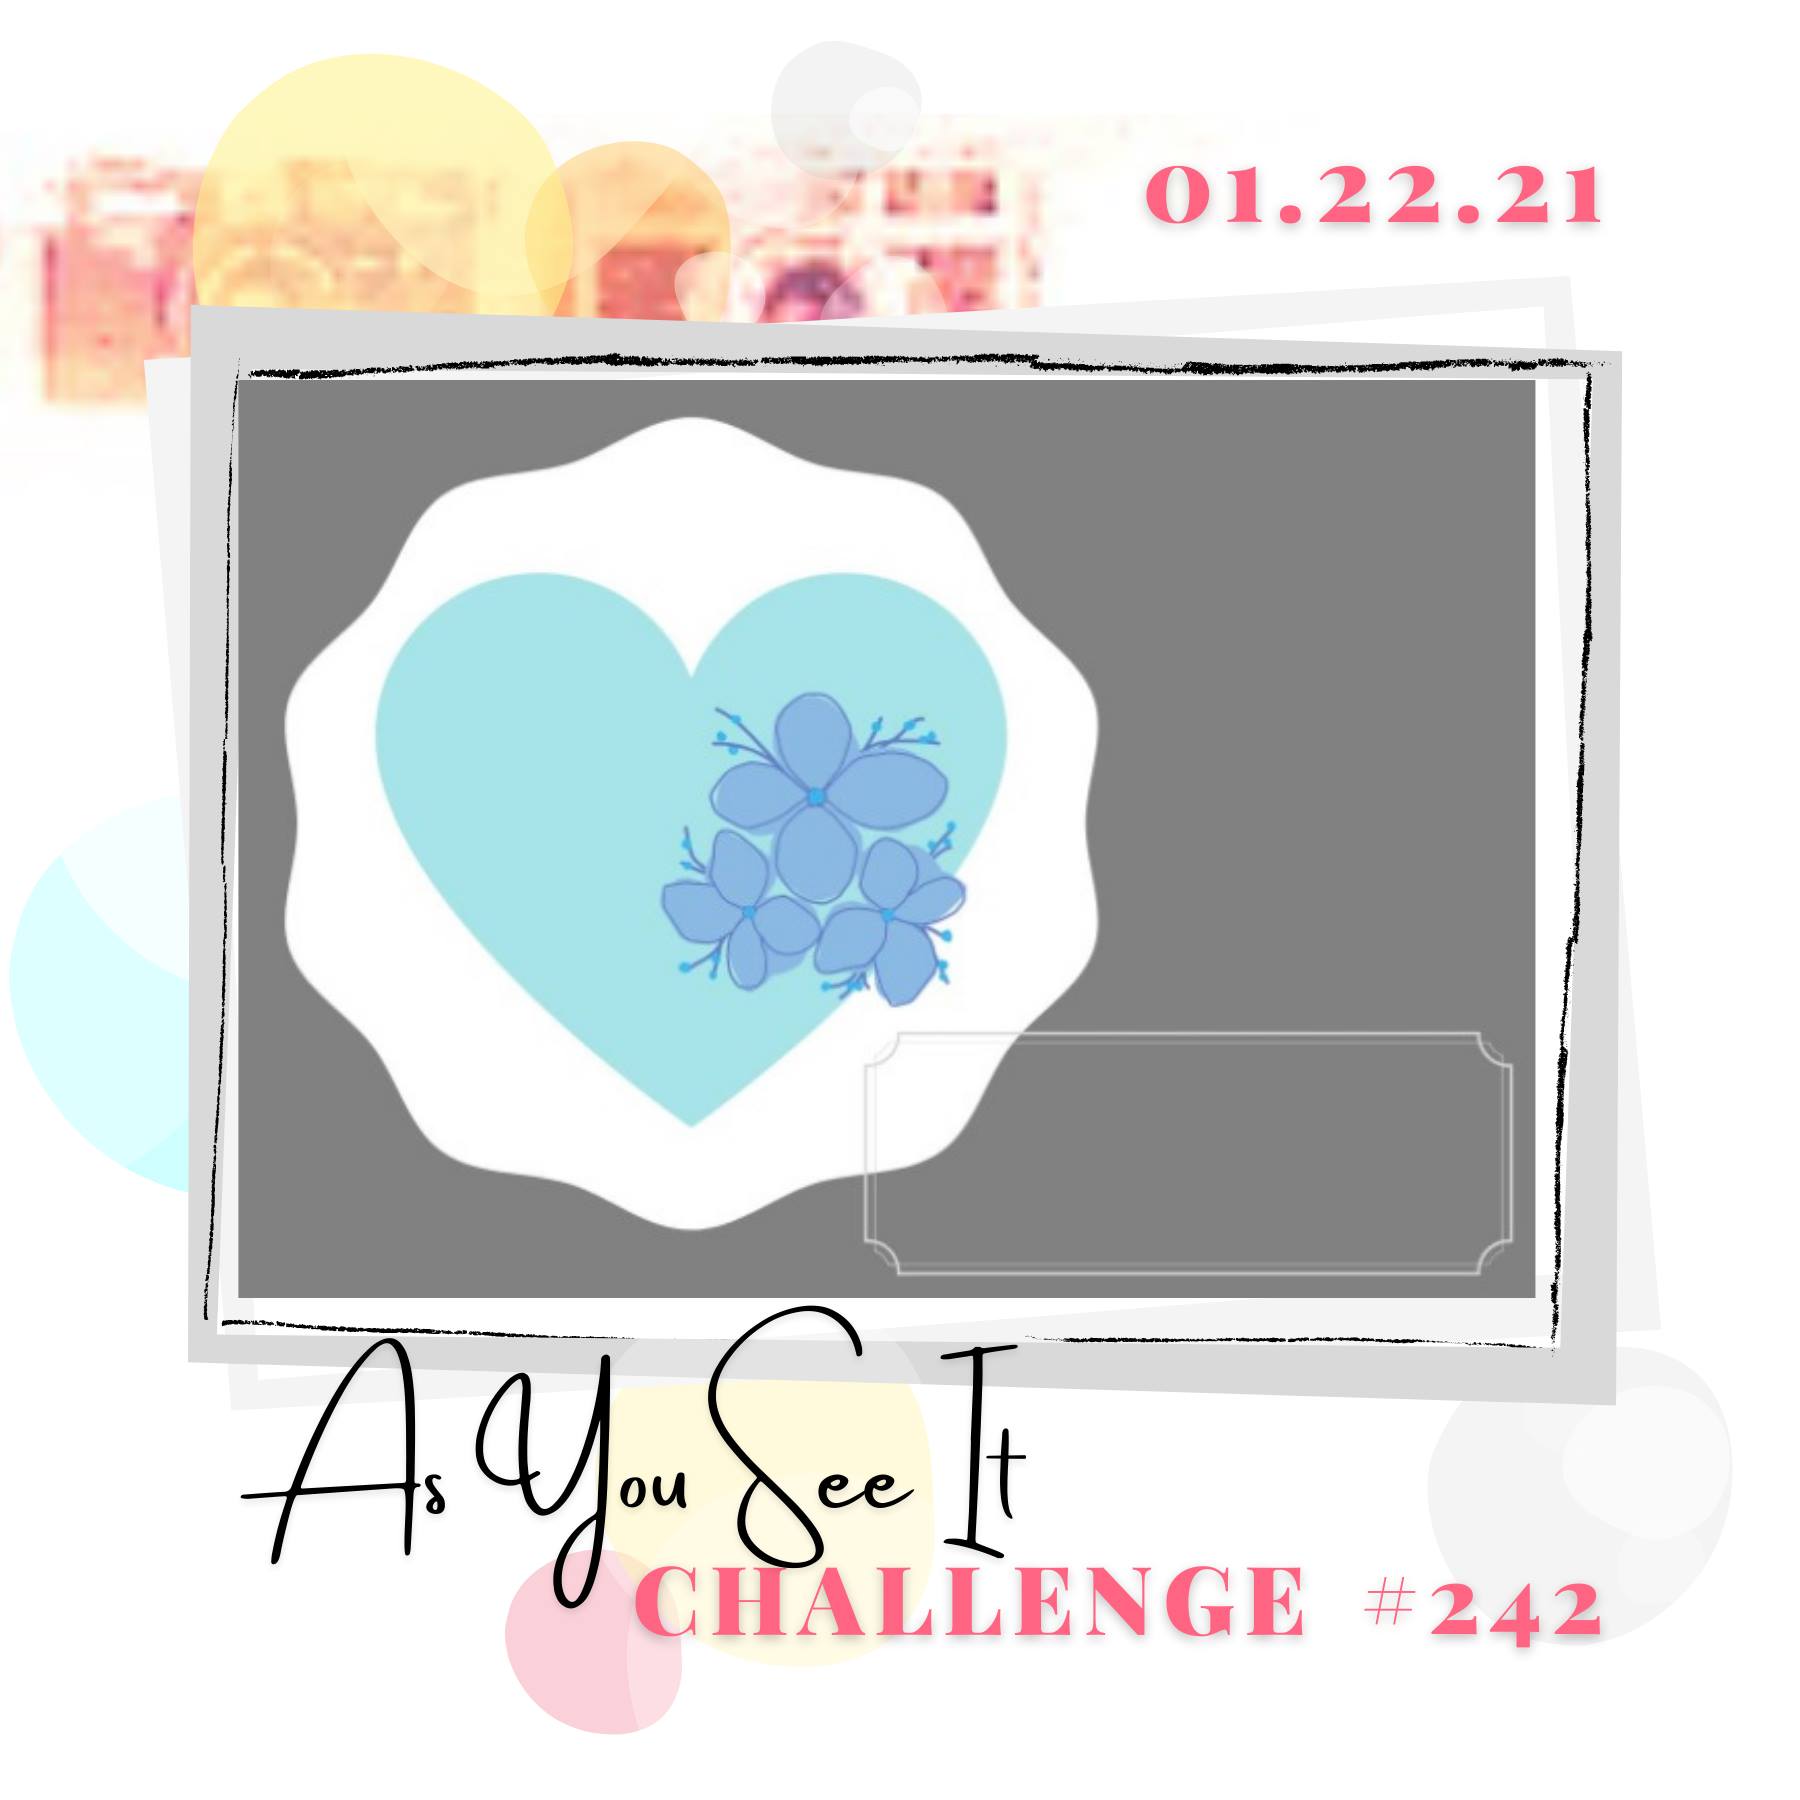
       

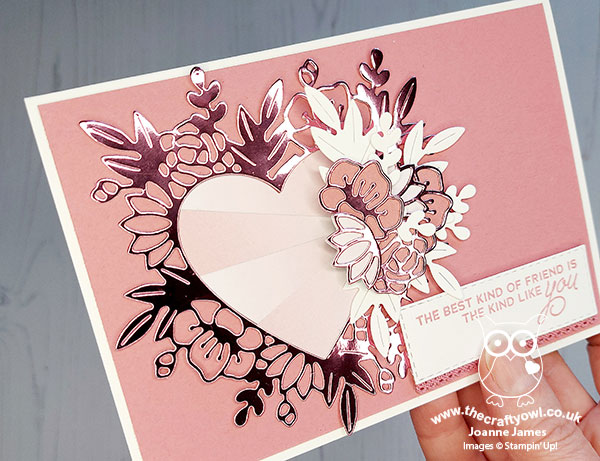
I need to warn you up front - this is a photo-heavy post with lots to look at! I took the sketch quite literally and decided to use that layered shape to make another card using my Floral Hearts Dies. Here's the card I made - take a look:
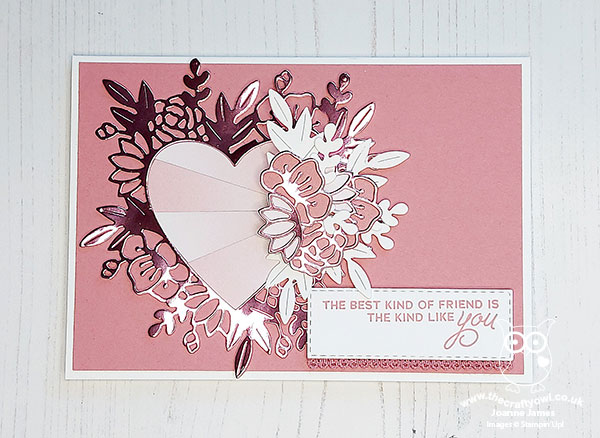
 

Here's the low-down on today's card:

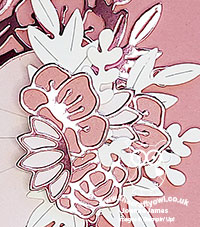
Photographing Foil - I couldn't resist another of those fabulous foil floral hearts, so decided to go with Rococco Rose foil again and a Rococco Rose/White colour scheme. I addition to my heart, I layered a cluster of layered flowers and leaves to the right of my heart. Foil is super tricky to photograph though, whether in natural or artificial light, because of it's reflective qualities. Here's another shot below - I just can't explain how beautiful this foil is in real life:
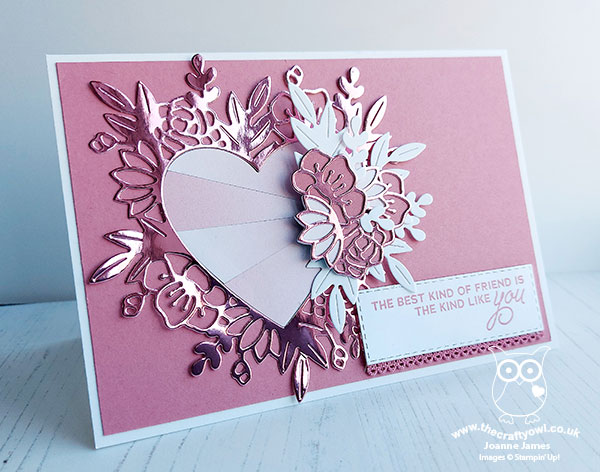
 

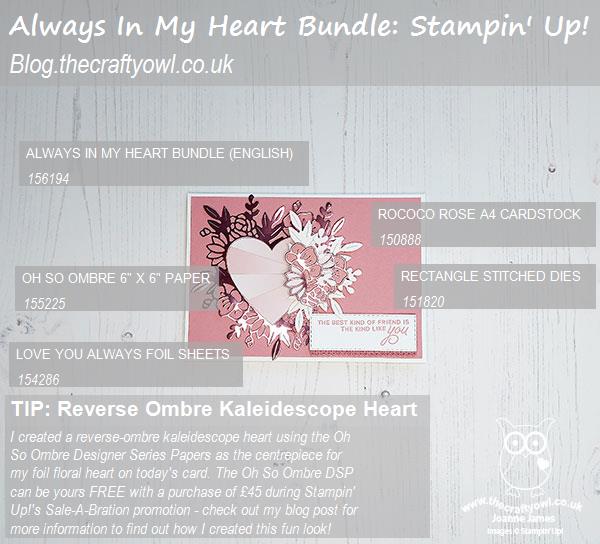
Reverse Ombre Kaleidescope Heart - I had seen a sunburst-type technique using the Oh So Ombre paper (yours free with a £45 purchase during Sale-A-Bration before the end of 28 February) and decided that with the floral cluster on the right of the heart, this would provide the perfect anchor for a similar effect on the centre of my heart. This technique is really easy to achieve: You need to cut two identical shapes, in my case hearts, but with the ombre design of the paper reversed each time, i.e. the first one needs to go light to dark from left to right, and the the second one needs to go dark to light from left to right. You then cut them identically into sections, and switch out alternating pieces before piecing back together. I used the very pale side of the paper for my heart, and I just love the subtle effect. You can see it more closely below:
 

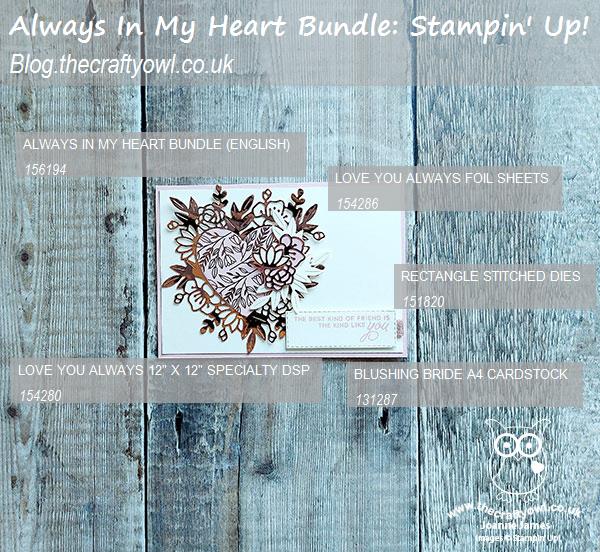
Even More Foil - I loved this card so much, I decided to make another using Very Vanilla and Blushing Bride, this time using the Love You Always Specialty Foil Papers for the centre of my heart:
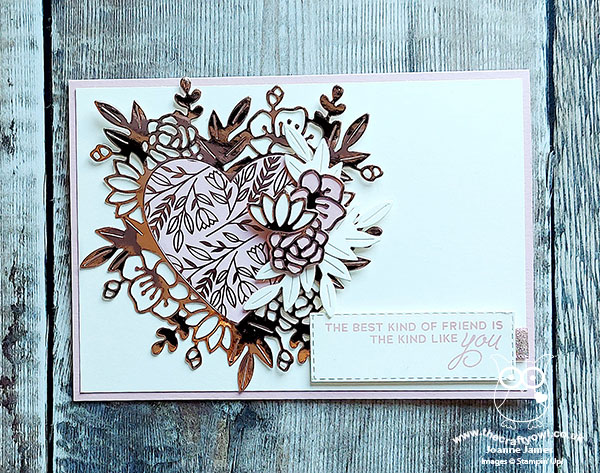
 

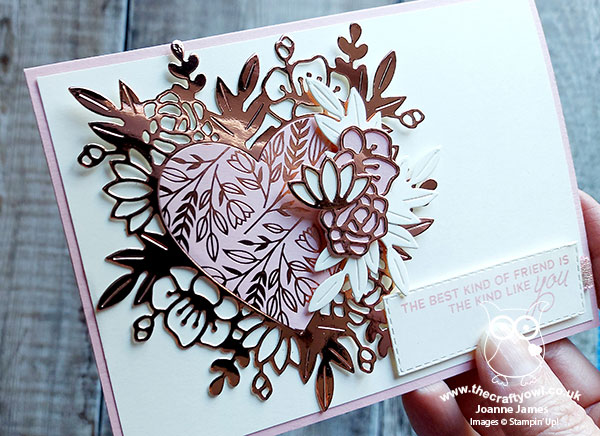
 Both cards feature the same sentiment and the first one is decorated with the edge of some linen scalloped ribbon, whilst this one has a tab of the pretty metallic Blushing Bride ribbon that features in the suite - check out those specialty foils below:
 

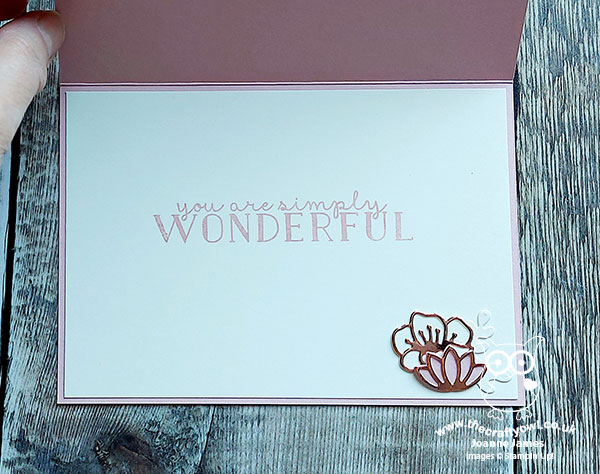
So, so pretty! I also remembered to take a picture of the inside of this one - I finished it with a sentiment from the Bloom & Grow stamp set:
 

I'm linking the first of today's cards up over at Global Design Project #GDP275 for their Love theme this week, and the second one over at SUO Challenges where they too are celebrating with a Love theme for their current challenge.

Here is the visual summary of the key products used on today's projects for you to pin for easy reference:
 

 And the second one:
 

You can see all of my 'How To' summaries on my 'How To - Tips and Techniques' Pinterest board in case you've missed any.  

Here's a summary of our challenge rules:

  • Create any card, scrapbooking page, 3D project or packaging project that fits the challenge.
  • Please include the challenge graphic and link back to the challenge in your blog post. Turn off word verification so we can leave you lots of lovely comments. Make sure you link the post not the whole blog to the Linky. Use #AYSIXXX when uploading to a public gallery.
  • If you’re unsure about ‘the rules’, check the details under the Challenge Guidelines tab on the As You See It Challenge homepage
  • In a sketch challenge, you are welcome to rotate or flip a sketch. You can replace shapes used such as substituting a circle panel for a square panel. However, we must be able to still see the basis of the original sketch in your finished product.
We look forward to seeing your creations in the AYSI gallery.

Enjoy your day. I have a day of household chores today, but will be rewarded with dinner being cooked for me today - young Master James has his practical Food & Nutrition lesson today and is cooking rissotto, so we are delaying the 'lesson' until dinner so that we can enjoy the fruits of his labour fresh from the stove. I'm looking forward to it already! I'll be back tomorrow with another project. Until then, happy stampin'!


Stampin' Up! Supplies Used:
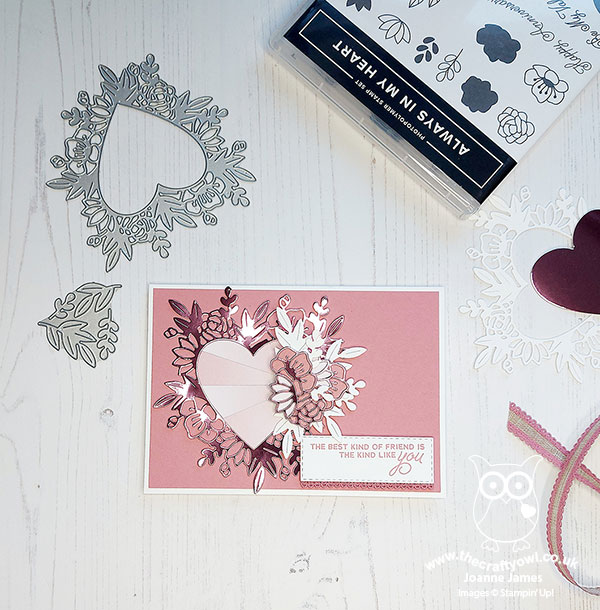
Table built using Product Table Builder by The Crafty Owl - Independent Stampin' Up! Demonstrator.

A Spotlight on Dragonfly Garden CCS 403

by Joanne James19. January 2021 13:00

It's Tuesday and time for a new challenge over at CAS Colours & Sketches. This week Jeanne has a colour challenge for us: 


I like all of these colours, yet for some reason I really struggled to create my card. Then the more I tinkered, the more my card strayed from the 'clean and simple'. Check out my card and I'll walk you through my creative process:


Here's the low-down on today's card:

A Spotlight on Dandy Garden - I thought these colours would be perfect for florals, so decided to use the single large grassy wildflower image from the Dandy Garden stamp set. I decided to use the spotlight technique to highlight a small area of the florals with the challenge colours, with some no-line watercolouring on a rectangle of watercolour paper, stamping the main image tone-on-tone on a panel of Old Olive.  

A Balance of Colour - I decided to use a Crushed Curry cardbase instead of white, with a panel of Old Olive; this base was run through my Subtle Embossing Folder to add some texture and create a seamless panel. I also added a border detail of Melon Mambo, for another touch of colour. Whilst I don't always use white as a base for a clean and simple card, the all important 'white space' is usually a single colour - my earlier card here is a good example of that. In hindsight, I think using all three colours of cardstock was probably too much and perhaps just using Old Olive without highlighting the flowers with an alternative base colour would have been a better idea. 

It's In The Details - There are a number of small details that in themselves I love - the subtle embossed texture of the base, the Melon Mambo border detail, the tone-on-tone twine bow and the heat-embossed fussy cut sentiment. Again, on reflection all of these things together may be why my card feels less 'clean and simple' than it otherwise would be. So a lesson learned for me this week and hopefully as you're reading this a lesson in clean and simple cardmaking for you too! All that said, I still like this card and it's already been sent to someone who will hopefully love it too ;-)

The visual summary of the key products used on today's project for you to pin for easy reference is to follow. 

You can see all of my 'How To' summaries on my 'How To - Tips and Techniques' Pinterest board in case you've missed any. 

As a reminder, for our colour challenges, you must use all of the stated challenge colours. You may also use neutral colours; however, the challenge colours should be the most noticeable ones featured on your card. We use Stampin' Up! color names for reference, but you are welcome to use any other companies' products as long as you match the challenge colours as closely as possible.

Enjoy your day; we woke up this morning to find that we have no broadband at Casa James and on investigation that it's unlikely to be fixed until the end of the week. Not ideal, when everyone is working at home due to lockdown and both James Juniors are having to follow a distance learning programme. We are managing so far, but seriously rationing access to the internet, much to the dismay of the teenagers!! Wish me luck!!!All being well, I'll be back tomorrow with another project. Until then, happy stampin'!


Stampin' Up! Supplies Used:

Table built using Product Table Builder by The Crafty Owl - Independent Stampin' Up! Demonstrator.

Treasures of Life Grandparents Card

by Joanne James19. January 2021 09:00

Today I'm sharing a card inspired by the following challenges:


Just Add Ink have this great family-themed inspiration photo this week, so it was a great opportunity to pair it with the sketch over at Inspire.Create and the theme challenge of 'love' over at Global Design Project and break open one of my favourite new stamp sets - take a look:


Here's the low-down on today's card:

A Grandparent's Love - For any of you reading this who are or have been at some time in your life either a grandchild or a grandparent, I'm sure you will agree that there is something very special about a grandparent's love. The unconditional devotion that is felt both ways and the one relationship where the rules are there to be broken - late bedtimes, messy play, chocolate cereal for breakfast, sweets always - I could go on, but you get the picture! The million dollar stamp set in the mini catalogue, inspired by Gail Murray, called 'Treasures of Life', is perfect for celebrating this special relationship. The James Juniors are still fortunate enough to have three grandparents in their lives and whilst their teenage hands are in some instances now bigger than those of some of their grandparents, the image I used on my card today makes me so nostalgic for the days when this wasn't the case. That tiny hand holding a heart full of love is just the sweetest image. 

Quick and Easy Sepia - GIven the nostalgia that this stamp set evokes for me, I decided to go with a sepia-style effect on today's card. There are lots of ways to achieve this effect, but for today's card I went super simple: I stamped my image in Soft Suede onto Crumb Cake cardstock, and used the finest of my aquapainter brushes to pull the ink from the image to give a watercoloured sepia-toned effect.  

Keeping It Simple - Today's card really is super simple and uses minimal materials. Just one ink colour and two cardstocks and the simple use of the outlined circle to highlight this sweet image. Clean and simple yet so effective I think - I might have to create a set of cards to accompany this one using the other images in the set.

Here is the visual summary of the key products used on today's project for you to pin for easy reference:


You can see all of my 'How To' summaries on my 'How To - Tips and Techniques' Pinterest board in case you've missed any. 

Enjoy your day and I'll be back tomorrow with another project. Until then, happy stampin'!


Stampin' Up! Supplies Used:

Table built using Product Table Builder by The Crafty Owl - Independent Stampin' Up! Demonstrator.

Oh So Ombre Snowman Season PP524

by Joanne James17. January 2021 09:00

Today it's Sunday and time for this week's new challenge over at The Paper Players! It's the turn of the lovely Claire to host this week and she has a seasonal clean and simple  challenge for us to work with:


I used the sketch over at Global Design Project for my layout (I rotated it through 180 degrees) and was also inspired by the snowman and the blue and white winter sentiment over at Hand Stamped Sentiments this week for my clean and simple snow card - take a look:


Here's the low-down on today's card:

I used the Oh So Ombre free Sale-A-Bration paper as the base for my card and heat-embossed the cute skyward-looking snowman onto the ombre paper in white, adding a little extra white with a chalk marker. I added my sentiment, finishing with the word 'snow' made out of the Playful Alphabet letters in white and replacing the 'o' with a glittery white glimmer paper snowflake. Finally I added a sprinkling of sequins from a selection of mixes in my stash amongst the falling snow:

I think I might add this card to next year's Christmas card stash - not that it ever snows here in the UK at Christmas, much to the disappointment of the James Juniors who continue to live in hope! We had the tiniest dusting yesterday morning first thing but it didn't hang around, and we are forecast a return to drizzle and grey skies by today! Hope my little snowman brings some cheer your way in lieu of some sunshine.

Here is the visual summary of the key products used on today's project for you to pin for easy reference:


You can see all of my Product and 'How To' summaries on my 'How To - Tips and Techniques' Pinterest board in case you've missed any. 

Before you reach for your ink and papers, check out what our amazing team has created to inspire you this week:

Here's a quick recap of our challenge rules:
 
1.  Create a new paper project
2.  Upload your creation to your blog with a link back to us and provide a direct link to the post featuring your challenge submission.
3.  Please link your card to no more than four challenges, TOTAL.
4.  Have FUN!

You can see all of my 'How To' summaries on my 'How To - Tips and Techniques' Pinterest board in case you've missed any. 

Enjoy your day; nothing much happening here this weekend as we continue to endure lockdown. I am enjoying having more time to read and build Lego and as a family we seem to have rediscovered chess this past week as we finished watching 'The Queen's Gambit' on Netflix. If you haven't seen it, I can highly recommend it. And you can't bit a game of chess for immersive distraction! I'll be back tomorrow with another project. Until then, happy stampin'!


Stampin' Up! Supplies Used: 

Table built using Product Table Builder by The Crafty Owl - Independent Stampin' Up! Demonstrator.

Red and White Heart Hello For TTT96

by Joanne James14. January 2021 17:00

It's Thursday and time for a new challenge over at TicTacToe! It's the turn of Team X to host this week and the lovely LeAnne is our featured designer this week. This is the fun board that we are playing along with: 


Lots of love-related elements on this week's board, but you are by no means restricted to creating a Valentines/wedding/anniversary card - this is your opportunity to get creative! I couldn't resist another card using my Floral Heart Dies and the sentiment that made me buy the accompanying stamp set - take a look:


Here's the low-down on today's card:

You Had Me At Hello - Any of my regular readers will know that the sentiment that features on the central heart that features on today's card is a line from one of my most favourite movies of all time - Jerry Maguire. If you'd like to read the back story to this, check out this previous post where I explained all. The Floral Hearts Dies were definitely on my wish list, but it was this stamp that sold me on the bundle. What can I say - I am an old romantic at heart!

Hearts and Flowers - Having stamped my sentiment in Real Red so that the wording would appear in white (I definitely recommend using your Stamparatus for this to give good, solid ink coverage), I decided to border it with the main die from the Floral Hearts Dies in white. This card is unashamedly made with Valentines in mind, with its red and white colour combination and showy red satin ribbon and bow detail, but sometimes it just has to be done!

And More Hearts - The background designer paper is now retired, but there is a similar design in the Snail Mail pack or you could even stamp a similar design with the tiny heart stamps in the Always in my Heart stamp set. I also added a trio of bright red resin hearts to my card to finish; these are actually from the Snail Mail Suite, but work perfectly for a Valentine's card and blend easily with other sets too.

Here is the visual summary of the key products used on today's project for you to pin for easy reference:


You can see all of my Product and 'How To' summaries on my 'How To - Tips and Techniques' Pinterest board in case you've missed any. 

I might keep this card for the DH, as he would certainly appreciate the sentiment, if not the fancy heart and showy bow. We don't generally send each other Valentine's cards since we got married, as our wedding anniversary is the following week, but it sometimes serves as a useful reminder to him to get a card for the following week - it is fair to say Mr James is not known for either remembering or celebrating memorable dates without a little help, much preferring spontaneous romantic gestures. Unexpected flowers are always lovely though, so I'm not complaining!

A tictactoe board offers so many creative possibilities - how does this week's board inspire you? Why not have a go? We would love to see you in the gallery and who knows - you might be selected for Designer's Choice and be eligible to be a guest designer on a future challenge. 

Enjoy your day; I'll be back tomorrow with another project. Until then, happy stampin'!


Stampin' Up! Supplies Used:

Table built using Product Table Builder by The Crafty Owl - Independent Stampin' Up! Demonstrator.

Happy Birthday Snail CCS 402

by Joanne James12. January 2021 13:00

It's Tuesday and time for a new challenge over at CAS Colours & Sketches. Today we have a sketch challenge and Jeanne has asked that we use any non-geometric shape. Feel free to flip or rotate the sketch when making your card.


For my card today I decided to make another card using the 'Snailed It' set. I know I used this set last week for my CC&S card too, but I just couldn't resist another outing (don't worry, if you're not a snail fan I have something different in store for my challenge card next week!) These snails are just perfect for a clean and simple card - take a look:


Here's the low-down on today's card:

Snailed It - For today's card, I used the alternative snail in the 'Snailed It' set, who instead of bearing snail mail comes bearing gifts - of the birthday kind! I coloured him using my Stampin' Blends markers and took the inspiration for my colours from the other elements of the suite.

Snail Mail - I decided to create a recessed panel from the horizontal line of the sketch that is both spanned by my birth!day snail and home to a narrow strip of Snail Mail designer paper on the panel below. It's a rare thing to use designer series paper on a clean-and-simple card, but used sparingly and to accentuate a specific design element, such as the recess, and with a clear pattern element, it can be used to great effect (as I've shown here, even if I say so myself ;-) ) 

Art Gallery Birthday - Lastly, the sentiment from today's comes from the Art Gallery stamp set. This set is so, so beautiful and contain some of the most amazing florals, but is also home to some fabulous basic block-type greetings, which are perfect for clean and simple cards.

And that's it - clean and simple, done!

Here is the visual summary of the key products used on today's project for you to pin for easy reference:


You can see all of my 'How To' summaries on my 'How To - Tips and Techniques' Pinterest board in case you've missed any. 

Enjoy your day; today both James Juniors are officially 'back to (virtual) school. I was fully anticipating getting some of my desk jobs ticked off, but so far I have had a steady stream of interruptions from each of them, who are both on breaks at different times and are requiring attention of one form or another, even if it's just real-life human interaction. Something tells me home-schooling is not a route to peace and quiet ... or productivity, or at least not for me anyway! Sanity aside, all being well I'll be back tomorrow with another project. Until then, happy stampin'!


Stampin' Up! Supplies Used:

Table built using Product Table Builder by The Crafty Owl - Independent Stampin' Up! Demonstrator.

Mini Catalogue

BROWSE THE CATALOGUE

The mini catalogue is now live! Read and download your copy here.

Shop Online

Access my online shop 24 x 7, 365 days of the year:

Current April hostess code:

VDKNV7BH

Shop Online

Join My Team

It's always a great time to join Stampin’ Up! New team members can get £130 worth of products for only £99 + free business supplies + free shipping + all the fun being a part of Stampin’ Up! Stampin' Up! has something for everyone: join my growing team and benefit from my support to enjoy Stampin' Up! however you choose.

If you're interested, call me for a chat to understand how I can help you realise your goals. Alternatively, if you have already decided to sign up and you just can't wait, please click here for the link to the online form where you can sign up and order your starter kit right away! 

Latest Kit!

Stampin Cut and Emboss

The Rock Legend Kit has all you need to make 8 cards with coordinating envelopes. Along with the new Panda Friends Kit, both are available from January 4th for just £14 each - get yours here!

2023-24 Annual Catalogue

BROWSE THE CATALOGUE

Click on the catalogue for a full list of current SU! supplies - if you would like to order any of the items featured, please drop me a line at [email protected] or give me a call on 07773 421446 - I'd be happy to help.

New Online Exclusives

There are new products available exclusively in the online store from 5 March - check them out here.

About Me

Hi I'm Joanne and live in Northampton and when I'm not looking after my husband and two beautiful children, am an avid crafter with a passion for all things Stampin' Up!

I must confess that I have never been a big rubber stamper - until I discovered Stampin' Up! that is. I love the fact that I can get such great results with co-ordinating stamps, inks, papers and punches - the possibilities are endless! Join me on my stamping journey as I share the things I love and be inspired to create amazing things yourself!

Follow Me

Monthly Newsletter

Box Builder

Click the button above to use Box Buster to create your custom box design using the Envelope Punch Board!

Kits Collection Now Available!

Stampin Cut and Emboss

The new Kits Collection from Stampin' Up! is now available!

Click here to see the current kits available and order yours online today.

I Design For


Stampin' Up Stuff

This is my personal blog and is not endorsed by Stampin’ Up! I hope you find it a plentiful source of ideas and personal inspiration but please don't copy my designs for contest submission or use for classes, publication or sale without express permission.