Painted Harvest Eclipse Thank You Card

by Joanne James6. November 2017 21:30

It's Monday and the start of another week - only 7 weeks to go until Christmas! I'm not counting down today though; Today I'm sharing a card that I made with the ladies in the second of my technique classes this month that also fits a new(ish) challenge that has appeared in blog land - the TicTacToe Challenge:


I went across the top row for my Painted Harvest thank you card - take a look:


Here's the low-down on today's card:

Large Letter Eclipse - Eclipse cards that use a word raised out of a background are everywhere right now and so on-trend, i thought it was about time I shared one with you. What a great opportunity to use those Large Letter Framelits again - these framelits really are so worth the investment! I went with a wide, thinner card than usual that is just right to fit my 'thanks'.

Painted Harvest - I created my sunflower background using a repeating pattern of bright sunflowers; my chosen colours are Crushed Curry and Peekaboo Peach and I think the latter most certainly adds a vibrancy to this card - the letters really 'pop' against those sunflowers.

A Split Sentiment - I decided to use a split sentiment to really tie my raised letters into the theme of my card: on my small cut oval I partially stamped one of the sentiments from the Painted Harvest set that says 'gather together & give thanks', omitting the 'thanks' and selectively inking the remaining portion, so that my raised letters complete the sentiment. 

Here is the visual summary of the key products used on today's project for you to pin for easy reference:


You can see all of my 'How To' summaries on my 'How To - Tips and Techniques' Pinterest board in case you've missed any. 

I hope your day was a productive one; the ladies in today's class all produced some fabulous creations! My next class in December is using the Delightful Daisy bundle - for more details check out the event on my Facebook page here and get in touch to book your place. I'll be back tomorrow with another project using the Painted Harvest stamp set. Until then, happy stampin'!


Stampin' Up! Supplies Used:

Table built using Product Table Builder by The Crafty Owl - Independent Stampin' Up! Demonstrator.

Say 'Hello' To Stampin' Blends - The New Alcohol Markers From Stampin' Up!

by Joanne James1. November 2017 22:00


Today is a big news day: Alcohol markers are back! It's the first of November and as promised in an earlier post, today sees the official launch of Stampin' Blends to customers.  These high quality, dual-tip markers come in 12 exclusive Stampin' Up! colours; they each have a light and a dark shade for the ultimate blending experience. In addition, there are two further colours, bronze and ivory, and a colour lifter to give your blended images the finishing touch. 


Stampin' Blends are available in 2-marker combo packs, as single markers or as the whole collection. There are so many great stamp sets in the catalogue that are perfect for colouring; in addition to celebrate the launch of these fabulous new pens, Stampin' Up! have also released a new stamp set and card project kit designed to be use with Stampin' Blends:


Color Me Happy Project Kit (144069)

  • You'll be coloured happy every time you create with this stamp set.
  • The line-art images are perfect for colouring techniques.
  • Quantity: 10 rubber stamps
  • Suggested clear blocks (not included): b, c, g, h, i


Color Me Happy Project Kit (144609)
The Colour Me Happy Project Kit will be available while supplies last.

The kit includes:

  • 16 card bases, 4 each of 4 designs
  • 16 envelopes with printed design inside, 4 each of 4 designs
  • Gold foil accents
  • Die-cut cardstock background and accents
  • Printed and gold foil die-cut accents
  • White Baker's Twine
  • Mini Pool Party tassels
  • Circle and star sequins
  • Gold foil tape

Coordinating colors: Basic Black, gold foil, Night of Navy, Pink Pirouette, Pool Party, Pumpkin Pie, Rich Razzleberry

If you're a fan of Stampin' Up! Bundles, than you'll love that these two coordinating products (project kit and stamp set) are available as a BUNDLE...save 10%. 

I am so excited about the arrival of these new pens and I can't wait to share some of my coloured creation with you. In the meantime, here's a little video from the nice people at the Home Office showing these pens in action: 

I'll be back soon with more news and another project. Until then, happy stampin'!


Stampin' Up! Supplies Used:

Table built using Product Table Builder by The Crafty Owl - Independent Stampin' Up! Demonstrator.

Label Me Pretty Sweet Cupcake Card

by Joanne James28. October 2017 19:00

It's the weekend - hurrah! It's always nice when the weekend rolls around, although I must confess this week has been a little easier than usual in terms of my usual activity schedule, with both James Juniors being on their half term holiday break. We have been enjoying time with friends, indoor climbing and outdoor play, making the most of the mild autumnal weather. I need to make the most of this weekend as that is all-change again come Monday with one of them at least back to school.

So, today I have a change from Christmas! I'm sharing a card for this week's challenge over at Just Add Ink where the challenge is all about cake:

 My card features cake two ways - take a look:


Here's the low-down on today's card:

A Neat Trick With Birthday Friends - The little girl holding the cupcake on my card has come straight from the Birthday Memories designer series paper (currently available as part of the 'buy3, get 1 free' paper promotion) but I didn't have to fussy-cut her; one of the framelits in the Birthday Friends Framelits set fits her shape perfectly. I simply lined them up on the big Shot, ran them through and voila - one little girl, complete with cupcake, and not a paper snip in sight!  

A Co-ordinated Background - I wanted to add some detail to my background without detracting from my sentiment or sweet little girl, so decided to continue the 'cake' theme with some tone-on-tone stamping in Blushing Bride using the cupcake in the 'Sweet Cupcake' stamp set to create a subtle background wallpaper.

From My Kitchen - I think the little girl has a slightly mischievious look about her and certainly looks like she is peeking around the side of something. I decided to make a feature of the sentiment and this one from the 'Label Me Pretty' stamp set is the perfect fit. 

All in all a sweet card - all I need now is a home-baked cupcake to go with it!

Here is the visual summary of the key products used on today's project for you to pin for easy reference:


You can see all of my 'How To' summaries on my 'How To - Tips and Techniques' Pinterest board in case you've missed any. 

So tomorrow it will be back to Christmas with my card for this week's new challenge over at The Paper Players, however in the meantime I would really like to hear your thoughts: I'm mindful that I have been sharing a lot of Christmas projects lately as it is often what I'm making at this time of year, but as my readers how do you feel about this? Are you happy to get as much Christmas inspiration as possible, or would you prefer a mix of projects? Do leave me a comment below - I'd really love to hear your thoughts on this. 

Until tomorrow - happy stampin'!


Stampin' Up! Supplies Used:

Table built using Product Table Builder by The Crafty Owl - Independent Stampin' Up! Demonstrator.

Labels To Love Quick and Easy Christmas Cards Two Ways

by Joanne James25. October 2017 20:19

I've been busy hosting a few Stampin' Up! parties this month - the current hostess promotion to earn the Merry Patterns stamp set means that it's a great time to gather with friends for an evening of creative fun. Today I'm sharing a couple of the cards that my hostesses and friends have had the opportunity to make:


Here's the low-down on today's cards:

Labels To Love - The Merry Little Labels stamp set and Everyday Punch bundle have been very popular with my customers and I wanted to share the other stamp set in the catalogue that also co-ordinates with the Everyday Label Punch: Labels To Love. There are sentiments for a variety of occasions in this set, not just Christmas, and each of them fits the Everyday Label Punch - that makes for a winner in my book! We used a couple of the Christmas sentiments and paired it with the festive Quilted Christmas papers. I even decorated the envelope flaps with a piece of co-ordinating paper in the alternating colourway. Here's one of them - you can see the second one at the bottom of this post:


Add Sparkle With Tinsel - The Mini Tinsel Trim is great for decorating your Christmas packages but is also great for adding a touch of sparkle to your cards. here we tied knots in each end and created a loop behind the label for a quick touch of glitz. 

A Quick Card Solution - These cards are a slightly smaller than a standard card size, measuring 12.7cm x 8.9cm, as we used Stampin' Up!'s white notecards and envelopes for speed. They arrive pre-scored and with envelopes included and are great if you are mass-producing or want to make some quick and easy cards, for Christmas or any time. They are also great for children's cards - both the James Juniors go through a pack of these when making up their Christmas cards for classmates.

Here is the visual summary of the key products used on today's project for you to pin for easy reference:


You can see all of my 'How To' summaries on my 'How To - Tips and Techniques' Pinterest board in case you've missed any. 

I've had lots of fun making these cards with some of my party groups; check out my Facebook page if you'd like to see some of the action. Equally if you would like to get together with friends for an evening of crafty fun in the run up to Christmas, do get in touch - I would love to share Stampin' Up! with you.

I'll be back tomorrow with another project. Until then, happy stampin'!


Stampin' Up! Supplies Used:

Table built using Product Table Builder by The Crafty Owl - Independent Stampin' Up! Demonstrator.

Quilted Christmas Star Quick and Easy Card

by Joanne James24. October 2017 21:00

I've had a busy day with the last of this month's technique classes - I'll share these cards later this week - and a couple of hours of garden tidying ready for the winter. Today I'm sharing another card using our sketch this week over at The Paper Players. Here's a reminder of the sketch:

You can see my original card here; I liked this sketch so much I made a second card too - take a look:


Here's the low-down on today's card:

Quilted Christmas - I used two of the Quilted Christmas patterned papers on today's card. The festive papers and colours in this pack make co-ordination easy and I love this traditional red and green colour combination. 

Add A Banner - The simple banner on my card is 2" wide and was punched with the Triple Banner Punch. This is one of my most useful and most used punches and whilst it gets lots of love I don't often give it a shout-out in my blog write-ups as it's one of those punches that I almost take for granted and there always seems to be something more exciting to talk about. Well, not today - three cheers for the Triple Banner Punch!

All About The Stitching - There is a common thread (pardon the pun!) running through today's card design and that is 'stitching'. From the patterns of my paper, to the stitched border that I used for my sentiment panel, along with the baker's twine bow and that pretty stitched felt star embellishment, stitching links them all and results in a clean and simple card with a seamless design. 

A simpler version of Sunday's card using the same layout, yet I love it - might have to knock a few more of these out to boost my Christmas card stocks! 

Here is the visual summary of the key products used on today's project for you to pin for easy reference:


You can see all of my 'How To' summaries on my 'How To - Tips and Techniques' Pinterest board in case you've missed any. 

Enjoy your day and I'll be back tomorrow with another project. Until then, happy stampin'!


Stampin' Up! Supplies Used:

Table built using Product Table Builder by The Crafty Owl - Independent Stampin' Up! Demonstrator.

Cherry Cobbler Monochromatic Be Merry Christmas Card

by Joanne James16. October 2017 10:00

It's Monday again - doesn't a new week roll around quickly? Today I'm sharing a Christmas card that I made using this week's sketch over at Freshly Made Sketches:

I decided to go monochromatic with this one using a bunch of co-ordinating products from the Be Merry Suite - take a look:


Here's the low-down on today's card:

Be Merry - I decided to feature the charming reindeer from the 'Merry Mistletoe' stamp set front and centre on my card today. This was one of the sets that was available at a discount during the World Card Making Day promotions, so I'm sure lots of you will have snapped it up! I am also featuring this set, along with the Be Merry designer series papers - still available until the end of the month as part of the current 'Buy 3, get one free' promotion on designer series paper - at my November Christmas Stamp-A-Stack Event on Tuesday 7th November. This is an all-day event that will enable you to make 40, yes 40 Christmas cards and envelopes in one go! you can see more details on my Facebook Events page here - if you live in or around Northampton do get in touch if you'd like to join me in person for this event. This class can also be provided as a 'class to go' in the mail, so if you're further afield and this is something that interests you, do get in touch to order yours. 

Mask It - The observant amongst you will notice that the sentiment I used on my card today is also from the 'Merry Mistletoe' stamp set, but not as designed. On the stamp the words are one on top of the other, but I wanted them to run one after the other to fit across the banner on my card. I am not one to cut up my stamps (absolute sacrilege in my book!); luckily there was no need for such drastic measures. I simply used some low-tack tape to mask off the bottom word before inking my stamp, removed the tape and stamped 'Christmas' then did the same in reverse and used my Stamp-a-ma-jig to add 'Wishes' alongside it.

Is It A Sprig? - I needed an embellishment to finish my card and immediately reached for the metal pieces in the Year of Cheer embellishments pot. The little stars speak for themselves, but the other design, the one that I used on my card today I'm not really sure what it is supposed to be - is it a foliage sprig perhaps? I think they look a little like a reindeer antler - hence my choosing it for my card today. What do you think - I'd love to hear your thoughts!

Here is the visual summary of the key products used on today's project for you to pin for easy reference:


You can see all of my 'How To' summaries on my 'How To - Tips and Techniques' Pinterest board in case you've missed any. 

Enjoy your day and I'll be back tomorrow with another project. Until then, happy stampin'!


Stampin' Up! Supplies Used:

Table built using Product Table Builder by The Crafty Owl - Independent Stampin' Up! Demonstrator.

Watercolor Christmas Be Merry Christmas Card #GDP108

by Joanne James14. October 2017 19:45

Today I'm sharing a card for this week's challenge over at Global Design Project where this week the challenge is to CASE The Designer and the man in question is one of my all-time favourites - the lovely Brian King. Here is the challenge badge showing the card of Brian's that we are to CASE:


And here's my festive-themed CASE of Brian's card:


Here's the low-down on today's card:

CASE = Copy And Selectively Edit - I am a big fan of Brian's clean, layered style and so CASEing his work was not difficult for me! I was inspired by the layout of Brian's card, the sentiment style and use of designer series paper, although chose to add to my Christmas card stash with an alternative festive theme and colour scheme.

Watercolour Christmas - I needed a big, bold sentiment for my card and wanted to mimic not only the size but also the swirling script style of Brian's card so I settled on the largest of the sentiments in the Watercolor Christmas set. This set is designed to work with the Watercolor Christmas project kit, yet the gorgeous scripted sentiments, along with the trio of trees, is useful for so much more than the kit cards alone - it's a definite keeper. The angle of the letters meant I needed to add my embellishment after the sentiment rather than slightly more centrally, but the basic layout that inspired my card can still be seen. 

Going Green - One of the things I liked about Brian's original card was the definition that the Early Espresso borders gives to the individual layers and elements. Having decided to use the Be Merry Designer Series Paper for my main panel, I chose to use Garden Green for my borders and sentiment. I carried on the colour with my Garden Green Stitched Felt Embellishment, which also serves as a nod to the Christmas tree pattern on my DSP. 

This is a great card that uses relatively few supplies - thanks Brian for the inspiration!

Here is the visual summary of the key products used on today's project for you to pin for easy reference:


You can see all of my 'How To' summaries on my 'How To - Tips and Techniques' Pinterest board in case you've missed any. 

I'll be back tomorrow with another project - or two! - for our new challenge over at The Paper Players. Until then, happy stampin'!


Stampin' Up! Supplies Used:

Table built using Product Table Builder by The Crafty Owl - Independent Stampin' Up! Demonstrator.

Painted Harvest Christmas Wreath CAS Card

by Joanne James11. October 2017 20:51

Wednesday already?! Just time for a really quick share of another clean-and-simple Christmas Wreath using the Painted Harvest stamp set that I made with some ladies in a Christmas card class a couple of weeks ago:


Here's the low-down on today's card:

A Christmas Wreath - Today's Painted Harvest stamp set Christmas wreath uses the largest of the petal stamps, stamped once in Wild Wasabi then rotated through 180 degrees before inking and stamping again in Garden Green over the top. This gives a much fuller, more dimensional wreath than the one on Monday's card. I then used the small dot stamp to stamp my Real Red berries.

Painted Autumn - I added a narrow strip of Painted Autumn designer series paper to my card; I love that the reverse side of our papers often feature a more neutral design, such as these watercoloured stripes, that lend themselves to more than just autumn/fall projects. Some of the ladies in my class used the leafy pattern on the reverse of this strip and I must say that looked great too. I'm so happy the Painted Autumn papers are included in the 'buy 3, get 1 free' offer on designer series paper this month too - all the more reason to stock up!

Season's Greetings - Today's card features a big, bold sentiment from the 'Snowflake Sentiments' set, perfect for today's card and not a snowflake in sight!

Here is the visual summary of the key products used on today's project for you to pin for easy reference:


You can see all of my 'How To' summaries on my 'How To - Tips and Techniques' Pinterest board in case you've missed any. 

Hopefully I'll be back tomorrow with another project. Until then, happy stampin'!


Stampin' Up! Supplies Used:

Table built using Product Table Builder by The Crafty Owl - Independent Stampin' Up! Demonstrator.

Painted Harvest Christmas Wreath Card

by Joanne James9. October 2017 13:00


Happy Monday everyone! Today I'm sharing a card that is actually a Christmas card but uses the Painted Harvest stamp set - take a look:


Here's the low-down on today's card:

A Christmas Wreath - The Painted Harvest stamp set really is so versatile: stamped in festive green, either singly or using both stamps, it's easy to change the look from a sunflower to a Christmas wreath. You can then either use the small dot stamp to stamp your berries or a few Real Red enamel dots as I've done here; finish with a bow of Quilted Christmas ribbon and there you have it - a simple Christmas wreath. I am featuring the Painted Harvest bundle at my monthly stamp class on Monday 6th November; this is a popular class with space now limited. If you would like to join me to explore this stamp set, do get in touch and book your place before it's too late!

Gorgeous Gingham - I backed my stitched square with a panel of Gardden Green gingham, one of the patterns in the Quilted Christmas designer series paper. This 6" x 6" paper stack has some fabulous designs both for Christmas and beyond. I also backed my DSP with a piece of extra thick Whisper White for added stability. I'm partial to a nice gingham to add a classic touch to my projects and the stack includes a Real Red gingham too - gorgeous!

Merry Christmas - My teeny-tiny sentiment is stamped in red onto Whisper White so that the words are in relief - can you tell what stamp set it comes from though? You might be surprised - I cropped it from one of the banner stamps in the Brightly Lit Christmas stamp set. I've circled it on the image below:


This stamp set is one of those reduced by 15% to for World Card Making Day until tomorrow and will also feature in its bundle at my Brightly Lit Christmas class on Tuesday 24th October. You can find full details of my classes on my Facebook page or on my website here. The important thing is to always look at all the stamps in your collection - you may find the perfect sentiment in the most unexpected if places!

Here is the visual summary of the key products used on today's project for you to pin for easy reference:


You can see all of my 'How To' summaries on my 'How To - Tips and Techniques' Pinterest board in case you've missed any. 

Enjoy the rest of your day and I'll be back tomorrow with another project. Until then, happy stampin'!


Stampin' Up! Supplies Used:

Table built using Product Table Builder by The Crafty Owl - Independent Stampin' Up! Demonstrator.

Stampin' Up! Offers Galore: World Card Making Day and Designer Series Paper Offer

by Joanne James4. October 2017 14:00

Hello everyone! I've had a busy start to my week: barely recovered from my weekend of exhibiting at the Crafting Live Show in Stoneleigh Park at the weekend, then two days of classes and today a wisdom tooth removal. The latter has at least resulted in an enforced day of quiet today for a change as I am to take it easy - dentists orders!  

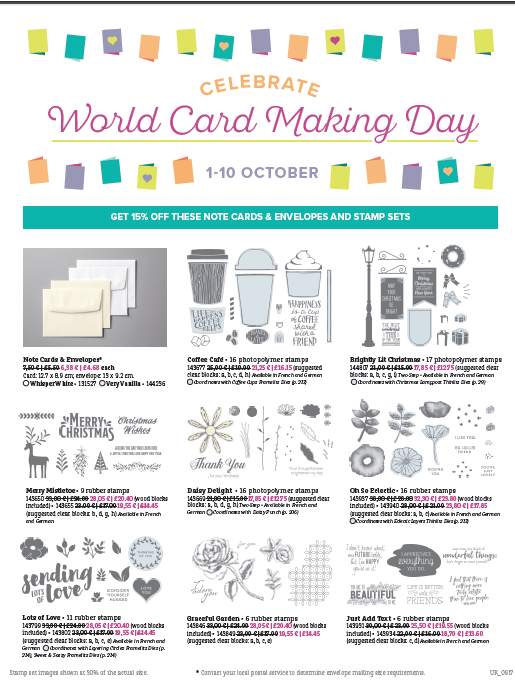
So I thought I would take the time to catch up and share with you some news of some fantastic promotions that Stampin' Up! has for this week and month. Firstly, for papercrafters everywhere, to celebrate World Card Making Day on 7th October we have a number of products that are available on offer from 1st-10th October:


Lots of great card making staples in there, including great deals on Fast Fuse and notelets and envelopes and some fabulous stamp sets. 

As if that wasn't enough, there is also an amazing 'buy three, get one free' offer on designer papers for the entire month of October:


This sale includes Designer Series Paper from both the annual catalogue and the recently released autumn/winter catalogue (not including Specialty Designer Series Paper or Designer Series Paper Stacks). Here is a close up of some of the paper collections that are included in this offer: 


You can already find lots of samples using these papers on my blog and I will continue to share lots more inspiration in the coming months. 

Before I go I have one last piece of exciting news to share with you: Stampin' Up! is getting ready to launch its new range of alcohol-based marker pens:

StampinBlends_Demothumb_SPUKCA

Stampin’ Blends as they will be known, are high-quality, dual-tip markers that come in twelve exclusive Stampin’ Up! colours. They each have a light and a dark shade, which will give you the utmost blending experience! The range also includes an ivory, bronze and colour lifter marker. These are currently only available to demonstrators until 15th October and the exact customer launch date is still to be confirmed. I have a great reason to be sharing them with you now though: if you, like me, love to colour and have been hotly anticipating the arrival of these markers, you might want to consider joining Stampin' up! as a demonstrator before the 15th October, as you are able to get the whole set as part of your starter kit, and still have room for a few other goodies too! If this is something you would like to chat with me about, then do get in touch for more information.

That's all from me; I'll be back tomorrow with a project to share with you. 

Until then, happy stampin'!

Mini Catalogue

BROWSE THE CATALOGUE

The mini catalogue is now live! Read and download your copy here.

Shop Online

Access my online shop 24 x 7, 365 days of the year:

Current April hostess code:

VDKNV7BH

Shop Online

Join My Team

It's always a great time to join Stampin’ Up! New team members can get £130 worth of products for only £99 + free business supplies + free shipping + all the fun being a part of Stampin’ Up! Stampin' Up! has something for everyone: join my growing team and benefit from my support to enjoy Stampin' Up! however you choose.

If you're interested, call me for a chat to understand how I can help you realise your goals. Alternatively, if you have already decided to sign up and you just can't wait, please click here for the link to the online form where you can sign up and order your starter kit right away! 

Latest Kit!

Stampin Cut and Emboss

The Rock Legend Kit has all you need to make 8 cards with coordinating envelopes. Along with the new Panda Friends Kit, both are available from January 4th for just £14 each - get yours here!

2023-24 Annual Catalogue

BROWSE THE CATALOGUE

Click on the catalogue for a full list of current SU! supplies - if you would like to order any of the items featured, please drop me a line at [email protected] or give me a call on 07773 421446 - I'd be happy to help.

New Online Exclusives

There are new products available exclusively in the online store from 5 March - check them out here.

About Me

Hi I'm Joanne and live in Northampton and when I'm not looking after my husband and two beautiful children, am an avid crafter with a passion for all things Stampin' Up!

I must confess that I have never been a big rubber stamper - until I discovered Stampin' Up! that is. I love the fact that I can get such great results with co-ordinating stamps, inks, papers and punches - the possibilities are endless! Join me on my stamping journey as I share the things I love and be inspired to create amazing things yourself!

Follow Me

Monthly Newsletter

Box Builder

Click the button above to use Box Buster to create your custom box design using the Envelope Punch Board!

Kits Collection Now Available!

Stampin Cut and Emboss

The new Kits Collection from Stampin' Up! is now available!

Click here to see the current kits available and order yours online today.

I Design For


Stampin' Up Stuff

This is my personal blog and is not endorsed by Stampin’ Up! I hope you find it a plentiful source of ideas and personal inspiration but please don't copy my designs for contest submission or use for classes, publication or sale without express permission.