Celebrate Sunflowers Monochromatic CAS Thank You Card - PP496

by Joanne James21. June 2020 09:00


Today it's Sunday and time for this week's new challenge over at The Paper Players! It's my turn to host this week and I have a clean and simple challenge for you to work with:


I always need lots of thank you cards and at this time of year as the academic year is coming to and end, even more so. A good clean and simple design that can be easily replicated can come in very handy. So a quick reminder for you - over at The Paper Players, what do we mean by Clean and Simple?

  • Minimal layers and embellishments
  • Plenty of open space, aka "white" space
  • Simple and uncluttered

I decided to play along with a new-to-me-challenge Color My Heart Color Dare and go with a monochromatic yellow card to test run my new in-color Bumblebee ink with my Celebrate Sunflowers set - take a look:


I kept my card super-simple, with a white card base, a piece of in-colour DSP in Bumblebee and then added a white panel onto which I had stamped a partial sunflower in yellow and added a scored border detail. I offset this panel onto the DSP and added a trio of enamel dots and a white on yellow heat embossed sentiment, that I fussy cut and popped up on dimensionals.


I like the finished card so much I think I'll make a few more in the other in-colours and use these for the first of my in-colour club cards this month!

Here is the visual summary of the key products used on today's project for you to pin for easy reference:


You can see all of my Product and 'How To' summaries on my 'How To - Tips and Techniques' Pinterest board in case you've missed any. 

Before you reach for your ink and papers, check out what our amazing team has created to inspire you this week:

Here's a quick recap of our challenge rules:
 
1.  Create a new paper project
2.  Upload your creation to your blog with a link back to us and provide a direct link to the post featuring your challenge submission.
3.  Please link your card to no more than four challenges, TOTAL.
4.  Have FUN!

You can see all of my 'How To' summaries on my 'How To - Tips and Techniques' Pinterest board in case you've missed any. 

Enjoy your day; we are having bike rides today and one of the James Juniors is having a socially distanced picnic with a few of her girlfriends today to celebrate her birthday earlier this week.. The rest of the day will be spent getting ready for the big return to school as both James Juniors will be back this week!

I'll be back tomorrow with another project. Until then, happy stampin'!


Stampin' Up! Supplies Used: 

Table built using Product Table Builder by The Crafty Owl - Independent Stampin' Up! Demonstrator.

Ornate Borders Rainbow Glimmer Thank You Card

by Joanne James19. June 2020 19:30


I have another quick card to share today that I made last weekend for the challenge over at Less Is More that is actually closing this evening - I'm not sure where this week has gone! I also used the sketch over at Hand Stamped Sentiments (I flipped it vertically):


I have a complete love affair with the new rainbow glimmer paper from Stampin' Up! and couldn't resist using a couple of the Ornate Borders to add detail to my top white panel and cutting away the right border edge to reveal a panel of rainbow glimmer paper - take a look:


Isn't it gorgeous?! I just love the sparkle - check it out:


I added my words courtesy of the Ornate Thanks set to complete my card - here's the inside:


Five simple products are all that's needed to create this gorgeous rainbow-inspired card.

Here is the visual summary of the key products used on today's project for you to pin for easy reference:


You can see all of my 'How To' summaries on my 'How To - Tips and Techniques' Pinterest board in case you've missed any. 

Enjoy your evening and I'll be back tomorrow with another project. Until then, happy stampin'!


Stampin' Up! Supplies Used:

Table built using Product Table Builder by The Crafty Owl - Independent Stampin' Up! Demonstrator.

Edited to Add: This card was Artist's Pick for the sketch challenge over at Hand Stamped Sentiments:


Ornate Garden Ornate Thanks Card For The Paper Adventures Blog Hop

by Joanne James19. June 2020 12:00

I have another post for you today! I was asked by the lovely Kelly Kent, of mypapercraftjourney.com and one of the talented design team members over at one of my favourite challenge sites, Just Add Ink (read more about that team in today's other post!) to be the guest designer on her Paper Adventures Team Monthly Blog Hop this month and I was delighted to say yes! This month they have a fun kit challenge! We were all asked to come up with a kit containing the following items and then to make a card from them:


I chose the following items from the Ornate Garden Suite for my kit:

  • Ornate Garden Designer Series Paper
  • Ornate Floral 3D Embossing Folder for dry embossing
  • Old Olive Ribbon from the Ornate Garden Ribbon Combo Pack
  • A flower trinket from the (retired) Bird Ballad embellishments

And using the sketch over at Inspire.Create as the basis for my card, this is what I made:


Here's the low-down on today's card:

Ornate Garden - I decided to keep things simple and choose a few co-ordinating products for my kit card. I cut out a piece of the Ornate Garden DSP with my Stitched Shapes Dies and tied my Old Olive Ribbon around it in a bow making this a featur of my card, and chose some co-ordinating Mint Macaron cardstock for my card base.

An Embossing Dilemma - I debated between heat embossing my sentiment or dry embossing my background and in the end the dry embossing won - look at the lovely dimension the Ornate Floral 3D embossing folder adds to the base:


Just To Say ... - I love the numerous combinations of sentiment that can be made using the Ornate Thanks stamp set; I can see the 'just wanted to say' going with so many phrases even those not thanks-related; in this instance I stayed with thanks and used these other stamps to complete the inside of my card:


I added my retired Bird Ballard flower embellishment to the sentiment on the front to complete my card. 

Here is the visual summary of the key products used on today's project for you to pin for easy reference:


You can see all of my 'How To' summaries on my 'How To - Tips and Techniques' Pinterest board in case you've missed any. 

Now that you've had a chance to see what I made, why not click here to go to the next stop on the hop and see what the lovely Kelly has made with her kit supplies! Thank you so much to the Paper Adventures team for inviting me to participate in their hop today.

Enjoy your day and I'll be back tomorrow with another project. Until then, happy stampin'!


Stampin' Up! Supplies Used:

Table built using Product Table Builder by The Crafty Owl - Independent Stampin' Up! Demonstrator.

Fancy Fold Wreath Of Love For AYSI 228

by Joanne James19. June 2020 11:00

Today I'm sharing my design team card for our new challenge over at As you See It where it's time for a recipe challenge:


I thought I'd go simple with my card today, but I reached for some new goodies and by the time I had incorporated all the elements of this week's recipe, I ended up creating something altogether more fancy - take a look:


Here's the low-down on today's card:

I decided to create a square card with a wreath in the centre as I wanted to play with my new 'Arrange A Wreath' bundle as I am running an online class with it on 27th July so wanted to start getting the ideas flowing. I decided to go with hearts and flowers so that I could incorporate my 'pink' and 'repeating images' elements. I ended up creating a fancy fold style card, with an outer wrap that I added a couple of panels to that I embossed with one of the new 'Greenery' embossing folders, and diecutting a circle in the centre to reveal my wreath on the inner card below. The outer flaps are held closed by some silver twine wrapped around a couple of mini brads, that when untwined open up to reveal the body of the card inside:


This is the layer where I created my wreath, which is a combination of stamped and diecut pieces. Fortunately there is a die in the Wreath Builder Die set that has the word 'love' cut out of a heart, so I used that for my one-word sentiment (check) and added a bow of white spotted tulle ribbon (check!). This card layer then opens as a conventional card to reveal the inside where you can write your greeting:


I added a little tone-on-tone sentiment and the letters that diecut out of the heart on the front, along with a strip of Petal Pink DSP leftover from another project (check!!)

I have no idea what kind of fold this is called - I saw one similar on Pinterest but without any details, and I had a search but am honestly none the wiser! So if it has a name that you know of, do let me know! Either way, it definitely constitutes 'fancy' in my book so I will be linking up with the team over at Just Add Ink where that is their challenge theme this week:

Here is the visual summary of the key products used on today's project for you to pin for easy reference:


You can see all of my 'How To' summaries on my 'How To - Tips and Techniques' Pinterest board in case you've missed any. 

What do you think? When I'd finished I wondered if I'd got a little carried away, as this card is certainly a little busier than my usual cards. 

Here's a summary of our challenge rules:

  • Create any card, scrapbooking page, 3D project or packaging project that fits the challenge.
  • Please include the challenge graphic and link back to the challenge in your blog post. Turn off word verification so we can leave you lots of lovely comments. Make sure you link the post not the whole blog to the Linky. Use #AYSIXXX when uploading to a public gallery.
  • If you’re unsure about ‘the rules’, check the details under the Challenge Guidelines tab on the As You See It Challenge homepage.

We look forward to seeing your creations in the AYSI gallery.

And talking of Just Add Ink - I have some exciting news today! In an hour's time there will be another blog post from me as I am guesting with the lovely Kelly Kent, one of the JAI design team, and her Paper Adventures team on a blog hop so be sure to come back and check it out. Until then, happy stampin'!


Stampin' Up! Supplies Used:

Table built using Product Table Builder by The Crafty Owl - Independent Stampin' Up! Demonstrator.


An Apple For The Teacher Thank You Card And Gift PP495

by Joanne James14. June 2020 09:00


Today it's Sunday and time for this week's new challenge over at The Paper Players! It's the turn of the lovely Laurie to host this week and she has an interesting colour challenge for you to work with:


First up, I have a confession to make: I couldn't find my Tranquil Tide ink pad so substituted with Garden Green. I have a few projects for you today; armed with Narelle's sketch over at Freshly Made Sketches I decided to use some retired designer series papers in the challenge colours and my 'Harvest Hellos' stamp set to make a couple of teacher thank you cards and some cute gift packaging.  Here's the first of my cards:


Some simple layering of my DSP and a stamped and punched apple, along with a 'thanks' diecut courtesy of the Well Written Dies, completed my card. I actually made two - on the second one, I reversed the layering of the papers and had the letter paper in front as opposed to the numbers:


 I added some simple stamping to the inside of my card from the same set:

 Here are the two cards together - which one do you prefer?

I had picked up a couple of cute apple notepads that I thought would be perfect for some extra small teacher gifts so took the opportunity to create some co-ordinating boxes for my cards, complete with tags:


And here's another view:


And that cute apple notepad that is in the box? Here it is:


The apple folds flat but when clipped open it forms an apple shape, so I just had to create a lidded box that could present it whole for full effect - here are both projects together:


Here is the visual summary of the key products used on today's project for you to pin for easy reference:


You can see all of my Product and 'How To' summaries on my 'How To - Tips and Techniques' Pinterest board in case you've missed any. 

Before you reach for your ink and papers, check out what our amazing team has created to inspire you this week:

Here's a quick recap of our challenge rules:
 
1.  Create a new paper project
2.  Upload your creation to your blog with a link back to us and provide a direct link to the post featuring your challenge submission.
3.  Please link your card to no more than four challenges, TOTAL.
4.  Have FUN!

You can see all of my 'How To' summaries on my 'How To - Tips and Techniques' Pinterest board in case you've missed any. 

Enjoy your day; the weather was glorious here in the UK yesterday so I'm hoping that will continue today and I can spend some time in the garden. I'll be back tomorrow with another project. Until then, happy stampin'!


Stampin' Up! Supplies Used: 

Table built using Product Table Builder by The Crafty Owl - Independent Stampin' Up! Demonstrator.

A Waterfront Sunset TTT68

by Joanne James11. June 2020 09:00

It's Thursday and time for a new challenge over at TicTacToe! It's the turn of Team X to host this week and the lovely Felicita is our featured designer this week. This is the fun board that we are playing along with: 


My card fits the vertical column - summer, scene, free - and also the diagonal - summer, sunset, black/white (although not exclusively) - and for today's card I decided to challenge myself to use a set I haven't used much to create a peaceful scene - take a look:


Here's the low-down on today's card:

Build A Scene - I decided to get creative with my 'Waterfront' stamp set for today's card. Just like 'My Meadow' and 'Snowfront', this is a build-a-scene stamp set with so many creative possibilities. I think for me that is sometimes the problem though; I am so attracted to these sets, but then struggle to make something that I'm happy with. The miserable weather here in the UK this week though got me thinking of sunnier climes and holidays gone by in sunny St Lucia, so I decided to create a sunset over the famous Pitons. Once I'd got started, it was actually really easy and a lot of fun! I stamped my mountains first, then the sea and then everything else, having created a simple post-it note mask over my mountains to maintain perspective.

Sunset Colours - I did reach for some retired Grapefruit Grove cardstock for my cardbase, because I found Pumpkin Pie too 'orange' with my Petal Pink and Calypso Coral colours. But You could vary this - the great thing about these kinds of sets is that you can create in whatever colours you have to hand and create a different look and feel to you scene each time.

Don't Forget The Inside - I added a little additional detail to the corner of the inside of my card too, just carrying the tropical feel into the inside:


I'm also linking up with the ladies over at Just Us Girls this week where the code word is 'sunshine' so I'm hoping that extends to sunsets too! You should definitely check out their gallery this week - it's so full of light and sunshine!

Here is the visual summary of the key products used on today's project for you to pin for easy reference:


You can see all of my Product and 'How To' summaries on my 'How To - Tips and Techniques' Pinterest board in case you've missed any. 

A tictactoe board offers so many creative possibilities - how does this week's board inspire you? Why not have a go? We would love to see you in the gallery and who knows - you might be selected for Designer's Choice and be eligible to be a guest designer on a future challenge. 

Enjoy your day; I am trying to catch up on indoor chores as the weather outside really is frightful! I shall be dreaming of Caribbean beaches as I go! I'll be back tomorrow with another project. Until then, happy stampin'!


Stampin' Up! Supplies Used: 

 Table to follow.


Rain or Shine Rainbow Under My Umbrella - PP494

by Joanne James7. June 2020 09:00

Today it's Sunday and time for this week's new challenge over at The Paper Players! It's the turn of the lovely Anne Marie to host this week and she has a fun theme challenge for you to work with:


I used Julee's current Mojo Monday sketch for my layout and decided to use my 'Under My Umbrella' stamp set that really hasn't seen that much ink since I had it so I decided to remedy that - take a look:


Here's the low-down on today's card:

I used some retired Sale-A-Bration raindrop patterned paper for my vertical panel, then created a rainbow from a series of narrow strips for the horizontal one. I then added some fussy cut wellies filled with punched flowers and a bright yellow umbrella, punched with my Umbrella Builder punch, along with my sentiment on a stitched square, to finish. This card was quite quick to complete once I'd decided what to do and is rather bright and cheery; in hindsight, all it's missing is some sunshine. What can I say - aren't we all!

Here is the visual summary of the key products used on today's project for you to pin for easy reference:


You can see all of my Product and 'How To' summaries on my 'How To - Tips and Techniques' Pinterest board in case you've missed any. 

Before you reach for your ink and papers, check out what our amazing team has created to inspire you this week:

Here's a quick recap of our challenge rules:
 
1.  Create a new paper project
2.  Upload your creation to your blog with a link back to us and provide a direct link to the post featuring your challenge submission.
3.  Please link your card to no more than four challenges, TOTAL.
4.  Have FUN!

You can see all of my 'How To' summaries on my 'How To - Tips and Techniques' Pinterest board in case you've missed any. 

Enjoy your day; we are making pizzas from scratch today and if the weather continues to be cold and wet me might embark on another game of Monopoly, since yesterday's game was terminated prematurely due to bedtime! I'll be back tomorrow with another project. Until then, happy stampin'!


Stampin' Up! Supplies Used: 

Table built using Product Table Builder by The Crafty Owl - Independent Stampin' Up! Demonstrator.

A Summer Day At The Beach

by Joanne James6. June 2020 20:49

The weather has been so wet and cold today it has been really miserable! I had a little time this afternoon to squeeze in a quick card and I couldn't resist pulling one of my retired stamp sets off the shelf to make a bright card for a few challenges:

RRCB 136      

 I had been considering what to use for a summer-themed card for Festive Friday, and a retired stamp set that I've had since 2017, Day At The Beach, had just the images that I needed to start ticking off that inspo list! It also means I can link my card up over at RetroRubber too! So armed with the current Fab Friday sketch too I set to work and came up with a colourful summer collage - take a look:


I grabbed a selection of summer stamps and set to work: sunshine, flip flops, ice lollies, beach ball, umbrella, sunglasses, bucket and spade, sunhat - everything you would need for a beach vacation and a bunch of my Blends markers and coloured in my bright pattern. I paired it with a bold, diecut sentiment to finish. A summer beach vacation seems like a distant memory right now, so it was nice to live life through my card for just a little while today.

Here is the visual summary of the key products used on today's project for you to pin for easy reference:


You can see all of my 'How To' summaries on my 'How To - Tips and Techniques' Pinterest board in case you've missed any. 

Enjoy your evening and I'll be back tomorrow with another project. Until then, happy stampin'!


Stampin' Up! Supplies Used:

Table built using Product Table Builder by The Crafty Owl - Independent Stampin' Up! Demonstrator.

Movie-Inspired In-Color Hello Card for AYSI 227

by Joanne James5. June 2020 12:00

No blog yesterday as I was still super busy with new catalogue launch day activities and making sure that all the bundles were ordered for my online  'Blossoms in Bloom' class on June 15th - there's still time to sign up if you'd like to join me! Today I'm sharing my design team card for our new challenge over at As you See It where it's time for a fun 'fill in the blank' challenge:


Like many of the team this week I procrastinated for ages over this card! I love movies and I could think of so many different cards, I struggled to narrow down my ideas. In the end I went with an iconic movie quote from my most favourite movie of all time - take a look:


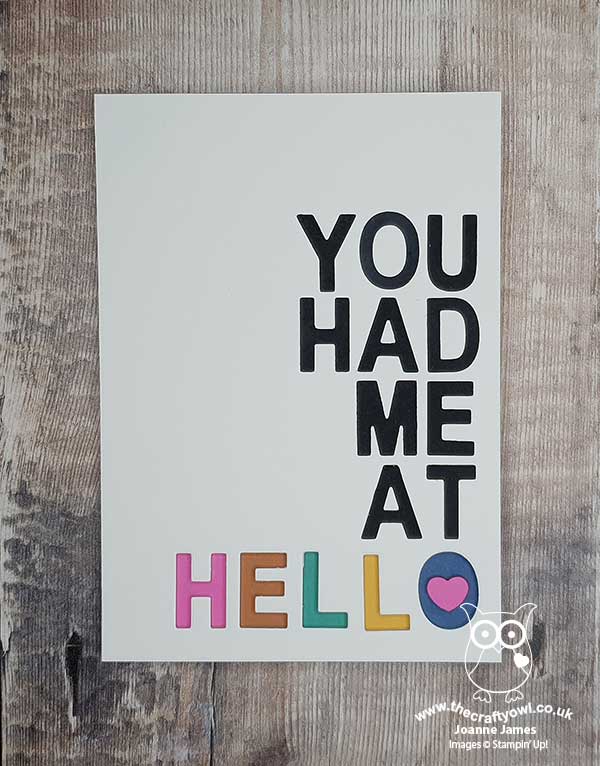
Do you recognise it? Yes, it's Renee Zellweger's classic line when her husband, the handsome Tom Cruise, returns from his road trip in the movie 'Jerry Maguire'. This is a movie packed with famous quotes: "Show me the money!" and "Did you know bees and dogs can smell fear?" to name just two. 

I decided to make a bold statement using diecut letters in black for the first part of the quote adhered directly to my card mat, then switched for 'hello' by diecutting this out of the mat itself and then adding snippets of each of the new Stampin' Up! 2020-22 in-colours directly to the cardbase below, and popping the mat up on dimensionals: 


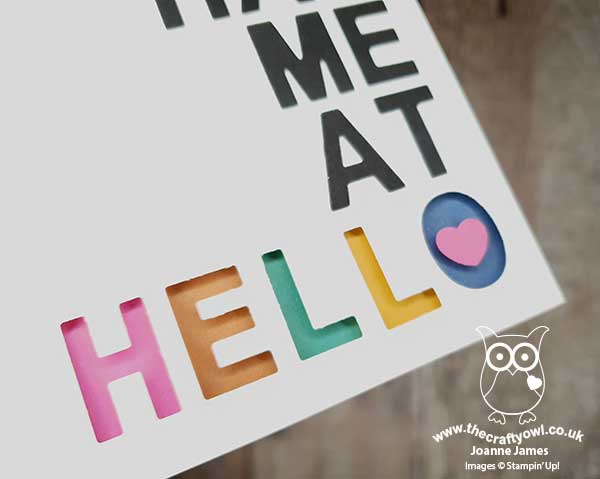
I added a little Magenta Madness pink heart to the centre of the 'o', courtesy of the dog builder punch (such a useful little heart!) to complete my card.

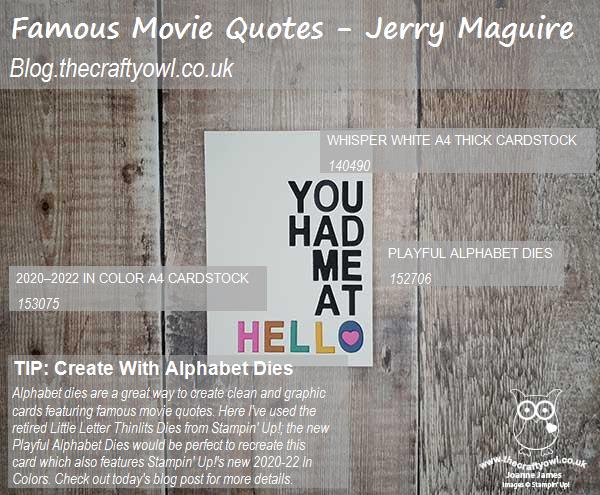
I used the retired Little Letters Thinlits Dies to create my card today, but it's a good opportunity to point out that the new Stampin' Up! catalogue has at last a new set of alphabet dies to purchase - something that many of you have missed from the last one, judging by the number of enquiries I get! The new set is called 'Playful Alphabet' (page 178) and is very similar in size and style to the thinlits I used on my card although there are a couple of great additions: duplicate letters for commonly used characters, such as vowels, as well as numbers and a set of characters, including a question mark, accents and a hashtag - and all for a very reasonable price of £32. As such, this is the set I've linked to below should you wish to purchase from my online store and re-create my card.

I don't have a photo of the inside of my card, as I wrote a personal message in it as soon as my card was made. I know my husband will totally 'get' this card as he knows how much I love this card, but I will confirm I did begin my message with another memorable quote from the movie: "You complete me" - it just had to be done! If you haven't seen this movie and have no idea what I'm talking about today, I can highly recommend it; grab your tissues and watch this little  clip, courtesy of movies.com, to whet your appetite: 

 And on that beautiful note - here is the visual summary of the key products used on today's project for you to pin for easy reference:


You can see all of my 'How To' summaries on my 'How To - Tips and Techniques' Pinterest board in case you've missed any. What is your favourite movie? Do leave me a comment below or better still, make a card to illustrate it and play along with us this week!

Here's a summary of our challenge rules:

  • Create any card, scrapbooking page, 3D project or packaging   project that fits the challenge.
  • Fill in the blanks with the words that are right for you and then create your project with those words in mind. Tell us, in your blog or on your site, what words you used.
  • Please include the challenge graphic and link back to the challenge in your blog post. Turn off word verification so we can leave you lots of lovely comments. Make sure you link the post not the whole blog to the Linky. Use #AYSIXXX when uploading to a public gallery.
  • If you’re unsure about ‘the rules’, check the details under the Challenge Guidelines tab on the As You See It Challenge homepage.

We look forward to seeing your creations in the AYSI gallery.

I am spending this morning in my office, whilst young Master James basks in the glory of CE exam completion and enjoys a 'day of rest', otherwise known as chatting and playing online with his friends, along with virtual pizza night this evening to celebrate. He is back on it next week as he begins what is usually a month of post CE exam fun, not with a week of outward bound activities in the Lake District with his class mates as planned, but instead video production to enable the Year 8 fashion show that they've been busy creating outfits for to happen online. I am off to school this afternoon to collect the 8 foot-high tree that I declined to bring home on the final day of school before lockdown because I couldn't fit it in my car along with all of the school books, files and sports kit and I couldn't believe it would be essential. Clearly I was wrong!!

Enjoy your day and I'll be back tomorrow with another project. Until then, happy stampin'!


Stampin' Up! Supplies Used:

Table built using Product Table Builder by The Crafty Owl - Independent Stampin' Up! Demonstrator.

Celebrate Sunflowers Birthday Card Times Two

by Joanne James2. June 2020 11:19

Today I'm sharing a couple of cards that started with the current challenge over at Just Add Ink but are also perfect for the current challenge over at Just Us Girls and Global Design Project too:


I decided to go with the same base papers - some retired wood patterned DSP and retiring brights DSP in Daffodil Delight - and make a feature of one of the sunflowers in the new Celebrate Sunflowers bundle that launches tomorrow in the new 2020 Stampin' Up! Annual Catalogue. The trouble, is I couldn't decide which one to choose! Instinctively, I reached for the smaller flower first: 


I coloured it with my Blends and then added a heat-embossed sentiment, some ruched ribbon and a scattering of pearls. But I couldn't help thinking what would it look like with one of those huge layered sunflowers instead - so I made another one!


What do you think? Isn't that amazing detailed sunflower die just something?! Both images were stamped in Early Espresso before colouring instead of black, which I think works better for the sunflower and also compliments the diecut in the same colour. I also decorated the inside of each card:


Normally I would never choose a flower so large with a sketch like that, but some of the JAI DT had gone with larger flowers and I loved the effect, so thought I would experiment - and I love it! The only dilemma now, is which one should I link up for each challenge?! I think I'll go with the smaller flower for Just Add Ink and Just Us Girls, since it's the one most faithful to the sketch and has most of the designer paper visible. I'll add my larger sunflower to the gallery over at Global Design Project #GDP243 - I feel it has to be shared somewhere! Here's photo of both cards together:


So which one is your favourite? I'd love to know!

Here is the visual summaries of the key products used on today's project for you to pin for easy reference:


You can see all of my 'How To' summaries on my 'How To - Tips and Techniques' Pinterest board in case you've missed any. Equally, if you would like to buy this fabulous sunflower bundle I'd be delighted - it will be available from 9am tomorrow morning in my online store and I will update this post in the morning with the direct clickable links.

Enjoy your day; mine is being spent in a flurry of online activity as my retired 'BOGOF' sale gathers pace in my online catalogue launch party group and I am busy collating new catalogue orders, paper share requests, in-color club bookings and having a lot of fun too! I am sharing most of this info via my Facebook page so either hop on over there, search my blog or drop me a line if you would like more info on any of the above. All of this whilst currently invigilating the third of Master James' exams today - Biology. The silence in what is usually such a noisy household is deafening! I'll be back tomorrow with another post to celebrate everything exciting that is happening in June and hopefully I will have another creative project for you too. Until then, happy stampin'!


Stampin' Up! Supplies Used:

To be updated.


Mini Catalogue

BROWSE THE CATALOGUE

The mini catalogue is now live! Read and download your copy here.

Shop Online

Access my online shop 24 x 7, 365 days of the year:

Current April hostess code:

VDKNV7BH

Shop Online

Join My Team

It's always a great time to join Stampin’ Up! New team members can get £130 worth of products for only £99 + free business supplies + free shipping + all the fun being a part of Stampin’ Up! Stampin' Up! has something for everyone: join my growing team and benefit from my support to enjoy Stampin' Up! however you choose.

If you're interested, call me for a chat to understand how I can help you realise your goals. Alternatively, if you have already decided to sign up and you just can't wait, please click here for the link to the online form where you can sign up and order your starter kit right away! 

Latest Kit!

Stampin Cut and Emboss

The Rock Legend Kit has all you need to make 8 cards with coordinating envelopes. Along with the new Panda Friends Kit, both are available from January 4th for just £14 each - get yours here!

2023-24 Annual Catalogue

BROWSE THE CATALOGUE

Click on the catalogue for a full list of current SU! supplies - if you would like to order any of the items featured, please drop me a line at [email protected] or give me a call on 07773 421446 - I'd be happy to help.

New Online Exclusives

There are new products available exclusively in the online store from 5 March - check them out here.

About Me

Hi I'm Joanne and live in Northampton and when I'm not looking after my husband and two beautiful children, am an avid crafter with a passion for all things Stampin' Up!

I must confess that I have never been a big rubber stamper - until I discovered Stampin' Up! that is. I love the fact that I can get such great results with co-ordinating stamps, inks, papers and punches - the possibilities are endless! Join me on my stamping journey as I share the things I love and be inspired to create amazing things yourself!

Follow Me

Monthly Newsletter

Box Builder

Click the button above to use Box Buster to create your custom box design using the Envelope Punch Board!

Kits Collection Now Available!

Stampin Cut and Emboss

The new Kits Collection from Stampin' Up! is now available!

Click here to see the current kits available and order yours online today.

I Design For


Stampin' Up Stuff

This is my personal blog and is not endorsed by Stampin’ Up! I hope you find it a plentiful source of ideas and personal inspiration but please don't copy my designs for contest submission or use for classes, publication or sale without express permission.