
Today I'm excited to be sharing another card I've made using the new Thoughtful Branches bundle, an exclusive set that will be available for a limited time only 2-31 August. As I mentioned earlier in the week, having been on vacation for most of July I had to wait patiently to come home and play with my pre-order set. I have tons of ideas for this set (you can see my card and home decor frame that I made earlier in the week here and here if you missed them) and for me the apple tree alone is enough to sell it - this will be my new 'go to' set for teacher's cards for sure - however the card that I want to share today isn't one I designed - it is a CASE of the one that the super-talented Brian King submitted to our challenge over at The Paper Players a couple of weeks ago.
So what is a CASE? Well, it can mean a couple of things: 'Copy And Share Everything', where you literally make a copy of the card that you see, or 'Copy And Selectively Edit', where you take the things from the card that inspires you and create something that has some foundation in the original card but the end result can look quite different. My card today uses the first definition - I've changed the colours and stamp choice, but my card is virtually identical to Brian's. Here's the link to Brian's original blog post that gives the detail on how he made his card and here is a photograph of it, reproduced with kind permission from Brian:

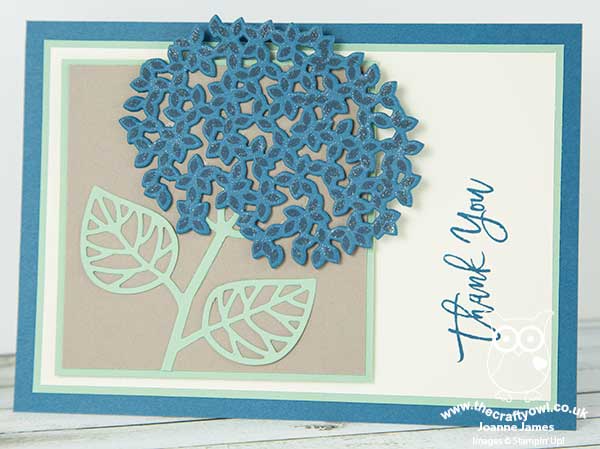
I just love this card and so wanted to create my own version in an alternative colourway - here's my card:
So what is about Brian's card that I love so much? I guess if I had to choose just three things they would be:
Perfect Layering - Brian is the King (no pun intended!) of Layers and often uses them to great effect on his cards and this one is no exception. The smaller layered panel behind the large bloom adds a bold block of colour that further accentuates the detail of the diecut.
Interesting Details - Brian chose a number of different ways to add interest to his bloom, using texture, lift and shine. He could have just diecut the bloom and left it 'naked' - but he is far too considered for that! The details added are what takes this bloom from 'pretty' to 'pretty spectacular' in my book! I inked my bloom with the stamp from the set as opposed to the textured stamp that Brian used, but did use the additional diecuts for lift and a liberal dose of clear Wink of Stella for shine.
Vertical Sentiment - Whilst this wasn't Brian's original intention, I think the size and script of the font really lend themselves to a vertical orientation. Sometimes a 'happy accident' is all it takes to create design genius!
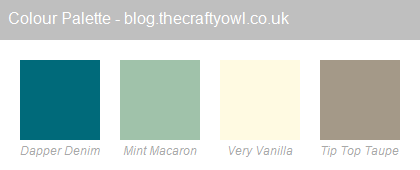
I chose to use Dapper Denim for my hydrangea, coupled with Mint Macaron, Very Vanilla and Tip Taupe Taupe, the same colour combination I used recently for this card here. Feel free to save this combination if it's one that appeals to you too:
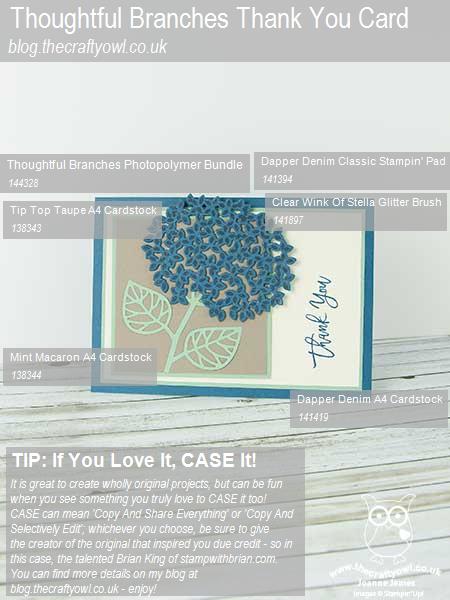
Here is the visual summary of the key products used on today's project for you to pin for easy reference:
You can see all of my 'How To' summaries on my 'How To - Tips and Techniques' Pinterest board in case you've missed any.
Thank you Brian for allowing me to share your card today and create my own CASE'd version - this was a worthy 'top pick' for sure and if Sandy hadn't got there before me it would most certainly have been mine!
Enjoy your day and I'll be back tomorrow with another project. Until then, happy stampin'!
Stampin' Up! Supplies Used: