I'm So Grateful There's You in The World

by Joanne James14. September 2013 21:09

Last week it was my mother-in-law's birthday and today I'm sharing the birthday card I made for her, using my Chalk Talk set for the first time:

I had some of the lovely pink wide ribbon left over from the Spring-Summer Seasonal Catalogue earlier in the year and I wanted this to be a real feature of this card, so the actual stamping is understated. I really love the sentiment on this Chalk Talk stamp and for someone who is such an integral part of our family, it was especially appropriate for this card. Also, did you notice the background paper - wondering where I got this from? Well, I made it myself using the 'Mum' stamp from the retired 'For My Family' stamp set. I'm really pleased with how it turned out - and I didn't even use a stamp-a-ma-jig to line it up! I love the colour combo too - I'm really into Bermuda Bay at the moment and I think it works really well with the pinks in this card.

Back tomorrow with another card; until then, happy stampin'!


Stampin' Up Supplies:

Stamps: Chalk Talk, For My Family (retired)

Cardstock: Whisper White, Rose Red, Bermuda Bay

Ink/Stampin' Write Markers:  Pink Pirouette, Rose Red, Bermuda Bay

Tools: Chalk Talk Framelits, Extra Large Oval Punch, Big Shot, Magnetic Platform

Finishing Touches: 1 1/4" Two Tone Ribbon (retired), Basics Rhinestones

Tags: , , , , , , , , ,

Cards | Stamping

Happy 40th Birthday Brother

by Joanne James15. August 2013 16:43

Another brother Birthday card today, but this time for my brother-in-law, who celebrated his 40th birthday recently. I took this card by LeeAnn Greff as my inspiration, changing the colours to use up some of my retired papers and incorporating the necessary changes of sentiment to produce the following card:

A great masculine card, with some Tangerine Tango and Bermuda Bay for pops of colour. Back in a couple of days with the card I made from the children for their uncle; I'll be posting every other day for the next couple of weeks, as I'm having a couple of weeks of dedicated family time before the children go back to school. 

Until then, happy stampin'!


Stampin' Up Supplies:

Stamps: Banner Greetings (hostess)

Cardstock: Basic Grey, Bermuda Bay, Coastal Cabana, Whisper White, Twitterpated DSP (retired), Sycamore Street Designer Series Paper (SAB - retired)

Ink/Stampin' Write Markers: Basic Grey, Tangerine Tango

Tools: Simply Scored, Big Shot, Chevron Textured Impressions Embossing Folder, Typeset Alphabet Die, Paper Piercing Essentials Pack

Finishing Touches: Sycamore Street Ribbon (SAB - retired)


Pop Up Teacher Thank You Card

by Joanne James9. July 2013 21:38

Back again with the last of my teacher cards (I think!) this year - this time a pop-up card using my dress up framelits. The credit for this design goes to Fran Sabad; you can see her original card, a teacher birthday card, here. If you're looking for ways to use your Dress Up Framelits, I thoroughly recommend you check out Fran's blog - she has made some amazing cards using the Pop 'n' Cuts base and co-ordinating framelits. I thought this card would work equally well as a teacher thank you card with a few minor alterations and give me yet another opportunity to get stuck in to my Storytime DSP. So here is the outside of my card:

It's the inside that is the real star of the show though - a teacher mannequin in her classroom, in front of a traditional blackboard:

I absolutely love this card, complete with all the little details - check out the apple on the corner of the teacher's desk - how cute is that?! In case you're wondering about the glimmer paper 'brooch' pinned to the teacher's blouse, I know it looks a little out of place against the muted colours and traditional classroom feel, but Rebecca's teacher has what can only be described as a glitter obsession - she can't complete an art project without using tons of the stuff, so I know she wouldn't think this card complete without just a little bit of 'bling'. I wish I could convert her to the benefits of SU no-shed glimmer paper; well, Ben is likely to have her as his teacher the year after next, so there's still time!

The funniest thing about this card was when I showed it to Rebecca to see if it met with her approval; she said, "I love it - but why is there a blackboard? We've never had one of those in the classroom Mummy, all our classrooms have interactive whiteboards". What can I say? A sign of the times and made me feel quite old!

Back tomorrow with something different; until then, happy stampin'!


Stampin' Up Supplies:

Stamps: Word Play (retired), For My Family (retired)

Cardstock: Cherry Cobbler, Baja Breeze, Wild Wasabi, So Saffron, Pumpkin Pie, Pink Pirouette, Gumball Green, Crumb Cake, Storytime DSP

Ink/Stampin' Write Markers: Cherry Cobbler

Tools: 1 3/4" Circle Punch, 2 3/8" Scallop Circle Punch, Large Scallop Edgelits, Dress Up Framelits, Pop 'n' Cuts Card Base

Finishing Touches: White Baker's Twine, Silver Glimmer Paper

Blackboard Teacher Thank You Card

by Joanne James3. July 2013 20:51

Apologies for a few blog-less days - lots going on in the James household, and most of it not at home! Both James juniors have had their sports day this week and Rebecca has just finished a three night run singing in her school musical 'Bugsy Malone'; I honestly feel like I've been running around like a mad thing these last few days. Having put up tents and got out the sand and garden play toys this morning, I spent a couple of hours finishing my ironing before it got too hot (I'm not complaining - I love that summer has arrived at last!) and following a pleasant lunch in the garden, I'm now taking the opportunity to catch up with my blogging whilst cheering on Andy Murray in the Wimbledon Men's Final.

So, another teacher thank you card from me today - this time an old fashioned blackboard, which gave me the opportunity to have a little go at the 'chalkboard' technique that is so on-trend in the world of papercrafting at the moment. So here is my card:

It's based on a teacher Valentine's card that I saw on Pinterest but I think it makes a nice simple teacher thank you card. Once I stamped the sentiment, I just used a sponge to smudge some of the white ink across the card to give the impression of chalk dust. I stamped the inside with a bright red 'Thanks a MILLION' from the retired 'Word Play' stamp set, to pick up the red of the apple - well, it is for a teacher, right?!

I also made another teacher thank you card using my Storytime designer series paper - check it out:

I think this paper really lends itself to teacher thank you cards. I'm having fun creating these in between playing with some of the stamp sets from the new annual catalogue.

Should be back on course now with another project to post tomorrow; until then, enjoy the sunshine and happy stampin'!


Stampin' Up Supplies (Blackboard Card):

Stamps: For My Family

Cardstock: Crumb Cake, Basic Black, Whisper White, Real Red, Gumball Green, Chocolate Chip

Ink/Stampin' Write Markers: White, Real Red

Tools: Corner Punch, 1/2" Circle Punch, Sponge Dauber

Tags: , , , , , , , ,

Cards | Stamping

Teacher Thank You Cards

by Joanne James1. July 2013 20:30

I've had a busy day today, amongst other things shooting a video to share with you my absolute favourite new products from the new Stampin' Up! annual catalogue out tomorrow; but you're going to have to wait until tomorrow to see that!

For anyone reading this with children of school age, you will no doubt be looking forward to (or dreading - it depends on your perspective!) the long summer holidays that wigiftll be with us in a few weeks time. With that in mind, I've been making some teacher thank you cards for both of my children to take in and give to their teachers along with a small token of appreciation for their help and support throughout the year. I'll share the gift nearer the end of term, but today I thought I'd share the first two cards I've made. here is the first one:

This is a CASE of a Jen Arkfeld card that I saw on Pinterest and was perfect to use up some of my leftover Storytime DSP. This paper showcases some great images from childhood that make lovely teacher thank yous or even 'best friend' cards and requires very little actual stamping. Having made the above card, I then made a second one that had more of a masculine feel - perfect for my son to give to his teacher:

I even used a strip of the handwriting paper in the background, as this has been one of his key areas of focus this year and something I'm sure his teacher will remember him for!

I hope you like these cards; I have a few more ideas for teacher thank yous that I will be sharing in the next week or so, interspersed with lots of great projects using products from the new annual catalogue. Back tomorrow with the official launch of the new annual catalogue - I can't wait!

Until then, happy stampin'!


Stampin' Up Supplies:

Stamps: For My Family

Cardstock: Pool Party, Very Vanilla, Midnight Muse, Storytime DSP

Ink/Stampin' Write Markers: Midnight Muse

Tools: 1 3/4" Circle Punch, 2 3/8" Scallop Circle Punch

Finishing Touches: Natural Linen Thread, Brights Designer Buttons, Sycamore Street Buttons (Sale-a-bration - retired)


Tags: , , , , , , ,

Cards | Stamping

Happy Birthday Sister

by Joanne James18. June 2013 20:30

Today I'm back with the birthday card I promised yesterday: this time the card I made from her little brother. I saw a great card by Wendy Cranford on Pinterest a while ago and whilst this was for a LaLa Loopsy doll, I thought I could make a great likeness of Rebecca from it. Here's the link to Wendy's original card where she also provides a great video tutorial with step-by-step instructions on how she created her version. Now for my card:

I made my hair blonde and cut in a fringe - don't you just love the hair tied in bunches?! Also, instead of buttons for eyes, I used some punched navy circles and painted with Crystal Effects to make them shiny. Another sentiment courtesy of 'For My Family', this time pairing 'sister' with the 'Happy Birthday' from Wacky Wishes. Another set I'll be sorry to see go; if you would like to own this set, you need to host a party before the end of the month so get in touch!

Here's a close up of the little girl's face again:

I know, totally impractical for putting in an envelope, but I love the hair! So simple to recreate - just cut the card using paper snips into thin strands, then curl around a pencil - but so effective. The perfect card for little girls and I love that you can make them individual to look like the recipient. To be fair, this photo looks more like 'baby Rebecca' than my now 8 year-old - this is the photo that inspired my version of this card:

I guess in my mind's eye she will always look this way to me - beautiful!

Back tomorrow with another project - until then, happy stampin'!


Stampin' Up Supplies:

Stamps: For My Family, Wacky Wishes

Cardstock: Whisper White, Real Red, Daffodil Delight, Rich Razzleberry, Night of Navy, Blushing Bride, Summer Smooches Parade Designer Series Paper

Ink/Stampin' Write Markers: Real Red, Melon Mambo, Whisper White Kraft Ink

Tools: Circles #2 Originals Die, Small Heart Punch, Corner Punch, Dress Up Framelits, Itty Bitty Punches (circle), Small Oval Punch, Stamp-a-ma-jig

Finishing Touches: Basics Rhinestones

Dad - You Are The Best!

by Joanne James16. June 2013 20:09

Today is Father's Day and I can finally share the Father's Day card that I made for the James Juniors to give to Daddy on Father's Day. This has been something of a closely guarded secret in our house, but we managed to get to the official envelope-opening before he saw it, so that's pretty good going! I tried something new for this card and broke into my This and That Washi Tape for the first time - take a look:

It is so easy to tape and reposition this tape and it's great for card detail, as well as to hold photos and keepsakes into your journal. Wondering where I got the sentiment from? The 'To My Dad' is from the soon-to-be retired 'For My Family' set (can't believe this set is going - it is SO useful for card personalisation!) but the 'You are the best' is a combination of words taken from a couple of the 'Feel Goods' stamps - with careful use of my trusty stamp-a-ma-jig and some selective colouring with my Basic Grey marker pen, I created my very own sentiment that summed up exactly what I wanted to say. Some stars, linen thread and designer button, along with a co-ordinating envelope, finished off the card worthy of the best Dad - in our eyes, anyway! And as if to prove the point, it has to be said his day was very similar to most Sundays and with the exception of a card and gift, he wasn't treated any differently to any other day - but in his own words, every day is his day so he was fine with that. I can't promise the same will be said next time Mother's Day comes round, but there we go!

So Happy Father's Day - to my husband and Daddy to my children, to my own Dad and everyone else who shares this day.

Back tomorrow with another birthday project - until then, happy stampin'!


Stampin' Up Supplies:

Stamps: For My Family, Feel Goods

Cardstock: Crumb Cake, Very Vanilla, Calypso Coral, basic Grey, This and That Designer Series Paper

Ink/Stampin' Write Markers: Basic Grey

Tools: Stamp-a-ma-jig, Merry Minis Punch (star)

Finishing Touches: Basics Designer Buttons, Linen Thread, This and That Washi Tape, 1/8" Mini Brads

Number One Dad Card

by Joanne James6. June 2013 22:00

Keeping with the Father's Day theme, another quick Dad card from me today. This time I went with a rosette for a Number One Dad:

I went with a Cherry Cobbler base to match my designer paper. The striped paper actually comes from the Christmas Be of Good Cheer paper stack (retiring this month), but it is neutral enough to work well on a masculine card. I made a rosette in double-quick time using my Simply Scored score board, then layered my 'Number One' stamp with a couple of scalloped circles to balance the size. I quite like this card, although if I made it again I would substitute the green scalloped circle with a vanilla one; I don't know whether it's psychological or not, but adding the green into the colour combo makes it look more 'Christmassy', which isn't quite the effect I was after!

Back tomorrow with another project; until then, happy stampin'!


Stampin' Up Supplies:

Stamps: Ciao Baby!, For My Family

Cardstock: Cheery Cobbler, Very Vanilla, Be of Good Cheer DSP

Ink/Stampin' Write Markers: Cherry Cobbler

Tools: Simply Scored, 7/8" Scallop Circle Punch, 1 1/4" Scallop Circle Punch, 1 3/4" Scallop Circle Punch

Finishing Touches: Cherry Cobbler Baker's Twine

An Abstract Card for the Man in your Life!

by Joanne James5. June 2013 20:39

I have been such a busy bee and my date with the ironing basket didn't leave me time for a blog post yesterday, but I'm back on track today and have so much to share I'm almost spoilt for choice! I've been spending much of today preparing for next week's classes: we are doing a 'One Sheet Wonder' using the Secret Garden stamp set and framelits. If you would like to attend this or any of my other classes, or get together with some friends and host a private class of your own, do get in touch via [email protected]

But  for today, with Father's Day just around the corner I will be spending the next week or so sharing some masculine cards with you, interspersed with some lovely cards featuring products and accessories on the retiring lists and a few cards featuring this months 'Best of Flowers' anniversary set. Today's cards were inspired by a birthday card shown on page 14 of the Spring-Summer seasonal catalogue:
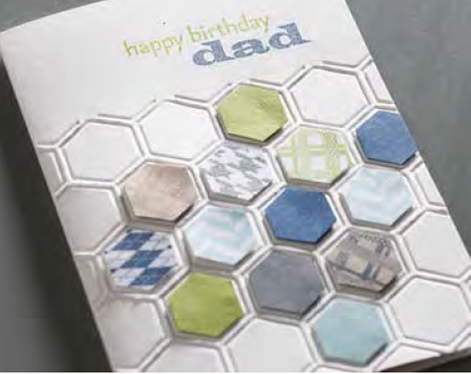
There were a number of things I liked about this card, in no particular order:

  • the partial embossing using the hexagon embossing folder
  • the use of patterned paper to build the design
  • the simple sentiment

So taking these things as my starting point, I developed two similar but slightly different designs. The first one a Father's Day card:
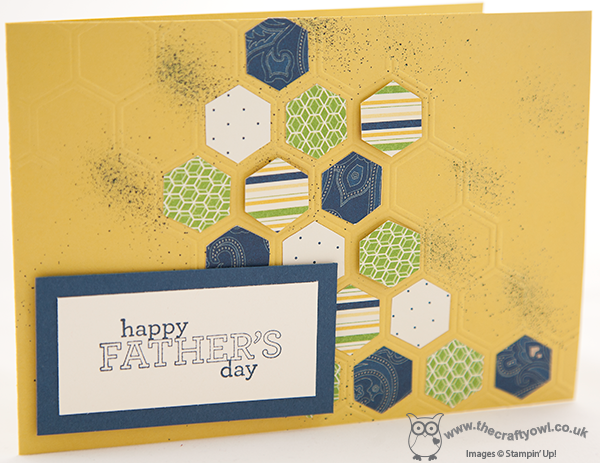
I used the current in-colours and with a Summer Starfruit base, used a number of the patterned papers from the Print Poetry DSP for my patterned hexagons. Some of them I stuck flat, and some of them are adhered using dimensionals. This DSP has a nice variety of papers, with some lovely spots and stripes, which work well for masculine cards. I also spritzed the base card with Midnight Muse so that it didn't look too 'yellow'. I decided to partially emboss a diagonal section across the card and use the unembossed corner for the sentiment.

I then created a second version along the same lines, but this time adhered the Summer Starfruit embossed panel to a Midnight Muse card base and used a simple 'Dad' sentiment on a flag:
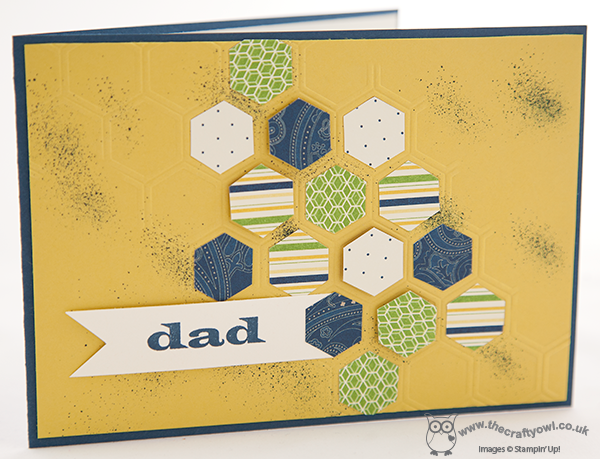
This card could be used for any masculine occasion by altering the sentiment inside the card to suit. The 'Dad' stamp I used here is part of the retiring 'For My Family' stamp set that is one of my 'go to' stamp sets for personalising a card - if this is a set you've had your eye on, it will only be available until the end of the month so get your order to me soon.

So what do you think of these cards? My husband said it reminded him of The Gold Run on the 80's quiz show 'Blockbusters' ("I'll have a 'P' please, Bob"!) which I think is rather cheeky of him - he won't be receiving either of these cards then!! Personally, I'm quite pleased with how they turned out - especially for someone who doesn't 'do' masculine cards for anyone other than the under 12s!

Back tomorrow with another card - until then, happy stampin'!


Stampin' Up Supplies:

Stamps: Delightful Dozen, For My Family

Cardstock: Summer Starfruit, Midnight Muse, Very Vanilla, Print Poetry DSP

Ink/Stampin' Write Markers: Midnight Muse

Tools: Textured Impressions Honeycomb Embossing Folder, Colour Spritzer Tool


Mini Catalogue

BROWSE THE CATALOGUE

The mini catalogue is now live! Read and download your copy here.

Shop Online

Access my online shop 24 x 7, 365 days of the year:

Current April hostess code:

VDKNV7BH

Shop Online

Join My Team

It's always a great time to join Stampin’ Up! New team members can get £130 worth of products for only £99 + free business supplies + free shipping + all the fun being a part of Stampin’ Up! Stampin' Up! has something for everyone: join my growing team and benefit from my support to enjoy Stampin' Up! however you choose.

If you're interested, call me for a chat to understand how I can help you realise your goals. Alternatively, if you have already decided to sign up and you just can't wait, please click here for the link to the online form where you can sign up and order your starter kit right away! 

Latest Kit!

Stampin Cut and Emboss

The Rock Legend Kit has all you need to make 8 cards with coordinating envelopes. Along with the new Panda Friends Kit, both are available from January 4th for just £14 each - get yours here!

2023-24 Annual Catalogue

BROWSE THE CATALOGUE

Click on the catalogue for a full list of current SU! supplies - if you would like to order any of the items featured, please drop me a line at [email protected] or give me a call on 07773 421446 - I'd be happy to help.

New Online Exclusives

There are new products available exclusively in the online store from 5 March - check them out here.

About Me

Hi I'm Joanne and live in Northampton and when I'm not looking after my husband and two beautiful children, am an avid crafter with a passion for all things Stampin' Up!

I must confess that I have never been a big rubber stamper - until I discovered Stampin' Up! that is. I love the fact that I can get such great results with co-ordinating stamps, inks, papers and punches - the possibilities are endless! Join me on my stamping journey as I share the things I love and be inspired to create amazing things yourself!

Follow Me

Monthly Newsletter

Box Builder

Click the button above to use Box Buster to create your custom box design using the Envelope Punch Board!

Kits Collection Now Available!

Stampin Cut and Emboss

The new Kits Collection from Stampin' Up! is now available!

Click here to see the current kits available and order yours online today.

I Design For


Stampin' Up Stuff

This is my personal blog and is not endorsed by Stampin’ Up! I hope you find it a plentiful source of ideas and personal inspiration but please don't copy my designs for contest submission or use for classes, publication or sale without express permission.