Masculine Mini Treat Bag Thinlit Card and Self-Closing Gift Bag Punch Board Bag

by Joanne James7. June 2015 10:00

Yay it's Sunday and time for a new challenge over at The Paper Players - and this week I'm the hostess! With Father's Day approaching, I thought that masculine cards would make a great theme this week and it would at least encourage me to be organised!

I have lots of photos to share with you today, as I made not just one but two projects: a fun card using the mini treat bag thinlits and a matching gift bag using my new Gift Bag Punch Board - oh how I love this!

So first to my card: I've seen a few of these fun cards on Pinterest using the Mini Treat Bag Thinlits Die to create a fancy shirt with a sliding insert (one of my favourites is this one by Julie Kettlewell) and have been wanting to have a go at creating my own version for a while. Here it is: 

I have used the now retired Adventure Bound DSP for my card - this paper is just so fabulous for masculine cards and I hope you all stocked up before it retired! The Mini Treat Bag Thinlits are great for making simple slider cards as well as treat bags; I added silver buttons, a pocket punched with my hexagon punch and with a snippet of Island Indigo chevron ribbon in for a handkerchief. For my insert, I cut it taller than my pocket, then snipped in a third of the way each side to create my turned down collar and added my bow tie. The picture below shows the insert with my stamped sentiment from the 'Guy Greetings' stamp set and a pair of shoes to finish off this dapper outfit:

Pleased as I was with this cute little card, I couldn't stop there; I had to create a matching gift bag using my new Gift Bag Punch Board. I think this is going to be one of my new favourite tools - it is so easy to use and offers so many creative possibilities that go beyond the constraints of the board. Here is my bag:

I made my bag using the 'L' measurements on the board and used a sheet of Whisper White cardstock measuring 9 1/2" x 12". Once I'd punched the bottom according to the board instructions, I flipped it around and did the same on the other end, cutting away all except the long flap on the back of the bag, which I then also punched in the middle to create my collar. I then used the collar as the close mechanism for my bag, by tucking it underneath the bow tie - the photo below of the open bag illustrates that more clearly:

I then added two pieces of DSP with co-ordinating lapels and a large silver button threaded with a piece of white jute ribbon trim to finish my bag. Here are both items together:

I'm really pleased with this project duo; the gift bag is large enough for a couple of pairs of socks, some toiletries, a sweet treat (or two!) - pretty much anything that might be on a Dad's wish list. I hope you like them too and they inspire you to create some fun masculine projects this week! Before you reach for your ink and papers, check out what our amazing team has created to inspire you this week, including our three new guest designers:

The Paper Players Design Team
 
 
Here's a quick recap of our challenge rules:
 
1.  Create a new paper project
2.  Upload your creation to your blog with a link back to us and provide a direct link to the post featuring your challenge submission.
3.  Please link your card to no more than three challenges, TOTAL.
4.  Have FUN! 

I look forward to seeing your masculine creations in the gallery this week. I'm off to finish preparations for this week's technique classes and tackle my mountain of ironing. How does the saying go - no rest for the wicked?!

Back tomorrow with another project; until then, happy stampin'!


Stampin' Up! Supplies Used:

Table built using Product Table Builder by The Crafty Owl - Independent Stampin' Up! Demonstrator.


Guy Greetings Strong Man Card

by Joanne James2. June 2015 17:17

It's been all busy here at the James' today: I have had the first of my Stampin' Up! Annual Catalogue Launch Open House sessions and enjoyed welcoming lots of guests to share in the delights of the new catalogue. More on that later in the week, meanwhile for all you lovely blog readers I have a card that I made for a few challenges today: CAS(E) This Sketch, CAS-ual Fridays who are calling for use of tan, white and one bright colour and Less Is More, where they are looking for two legs or four:


So with all that in mind and Fathers Day just around the corner, here is today's card:


I thought the sketch was an interesting one and whilst my choice of two legs might not seem altogether adventurous, this is the only stamp in my Guy Greetings stamp set that I haven't inked up to date since as much as I love the set, I'm not sure about this fella! I did all my stamping in Soft Suede, stamping the man again on Tangerine Tango cardstock and fussy cutting out his trousers and paper piecing them onto my card base. The arrows I used with my sentiment are from an old photopolymer set (can't remember the name) and I popped the 'DAD' onto a small punched oval over some Tangerine Tango baker's twine for a little more added colour and emphasis. 

That's all from me for today; I'll be back tomorrow with a card for this week's new challenge over at Create With Connie and Mary using a brand new stamp set, so do pop back as you're not going to want to miss it. until then, happy stampin'!


Stampin' Up! Supplies Used:

Table built using Product Table Builder by The Crafty Owl - Independent Stampin' Up! Demonstrator.


Tags: , , , , , , ,

Cards | Stamping

To A Classic Masculine Card

by Joanne James3. May 2015 10:00

It's Sunday and time for a new challenge over at The Paper Players. There were some great takes on Anne's sketch last week and today we are kicking off with a challenge from the talented Sandy, who has chosen a great theme for you to play along with this week:


I used this week's layout over at Mojo Monday as the basis for my card (although I didn't go tall and skinny!). As soon as I knew Sandy's theme this week, I knew immediately that I wanted to do something using the vintage car in the 'Guy Greetings' stamp set. Here's what I came up with:

I decided the layout was perfect for showcasing some of the fabulous masculine patterned papers in the 'Adventure Bound' DSP stack too and used the plaid paper as the inspiration for my colour scheme. The base and mat layers are Smoky Slate, with a layer of Island indigo in between along with a band in the same colour across the front of the card, which I tied with a piece of thread split from the white jute ribbon in the current Occasions catalogue. I then used my piece of DSP for the vertical panel and stamped my car in Island Indigo onto a 2" punched circle of Whisper White, with the sentiment stamped in the same colour onto a banner of Smoky Slate, which I then laid over the top.

A great masculine card that could be paired with any of the other sentiments in the same stamp set for a special husband, dad or grandad, and would be suitable for a birthday or Father's Day alike. 

So before you reach for your paper and inks, check out what our amazing team has created to inspire you this week:

The Paper Players Design Team
 
Here's a quick recap of our challenge rules:
 
1.  Create a new paper project
2.  Upload your creation to your blog with a link back to us and provide a direct link to the post featuring your challenge submission.
3.  Please link your card to no more than three challenges, TOTAL.
4.  Have FUN! 

I look forward to seeing how many different modes of transport get into the gallery this week. I'm off to enjoy a nice long Bank Holiday weekend here in the UK - let's hope the sun shines!

Back tomorrow with another project; until then, happy stampin'!


Stampin' Up! Supplies Used:

Table built using Product Table Builder by The Crafty Owl - Independent Stampin' Up! Demonstrator.


Traveler Happy Father's Day Card

by Joanne James11. June 2014 21:17

With Father's Day coming up this weekend, I thought I should share a few more suitably themed cards with you for anyone in need of last minute ideas! Today's card has both something old and something new - here's my card:

I used Soft Suede for my card base, then created a simple central panel by stamping the globe image from the new Traveler stamp set in Versamark and heat embossed in gold embossing powder. I created a mask for the globe using a piece of scrap cardstock, then carefully sponged in the colours on the globe using sponge daubers and Island Indigo, Garden Green and Encore Gold inks. Here's a close up of the central image:

This is one of those cards that looks so impressive in real life and the colours are really vibrant against the gold. I then matted this panel on some brushed gold cardstock and finished the card by stamping the 'Happy Father's Day' sentiment from the Delightful Dozen stamp set (it's on the retiring list) and heat embossing in gold, then stamping it in Versamark again slightly offset to create a shadow and add some depth to the card. I also created a slightly altered version of the same card, this time stamping the sentiment on a piece of Island Indigo to inject a little more colour - browns have their place, but I don't believe that just because cards are for men, they shouldn't have some brighter colours too.

These cards would work equally well for a male birthday or other masculine card with a change of sentiment; or maybe even a graduation or travel-themed card. That's all from me today; back tomorrow with another card. Until then, happy stampin'!


Stampin' Up! Supplies Used:

Table built using Product Table Builder by The Crafty Owl - Independent Stampin' Up! Demonstrator.


Tags: , , , , , , , , ,

Cards | Stamping

Look Up To Father Acrylic Block Technique

by Joanne James12. April 2014 20:45

I've had a lovely day today finishing off my swaps in readiness for our quarterly team training tomorrow. Our swaps always have a theme and this quarter it's 'technique'; I've based my swaps on a card I made for the challenge over at Seize The Sketch this week, which has this great layout:

Here is my card - can you tell what technique I'm showcasing?

I know Father's Day is still a few months away, but I love the sentiment on this stamp and have been keen to use it for the first time. I decided that I would showcase the 'acrylic block & markers' technique on my card: this is where you colour an acrylic block with markers (I used a variety of greens and browns) and then spritz with water (I add a few drops of alcohol to mine so that it dries quicker) then stamp the block onto the paper.

I thought this technique would make a lovely background to the tree stamp and would add a little more interest than just colouring the image with markers directly. Here's a close-up of the stamped background:

Whilst all of my swap cards look the same, each has a slightly different central panel as each time you stamp using a block it comes out differently, making them all unique.

Sticking with the wood theme, I added a panel of Chocolate Chip embossed with the Woodgrain Textured Impressions Embossing Folder and stamped the layer of Crumb Cake beneath this with the Hardwood background stamp. To finish, I added a couple of chevrons as an accent - wooden of course, coloured with my Chocolate Chip Stampin' Write marker pen:


I also incorporated some Old Olive into the mat layers just to give the card a lift and so that it wouldn't appear too 'brown'.

I'm quite pleased with the overall end result - let's hope my team like their swaps tomorrow too!

Back tomorrow with another card; until then, happy stampin'!


Stampin' Up! Supplies Used:

Table built using Product Table Builder by The Crafty Owl - Independent Stampin' Up! Demonstrator.


Dad - You Are The Best!

by Joanne James16. June 2013 20:09

Today is Father's Day and I can finally share the Father's Day card that I made for the James Juniors to give to Daddy on Father's Day. This has been something of a closely guarded secret in our house, but we managed to get to the official envelope-opening before he saw it, so that's pretty good going! I tried something new for this card and broke into my This and That Washi Tape for the first time - take a look:

It is so easy to tape and reposition this tape and it's great for card detail, as well as to hold photos and keepsakes into your journal. Wondering where I got the sentiment from? The 'To My Dad' is from the soon-to-be retired 'For My Family' set (can't believe this set is going - it is SO useful for card personalisation!) but the 'You are the best' is a combination of words taken from a couple of the 'Feel Goods' stamps - with careful use of my trusty stamp-a-ma-jig and some selective colouring with my Basic Grey marker pen, I created my very own sentiment that summed up exactly what I wanted to say. Some stars, linen thread and designer button, along with a co-ordinating envelope, finished off the card worthy of the best Dad - in our eyes, anyway! And as if to prove the point, it has to be said his day was very similar to most Sundays and with the exception of a card and gift, he wasn't treated any differently to any other day - but in his own words, every day is his day so he was fine with that. I can't promise the same will be said next time Mother's Day comes round, but there we go!

So Happy Father's Day - to my husband and Daddy to my children, to my own Dad and everyone else who shares this day.

Back tomorrow with another birthday project - until then, happy stampin'!


Stampin' Up Supplies:

Stamps: For My Family, Feel Goods

Cardstock: Crumb Cake, Very Vanilla, Calypso Coral, basic Grey, This and That Designer Series Paper

Ink/Stampin' Write Markers: Basic Grey

Tools: Stamp-a-ma-jig, Merry Minis Punch (star)

Finishing Touches: Basics Designer Buttons, Linen Thread, This and That Washi Tape, 1/8" Mini Brads

Father's Day Card

by Joanne James14. June 2013 22:04

So today I can share the card I've made for my own Dad in readiness for Father's Day on Sunday. I've had the card made for over a week, but I couldn't be sure he wouldn't check out my blog as he does every once in a while and see it, so I've had to wait until I knew there was no chance of this happening. As he's at my house with my Mum visiting for the weekend, ready to celebrate Rebecca's birthday tomorrow, I know he won't be on the internet so there will be no chance he will see it before he receives it in person. Here is the finished card:

The layout is very similar to the Mother's Day card I made for my Mother-in-law which you can see here. For my Father's Day card, I used Island Indigo and the retiring Baja Breeze (these blues go so well together) and used some First Edition Designer Series Paper to highlight my typeset raised letters of the word 'Dad'. I also scored some border lines to each side of the panel for added definition. I offset this panel so that I could add some co-ordinating baker's twine and one of the large brushed nickel Basics Designer Buttons to finish off the card. I then created a Very Vanilla insert panel that I stamped with the 'Happy Father's Day' stamp from the Delightful Dozen stamp set.

I really like this card and have also made a version in red for a commission - a clean and classic style. I do have one last Father's Day card to share with you: the one I've made for my own husband from the James juniors, but for obvious reasons I won't be sharing this one until Sunday, although if we manage another two days without him seeing it or my youngest giving the game away it will be nothing short of a miracle!

Back tomorrow with a special birthday card to share. Until then, happy stampin'!


Stampin' Up Supplies:

Stamps: Delightful Dozen (inside card)

Cardstock: Island Indigo, Baja Breeze, Very Vanilla, First Edition DSP

Ink/Stampin' Write Markers: Island Indigo

Tools: Typeset Alphabet Die, Simply Scored

Finishing Touches:  Island Indigo Baker's Twine, Basics Designer Buttons

Tags: , , , , , , , ,

Cards

Number One Dad Card

by Joanne James6. June 2013 22:00

Keeping with the Father's Day theme, another quick Dad card from me today. This time I went with a rosette for a Number One Dad:

I went with a Cherry Cobbler base to match my designer paper. The striped paper actually comes from the Christmas Be of Good Cheer paper stack (retiring this month), but it is neutral enough to work well on a masculine card. I made a rosette in double-quick time using my Simply Scored score board, then layered my 'Number One' stamp with a couple of scalloped circles to balance the size. I quite like this card, although if I made it again I would substitute the green scalloped circle with a vanilla one; I don't know whether it's psychological or not, but adding the green into the colour combo makes it look more 'Christmassy', which isn't quite the effect I was after!

Back tomorrow with another project; until then, happy stampin'!


Stampin' Up Supplies:

Stamps: Ciao Baby!, For My Family

Cardstock: Cheery Cobbler, Very Vanilla, Be of Good Cheer DSP

Ink/Stampin' Write Markers: Cherry Cobbler

Tools: Simply Scored, 7/8" Scallop Circle Punch, 1 1/4" Scallop Circle Punch, 1 3/4" Scallop Circle Punch

Finishing Touches: Cherry Cobbler Baker's Twine

An Abstract Card for the Man in your Life!

by Joanne James5. June 2013 20:39

I have been such a busy bee and my date with the ironing basket didn't leave me time for a blog post yesterday, but I'm back on track today and have so much to share I'm almost spoilt for choice! I've been spending much of today preparing for next week's classes: we are doing a 'One Sheet Wonder' using the Secret Garden stamp set and framelits. If you would like to attend this or any of my other classes, or get together with some friends and host a private class of your own, do get in touch via [email protected]

But  for today, with Father's Day just around the corner I will be spending the next week or so sharing some masculine cards with you, interspersed with some lovely cards featuring products and accessories on the retiring lists and a few cards featuring this months 'Best of Flowers' anniversary set. Today's cards were inspired by a birthday card shown on page 14 of the Spring-Summer seasonal catalogue:
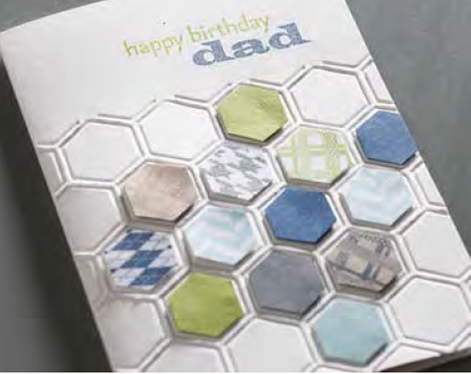
There were a number of things I liked about this card, in no particular order:

  • the partial embossing using the hexagon embossing folder
  • the use of patterned paper to build the design
  • the simple sentiment

So taking these things as my starting point, I developed two similar but slightly different designs. The first one a Father's Day card:
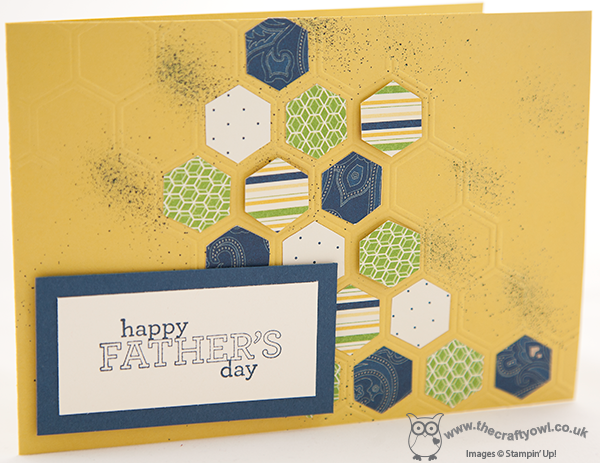
I used the current in-colours and with a Summer Starfruit base, used a number of the patterned papers from the Print Poetry DSP for my patterned hexagons. Some of them I stuck flat, and some of them are adhered using dimensionals. This DSP has a nice variety of papers, with some lovely spots and stripes, which work well for masculine cards. I also spritzed the base card with Midnight Muse so that it didn't look too 'yellow'. I decided to partially emboss a diagonal section across the card and use the unembossed corner for the sentiment.

I then created a second version along the same lines, but this time adhered the Summer Starfruit embossed panel to a Midnight Muse card base and used a simple 'Dad' sentiment on a flag:
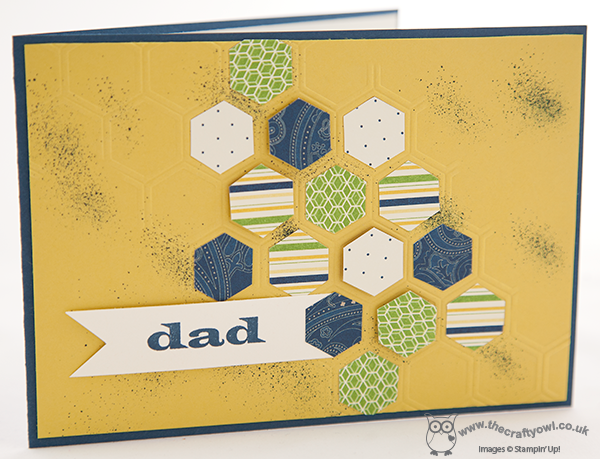
This card could be used for any masculine occasion by altering the sentiment inside the card to suit. The 'Dad' stamp I used here is part of the retiring 'For My Family' stamp set that is one of my 'go to' stamp sets for personalising a card - if this is a set you've had your eye on, it will only be available until the end of the month so get your order to me soon.

So what do you think of these cards? My husband said it reminded him of The Gold Run on the 80's quiz show 'Blockbusters' ("I'll have a 'P' please, Bob"!) which I think is rather cheeky of him - he won't be receiving either of these cards then!! Personally, I'm quite pleased with how they turned out - especially for someone who doesn't 'do' masculine cards for anyone other than the under 12s!

Back tomorrow with another card - until then, happy stampin'!


Stampin' Up Supplies:

Stamps: Delightful Dozen, For My Family

Cardstock: Summer Starfruit, Midnight Muse, Very Vanilla, Print Poetry DSP

Ink/Stampin' Write Markers: Midnight Muse

Tools: Textured Impressions Honeycomb Embossing Folder, Colour Spritzer Tool


Mini Catalogue

BROWSE THE CATALOGUE

The mini catalogue is now live! Read and download your copy here.

Shop Online

Access my online shop 24 x 7, 365 days of the year:

Current April hostess code:

VDKNV7BH

Shop Online

Join My Team

It's always a great time to join Stampin’ Up! New team members can get £130 worth of products for only £99 + free business supplies + free shipping + all the fun being a part of Stampin’ Up! Stampin' Up! has something for everyone: join my growing team and benefit from my support to enjoy Stampin' Up! however you choose.

If you're interested, call me for a chat to understand how I can help you realise your goals. Alternatively, if you have already decided to sign up and you just can't wait, please click here for the link to the online form where you can sign up and order your starter kit right away! 

Latest Kit!

Stampin Cut and Emboss

The Rock Legend Kit has all you need to make 8 cards with coordinating envelopes. Along with the new Panda Friends Kit, both are available from January 4th for just £14 each - get yours here!

2023-24 Annual Catalogue

BROWSE THE CATALOGUE

Click on the catalogue for a full list of current SU! supplies - if you would like to order any of the items featured, please drop me a line at [email protected] or give me a call on 07773 421446 - I'd be happy to help.

New Online Exclusives

There are new products available exclusively in the online store from 5 March - check them out here.

About Me

Hi I'm Joanne and live in Northampton and when I'm not looking after my husband and two beautiful children, am an avid crafter with a passion for all things Stampin' Up!

I must confess that I have never been a big rubber stamper - until I discovered Stampin' Up! that is. I love the fact that I can get such great results with co-ordinating stamps, inks, papers and punches - the possibilities are endless! Join me on my stamping journey as I share the things I love and be inspired to create amazing things yourself!

Follow Me

Monthly Newsletter

Box Builder

Click the button above to use Box Buster to create your custom box design using the Envelope Punch Board!

Kits Collection Now Available!

Stampin Cut and Emboss

The new Kits Collection from Stampin' Up! is now available!

Click here to see the current kits available and order yours online today.

I Design For


Stampin' Up Stuff

This is my personal blog and is not endorsed by Stampin’ Up! I hope you find it a plentiful source of ideas and personal inspiration but please don't copy my designs for contest submission or use for classes, publication or sale without express permission.