Clean And Simple Winter Wonder Embossed Snowflake Card

by Joanne James13. September 2017 21:00

Wednesday already - where does the week go?! I had a technique class yesterday and was out on the rugby touchline for the first game of the season today (a narrow 8-7 defeat, but well-played all round) and have lots of makes to share so thought it was about time I squeezed in a quick blog post! Today I'm sharing a super quick and easy Christmas card that would be perfect for mass production - take a look:


Here's the low-down on today's card:

Winter Wonder - It's that snowflake again! Yes, the Winter Wonder Embossing Folder produces such great texture and dimension, it really is a centrepiece in itself. 

A White Christmas - A simple design in all-white can be really effective; here I've layered my embossed snowflake panel onto an extra-thick whisper white cardbase for a seamless design. 

A Simple Sentiment Banner - To finish, I added a simple sentiment banner, heat embossed in silver. This could just as easily be stamped in a colour of your choice. Equally, I used a sentiment from the 'Christmas Pines' stamp set, but this could be switched out for any similar one-line stamp. I stepped my banner, but it still pushes flat for posting - great for friends and family mailings in the run up to Christmas. A trio of rhinestones for a little festive sparkle complete my card.

Here is the visual summary of the key products used on today's project for you to pin for easy reference:


You can see all of my 'How To' summaries on my 'How To - Tips and Techniques' Pinterest board in case you've missed any. 

This card would be great if you want to make a whole bunch of cards in one go, so if you need to make a big dent on your Christmas card making, this could be the card for you!

Enjoy your day and I'll be back tomorrow with another project that also uses the snowflake embossing folder, but is a stepped up version with a matching gift box too. Until then, happy stampin'!


Stampin' Up! Supplies Used:

Table built using Product Table Builder by The Crafty Owl - Independent Stampin' Up! Demonstrator.

A Winter Wonder Joy Christmas Card

by Joanne James9. September 2017 16:30

Yay, it's the weekend! I've had a busy week and didn't manage to squeeze in yesterday's blog post following my open house event to celebrate the launch of the new Autumn-Winter catalogue - a big thank you to all the lovely ladies who attended - so I'm back today with the Christmas card I promised for this week's challenge over at Merry Monday - I need to get cracking on building my festive stash:

I had a marathon session this week creating cards using the new snowflake embossing folder and knew that this would be perfect for the challenge - take a look:


Here's the low-down on today's card:

Year Of Cheer - My card was inspired by the wonderful display of projects on page 36 of the seasonal catalogue featuring the Year Of Cheer Suite - the combination of whites and metallics and intricate foiled papers are perfect for seasonal wintry projects. I particularly love the papers in this suite - the foil patterns are gorgeous and work for lots of occasions, not just Christmas, The snowflake foiled pattern was just the right base for my wintry Christmas card.

A Winter Wonder - I'm generally not big into embossing folders, but there are a few in my collection that are absolute keepers and at this time of year are much loved and used. Two of my long-time favourites are the Woodland TIEF and my all-time favourite Softly Falling however I am pleased to report that the Winter Wonder Textured Impressions Embossing Folder will be completing my trio of festive favourites. This huge single snowflake measures 4" square and makes a real statement on a Christmas card, for sure.

JOY - The 'Cheers to the Year' stamp set that is part of the Year Of Cheer Suite includes the word 'Joy' - although as I don't have this stamp set I substituted with a little more retro rubber today and used a very similar stamp from last year's retired 'Holly Jolly Greetings' stamp set, heat embossed in silver on my folded banner. 

Here is the visual summary of the key products used on today's project for you to pin for easy reference:


You can see all of my 'How To' summaries on my 'How To - Tips and Techniques' Pinterest board in case you've missed any. 

I'll be back tomorrow with another project for this week's new challenge over at The Paper Players. Until then, happy stampin'!


Stampin' Up! Supplies Used:

Table built using Product Table Builder by The Crafty Owl - Independent Stampin' Up! Demonstrator.

Colorful Seasons Winter Snowflakes Triple Stamping Babywipe Reinker Card

by Joanne James30. August 2017 05:00

The Bank Holiday is over and we are back to normality. I'm sharing another card from my recent technique class featuring the Colorful Seasons stamp set using the baby wipe technique, this time with a winter theme - take a look:


Here's the low-down on today's card:

Triple Stamping Technique - Today's card uses the same babywipe reinker technique that I shared with you yesterday, this time using the snowflake outline images and also incorporates another fun technique: triple stamping. This is where you stamp over several layers to create a dimensional image, or alternatively stamp over a single layer then cut your sheet into a central piece with two surrounding frames using your trimmer. Each stamped section is then layered with a solid coloured mat in between to add dimension to the image.

Seasonal Layers Snowflake - The co-ordinating Seasonal Layers Thinlits have a number of fun dies and today's card features one of the snowflakes, so incredibly detailed - check it out in the close up at the start of today's post. It makes a great focal point, this time with a glitter enamel dot as its centrepiece.

A Frosty Colour Combo - Today's colour combination is all about frosty, cold wintry days - here it is for you if you'd like to save it to use on your winter and Christmas projects:

Here is the visual summary of the key products used on today's project for you to pin for easy reference:


You can see all of my 'How To' summaries on my 'How To - Tips and Techniques' Pinterest board in case you've missed any. 

Enjoy your day and I'll be back tomorrow with another project from my class that also uses the baby wipe reinker technique. Until then, happy stampin'!


Stampin' Up! Supplies Used:

Table built using Product Table Builder by The Crafty Owl - Independent Stampin' Up! Demonstrator.

Carols Of Christmas Folded Corner Card

by Joanne James22. August 2017 10:00

Today I'm sharing my second card in a row for the current colour challenge over at As you See It:


As I mentioned in yesterday's post, this was the first card I made using these colours and the Carols of Christmas bundle - take a look:


Here's the low-down on today's card:

Carols of Christmas - I used the other large sentiment from the Carols Of Christmas stamp set on my card today, again inking the sentiment in Elegant Eggplant and Real Red, using the rock 'n' roll ink technique to blend the colour across the centre of the stamp for a two-tone effect. I layered my stamped panel using my Layering Squares Framelits for a little extra colour and detail.

A Fancy Fold - The real interest on today's card is the fancy fold. This is called a Folded Corner Card, although I adapted the fold to the centre as I wanted a wide border that was equal and opposite to the inside edge, where I decorated the border with stamped and cut out poinsettias.

Paper-Pieced Poinsettias - For the opposing corner, I used the detail of the poinsettia corner thinlit and paper-pieced the flowers, berries and leaves, finishing off with a few pearl centres. It was a little fiddly, especially the berries, however worth it to show both of the poinsettia pieces.

So what do you think? Which one do you prefer - yesterday's card which you can see here if you missed it or today's? I'd love to hear your thoughts. 

Here is the visual summary of the key products used on today's project for you to pin for easy reference:


You can see all of my 'How To' summaries on my 'How To - Tips and Techniques' Pinterest board in case you've missed any. 

I have the second of my technique classes this month this morning so I will be busy. Hopefully I'll be back tomorrow with another project - perhaps I'll share something from today's class. Until then, happy stampin'!


Stampin' Up! Supplies Used:

Table built using Product Table Builder by The Crafty Owl - Independent Stampin' Up! Demonstrator.

Carols Of Christmas Available Now To Order!

by Joanne James21. August 2017 19:30

Today I'm sharing a card for the current colour challenge over at As you See It:


Continuing with my run of Christmas cards, I decided it was time to finally ink up my new Carols of Christmas bundle - take a look:


Here's the low-down on today's card:

Carols of Christmas - Carols of Christmas is a bundle that features in the new forthcoming Autumn-Winter seasonal catalogue. Christmas has come early at Stampin' Up! though and it has been available to all customers to purchase since the beginning of August, a whole month early. It features two large focal sentiments and a range of accompanying pieces, with everything from baubles to poinsettias and a sweet deer. Here I've inked the sentiment in Elegant Eggplant and Real Red, using the rock 'n' roll ink technique to blend the colour across the centre of the stamp for a two-tone effect.

Frame Your Card - The Carols Of Christmas bundle also includes some great card front builder thinlits that can be used to create frames and decorative borders to your cards. I used the patterned edge frame on my card today. It adds a nice decorative border to your card without being too fussy. 

Hanging BaublesI also cut out my ornaments individually using the co-ordinating thinlits; this is useful as it means you can be lazy when stamping the baubles and strings and stamp them in the colour that you want for your strings (here I stamped them in black) then stamp them again on some scrap paper in your chosen colours, then just cut out the baubles and pop them on top of the original stamped ones, enabling you to combine colours with ease. If you look at your card at an angle (see my thumb nail at the top of this post), you will be able to see the original stamps underneath if you pop you ornaments onto mini dimensionals - which are perfect for this by the way! - but they can't be seen from the front, so worth the time saved I think. I also used a few leftover baubles to decorate the inside of my card:


Here is the visual summary of the key products used on today's project for you to pin for easy reference:


You can see all of my 'How To' summaries on my 'How To - Tips and Techniques' Pinterest board in case you've missed any. 

So I have something of a confession to make: this is actually the second card I made for this week's As You See It challenge - I had an idea that I used for the first one but when finished I wasn't sure that I liked the finished result. I might share that one with you tomorrow to see what you think!

I have the second of my technique classes this month tomorrow morning so am looking forward to working with the Color Theory Suite, which is our bundle of choice. I'll be back tomorrow with another project. Until then, happy stampin'!


Stampin' Up! Supplies Used:

Table built using Product Table Builder by The Crafty Owl - Independent Stampin' Up! Demonstrator.
 
Carols of Christmas

Holly Berry Happiness Wreath Christmas Card

by Joanne James19. August 2017 21:35

Today I'm popping by with a quick post and a card for this week's challenge over at CASology where they have a fun cue word:

Many of the designers over at CASology this week were inspired to use cacti or hedgehogs on their cards. Me? I have Christmas on the brain this week and I immediately thought 'holly' - take a look:


Here's the low-down on today's card:

I use the holly berry sprig from the 'Holly Berry Happiness' stamp set, on carryover from last year and now available all year round in the annual catalogue, to create a holly wreath that I coloured in with my Pear Pizzazz and Old Olive Stampin' Write markers. I used the same layout that I used for my recent quilted Christmas card, stamping my wreath off the page and adding a strip of Coffee Break DSP and a sentiment banner accented with a piece of punched holly, courtesy of the Holly Berry Builder Punch, to finish. I stamped this lovely verse onto the inside too:


It was fun to get this set out again and always worth remembering that the annual catalogue has some great Christmas sets - you don't have to wait until the release of the new Autumn-Winter seasonal catalogue if you want to start festive crafting in earnest.

Here is the visual summary of the key products used on today's project for you to pin for easy reference:


You can see all of my 'How To' summaries on my 'How To - Tips and Techniques' Pinterest board in case you've missed any. 

I'll be back tomorrow with another project. Until then, happy stampin'!


Stampin' Up! Supplies Used:

Table built using Product Table Builder by The Crafty Owl - Independent Stampin' Up! Demonstrator.

Night In Bethlehem One Layer Card

by Joanne James18. August 2017 20:16

 had a little crafty time today and was creating with more of my pre-order stash and decided I just about had time to squeeze in a card for the current challenge over at Less Is More (this was my starting point for today's card but I'm too late to link up unfortunately) which also fits the bill over at Stamp Ink Paper and ATCAS this week:


I went with a rather less obvious vehicle for my one layer card today - take a look:


Since the dictionary definition of 'vehicle' is 'a thing used for transporting people or goods, especially on land, such as a car, lorry, or cart' I think my donkey more than qualifies; not the most common mode of transport granted, but one that transported Mary on that momentous journey to Bethlehem so many years ago. 

I've used a combination of stamps from one of my favourite sets in the new Stampin' Up! Autumn-Winter catalogue called 'Night In Bethlehem' to create my card today. It has a set of co-ordinating framelits which I will share another day; today's card uses the stamp set alone, with some additional masking and brayering to create the illusion of depth and layers, finished with an embossed star. I also stamped the verse that comes with this set on the inside too (in my second colourway):


Little more than stamps, ink and paper today - and I love this card! In fact I liked it so much I made a second version in an alternative colour combination too:


Which one do you prefer? Leave me a comment below - I'd love to hear your thoughts.

Here is the visual summary of the key products used on today's project for you to pin for easy reference:


You can see all of my 'How To' summaries on my 'How To - Tips and Techniques' Pinterest board in case you've missed any. 

Enjoy your day and I'll be back tomorrow with another project. Until then, happy stampin'!


Stampin' Up! Supplies Used:

Table built using Product Table Builder by The Crafty Owl - Independent Stampin' Up! Demonstrator.


Sneak Peek Quilted Christmas CAS Christmas Card

by Joanne James17. August 2017 09:40

My week has been whizzing by as usual, but I've had a few snatched opportunities to create with my pre-order goodies and managed to whip up a quick card using this week's CAS(E) This Sketch using some new products:


I used a new stamp set called Christmas Quilt and some new co-ordinating designer series paper called Quilted Christmas for my border for my clean and simple Christmas card:


Such a versatile set with a wonderful homespun feel that will be useful for Christmas and beyond and is sure to appeal to the seamstresses out there. A lovely sentiment for the inside too:


Here is the visual summary of the key products used on today's project for you to pin for easy reference:


You can see all of my 'How To' summaries on my 'How To - Tips and Techniques' Pinterest board in case you've missed any. 

The items used on today's card will be available to purchase when the new seasonal catalogue goes live on 1st September; if you're not already on my mailing list and don't already have a Stampin' Up! demonstrator of your own and would like me to send you a catalogue, please get in touch with your details and I will pop one in the post to you when mine go out within the next week or so. 

Enjoy your day and I'll be back tomorrow with another project. Until then, happy stampin'!


Stampin' Up! Supplies Used:

Table built using Product Table Builder by The Crafty Owl - Independent Stampin' Up! Demonstrator.

Sponged Star Of Light Christmas Card In July!

by Joanne James5. July 2017 20:40

I'm having a busy week as the youngest of the James Juniors is on the last week of the school year this week so blogging is having to take something of a back seat whilst I get other work things in order and prepare for the long summer break! I did find time yesterday to make a card for a couple of challenges that I wanted to share with you today. Yes, another scorcher here in the UK today and I'm sharing a Christmas card! My original inspiration was this rather perplexing sketch over at CAS(E) This Sketch:


It's been swirling around in my creative subconscious for days and I was keen to play along as I love their sketches but when combined with this week's challenge over at Stamp Ink Paper I finally found my answer  - take a look:


My 'Star of Light' stamp set to the rescue! This stamp set has to me one of my most-used Christmas sets last year and worth it for that fabulous swirl of trailing sparkle alone in my opinion. Some background sponging and a white glimmer star, cut using my Starlight Thinlits Dies, completes the picture. I even remembered to take a photograph of the inside to show you, so that you can see how the greeting follows on:

A card that took longer to execute than to explain, but I guess that's the beauty of the creative process! If you don't have this set, I can definitely recommend it; buy both the stamp set and co-ordinating thinlits this month and you will not only be able to get a head start on your Christmas cards, you'll get a £5 voucher to spend next month too!

Here is the visual summary of the key products used on today's project for you to pin for easy reference:


You can see all of my 'How To' summaries on my 'How To - Tips and Techniques' Pinterest board in case you've missed any. 

I've a busy couple of days ahead but promise I'll be back soon with another project. Until then, happy stampin'!


Stampin' Up! Supplies Used:

Table built using Product Table Builder by The Crafty Owl - Independent Stampin' Up! Demonstrator.

Softly Falling And Hang Your Stocking - A Perfect Pair

by Joanne James11. December 2016 09:00

It's Sunday and time for a new challenge over at The Paper Players! Before I get into my post, I must just give a shout out to the lovely Linda, Hannelie and Colleen who have been the most awesome guest designers with us for the last six months; these ladies have done a fabulous job and I will miss your contributions and do hope you continue to play along with us from time to time. Thank you for sharing your designs and creativity with us! Whilst we are sad to see these ladies leave, it also means we will have some new guest designers joining us too; watch out for more news on this with my mid-week reminder post on Wednesday to see who will be joining us to kick off 2017!

Meanwhile, it's the turn of the lovely Jaydee to host this week and she has a glamorous colour challenge for us to work with:
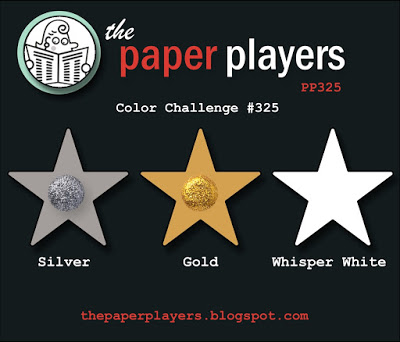
    

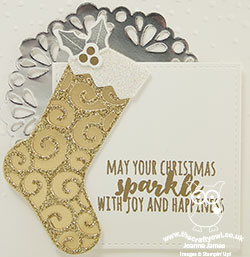
All the sparkle of silver and gold, paired with brilliant white! I decided that a glamorous stocking was going to be my focal point today and I also used Amy's sketch over at Freshly Made Sketches for my layout - here's my card:
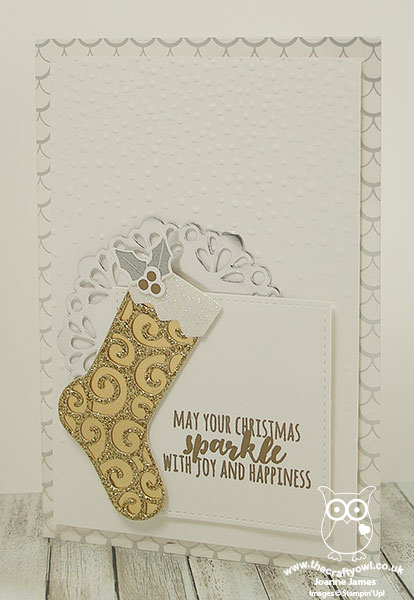
 

My card today is another one with lots of layers and a variety of foil and glimmer paper to add lots of sparkle: my diecut stocking is gold foil layered with gold glimmer and a white glimmer top with embossed holly decoration, I layered a silver foil doily behind and added a piece of silver foil acetate between my white cardbase and mat, which I embossed with my favourite embossing folder of all time, Softly Falling, for added detail. I used my Stitched Shape Framelits for my sentiment square (you will be pleased to know theses will be available to order again early January in time for Sale-A-Bration - yay!) and chose a sentiment from the Christmas Pines stamp set to complete my card as this seemed the most appropriate, which I also heat embossed in gold.

This is the kind of stocking I imagine someone like Joan Collins to own (or maybe Donald Trump, since he seems to be a fan of all things glitzy and gold!) - either way, definitely all about the luxury! I'm more of a traditional red and white girl myself :-)

Here is the visual summary of the key products used on today's project for you to pin for easy reference:
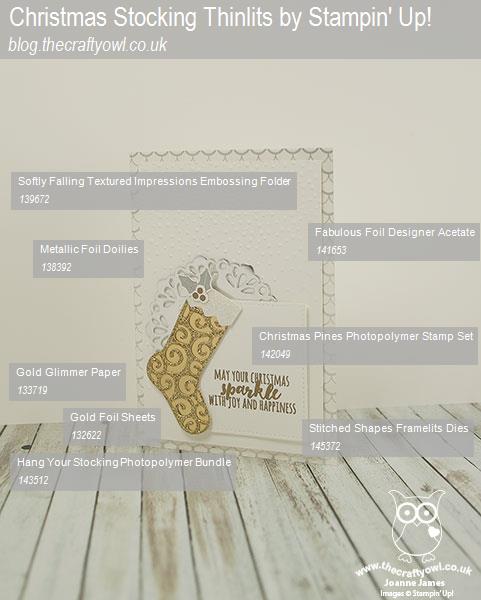
 

You can see all of my Product and 'How To' summaries on my 'How To - Tips and Techniques' Pinterest board in case you've missed any. 

Before you reach for your ink and papers, check out what our amazing team has created to inspire you this week:

The Paper Players Design Team
 
 
Here's a quick recap of our challenge rules:
 
1.  Create a new paper project
2.  Upload your creation to your blog with a link back to us and provide a direct link to the post featuring your challenge submission.
3.  Please link your card to no more than four challenges, TOTAL.
4.  Have FUN! 


I look forward to seeing what you create with this colour palette this week. This morning I will be recovering from a Christmas night out yesterday and this afternoon we are officially decorating the James household for Christmas. My wreath is made and hanging proudly on my front door already, so with the tree up and the rest of the decorations in place, I'm sure it will start to feel like Christmas is well and truly on its way!

Enjoy the rest of your weekend as it will be over all too quickly; I'll be back tomorrow with another project; until then, happy stampin'!


Stampin' Up! Supplies Used:

Table built using Product Table Builder by The Crafty Owl - Independent Stampin' Up! Demonstrator.

Mini Catalogue

BROWSE THE CATALOGUE

The mini catalogue is now live! Read and download your copy here.

Shop Online

Access my online shop 24 x 7, 365 days of the year:

Current April hostess code:

VDKNV7BH

Shop Online

Join My Team

It's always a great time to join Stampin’ Up! New team members can get £130 worth of products for only £99 + free business supplies + free shipping + all the fun being a part of Stampin’ Up! Stampin' Up! has something for everyone: join my growing team and benefit from my support to enjoy Stampin' Up! however you choose.

If you're interested, call me for a chat to understand how I can help you realise your goals. Alternatively, if you have already decided to sign up and you just can't wait, please click here for the link to the online form where you can sign up and order your starter kit right away! 

Latest Kit!

Stampin Cut and Emboss

The Rock Legend Kit has all you need to make 8 cards with coordinating envelopes. Along with the new Panda Friends Kit, both are available from January 4th for just £14 each - get yours here!

2023-24 Annual Catalogue

BROWSE THE CATALOGUE

Click on the catalogue for a full list of current SU! supplies - if you would like to order any of the items featured, please drop me a line at [email protected] or give me a call on 07773 421446 - I'd be happy to help.

New Online Exclusives

There are new products available exclusively in the online store from 5 March - check them out here.

About Me

Hi I'm Joanne and live in Northampton and when I'm not looking after my husband and two beautiful children, am an avid crafter with a passion for all things Stampin' Up!

I must confess that I have never been a big rubber stamper - until I discovered Stampin' Up! that is. I love the fact that I can get such great results with co-ordinating stamps, inks, papers and punches - the possibilities are endless! Join me on my stamping journey as I share the things I love and be inspired to create amazing things yourself!

Follow Me

Monthly Newsletter

Box Builder

Click the button above to use Box Buster to create your custom box design using the Envelope Punch Board!

Kits Collection Now Available!

Stampin Cut and Emboss

The new Kits Collection from Stampin' Up! is now available!

Click here to see the current kits available and order yours online today.

I Design For


Stampin' Up Stuff

This is my personal blog and is not endorsed by Stampin’ Up! I hope you find it a plentiful source of ideas and personal inspiration but please don't copy my designs for contest submission or use for classes, publication or sale without express permission.