by Joanne James16. August 2022 13:00
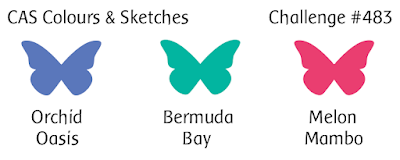
It's Tuesday and time for a new challenge over at CAS Colours & Sketches. Nancy is hosting this month and I today it's her second a colour challenge:
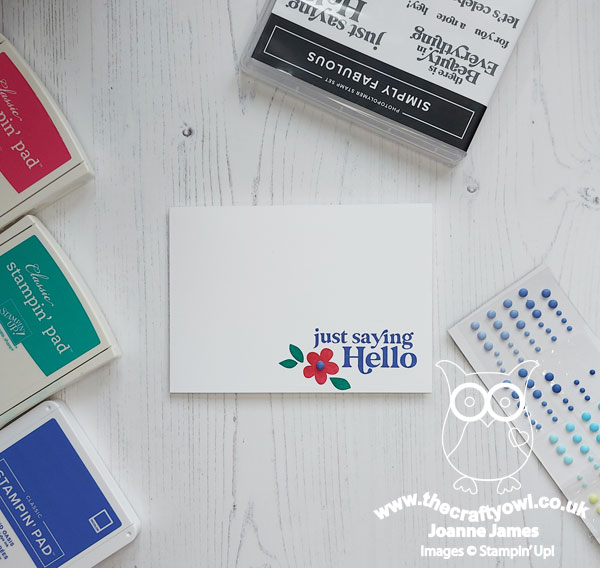
For my card today I went super clean and simple with this week's colours (love them!) and my favourite 'Simply Fabulous' stamp set - take a look:
Here's the low-down on today's card:
This really is a card that needs no explanation: I stamped the sentiment, popped in the flower and added a single matte dot to the centre:
#simplestamping at its best!
Here is the visual summary of the key products used on today's project for you to pin for easy reference:

You can see all of my 'How To' summaries on my 'How To - Tips and Techniques' Pinterest board in case you've missed any.
As a reminder, for our colour challenges, you must use all of the stated challenge colours. You may also use neutral colours; however, the challenge colours should be the most noticeable ones featured on your card. We use Stampin' Up! color names for reference, but you are welcome to use any other companies' products as long as you match the challenge colours as closely as possible.
Enjoy your day and I'll be back at the weekend with my card for the new challenge over at The Paper Players. until then, happy stampin'!
Stampin' Up! Supplies Used:
by Joanne James9. August 2022 13:00
It's Tuesday and time for a new challenge over at CAS Colours & Sketches. This week's challenge is a sketch challenge and Nancy has asked that we use the following layout:

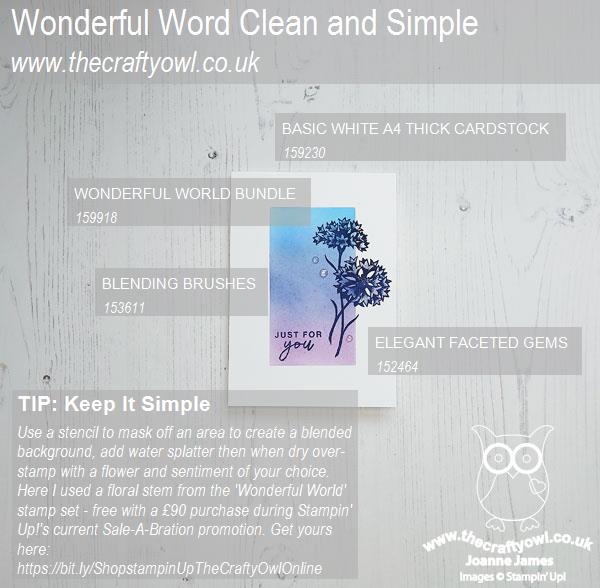
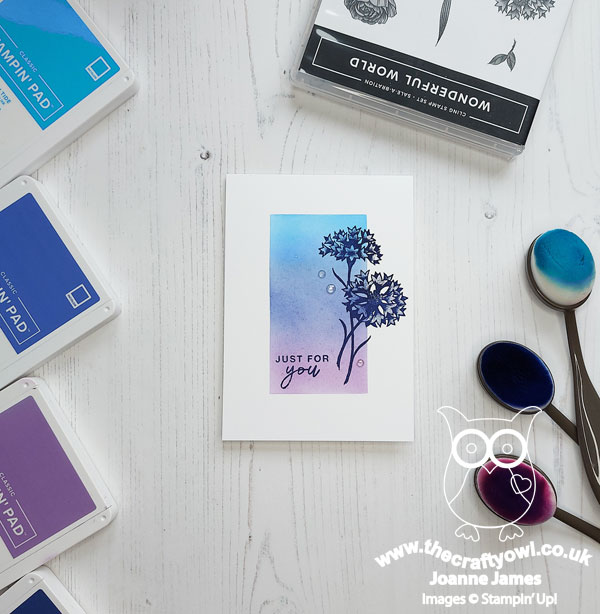
Feel free to flip or rotate the sketch when making your card. For my card today I am also playing along with the new Color Hues challenge in memory of their team mate Lindsey who recently lost her battle with cancer. She chose the colour scheme of blue and purple and loved clean and simple cards, so I chose to add in flowers as one of her other favourite things and use all three to create a card in her honour today - take a look:
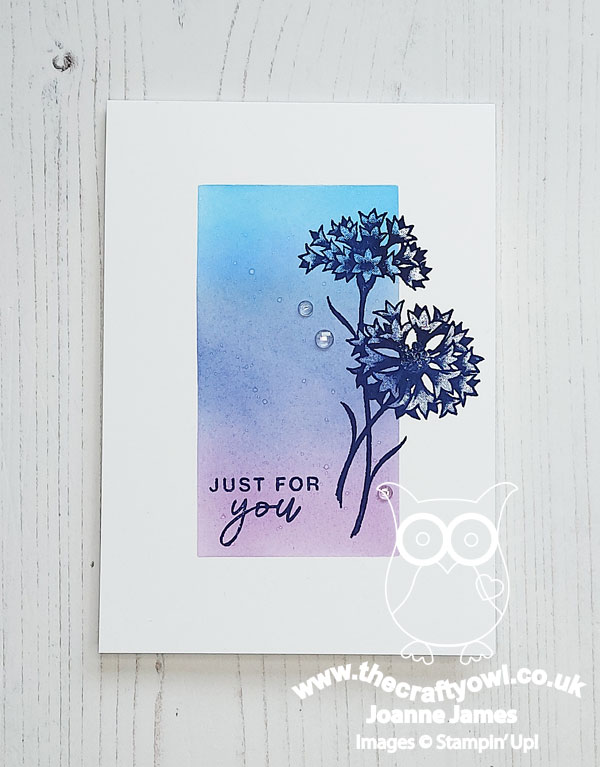
Here's the low-down on today's card:
I masked off a rectangle and used my blending brushes to add a combination of blues and purple ink, before spalttering lightly with water to create some additional detail. Once dry, I stamped a sentiment from 'Rings of Love' and a single flower stem from the 'Wonderful World' Sale-A-Bration stamp set in Starry Sky ink along the edge of my blended panel:
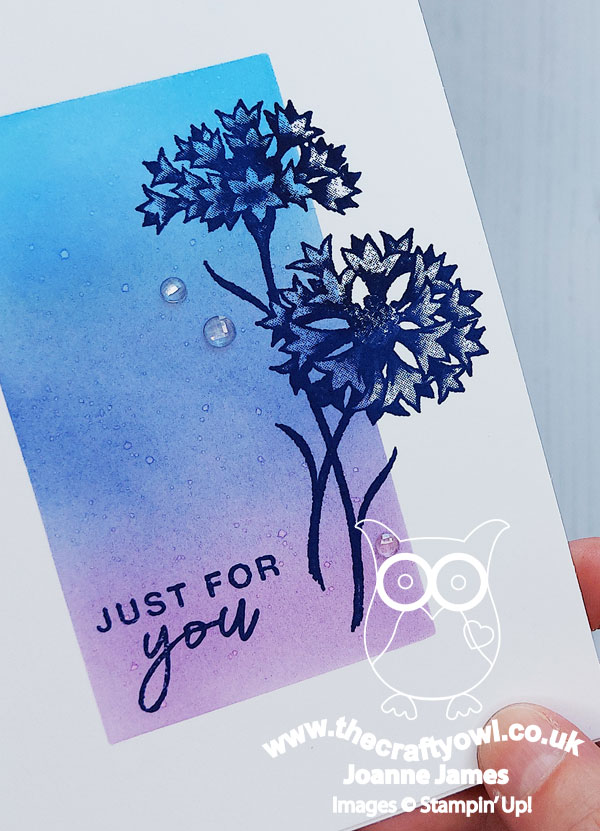
A trio of clear faceted gems complete my one layer card in memory of Lindsey - I hope I've done her memory proud.
Here is the visual summary of the key products used on today's project for you to pin for easy reference:
You can see all of my 'How To' summaries on my 'How To - Tips and Techniques' Pinterest board in case you've missed any.
As a reminder, for our colour challenges, you must use all of the stated challenge colours. You may also use neutral colours; however, the challenge colours should be the most noticeable ones featured on your card. We use Stampin' Up! color names for reference, but you are welcome to use any other companies' products as long as you match the challenge colours as closely as possible.
Enjoy your day and I'll be back on Thursday with another project. Until then, happy stampin'!
Stampin' Up! Supplies Used:
by Joanne James2. August 2022 13:00
It's Tuesday and time for a new challenge over at CAS Colours & Sketches. Nancy is hosting this month and our first challenge is a colour challenge:
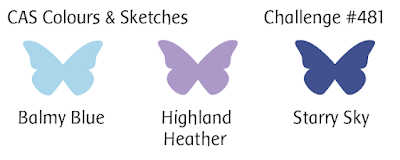

For my card today I decided to have another go at the nautical challenge over at Addicted to CAS and this time create an uber-CAS card - take a look:
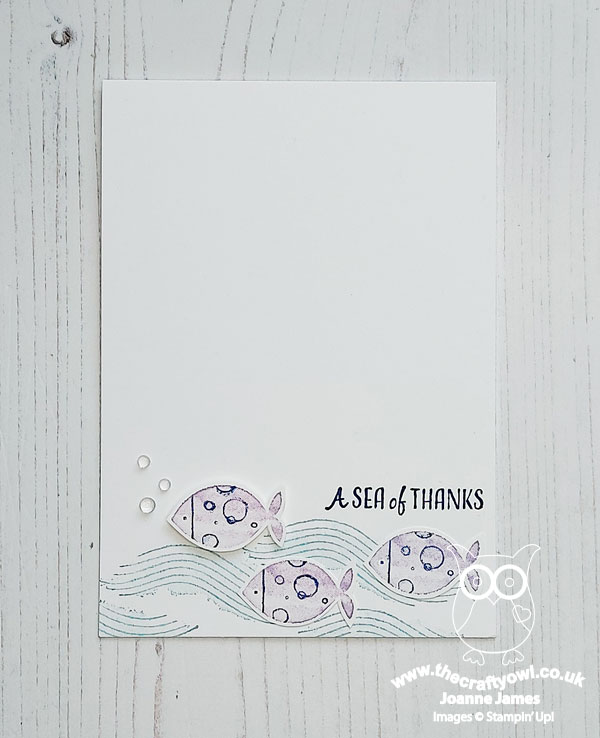
Here's the low-down on today's card:
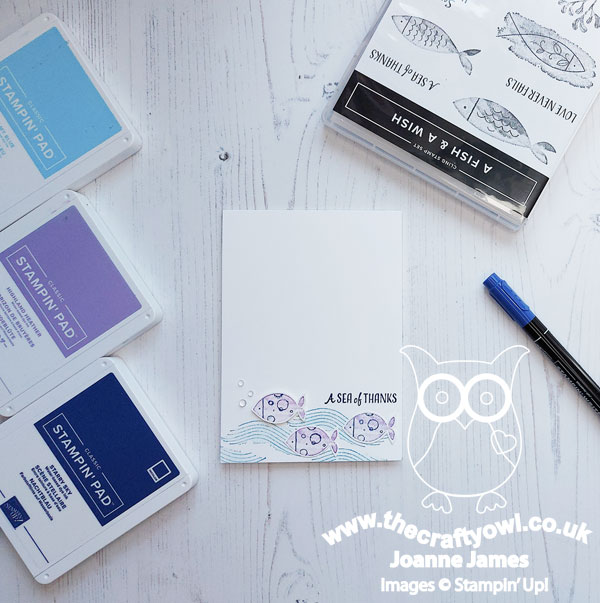
A few stamped waves, a sentiment and a trio of fish all from the 'A Fish And A Wish' set, with one of the fish popped up on dimensionals with a trio of sparkly bubbles for good measure. I kept things really simple, using a Stampin' Write marker brushed lightly over my fish once I'd stamped them in Highland Heather, to give them a two-tone look:

I like the added detail that highlighting the fish pattern gives and it's a great way to tie them into the sentiment too. Super simple!
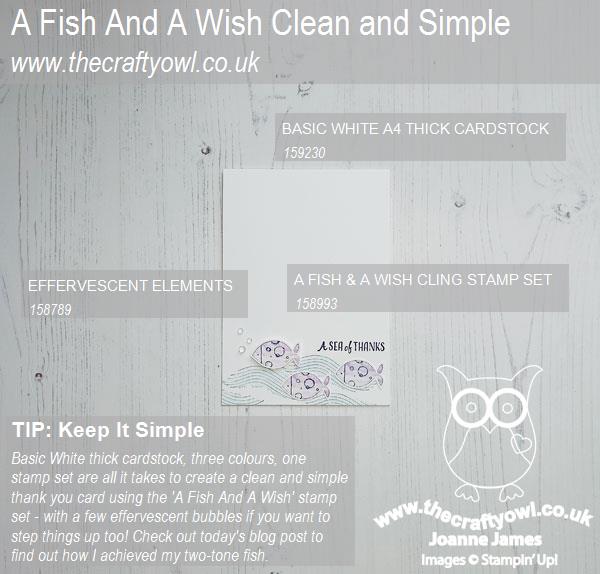
Here is the visual summary of the key products used on today's project for you to pin for easy reference:
You can see all of my 'How To' summaries on my 'How To - Tips and Techniques' Pinterest board in case you've missed any.
As a reminder, for our colour challenges, you must use all of the stated challenge colours. You may also use neutral colours; however, the challenge colours should be the most noticeable ones featured on your card. We use Stampin' Up! color names for reference, but you are welcome to use any other companies' products as long as you match the challenge colours as closely as possible.
A super-quick post from me today - I am a busy, busy bee! Enjoy your day and I'll be back tomorrow with another project. Until then, happy stampin'!
Stampin' Up! Supplies Used:
by Joanne James26. July 2022 12:00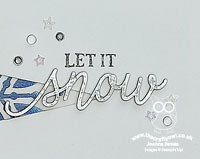
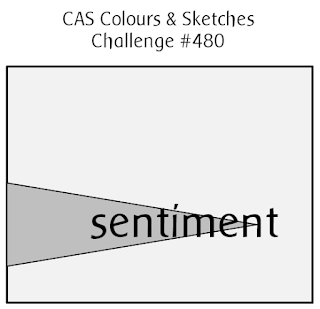
It's Tuesday and time for a new challenge over at CAS Colours & Sketches. This week's challenge is a sketch challenge and Patricia has asked that we incorporate an angled element overlaid with a sentiment. Feel free to flip or rotate the sketch when making your card.
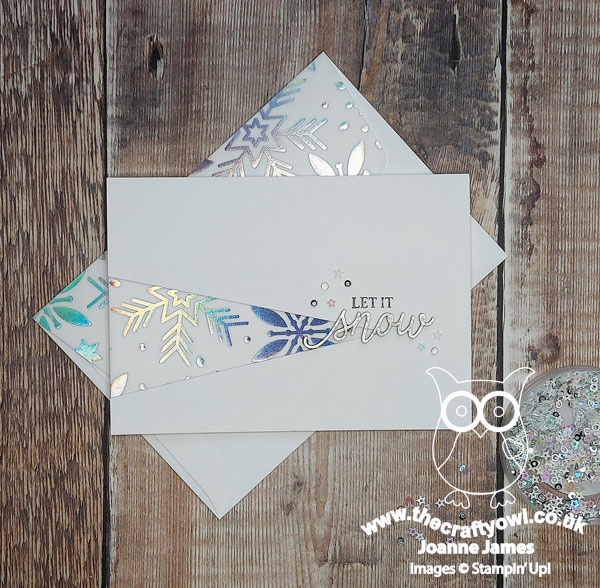
This is an interesting sketch with so many possibilities for that angled section. For my card today I decided to use it to highlight some new speciality paper and create a clean and simple Christmas card - take a look:
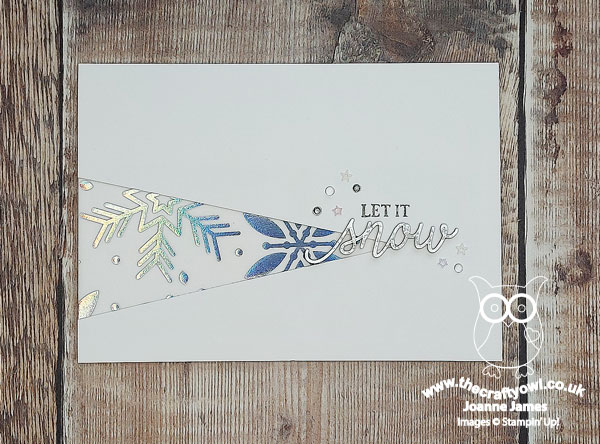
Here's the low-down on today's card:
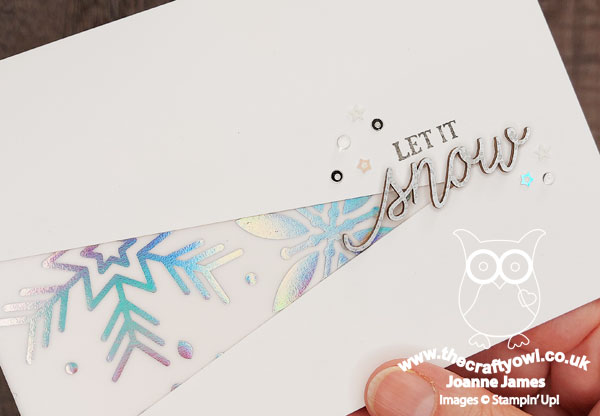
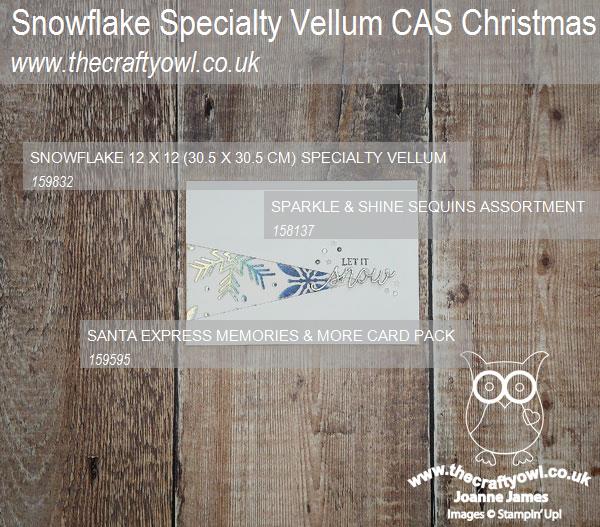
Snowflake Vellum - I cut a strip of one of the patterns of the new Snowflake Speciality Vellum and tucked it behind the triangle 'v' shape that I cut out of my top white card layer. The vellums in this pack are gorgeous - a variety of snow patterns, some of which are fuzzy white velvet and some of which are silver holographic foil, one of which I used here. They are so pretty - difficult to photograph, but so shiny in real life! I used the remainder of the vellum strip to decorate the flap of my envelope - you can see that on the photo at the bottom of the post.
A Hidden Gem - I love a good word diecut and was disappointed to not find any new ones in the new seasonal catalogue. But wait - there is a hidden gem! In the Santa Express Memories and More card pack, there are two - yes two! - sheets of wooden diecut sentiments - score! These are great for adding dimension and detail to all kinds of projects. They are naturally the colour of whitewashed wood, but I coloured mine silver with a retired silver encore ink pad before adding to my card:
The Santa Express Memories and More pack has some great cards for both both memory keeping and card making, but I have to say I think the pack is worth it for the diecut sentiments alone - such a great way to create an impact!
Sparkle and Shine - I finished my card with a sprinkle of Sparkle and Shine Sequins to highlight my sentiment and bring out the sparkle of the vellum. Not too many - today is clean and simple day, after all!
Here is the visual summary of the key products used on today's project for you to pin for easy reference:
You can see all of my 'How To' summaries on my 'How To - Tips and Techniques' Pinterest board in case you've missed any.
Enjoy your day and I'll be back tomorrow with another project. Until then, happy stampin'!
Stampin' Up! Supplies Used:
4e260d35-691d-43e8-9ca6-1edecf645f2c|0|.0|96d5b379-7e1d-4dac-a6ba-1e50db561b04
Tags: Stampin' Up, Stampin' Up Card, Stampin' Up Card ideas, Stampin' Up Supplies, Shop online, Shop Stampin' Up online, Shop Stampin' Up! Online, CAS Colours and Sketches, Snowflake Specialty Vellum, Santa Express, Memories and More, Christmas
Cards | Memories and More | Shop Online | Shop Stampin' Up! Online | Stamping
by Joanne James19. July 2022 12:00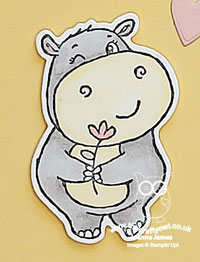
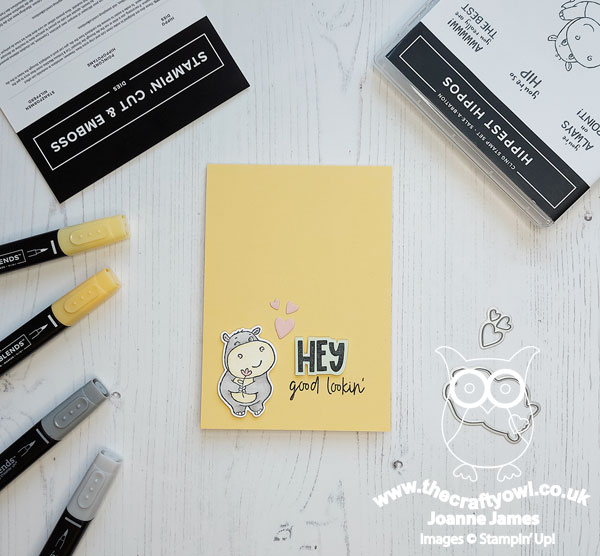
It's Tuesday and time for a new challenge over at CAS Colours & Sketches. Patricia is hosting this month and this week she has another colour challenge for us:
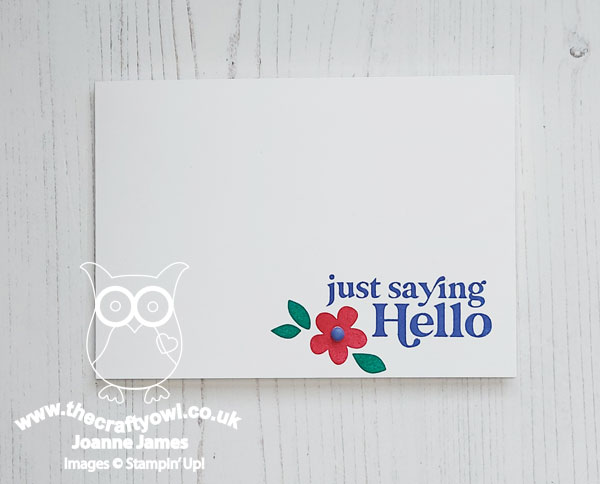
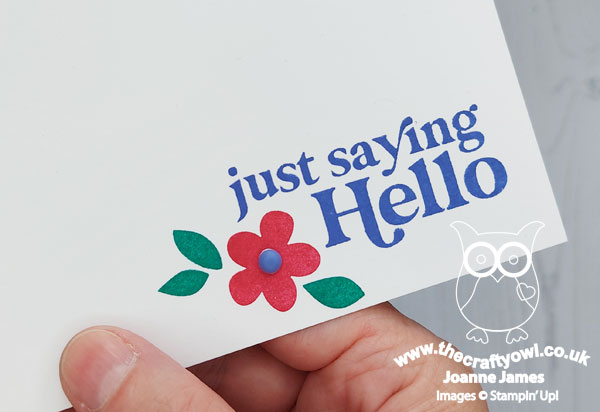
For my card today I couldn't resist another of those Hippest Hippos. This time I paired this little guy with a fun sentiment from another Sale-A-Bration stamp set that can be yours free with a £90 purchase called 'Amazing Phrasing' - take a look:
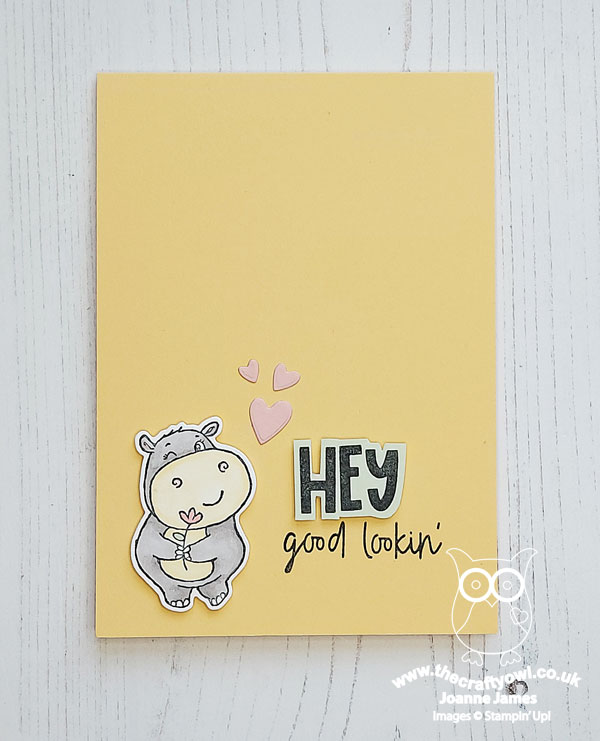
Here's the low-down on today's card:
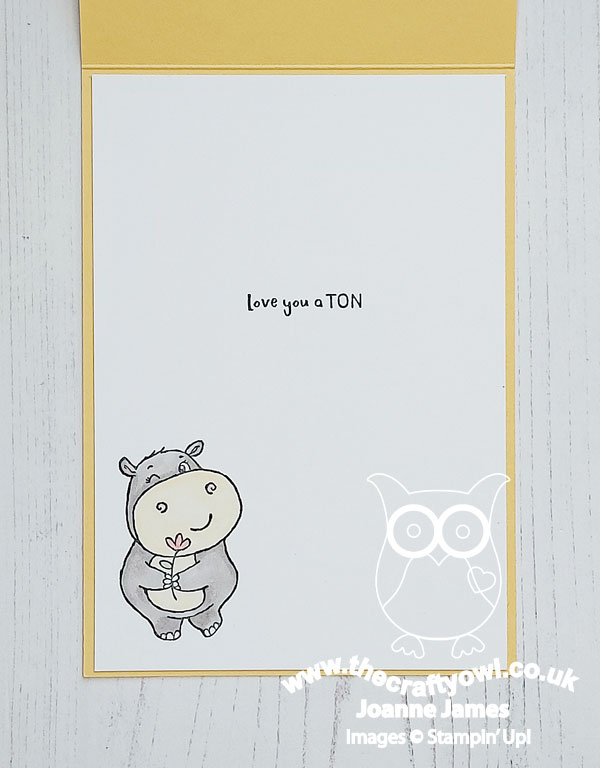
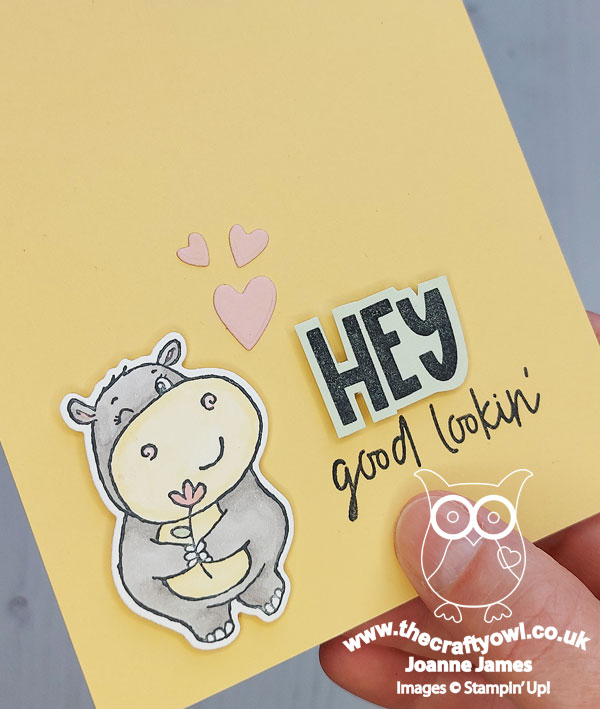
'Amazing Phrasing' is one of those useful stamp sets that you can use to create lots of different sentiment combinations. I thought this hippo looked like he was definitely sweet on someone, so I chose this sentiment and paired it with one on the inside from the 'Hippest Hippos' set:
I went back to a grey hippo today, so with my So Saffron cardbase had to really look at ways to incorporate a little more of the other two colours. In addition to the flower he's holding, I added some pink diecut hearts and stamped part of my sentiment onto Soft Sea Foam and fussy cut it to add in a little more green too:
And that's all there is to it - another clean and simple hip hippo!
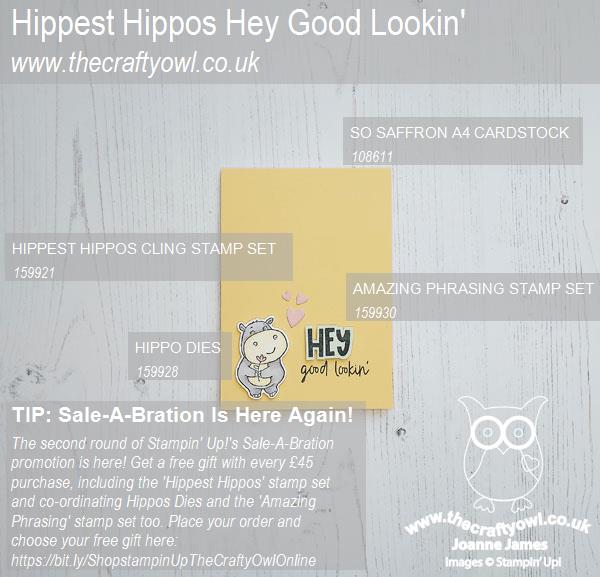
Here is the visual summary of the key products used on today's project for you to pin for easy reference:
You can see all of my 'How To' summaries on my 'How To - Tips and Techniques' Pinterest board in case you've missed any.
As a reminder, for our colour challenges, you must use all of the stated challenge colours. You may also use neutral colours; however, the challenge colours should be the most noticeable ones featured on your card. We use Stampin' Up! color names for reference, but you are welcome to use any other companies' products as long as you match the challenge colours as closely as possible.
Enjoy your day; I got up and crafted early this morning, as my craft room will be like a sauna from mid-morning in this heatwave we are experiencing here in the UK. No complaints here though - I shall be taking it easy and catching up on a good book beneath a fan, probably whilst lying on the stone tiles to keep cool! The weather is supposed to break tomorrow so the temperatures should be easing off a little. Stay safe and enjoy your day wherever you are and I'll be back tomorrow with another hippo project for you. Until then, happy stampin'!
Stampin' Up! Supplies Used:
6d82936d-9716-4bad-baeb-4d0bd78fd916|0|.0|96d5b379-7e1d-4dac-a6ba-1e50db561b04
Tags: Stampin' Up, Stampin' Up Card, Stampin' Up Card ideas, Stampin' Up Supplies, Shop online, Shop Stampin' Up online, Shop Stampin' Up! Online, CAS Colours and Sketches, Hippest Hippos, Hippo Dies, Amazing Phrasing, Sale-A-Bration 2022
Cards | Shop Online | Shop Stampin' Up! Online | Stamping
by Joanne James12. July 2022 12:00
It's Tuesday and time for a new challenge over at CAS Colours & Sketches. This week's challenge is a sketch challenge and Patricia has asked us to create something with the layout below. Feel free to flip or rotate the sketch when making your card.
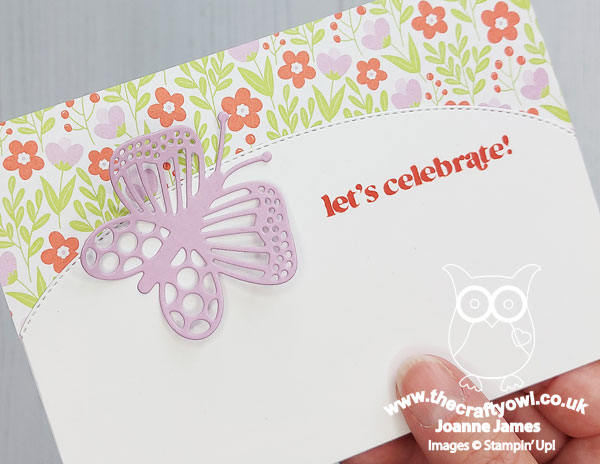
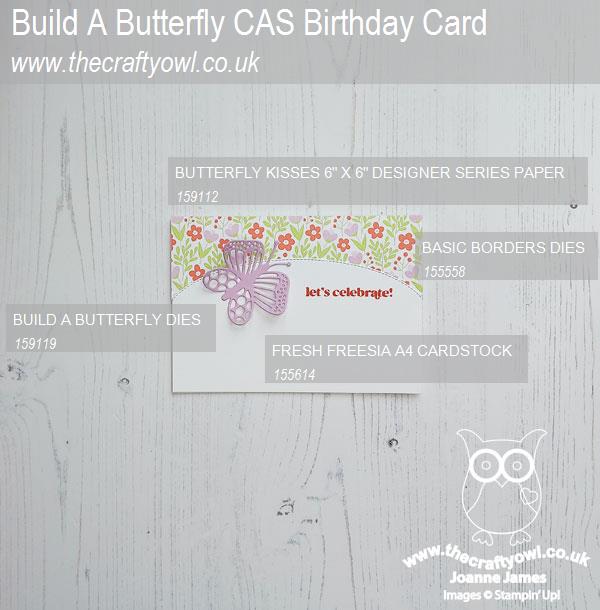
For my card today I decided to go for a clean and simple birthday card with a pop of bright colour courtesy of the Butterfly Kisses designer paper - take a look:
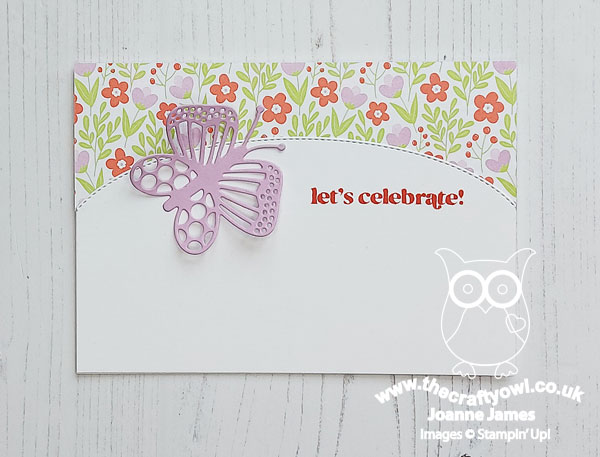
Here's the low-down on today's card:
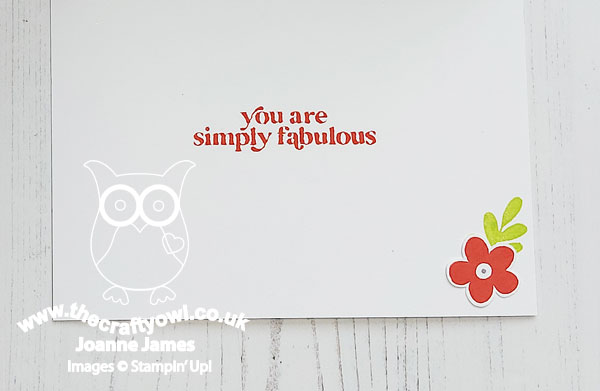
I added a piece of Butterfly Kisses designer paper to my card base, then overlaid the front section with a piece of Basic White cardstock that I cut with one of my Basic Borders Dies to give it the curve of the sketch. To this I added a butterfly cut with one of the Build A Butterfly Dies and a sentiment from the 'Simply Fabulous' stamp set. I did add my sentiment to the lower portion of my card rather than where it was suggested on the sketch as I wanted it to stand out better and not get lost in the pattern of the paper. I also added a greeting and small decoration from the same stamp set to the inside of my card:
I chose two of the colours that feature in the paper for my sentiment and butterfly respectively to give the whole thing a sense of cohesiveness. One of those cards that is simple and yet so effective I think:
A great sketch too with loads of creative possibilities. Looking forward to see what's in the gallery this week!
Here is the visual summary of the key products used on today's project for you to pin for easy reference:
You can see all of my 'How To' summaries on my 'How To - Tips and Techniques' Pinterest board in case you've missed any.
Enjoy your day and I'll be back tomorrow with another project. Until then, happy stampin'!
Stampin' Up! Supplies Used:

47f9cc5d-f101-41de-933b-cf1fc548dd9e|0|.0|96d5b379-7e1d-4dac-a6ba-1e50db561b04
Tags: Stampin' Up, Stampin' Up Card, Stampin' Up Card ideas, Stampin' Up Supplies, Shop online, Shop Stampin' Up online, Shop Stampin' Up! Online, CAS Colours and Sketches, Build A Butterfly, Butterflies, Butterfly Kisses, Basic Borders Dies, Simply Fabulous
Cards | Shop Online | Shop Stampin' Up! Online | Stamping
by Joanne James5. July 2022 12:00
It's Tuesday and time for a new challenge over at CAS Colours & Sketches. It's July and Patricia is hosting this month and our first challenge is a colour challenge:
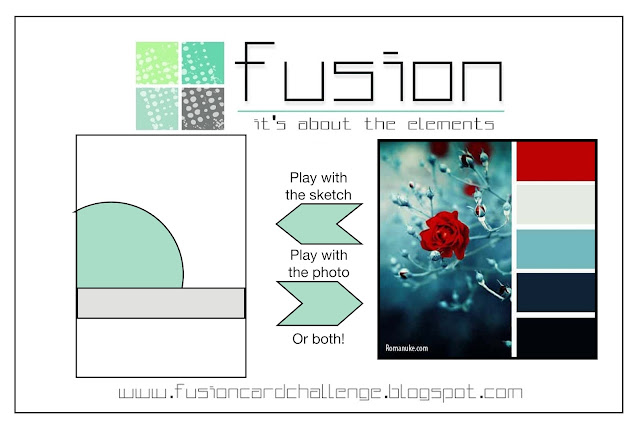
For my card today I combined the colours with the sketch and photo inspiration over at Fusion (using metallic gold instead of the icy blue tones in the photo) and decided to create a congratulations card using the 'Happiness Abounds' bundle - take a look:
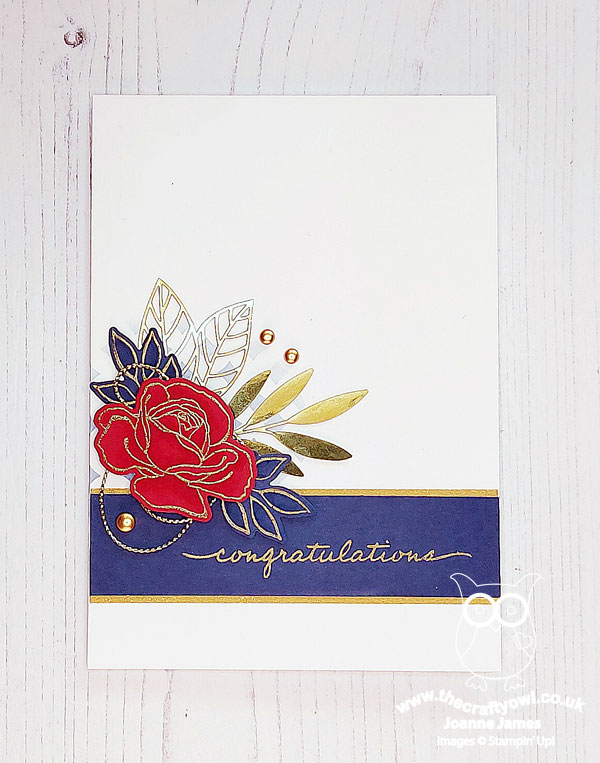
Here's the low-down on today's card:
I decided to heat emboss my rose and some leaves from the 'Happiness Abounds' stamp set in gold onto solid colour cardstock and cut them out with the Blossoming Happiness Dies. I considered using a Navy cardbase, but eventually went with white, adding some subtle ink blending using a retired stencil and a blending brush to add a hint of extra colour to my base behind my floral cluster. I added my sentiment to a banner backed with some (retired) gold vellum and added a number of metallic gold elements (some retired gold foil diecuts, gold twine and some of the lovely gold brushed metallic dots) to give an added feel of luxury and elegance to my clean and simple card. I also added some depth to my flower and coloured leaves using my Stampin' Blends on these elements - you can see that better on the photo below:
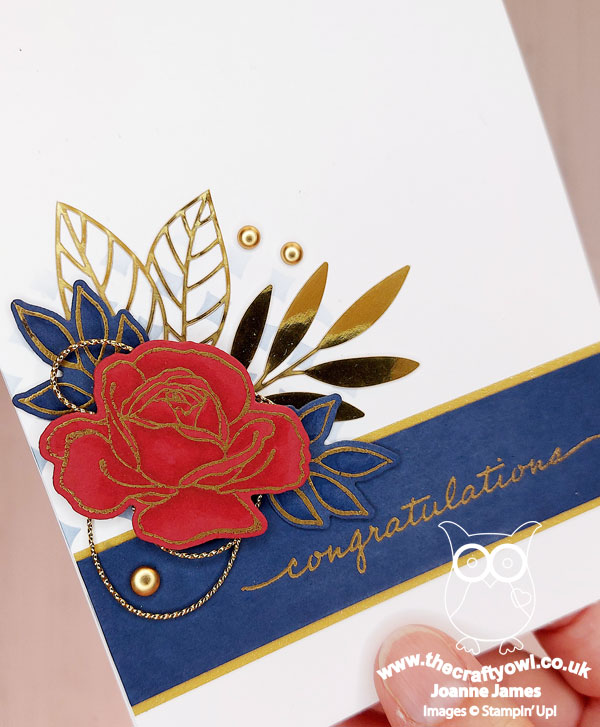
If you look closely at the 'spare' roses that are on the picture at the bottom of today's post, you will see that one of the roses has been left plain and the other has been shaded with Blends - this is a good way to see the difference that adding the shading makes; I think it's worth the extra effort. Apologies if the colours on today's photos are a little off - the sun was so bright when I took them, I struggled to balance the brightness. I did also use Cherry Cobbler as opposed to Merry Merlot (more by accident that design to be fair, but that also gives my rose a brighter shade of red).
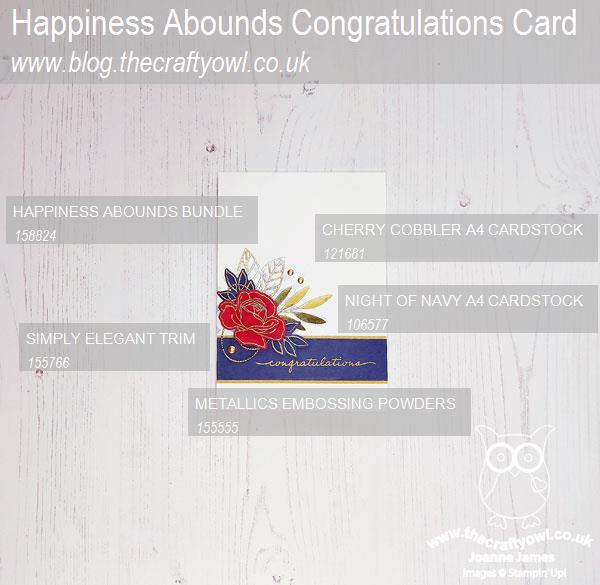
Here is the visual summary of the key products used on today's project for you to pin for easy reference:
You can see all of my 'How To' summaries on my 'How To - Tips and Techniques' Pinterest board in case you've missed any.
I struggled with today's card - but I love the
As a reminder, for our colour challenges, you must use all of the stated challenge colours. You may also use neutral colours; however, the challenge colours should be the most noticeable ones featured on your card. We use Stampin' Up! colour names for reference, but you are welcome to use any other companies' products as long as you match the challenge colours as closely as possible. "Metallic Gold" can have either a shiny or a brushed finish, but we do want to be able to see that it's gold and not plain yellow.
Enjoy your day and I'll be back tomorrow with another project. Until then, happy stampin'!
Stampin' Up! Supplies Used:

by Joanne James21. June 2022 12:00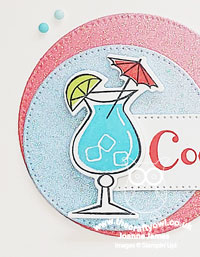
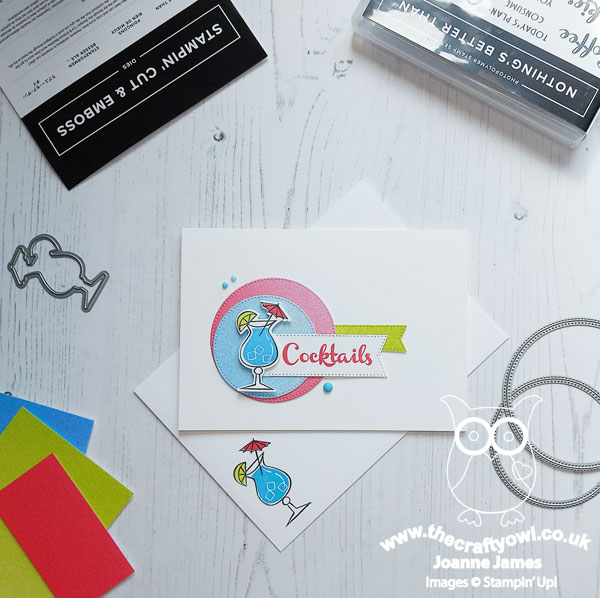
It's Tuesday and time for a new challenge over at CAS Colours & Sketches. Samantha is hosting this month and this week we have a colour challenge featuring three of the five new 2022-24 Stampin' Up! in colours:
For my card today I made a colourful cocktail card using the 'Nothing's Better Than' stamp set - take a look:

Here's the low-down on today's card:
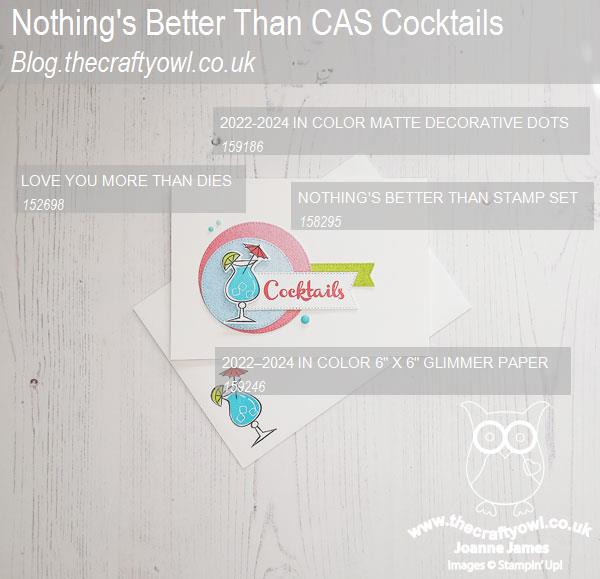
Nothing's Better Than - I've used the 'Nothing's Better Than' for a colourful cocktail card previously (you can see that card here if you missed it) but this one is an altogether more clean and simple affair.
Glimmer Shapes - I backed my stamped and die cut cocktail glass with a combination of in-colour glimmer stitched circles and backed the sentiment banner with another one in the third challenge colour - so much sparkle, yet concentrating it in a small area enables the clean and simple feel to be maintained:
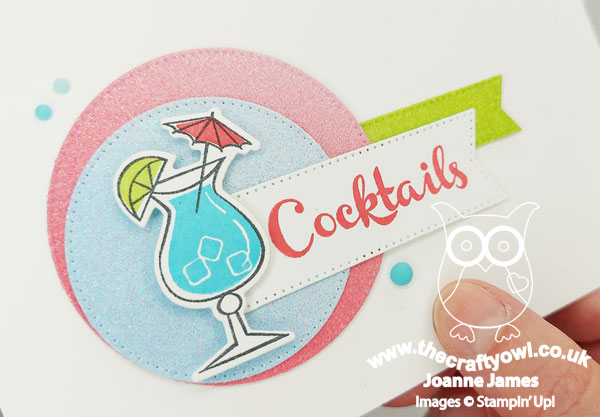
I also added a trio of Tahitian Tide enamel dots to continue the circle theme.
Inside And Out - Another cocktail inside my card and a second one on the envelope completes my card - no naked envelopes or insides here!

Here is the visual summary of the key products used on today's project for you to pin for easy reference:
You can see all of my 'How To' summaries on my 'How To - Tips and Techniques' Pinterest board in case you've missed any.
As a reminder, for our colour challenges, you must use all of the stated challenge colours. You may also use neutral colours; however, the challenge colours should be the most noticeable ones featured on your card. We use Stampin' Up! color names for reference, but you are welcome to use any other companies' products as long as you match the challenge colours as closely as possible.
Enjoy your day and I'll be back tomorrow with another project. Until then, happy stampin'!
Stampin' Up! Supplies Used:
43d39c19-1575-4d5c-b02c-b0bb78b58a86|0|.0|96d5b379-7e1d-4dac-a6ba-1e50db561b04
Tags: Stampin' Up, Stampin' Up Card, Stampin' Up Card ideas, Stampin' Up Supplies, Shop online, Shop Stampin' Up online, Shop Stampin' Up! Online, CAS Colours and Sketches, Love You More Than, Nothings Better Than, Stylish Shapes Dies
Cards | Shop Online | Shop Stampin' Up! Online | Stamping
by Joanne James14. June 2022 12:00
It's Tuesday and time for a new challenge over at CAS Colours & Sketches. This week's challenge is a sketch challenge and Samantha has asked that we frame a sentiment as the focal point and decorate with two additional elements. Feel free to flip or rotate the sketch when making your card.

For my card today I also took my inspiration from the deep blue of the sofas in the Time Out inspiration photo, along with the touches of gold and collections of things in twos - take a look:
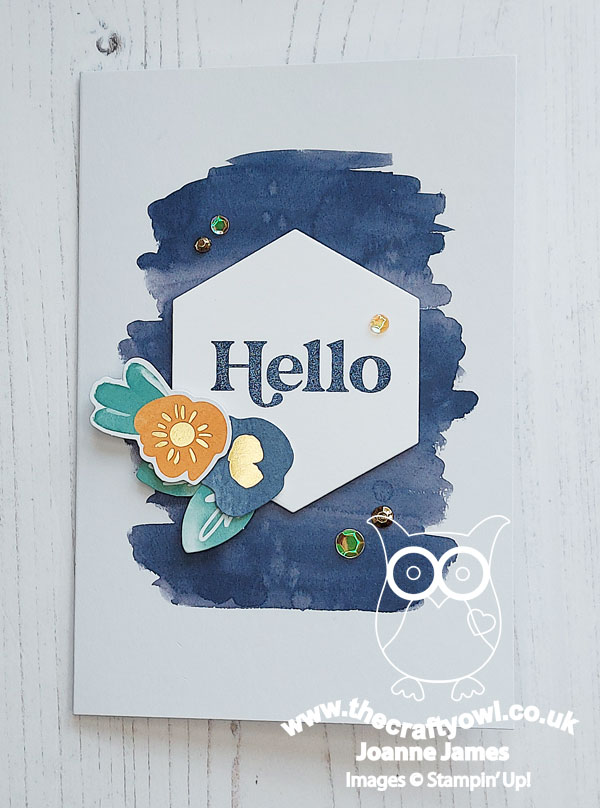
Here's the low-down on today's card:
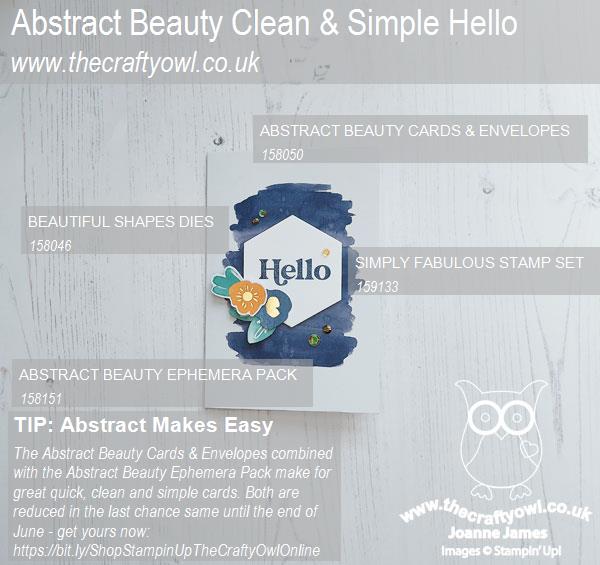
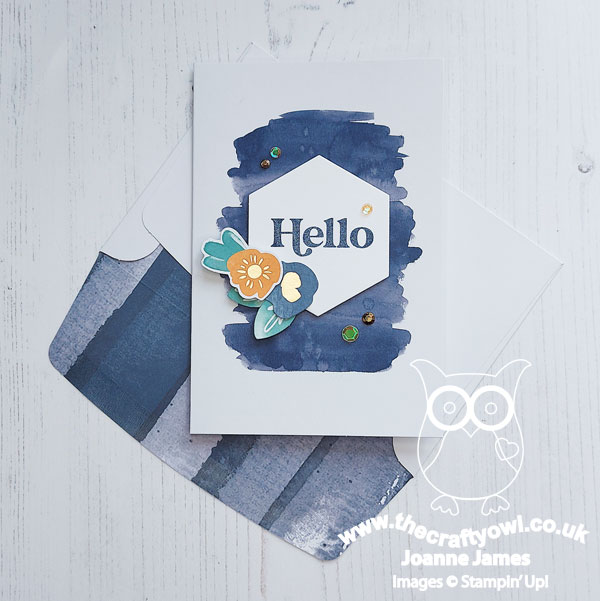
For today's card I reached for my Abstract Beauty Cards and the co-ordinating Abstract Beauty Ephemera pack - these are so great for quick cards and I knew I had everything there that I needed. My card base is pre-printed with a Night of Navy watercolour-effect background (and the envelope co-ordinates too - see the photo at the bottom of the post!) I cut a hexagon shape using my Beautiful Shapes Dies and partially inked one of the stamps in the new 'Simply Fabulous' stamp set so that I could isolate and stamp the word 'hello'. I popped this up on dimensionals, decorated with a couple of the flowers and leaves from the ephemera pack and added some (retired) gold gilded gems and Pumpkin Pie sequins from my stash to complete my card:
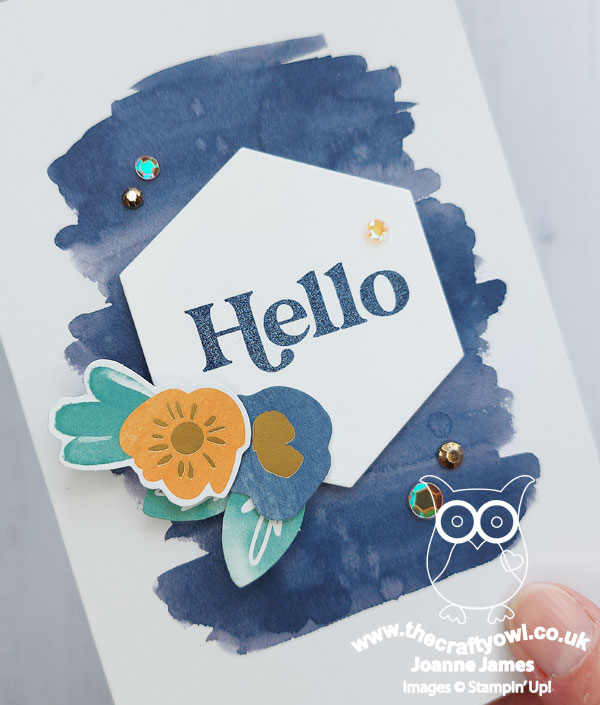
Quick and easy! Sometimes this kind of card making feels a little like cheating, when it all comes together so smoothly - but these kinds of cards are great when you are pressed for time and still allow for creativity, so no complaints from me! The Abstract Beauty Cards and Envelopes and the Ephemera Pack are currently on sale, reduced by 50% and 30% respectively until the end of the month when they retire - double bargain! The perfect time to stock up - just click on the links at the bottom of the post to go straight to the online store.
Here is the visual summary of the key products used on today's project for you to pin for easy reference:
You can see all of my 'How To' summaries on my 'How To - Tips and Techniques' Pinterest board in case you've missed any.
Enjoy your day; mine will be a busy one, with a considerable amount of baking going on in readiness for tomorrow's birthday celebrations - we are treating the whole of Sixth Form at school! I'll be back tomorrow with another project. Until then, happy stampin'!
Stampin' Up! Supplies Used:
930ec0d2-9e6d-4bf6-b26b-6761518d5531|0|.0|96d5b379-7e1d-4dac-a6ba-1e50db561b04
Tags: Stampin' Up, Stampin' Up Card, Stampin' Up Card ideas, Stampin' Up Supplies, Shop online, Shop Stampin' Up online, Shop Stampin' Up! Online, CAS Colours and Sketches, Abstract Beauty, Beautiful Shapes Dies, Simply Fabulous
Cards | Shop Online | Shop Stampin' Up! Online | Stamping
by Joanne James7. June 2022 12:00
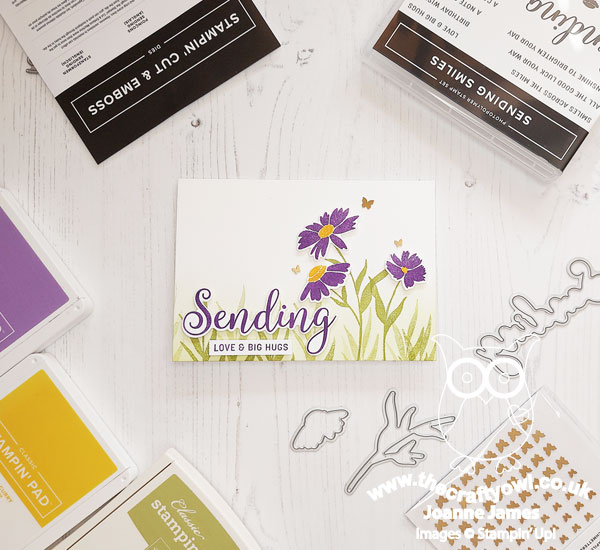
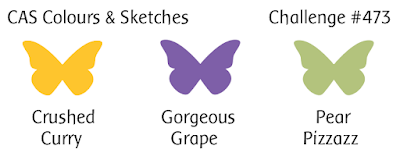
It's Tuesday and time for a new challenge over at CAS Colours & Sketches. We are into June so it's all change! Samantha is hosting this month and our first challenge is a colour challenge:
This trio of colours are perfect for florals so for my card today I pulled out one of my new favourites, the 'Sending Smiles' bundle, for a clean and simple card - take a look:

Here's the low-down on today's card:
I stamped my stems and leaves directly onto my card base, and blended some additional Pear Pizzazz ink along the bottom edge of my card base, then stamped my flower heads and sentiments onto a separate piece of white cardstock and diecut them with the Sending Dies in order that they would stand out from the background. A trio of brass butterflies complete the front of my card:
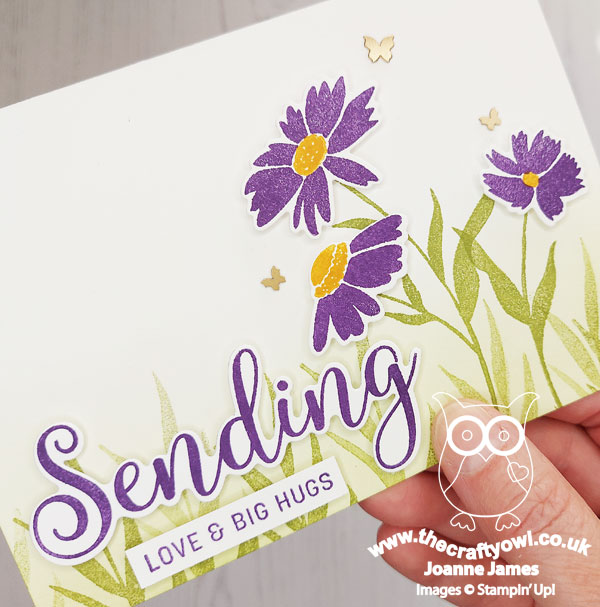
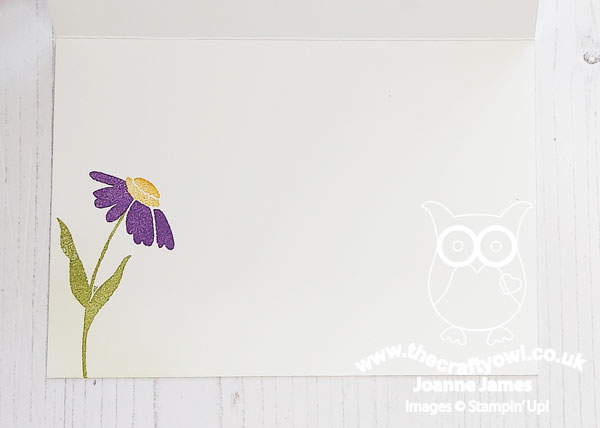
I also added a little extra stamping to the inside of my card - no naked insides here:
The 'Sending Smiles' stamp set is great for clean and simple cards and has a great variety of sentiment combinations too. Combined with this colour combination, this purple-lover couldn't be happier!
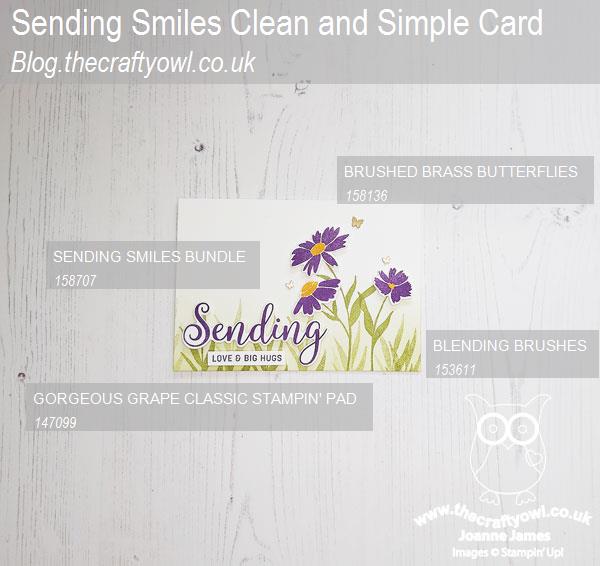
Here is the visual summary of the key products used on today's project for you to pin for easy reference:
You can see all of my 'How To' summaries on my 'How To - Tips and Techniques' Pinterest board in case you've missed any.
As a reminder, for our colour challenges, you must use all of the stated challenge colours. You may also use neutral colours; however, the challenge colours should be the most noticeable ones featured on your card. We use Stampin' Up! color names for reference, but you are welcome to use any other companies' products as long as you match the challenge colours as closely as possible.
Enjoy your day and I'll be back tomorrow with another project. Until then, happy stampin'!
Stampin' Up! Supplies Used: