by Joanne James29. December 2013 13:00As you will have guessed if you read yesterday's post and saw my 'sneak peek', today's post features butterflies - quite a few, in fact! Ever since I saw this piece of wall art by Fiona Duthie on Pinterest I've wanted to have a go at creating a version of my own. Butterflies have a special meaning to one of my best and most dear friends and she is also someone who loves home décor, so I decided to create this piece as a Christmas gift for her. Here's my finished piece:
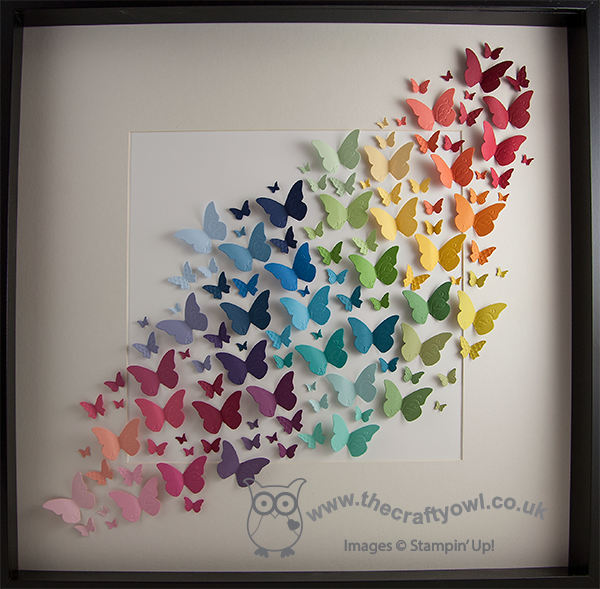
The finished piece measures 50cm x 50cm (approx. 20") so is a definite statement piece. I used a variety of colours across each of the Stampin' Up! colour families, including in-colours, along with one or two retired colours too. I wanted to give a full rainbow spectrum of colours, particularly given the size of the piece.
For the butterflies, I used the Beautiful Wings Embosslits to make the butterflies as opposed to a punch, as I wanted the texture that the embosslit provides - here's a closer look:
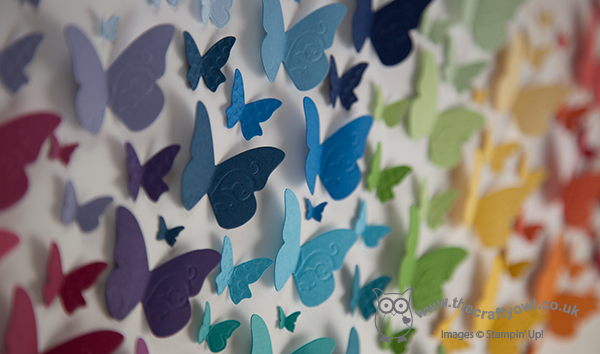
You could quite easily create a similar piece using one of the butterfly punches and it would be equally effective. I'm so pleased with the finished piece - it was quite tricky to photograph, but I hope you can get a sense of the movement it gives - it is so colourful and dramatic.
This is a nice early post from me today as I'm out with friends this evening on a cookery course, in an attempt to master the art of Indian cookery; it's the second one that hubby and I have attended (I'd like to say it's because we want to expand our repertoire, but it might just be that we need the practice - I'll have to get back to you on that!)
Back tomorrow with another project; until then, happy stampin'!
Stampin' Up! Supplies Used:
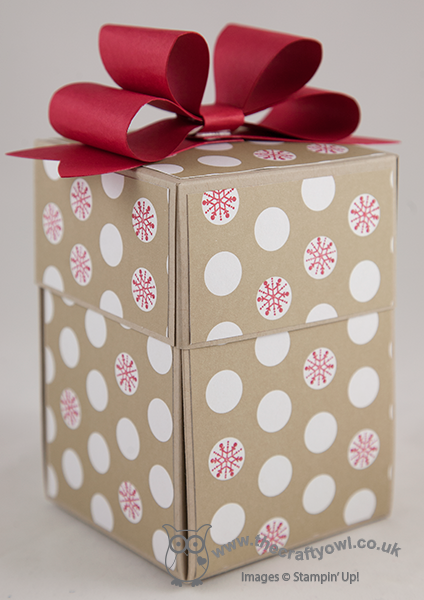
by Joanne James26. December 2013 20:29Today I'm going to share another of my Christmas projects, this time a fun packaging solution for a cute chocolate snowman that I bought at my local supermarket. From the outside, it looked like a fairly straightforward nicely packaged box, complete with bow:
It's when the box is opened that the 'reveal' happens - the snowman is sitting in the middle with the inside of the box decorated with four co-ordinating stamped 'snow day' snowmen:

I love the snowman stamp set in the 'Snow Day' set and as soon as I saw the chocolate snowman I knew the two belonged together. The box base uses one 12" x 12" sheet of Crumb Cake cardstock and is a great way to turn a simple chocolate gift into something extra-special.
Today is going to be an early night for me I think; after all the food and excesses of the last few days and a lovely long walk in the fresh air this afternoon, I am absolutely shattered! Back tomorrow with another project; until then, happy stampin'!
Stampin' Up! Supplies Used:
e255bd13-0bdf-4533-8c21-96bf506938a9|0|.0|96d5b379-7e1d-4dac-a6ba-1e50db561b04
Tags: 3D Projects, boxes, Christmas, Big Shot, Gift Bow Bigz L Die, Snow Day, Shop online, Stampin' Up, Stampin' Up Supplies, Exploding Box, Season of Style
3D Projects | Boxes | Stamping
by Joanne James11. December 2013 20:39Evening all! I've been busy in the kitchen today icing biscuits that I baked yesterday in readiness for end-of term teacher gifts later in the week. More to do tomorrow and I will endeavour to share some pictures later in the week, but for today something fun! A little while ago I entered a competition to create a video advertising a Stampin' Up! event or product. The winners were announced at this year's European Convention and whilst I didn't win, today I thought I would share with you my entry as it features - yes, you've guessed it - the Stampin' Up! Gift Bow Bigz Die!
This really is a great product, as there is so much you can do with it, including, but in no way exclusively, make the most beautiful bows. In addition, as with all Stampin' Up! dies, it will cut cut not only cardstock, but other materials too: cork, coaster board, fabric, felt and lots more. The inspiration for my video came from Bryony the elf, who features in one of my favourite Christmas movies, 'Arthur Christmas'. She is an ace gift wrapper whose catchphrase is "there's always time for a bow!". Here she is doing her thing:
And here I am, doing mine:
Did you spot the 'make' that I haven't shared with you separately? It really is so easy to use the Gift Bow Bigz Die to make so many different projects. I still have more I would like to share with you; I just need more hours in my day to make them all!
I hope you enjoyed today's fun video - back next time with more creative inspiration. Until then, happy stampin'!
Stampin' Up! Supplies Used:
by Joanne James9. December 2013 21:00So today is the start of the last week of school for the James' juniors, so there are lots of daily activities with Christmas in mind. I've just returned from watching my youngest in his Christmas school production, having given a stellar performance as the 'Bethlehem Census Man' (imagine town crier!) and delivered his one line with true dramatic style: "Hear ye, hear ye - census in Bethlehem! Your country needs you !" There's nothing like a Christmas production to make you feel like the festive season is upon us.
And so to today's creation with the Gift Bow Bigz Die: hot on the heels of yesterday's gift bow angel, a Christmas pudding tree ornament! Now, for my non-UK readers, you may not know that Christmas or plum puddings are a peculiarly British fayre, traditionally eaten after Christmas lunch on Christmas Day. They are eaten with either white sauce or brandy butter and are something of an acquired taste, or so my American friends told me after I sent them one for Christmas one year! So without further ado, here's a picture of the finished pudding:
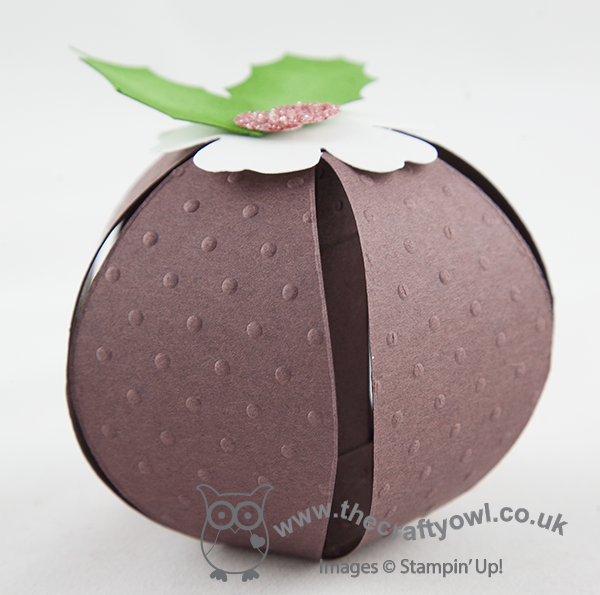
I made a few of these a while ago (tomorrow's post will explain all!) and I think they make another cute ornament for Christmas time. You could just follow the instructions to make a plain sphere out of patterned paper, but I decided mine needed dressing up, hence the Christmas pudding. I made a video showing you how easy they are to create using the Gift Bow Bigz Die from Stampin' Up!; the video also shares a handy technique for colouring your glimmer paper to match your product - did you know you can colour Stampin' Up!'s Glimmer Paper using your Stampin' Write markers? If not, watch the video to find out how:
I hope you like today's project - back tomorrow with something a little different, but still bow-related!
Until then, happy stampin'!
Stampin' Up! Supplies Used:
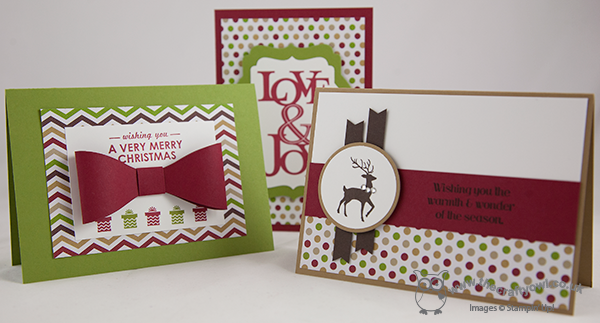
by Joanne James6. December 2013 22:23Another busy day today so a late post - I'm still putting the final touches to a couple of video tutorials that I've prepared to go with my next couple of posts, so meanwhile I'm going to share with you three of the Christmas cards that we made at this month's card class. Each one features the Season of Style paper and a variety of different stamps. So here is the first one:
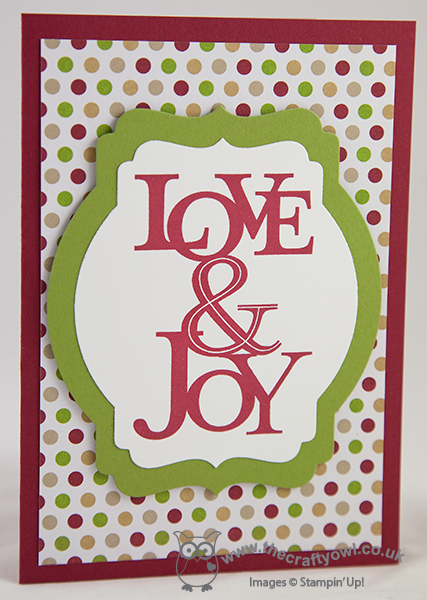
This card uses the 'Love and Joy' single stamp on a set of layered pieces cut with the Deco Labels framelits. This was our second card:
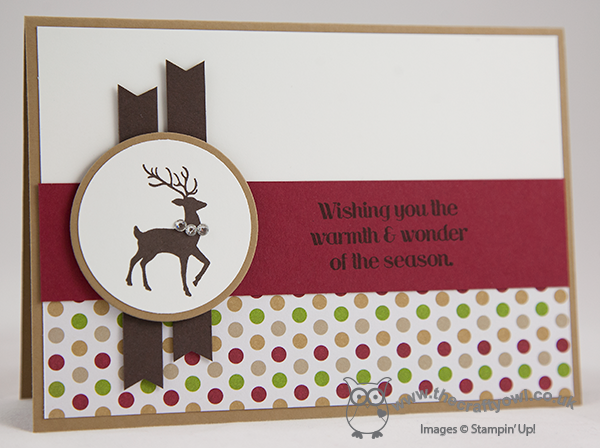
This card uses the 'Warmth and Wonder' hostess set and is a CASE of a card I fell in love with by Mary Fish, who created a similar card using the Winter Frost colour scheme; you can see her original card here. Here is the third card that we made:
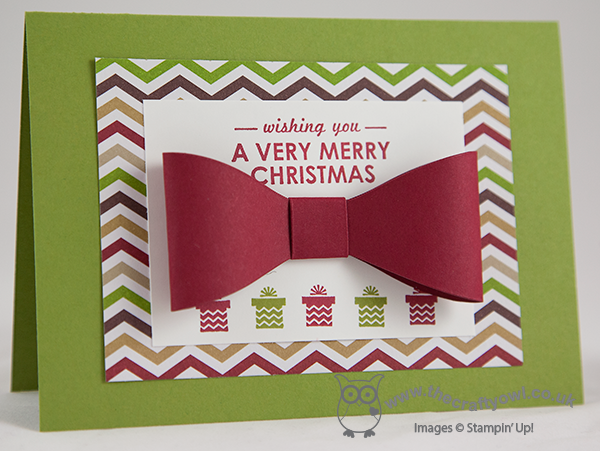
This uses a similar layout to one of the cards featured in the seasonal catalogue that showcases the 'Wishing You' stamp set, but I incorporated a small bow made with the Gift Bow Bigz Die for added impact. The last card was the Midnight Muse circle thinlit card I made a while ago featuring a bauble and two ways to make labels using the mosaic punch; the ladies in my class loved this card when they first saw it and were keen to have a go at it themselves. If you missed this card and would like to see it, you can find it here.
I also made alternative non-Christmas cards that followed each of the above design layouts, as I had a customer who didn't want to make Christmas cards (far too organised!); I'll share these cards with you next week.
I hope you liked the above cards, especially the last one - I love my Gift Bow Die and I have some great projects to share with you over the next few days using this useful product. Until next time, happy stampin'!
Stampin' Up! Supplies Used:
8aee8ace-2226-4541-ac31-54ddf6a189fe|0|.0|96d5b379-7e1d-4dac-a6ba-1e50db561b04
Tags: Christmas, circle punch, Circles Framelits, Big Shot, Warmth and Wonder, Love and Joy, Wishing You, Deco Labels Framelits, Gift Bow Bigz L Die, Shop online, Stampin' Up, Stampin' Up Card, Stampin' Up Card ideas, Stampin' Up Supplies, Season of Style
Cards | Classes | Stamping
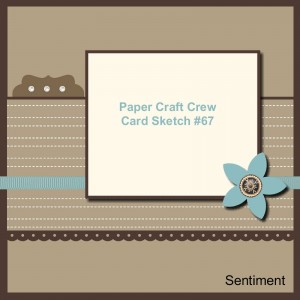
by Joanne James18. November 2013 20:08Today I'm sharing my entry for this week's Paper Craft Crew sketch challenge. Here is this week's challenge sketch:
I decided to use the nativity stamp from the Stapin' Up! 'Best of Christmas' stamp set. I haven't used this stamp before and think it's rather cute, however a few of my customers have avoided using this stamp as they see it as a children's stamp so I wanted to create a card using this stamp that had a more grown-up feel to it. This is what I came up with:
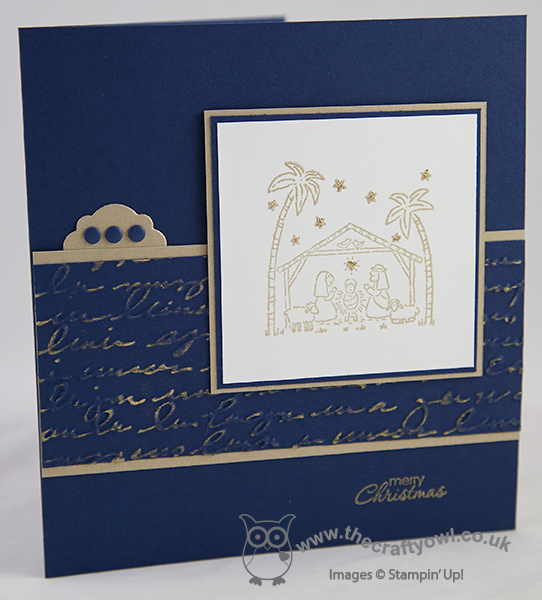
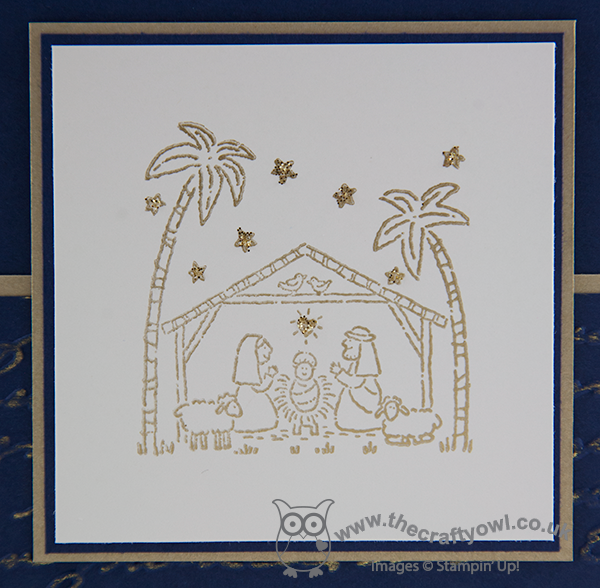
I used a Night of Navy card base, then stamped the image in gold metallic ink on Whisper White and matted it on squares of both navy and brushed gold. I highlighted the stars and heart with some gold glitter just to add a little extra sparkle, but otherwise left the image as stamped. Here's a close up of the stamped image so you can see the shimmer:
The layer beneath the image that runs across the card was made from a strip of navy cardstock embossed with the Print Poetry Embossing Folder with I then swiped the gold metallic ink pad across the surface to add some shine and pick up the detail of the embossed script. This was border was also matted with brushed gold cardstock and finally the sentiment was stamped in gold to finish. I used the narrow label from the Circle Card Thinlits set for the label piece and finished with three Night of Navy candy dots to tone in with the rest of my card.
Whilst this stamp will always look a child's drawing, I think this card shows that with the right colour combination and layout the boundaries can be stretched a little. Why don't you pop over to the Paper Craft Crew's challenge page and have a look at the design team inspiration there and see what the other challenge entrants have come up with.
Back tomorrow with a project and another video tutorial using the Envelope Punch Board; until then, happy stampin'!
Stampin' Up! Supplies Used:
f75c9073-ff84-4971-a39f-f6eaac50cae8|0|.0|96d5b379-7e1d-4dac-a6ba-1e50db561b04
Tags: Best of Christmas, Big Shot, Christmas, Circle Thinlit Card, Candy Dots, Petite Pairs, Pretty Print TIEF, Shop online, Stampin' Up, Stampin' Up Card, Stampin' Up Card ideas, Stampin' Up Supplies
Cards | Stamping
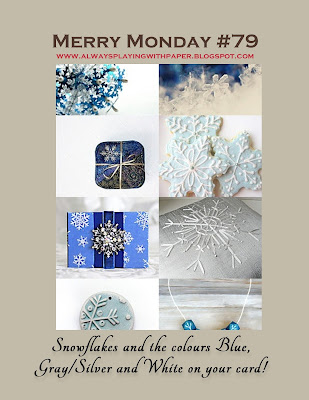
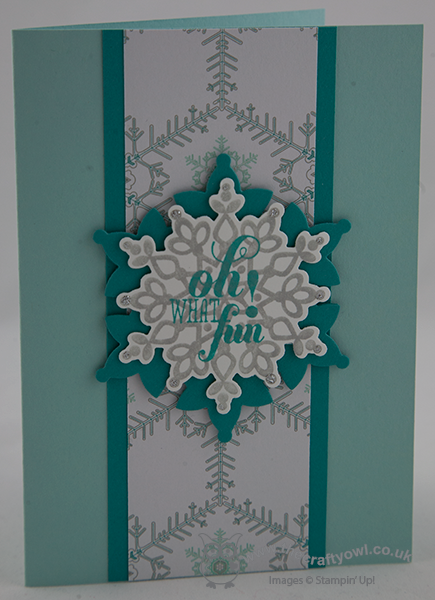
by Joanne James18. October 2013 21:06I know, you're probably thinking 'Merry Monday? It's only Friday!' I'm not wishing away my weekend, far from it. Rather today's card is another Christmas card made with the challenge over at Always Playing with Paper in mind. The challenge was to use blues, grey/silver and white and snowflakes:
I've been wanting to use a sketch layout I saw over at the Paper Pal Arts site a little while ago; here's the card I made:
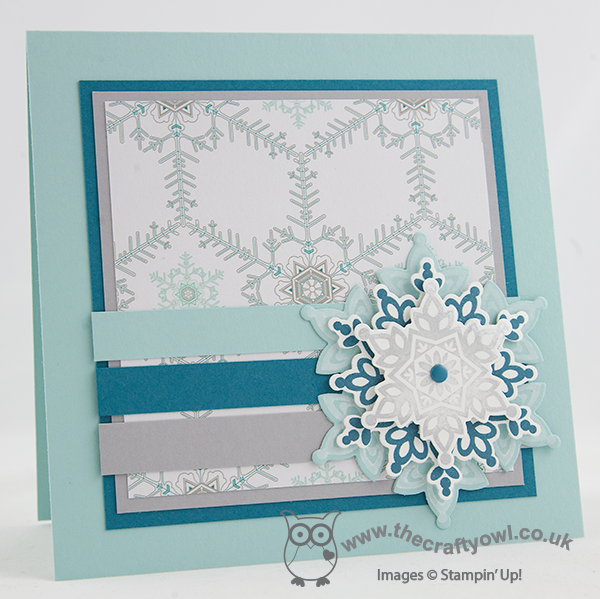
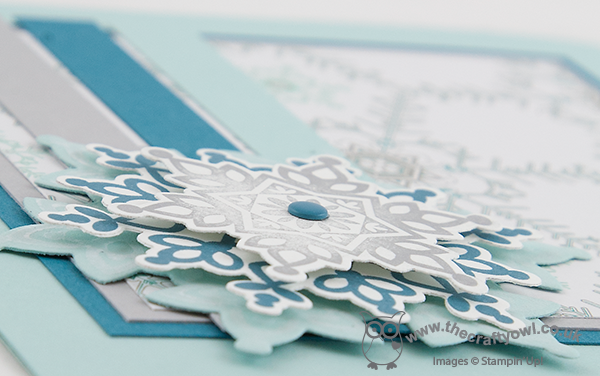
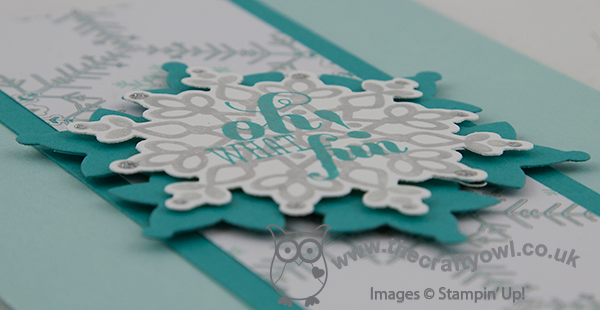
I used Pool Party for the base of my card and layered with Island Indigo and Smoky Slate and some of the Winter Frost DSP for the top layer. My design is anchored with a lovely Festive Flurry layered snowflake , which is stamped Whisper White on Pool Party cardstock for the first layer, Island Indigo on Whisper White for the second layer and then Metallic Silver on Whisper White for the top layer, finished with a single Island Indigo candy dot - I love these! Here's a close up of the snowflake, with the shimmery metallic silver finish (that is very difficult to photograph!):
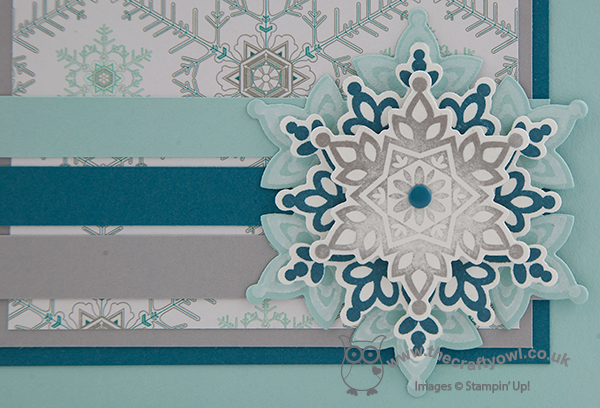
This photo shows the build of layers of the snowflake - this set is so good for this and the framelits make cutting out so easy:
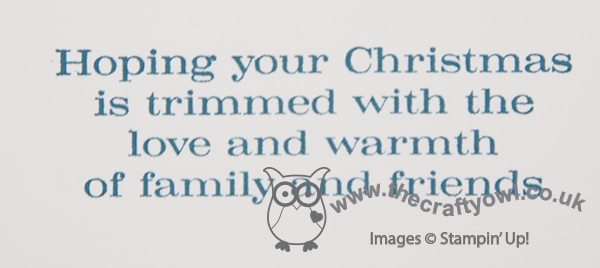
I finished the inside by stamping this verse from the Christmas Messages set:
As of today the James Juniors are on half term for two weeks. We have lots of homework to do, but I am relieved to be having a break from some of the challenges and routine of school life and looking forward to having fun with some pre-Christmas activities of our own. I'm also looking forward to another of my special project classes this weekend; I have a group of lovely ladies coming to make Christmas banners using the Build a Banner kit. Check out my Facebook page tomorrow if you would like a 'sneak peak'; otherwise I will be sharing the completed banners next week.
Back tomorrow with another project; until then, happy stampin'!
Stampin' Up Supplies Used:


ddeb249c-3846-4e93-a87f-ed70704c824d|0|.0|96d5b379-7e1d-4dac-a6ba-1e50db561b04
Tags: Christmas, Christmas Messages, Festive Flurry, Festive Flurry Framelits, Shop online, Stampin' Up, Stampin' Up Card, Stampin' Up Card ideas, Stampin' Up Supplies, Big Shot, Candy Dots
Cards | Stamping
by Joanne James14. October 2013 20:28Today I'm sharing another birthday card that I made last week, this time for my daughter to give to one of her school friends who celebrated his birthday yesterday. After much consultation, we decided that we would go with something fun. They've both seen the Dispicable Me movies, so I decided to have a go at creating my very own punch art minion. Here is the end result:
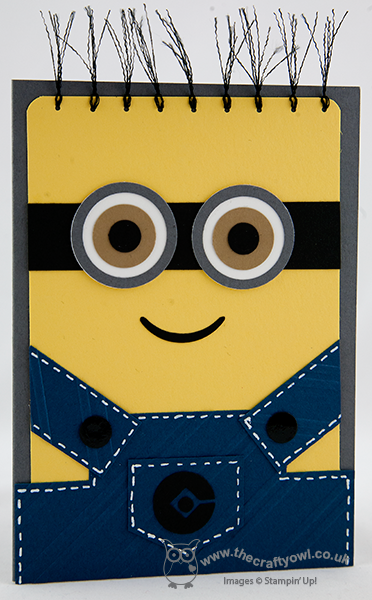
He was actually quite easy to make with the aid of a selection of circle punches and I'm very pleased with the result. I particularly like the striped embossing on his dungarees and the white stitching to add definition. The hair was made following a tip by Tanya Bell of StampingT.com.au by stripping some standard black ribbon into strands and threading through some holes. I've never been one for sewing, but as far as cards are concerned I think this is about as far as it gets! The only stamping on this card was on the inside - I don't have a photo, but I used my ABC 123 Sketch Alphabet to stamp 'You're One In A Minion!' A perfect sentiment to finish off this fun card.
Before I go, a quick reminder that we are 7 days in to the 14 day 'Join Stampin' Up! for £25'. This is a once in a lifetime offer to celebrate Stampin' Up's 25th anniversary and is unlikely to be repeated. You can find more information in my previous post here - if you're thinking of signing up, do give me a call to talk about the benefits that being a part of Stampin' Up and my team has to offer.
Back tomorrow with another project. Until then, happy stampin'!
Stampin' Up Supplies Used:


by Joanne James11. October 2013 19:53Today I'm sharing another of this week's class cards using the Festive Flurry stamp set and framelits bundle. Another simple layout featuring the Winter Frost paper stack. Here's the card we made:
This time we layered the snowflakes and overstamped on the top one (the snowflake was stamped in Smoky Slate, having been stamped off once first onto scrap paper to give a softer background). Bermuda Bay cardstock adds a real striking background and gives this colourway quite a modern feel. Some silver Dazzling Details on the tips of the snowflake adds a little finishing sparkle.
We used both of the seasonal colourways in our class, and I'm really undecided as to which one I prefer most. Which one do you like the most?
Back with another card tomorrow; until then, happy stampin'!
Stampin' Up Supplies Used:


6a2ba4c3-2cd4-4294-9958-badb0e698470|0|.0|96d5b379-7e1d-4dac-a6ba-1e50db561b04
Tags: Big Shot, Christmas, Festive Flurry, Festive Flurry Framelits, Christmas Messages, Magnetic Platform, Shop online, Stampin' Up, Stampin' Up Card, Stampin' Up Card ideas, Stampin' Up Supplies, Winter Frost
Cards | Classes | Stamping
by Joanne James10. October 2013 20:29Today I'm sharing another of this week's class Christmas cards. This one uses the 'Merry Little Christmas' stamp and some of the papers in the Season of Style paper stack:
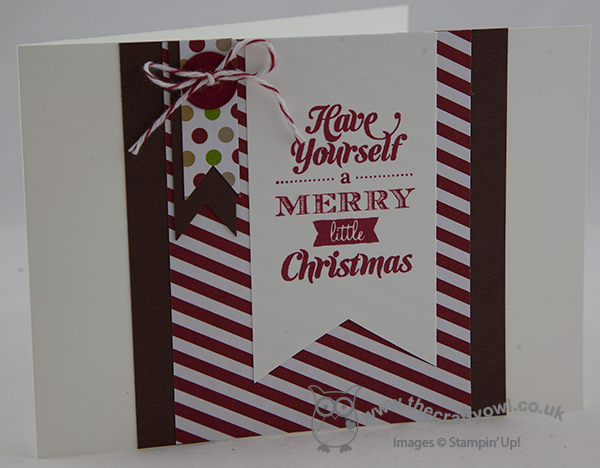
I love that the designer series paper stacks in the seasonal catalogue enable you to make some great cards with minimal stamping as the paper does a lot of the work for you in terms of colour and pattern; at £6.25 a stack they are great value for cardmakers too, and each stack has 4 different paper designs to choose from. For this card we stamped a simple flag and layered on some DSP edged with Chocolate Chip and created a couple of smaller flags made from offcuts from other projects. Did you notice the little button beneath the twine bow on the card? We were aiming to keep all of our cards post-friendly and largely flat in design, so instead of adding a real button we instead used a cardstock button made with the Sweet Buttons Embosslits to allow for added detail but without the bulk.
I had my second class of the week last night with a great bunch of ladies, who made me laugh so much my eyes watered! I was also delighted to see some of the great cards they've been making with My Digital Studio having downloaded their 30 day free trial. Unfortunately I didn't have my camera with me, so couldn't take any pictures but will be sure to get some next time to share with you. I was particularly pleased to hear them say how easy they found it to use, with no prior knowledge or experience. If you haven't downloaded your copy yet, I urge you to go to my online store and download your free trial version today. Equally, if you would like to join one of my monthly card classes, do get in touch for more details.
Back tomorrow with another project; until then, happy stampin'!
Stampin' Up Supplies Used:
Stamps: Merry Little Christmas
Cardstock: Whisper White, Chocolate Chip, Cherry Cobbler, Season of Style DSP
Ink/Stampin' Write Markers: Cherry Cobbler
Tools: Sweet Buttons Embosslits, Big Shot, Stamp-a-ma-jig
Finishing Touches: Cherry Cobbler Baker's Twine