Pink and Pretty Sheltering Tree Card

by Joanne James19. January 2015 10:45

It's Monday and I am filled with the enthusiasm of a new week! I managed to get some quality crafting time yesterday afternoon, so I'm hoping to tick off a few 'back burner' jobs this week. Today I'm sharing a card using this week's sketch over at Freshly Made Sketches, where Jen Timko has this sketch for us (and a great interpretation of it - you should really check out both her card and those of the other FMS designers):

I stuck with the circle for my shape and decided to go with a pink and pretty card today using the fab 'Sheltering Tree' stamp set from the new Spring-Summer catalogue. Here is my card:

I used Crumb Cake for my base and adhered a layer of Crumb Cake DSP with polka dots from the Neutrals DSP stack to the front. I stamped my tree on Whisper White in Crumb Cake, and the leaves twice, once in Pink Pirouette and once in Blushing Bride, then added some tiny pink hearts punched with my Confetti Heart Border Punch. The swing and sentiment are stamped in Chocolate chip for a little contrast and I embossed the top layer with the large polka dot embossing folder before adhering to my card with dimensionals. A small punched heart and tiny pearl complete the look. This stamp set offers so many possibilities; it was one of those sets that I bought 'for me' as I know I will get lots of use out if it. It's also photopolymer, so aligning the images is a doddle - no stamp-a-ma-jig required.

I am also linking today's card up with SUO Challenges where the current theme is dots; mine are subtle, but they are definitely there! This card would make a lovely Valentine's card or even a birthday or other occasion for a special little girl - I know my daughter would love it, although her fascination with the little bicycle that comes with this stamp set may require me to change out the swing with a two-wheeler!

Back tomorrow with another project; until then, stay warm (it's cold in the UK today!) and happy stampin'!


Stampin' Up! Supplies Used:

Table built using Product Table Builder by The Crafty Owl - Independent Stampin' Up! Demonstrator.


Petite Petals For A Great Friend

by Joanne James17. January 2015 20:44

Today's card is for this week's challenge over at Mojo Monday where this week's sketch has encouraged me to cut into my Painted Blooms DSP for the first time! Here's the sketch:

I thought this sketch was perfect to showcase some DSP and what better than 'Painted Blooms'; I've spent long enough stroking it and it's time to start cutting it! Here is my card:

I decided to go with the blue flowers, so used Pacific Point for my card base and matted with Whisper White. I used the floral panel for the main vertical section and backed this with Crushed Curry and an offset panel of Wild Wasabi. For the sentiment banner, I stamped off the row of dots in Crushed Curry once, then stamped my sentiment on top. A scallop edge trim, button and twine finish my card.

The papers in the 'Painted Blooms' DSP pack are some of the most beautiful I've ever seen and are works of art in their own right. Having started cutting now, I'll be sure to use more of them and share with you in the coming weeks.

Back tomorrow with my post for this week's challenge over at The Paper Players. Until then, happy stampin'!


Stampin' Up! Supplies Used:

Table built using Product Table Builder by The Crafty Owl - Independent Stampin' Up! Demonstrator.


There Is Always Something to be Thankful For

by Joanne James14. January 2015 12:01

I haven't managed to blog the last couple of days as there's just been too much going on. Whilst I was intending to blog later today, I thought I would just share with you a card that I made with the ladies in my Technique Card Class this week, as it features two if the punches that are available on Wednesday Weekly Deals this week. My card was heavily inspired by this one by Inge Groot that a saw a couple of weeks ago. Here is my altered version, in the colourway that we made in our class:


The technique class featured the new Chalkboard paper and all the different ways in which you can use the lovely new chalk inks that are now available in the Spring-Summer catalogue. These inks have a fabulous soft chalk effect on the new Chalkboard paper; here we used it to stamp the tag from the 'You Brighten My Day' stamp set, yours free with a £45 spend during Sale-A-Bration, and behind this added some black and white baker's twine, some of the Best Year Ever ribbon and buttons (another Sale-A-Bration freebie) and a strip of cardstock punched with the Hearts Border Punch. All of this was mounted on a feature mat in Pink Pirouette that we embossed with the new Happy Heart embossing folder. I also made two more cards to the same design, but in two alternative colourways. This one is Aquamarine chalk in on Coastal Cabana, with Crushed Curry accessories:

Lastly, Yellow Citrus chalk ink and So Saffron, with Calypso Coral accessories:

I like that these cards are quite subtle, despite the bright appearance of the chalk ink in the pad itself - it's quite deceiving. Both the Note Tag punch and the Hearts Border Punch are on offer this week as part of the Wednesday Weekly Deals, as is the What's Up punch that also co-ordinates with the house stamp in the 'You Brighten My Day' stamp set. If this stamp set appeals to you and you would like to be able to create today's card, the following product bundle costs £47.87, includes both punches and would enable you to acquire the key supplies and get the stamp set for free:

Table built using Product Table Builder by The Crafty Owl - Independent Stampin' Up! Demonstrator.

All you need to add is the cardstock in the colours of your choice, a button and some ribbon from your stash. For everyone that buys this bundle from my online store this week and uses the hostess code 44JKUBHY, I will send you a separate little thank you gift from me in the post. 

Back soon with another creative post; until then, happy stampin'!

'You Da Man' Moustache Valentine's Card

by Joanne James8. January 2015 14:29

I'm having a busy day today; productive though, so I'm not complaining! Today's post is a quick one - I'm sharing my card for Less is More this week where the colour challenge is to use black, metallic and one other colour on your card. Now I must confess, this card was embarrasingly quick to put together, but I am also rather pleased with the finished result - here it is:

I decided to use Basic Black for my card base, then layered with a red glimmer heart cut out with my Big Shot and Heart Framelits and topped with a black moustache onto which I stamped the corresponding stamp from the 'Well Worded' stamp set in Versamark and heat embossed in gold, before cutting out with my moustache framelit. To finish, I stamped my hashtag sentiment from the '#hello' stamp set and heat embossed in gold onto the base of my card. Simple right? It really is as easy as that! Don't get me wrong, I experimented with lots of different versions of this card before I decided on this one as my preferred version to share, but end to end you could produce this card in minutes - and who doesn't love a moustache?! I think this makes a great guy card, despite the glimmer.

That's all from me today; back tomorrow with another project. Until then, happy stampin'!


Stampin' Up! Supplies Used:

Table built using Product Table Builder by The Crafty Owl - Independent Stampin' Up! Demonstrator.


Hello Life 'Recycled' Kingfisher Card for The Paper Players

by Joanne James4. January 2015 07:00

Welcome to my Sunday posting for The Paper Players where today Anne-Marie has a fun challenge to kick start us into the new year:


I also used Narelle's sketch over at Freshly Made Sketches for the layout of today's card. So "Everything Old is New Again" - use a recycled or re-purposed item on your project. So many possibilities! Here is my card for this week's challenge - can you see what my re-purposed item is?

I used the lovely bird stamp from one of the exclusive 2015 Sale-A-Bration stamp sets called 'A Happy Thing' which is perfect for colouring with Stampin' Up! Blendabilities. I'm not sure what bird this is supposed to be, but to me it looks like a kingfisher, hence my colouring with Pumpkin Pie and Bermuda Bay (yes, I know - a new colour coming in the Spring-Summer catalogue) Blendabilities. I cut my coloured image out with one of my circle framelits and mounted it on a window frame in Island Indigo. Did you identify my re-purposed item yet? It's my 'designer series paper' - the patterned paper is actually the inside cover of the Sale-A-Bration promotional wrapper that is attached to the outside of the new 2015 Stampin' Up! Spring-Summer catalogue! Take a look at the photo below and you'll see what I mean:

The moment I saw this paper I thought it would make a useful 'DSP' and it was perfect for the large expanse of background for today's card as the subtle pattern wouldn't detract from my stamped image and the blue-green colourway was perfect to suggest a watery scene for my bird. So not only does the new Spring-Summer catalogue have a ton of great new products for you, it comes with some free 'DSP' too! I have started distributing catalogues to my customers in readiness for this week's launch; if you are reading this and you don't have a Stampin' Up! demonstrator and would like to be added to my customer mailing list, then please do get in touch.

I'm off to start de-Christmas-ing the house; before you go off in search of items that you can recycle on your projects this week, do visit the other design team members to see what interesting ideas they've had this week:

The Paper Players Design Team

I look forward to seeing your projects featuring recycled and repurposed items in the gallery this week. Back tomorrow with another project; until then, happy stampin'!


Stampin' Up! Supplies Used:

* 'A Happy Thing' stamp set - available 6th January - 31st March during Sale-A-Bration. Bermuda Bay Blendabilties - available 6th January.

Table built using Product Table Builder by The Crafty Owl - Independent Stampin' Up! Demonstrator.

Pictogram Punches I Love You Card - And Another Sneak Peek!

by Joanne James2. January 2015 21:03

I've had a fun day today, amongst other things transforming my kitchen table into a table tennis court and hosting a craft party for an enthusiastic group of ten year olds this afternoon. But enough about my day; I managed to make a quick card yesterday for the current challenge over at CAS(E) This Sketch:

This is such a simple sketch layout with so many possibilities and it was perfect for a simple 'I love you' card featuring one of the stamps from Pictogram Punches:

I used a Whisper White card base and created my bottom panel from a piece of Real Red cardstock edged with the Hearts border punch and overlaid this with a piece of Crisp Cantaloupe cardstock that I first dry embossed with the new Happy Heart Textured Impressions Embossing Folder, coming shortly in a few days time with the new Spring-Summer catalogue (I fussy cut the edge following the line of the hearts). I stamped my sentiment in Crisp Cantaloupe above the layered section, then using Real Red ink I overlaid a new 'love' stamp onto the heart - this stamp is from an exclusive Sale-A-Bration set called 'You Brighten My Day', available free with every order of £45 or more between January 6th - March 31st. It fits perfectly and makes the heart 'pop' a little. To finish, I added a thick baker's twine bow. 

I hope you like today's card. Back tomorrow with another project; until then, happy stampin'!


Stampin' Up! Supplies Used:

Table built using Product Table Builder by The Crafty Owl - Independent Stampin' Up! Demonstrator.


Happy First Birthday Colour Me...! and 2015 Sale-A-Bration Sneak Peeks!

by Joanne James31. December 2014 10:00

Today it's a special day: the Colour Me...! challenge is celebrating its first birthday and so the co-creators, the lovely Hayley and Tara, are hosting a party to celebrate! As one of the outgoing designers, I was invited to choose any previous challenge colour combination and create a card for this week's showcase. I decided to go with the creative choice from week 5, which enabled me to use some of the gorgeous new 'Best Year Ever' DSP from the 2015 Sale-A-Bration offering; I also used this week's sketch layout over at Create With Connie and Mary, as this layout was perfect for what I had in mind: 


As much as I've enjoyed making Christmas cards these past few months, I am so ready for a change! The colours of the promotional designer series paper and co-ordinating embellishment packs are like a breath of spring air - take a look:

I based the colour scheme for my card on the feature colours of the Best Day Ever papers - Calypso Coral, Coastal Cabana, Crushed Curry, Soft Suede and Sahara Sand, with white as my neutral - isn't it a gorgeous colour combination for Spring? I used two pieces of the same paper for my card, paired with a couple of blocks of solid colour, as the background for my card, then used another Sale-A-Bration promotional item, the 'Big Day' stamp set to create my focal point. What better than a birthday cake with a single candle for a first birthday?! The sentiment is from the same set. I stamped them both in Soft Suede, before colouring with my Calypso Coral and Coastal Cabana Blendabilities. Did you know that Stampin' Up! Blendabilities work with many of the standard Stampin' Up! coloured ink pads, in addition to Memento Black? Sometimes an alternative colour outline works really well and can give a different effect. I decided to create a little 'badge' to anchor my sentiment, using a punched circle, a number 1 cut with my retired Typeset alphabet Bigz Die (you could use the Perfect Print Bigz Number Die as an alternative) and a punched gold glimmer star. I coloured the envelope to match and I even created a fancy sentiment inside my card:

Both the Best Day Ever DSP and the Big Day stamp set are items that could be yours free with a purchase of £45 or more during Sale-A-Bration; Slae-A-Bration starts early this year on 6th January, so not long to wait now! I made this card to congratulate Hayley and Tara on their first Colour Me...! anniversary, however it would work just as well for a child's first birthday I think in this colour scheme.

That's all from me today; do pop by the Colour Me...! challenge blog and see what other birthday delights are in store. I hope you have a fun New Year's Eve planned - mine will be a quiet one - and I'll be back tomorrow with another project; until then, happy stampin'!


Stampin' Up! Supplies Used:

* Best Day Ever Designer Series Paper and Big Day stamp set available 6th January.

Table built using Product Table Builder by The Crafty Owl - Independent Stampin' Up! Demonstrator.


Happy New Year Card with a Little Sparkle!

by Joanne James30. December 2014 21:15

I've had a great work day today and managed to fit in some quality crafting time, so amongst other things I have a Happy new Year card to share with you today that was inspired by this week's sketch over at The Paper Craft Crew:


Here is the card I created:

For a new year celebratory card some glitz and glamour were definitely the order of the day, so I layered a number of gold and sliver elements - glimmer paper, silver foil, sequins and gold vellum and topped with a silver embossed black pennant cut with my Banner framelits. The stamp I used is from the versatile 'Mingle All The Way' set from the Autumn-Winter Seasonal Catalogue; this set along with many others, is only available until January 5th when the catalogue ends, so if it's still on your wish list then don't leave it to late to order. I created a popped-up banner for the word 'cheers' having heat embossed this section in black on brushed gold cardstock, then cut it out and adhered with dimensionals. Some gold ribbon, a trio of rhinestones coloured with a black permanent marker and done!

We are having our traditional James family day on New Year's Day so I will be taking this card along with me for my mother-in-law; I'm hoping it will go some way to make up for the lack of Christmas card!

I'm also linking up to the new year challenge over at Hand Stamped Sentiments where this is the challenge inspiration photo:


Back tomorrow with a special 'extra' post for the lovely ladies over at Colour Me...! and a new set of weekly deals. Until then, happy stampin'!


Stampin' Up! Supplies Used:

Table built using Product Table Builder by The Crafty Owl - Independent Stampin' Up! Demonstrator.


Gift Packaging Made Easy with the Gift Box Punch Board and Banner Framelits

by Joanne James27. December 2014 16:40

Merry Christmas to you all, my lovely blog readers! After a welcome few days break hosting Christmas for my family, today I'm back to the blog! I have a couple of pre-Christmas makes to share still; do you ever find yourself so busy crafting in the run up to the big day that you spend more time 'in the moment' rather than recording it and sharing? Well, this year that was definitely me! Today I am being treated to a day of rest - my seven year old has declared that he is doing the cooking today, from his new boy's cookbook (doing well so far - fresh fruit and pancakes for breakfast, followed by shepherd's pie for lunch) - so whilst he prepares a feast of chicken dippers for tea, I thought I would take the opportunity to get back into my blog. 

Today's share is some lovely gift packaging made with the Gift Box Punch Board, Envelope Punch Board and the Big Shot and Banner Framelits. I decorated some gifts using boxes made with the gorgeous Under the Tree speciality DSP and the Gift Box Punch board and some easy die cut tags to co-ordinate:
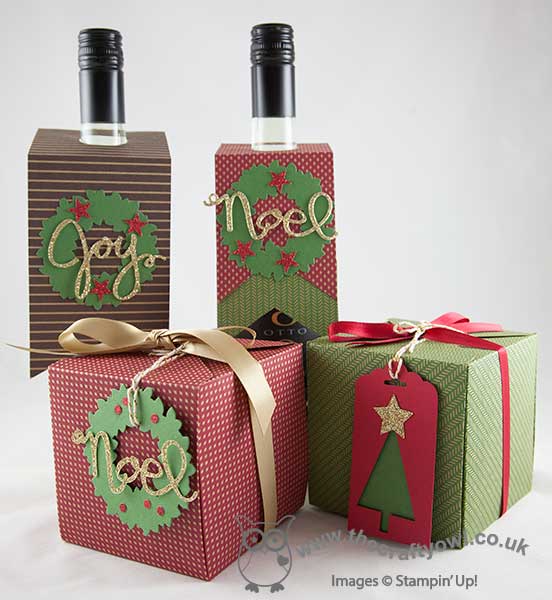
 

If your gift fits the standard boxes that the Gift Box Punch Board makes, it is a quick and easy 'no glue' packaging solution. With some ribbon and a fancy tag they really look the part:
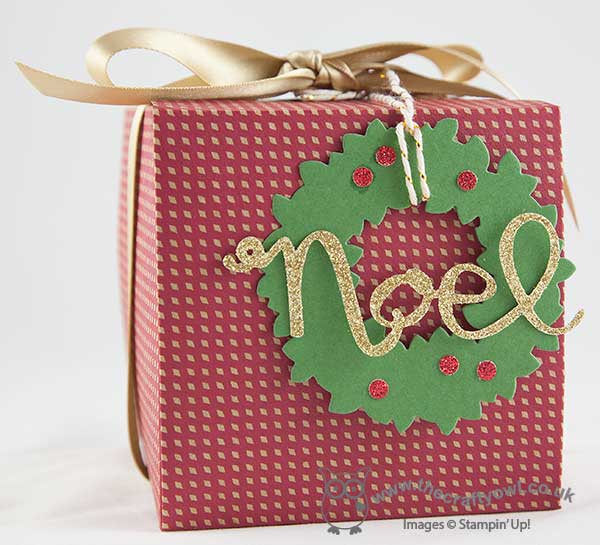
 

I also made some bottle tags using the Banner framelits and a circle punch, again decorating with some simple wreaths cut with the Wonderful Wreath framelits - here's a close up:


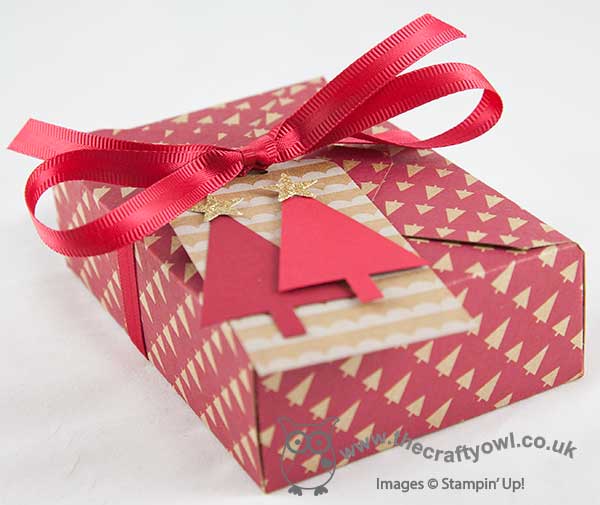
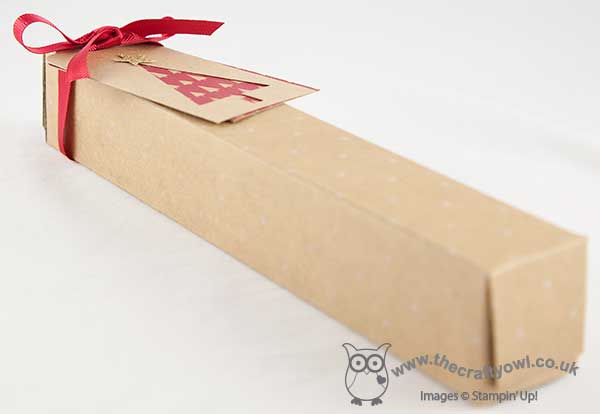
As my regular readers will know, I am a big fan of the Envelope Punch Board and it is still my tool of choice for creating custom boxes - this is so easy to do with my BoxBuster tool - it enables you to create the perfect box size first time with no paper wastage. Here's one I made for my niece's Christmas gift that is the perfect case in point, this time finished with a tag made with the tree punch to co-ordinate with the Under The Tree paper:
 

If you are a fan of creating easy, attractive gift packaging, you will be pleased to know that the Gift Box Punch Board is carrying over and will still be available when the current Autumn-Winter seasonal catalogue ends. The Envelope Punch Board is always available as a standard annual catalogue item - phew, I don't know what I'd do if this tool was ever discontinued!

Back tomorrow with another of my pre-Christmas makes and a special announcement, so check back then for more crafting lovliness!

Until then, happy stampin'!
 

Stampin' Up! Supplies Used:

Table built using Product Table Builder by The Crafty Owl - Independent Stampin' Up! Demonstrator.


Snowflake Paper Christmas Wreath

by Joanne James21. December 2014 20:33

Sunday already?! Where are the days going??! I have been busy with my Christmas preparations and my focus has been on gift packaging these last few days, along with a few special Christmas cards. Most are going out of the door before they are even photographed though! Today I wanted to do a quick post to share a snowflake paper wreath that I made recently for a friend of mine:

It uses a whole bunch of retired product - the paper is from a couple of years ago (I can't even remember what it was called) and is decorated with snowflakes made from stamping Cherry Cobbler and Gumball Green on Very Vanilla carstock using the Festive Flurry stamp set, that I then cut out using the Big Shot and co-ordinating framelits and finished with a paper bow made using my Gift Bow Bigz Die. 

My friend specifically wanted this paper pattern as she wanted her wreath to co-ordinate with other festive pieces she had - as such I had to include a few pieces of solid colour cardstock just to enable me to get all the way around the wreath base; I am now officially out of this DSP pattern! I am going to make another of these wreath types at some point as I think it's really effective, although will probably choose a more traditional blue/silver colour scheme with my snowflakes. It was also quite easy to achieve: about 22 strips of DSP measuring 12" x 1 1/4", adhered to a styrofoam wreath and then the ends flagged.

That's all from me today - back soon with another project when time allows. Until then, happy stampin!

Tags: , , , , , , , , ,

3D Projects | Stamping

Mini Catalogue

BROWSE THE CATALOGUE

The mini catalogue is now live! Read and download your copy here.

Shop Online

Access my online shop 24 x 7, 365 days of the year:

Current April hostess code:

VDKNV7BH

Shop Online

Join My Team

It's always a great time to join Stampin’ Up! New team members can get £130 worth of products for only £99 + free business supplies + free shipping + all the fun being a part of Stampin’ Up! Stampin' Up! has something for everyone: join my growing team and benefit from my support to enjoy Stampin' Up! however you choose.

If you're interested, call me for a chat to understand how I can help you realise your goals. Alternatively, if you have already decided to sign up and you just can't wait, please click here for the link to the online form where you can sign up and order your starter kit right away! 

Latest Kit!

Stampin Cut and Emboss

The Rock Legend Kit has all you need to make 8 cards with coordinating envelopes. Along with the new Panda Friends Kit, both are available from January 4th for just £14 each - get yours here!

2023-24 Annual Catalogue

BROWSE THE CATALOGUE

Click on the catalogue for a full list of current SU! supplies - if you would like to order any of the items featured, please drop me a line at [email protected] or give me a call on 07773 421446 - I'd be happy to help.

New Online Exclusives

There are new products available exclusively in the online store from 5 March - check them out here.

About Me

Hi I'm Joanne and live in Northampton and when I'm not looking after my husband and two beautiful children, am an avid crafter with a passion for all things Stampin' Up!

I must confess that I have never been a big rubber stamper - until I discovered Stampin' Up! that is. I love the fact that I can get such great results with co-ordinating stamps, inks, papers and punches - the possibilities are endless! Join me on my stamping journey as I share the things I love and be inspired to create amazing things yourself!

Follow Me

Monthly Newsletter

Box Builder

Click the button above to use Box Buster to create your custom box design using the Envelope Punch Board!

Kits Collection Now Available!

Stampin Cut and Emboss

The new Kits Collection from Stampin' Up! is now available!

Click here to see the current kits available and order yours online today.

I Design For


Stampin' Up Stuff

This is my personal blog and is not endorsed by Stampin’ Up! I hope you find it a plentiful source of ideas and personal inspiration but please don't copy my designs for contest submission or use for classes, publication or sale without express permission.