by Joanne James16. April 2015 08:05It's Thursday and time for another challenge over at Create With Connie and Mary, where this week we have a new sketch challenge for you:
I took quite an unusual approach with this card and decided to try out a new technique that was highlighted on a recent Splitcoast Stampers newsletter - paper tole, where you cut elements of your one layer card using a craft knife to create a raised almost 3D effect. Take a look at my card and then I'll share with you some tips:
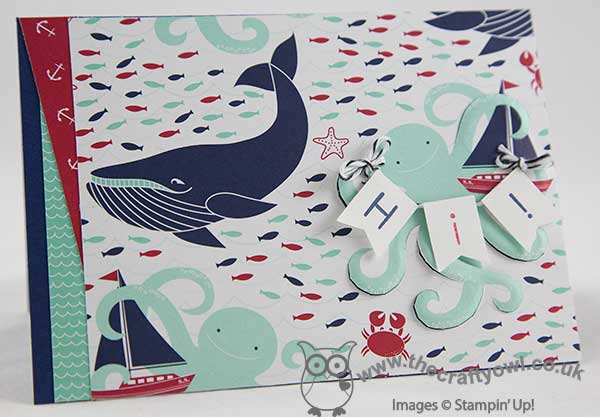
I decided to use a sheet of highly patterned Maritime Designer Series Paper for my card front; I haven't used this paper in a while and it is one of my favourites, so thought it opportune to give it some love again for a change! It also has lots of great co-ordinating patterns that made it easy to add my angled layers on the left hand side.
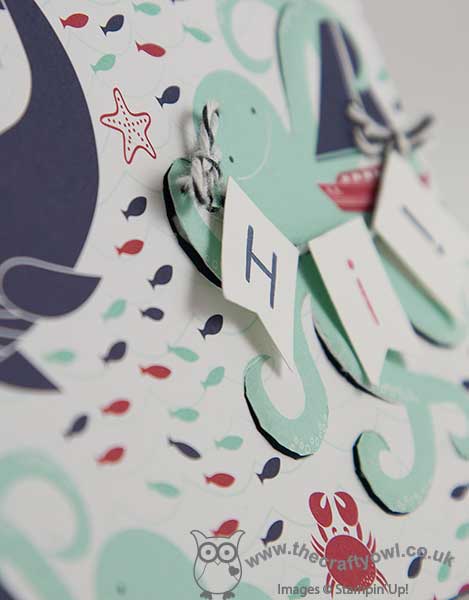
I decided to use the octopus as the focal point for my card, and based my cutting line around that. To create the paper tole effect, I cut some of the upper 'layers' of his legs and rubbed the reverse side with the rounded end of my pokey tool to create a raised cardfront, that is accentuated by placing dimensional behind the cut pieces. You can see that better in the photo below:
I wasn't sure this would work with DSP as the technique suits a thicker cardstock or watercolour paper, but it actually worked quite well and I'm pleased with the overall result. I included some minimal stamping, in the little banner that the octopus is holding, but otherwise, this card is all about the paper!
I was having an interesting discussion with one of my customers yesterday about sketch challenges and I thought I would just take the opportunity in my post to just mention a few of the things that we were talking about - if you've ever considered having a go at one, but were holding back because you weren't sure, you may find the following useful:
- The sketch is for inspiration - it should be used as a guide.
- You don't have to interpret the sketch literally, but your challenge card should bear a resemblance to it and share key elements. So for example, with the sketch above, I would expect to see a focal image, but it can usually be any shape and doesn't have to be exactly the same as the one in the sketch (I used the octopus) some form of flag/embellisment/sentiment banner (I used my Hi! banner garland) and some form of treatment on the left (I layered my DSP).
- The number of mats and layers isn't prescriptive; I did choose to go edge-to-edge with my DSP for this card, largely to fit everything in and because I didn't want a border to distract, however had I been using a punched image for my focal point, I might have created a bordered mat - that would have been ok too.
- You should take note of the challenge rules; all challenges are different, e.g. the Create With Connie and Mary Challenge requires you to use Stampin' Up! products only, others may restrict the number of challenge entries you can combine or have other guidelines to be adhered to.
You will notice that all of the design team have interpreted this week's sketch challenge differently, yet all of them bear a resemblance to the sketch - hence you get lots of additional creative inspiration on how to interpret the sketch and use your SU! products. So enough from me - go get your inks, stamps and paper and see what you can make of this week's sketch - we look forward to seeing your creations in the gallery.
That's all from me - back tomorrow with another project. Until then, happy stampin'!
Stampin' Up! Supplies Used:
- Maritime Designer Series Paper
- Back To Basics Alphabet Photopolymer Stamp Set
- Banner Punch
- Paper-Piercing Tool
- Stampin' Pierce Mat
- Basic Black Baker's Twine
- Night Of Navy Classic Stampin' Pad
- Night Of Navy A4 Card Stock
- Real Red Classic Stampin' Pad
- Whisper White A4 Card Stock
by Joanne James22. March 2015 10:00It's Sunday and time for a new challenge over at The Paper Players. There were some great CAS florals last week and this week we have my favourite kind of challenge. My good friend and talented team member LeAnne has a great sketch challenge for us:
I decided this sketch would be great for a DSP showcase, so today I have a very bright and colourful card to share with you:
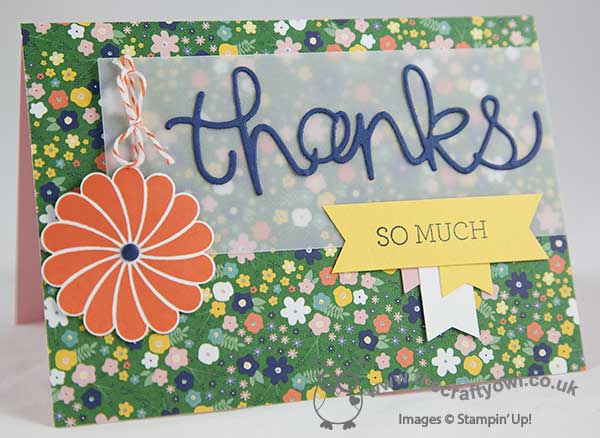
I covered my entire card front with a piece of one of the 'busy' patterns from the Flowerpot DSP pack then used a piece of vellum to tone down the pattern so that my 'thanks' die cut in Night of Navy would still stand out against the pattern. I wrapped a piece of Tangerine Tango around the vellum in a bow before adhering it to my card base, using glue dots where they are covered by other elements so that they don't show through. I added the second part of my sentiment from the 'Crazy About You' stamp set and layered over my banner trio, punched out of colours I had picked up from the pattern using my banner punch. Lastly, I finished with a bold orange flower finished with a candy dot.
This card has such a clash of bright and bold colours and yet I think they work with the sketch beautifully. There are some great cards from the Design Team this week, all of whom have interpreted the sketch in interesting ways. Do pop by their blogs and take a look:
The Paper Players Design Team
Here's a quick recap of our challenge rules:
1. Create a new paper project
2. Upload your creation to your blog with a link back to us and provide a direct link to the post featuring your challenge submission.
3. Please link your card to no more than three challenges, TOTAL.
4. Have FUN!
I look forward to seeing your takes on this week's sketch in our gallery this week.
No lie in for me as I am off for an early morning of hockey as today is tournament day and then hopefully home again to dinner cooked by the men in our house - this is becoming something of a habit! Back tomorrow with another project; until then, happy stampin'!
Stampin' Up! Supplies Used:
5f23a4da-9b04-4ede-8c8b-ca223b0f1b43|0|.0|96d5b379-7e1d-4dac-a6ba-1e50db561b04
Tags: Crazy About You, Hello You Thinlits Dies, Flowerpot, scallop circle punch, Banner Punch, Shop online, Stampin' Up, Stampin' Up Card, Stampin' Up Card ideas, Stampin' Up Supplies, The Paper Players
Cards | Stamping
by Joanne James17. December 2014 07:00It's Wednesday so that means a new collection of Wednesday Weekly Deals! This week's deals are included below - they will be available for one week only, before a new collection of deals is announced.
As always, if you want to take advantage of any of the deals on offer, you can support my business by placing your order online by clicking here or using the link to my store on the right hand side of my blog page where it says 'Shop Online' or with me in person. Don't forget to add the Hostess Code for December (you can find this under the 'Shop Online' section on the right) and be sure to make sure that you don't check the 'no contact' box if you'd like to be kept updated with the progress of you order and receive a little thank you in the post from me.
Here's a summary of this week's one-week only Wednesday deals - click on each item to go to the online store to purchase:
A great mixed bag of delights today - everything from In-Colour markers, to punches, framelits and embellishments. Race you to the store! Back shortly with today's creative post - until then, happy shopping!
c0619a7e-b896-4385-9960-18740a41613a|0|.0|96d5b379-7e1d-4dac-a6ba-1e50db561b04
Tags: Promotions, Wednesday Weekly Deals, Windows Framelits, Shop online, Stampin' Up, Stampin' Up Card, Stampin' Up Card ideas, Stampin' Up Supplies, Stampin' Up SuppliesCircles Framelits, Banner Punch, Banners Framelits, In Colours
Promotions | Shop Online
by Joanne James10. September 2014 09:35It's Wednesday so that means a new collection of Wednesday Weekly Deals! This week's deals are included below - they will be available for one week only, before a new collection of deals is announced.
As always, if you want to take advantage of any of the deals on offer, you can support my business by placing your order online by clicking here or using the link to my store on the right hand side of my blog page where it says 'Shop Online' or with me in person. Don't forget to add the Hostess Code for September (you can find this under the 'Shop Online' section on the right).
Here's a summary of this week's one-week only Wednesday deals - click on each item to go to the online store to purchase:
This weeks deals:
More great offers this week: the Modern Mosaic TIEF and Mosaic Punch are both great prices and just over £16 if you purchase both. At £8.63 the Banner Punch is a bargain; what's more if you combine it with one of the co-ordinating stamp sets from the annual catalogue, such as Banner Banter (134060 clear, £12.95) this would make a great gift for a crafty friend for just over £20 - a good opportunity to get started with some Christmas shopping perhaps! Plus framelits, ribbon, cardstock and MDS - so much to choose from!
Back shortly with today's creative project; until then, happy shopping!
by Joanne James19. March 2014 20:33Today I want to share with you another use for one of my new favourite punches - the scalloped tag top punch. This really is such a versatile punch that can be used in so many ways. There are lots of variations on how it can be used to make an unusual card closure - today's card is a fun, concertina style Mother's Day card, where the scalloped tag top punch is used to add detail to the closure. I saw a similar card to this on Julie Kettlewell's blog here and liked it so much I decided to create one. This is what the card looks like 'closed':
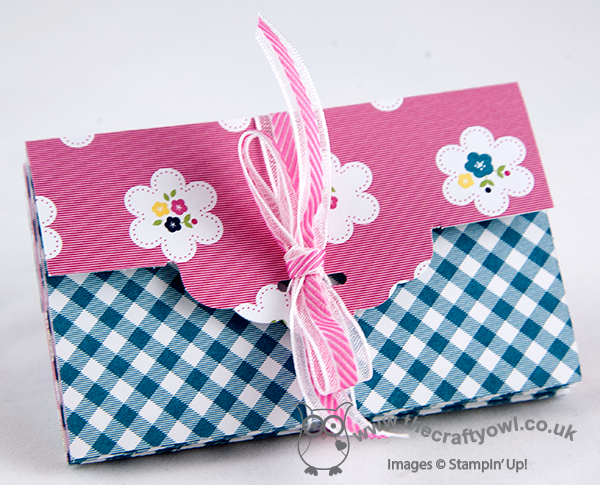
Ribbon is threaded through the punch out hole and around the card and tied in a bow to keep it shut, then when you undo the ribbon and open the card out, you see the message inside:
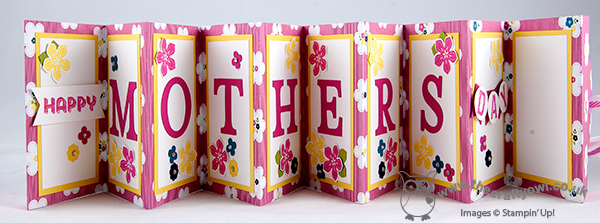
These cards are such fun to make and so easy. All you need is one sheet of 12" x 12" for the basic card. I used a sheet of the Gingham Garden DSP for my card, and layered the inside panels with Whisper White matted on Daffodil Delight. I cut the letters for 'Mothers' with my Typeset Alphabet die, but you could easily use an alphabet stamp set such as Morning Post or Notable Alphabet if you have one instead. I took the word 'Happy' from one of the 'See Ya Later' Sale-A-Bration stamp sets and the letters for 'Day' from my Sketched Alphabet individual stamps before punching out and layering on a mini banner. I then decorated with flowers stamped and punched from the Petite Petals bundle and the Itty Bitty Punches set in colours that co-ordinated with my chosen DSP. The last panel is left blank for you to write your personalised Mother's Day message.
I had intended to shoot a video tutorial on how to make one of these cards to accompany my series of Scalloped Tag Top Punch video tutorials, but time has not been on my side so I haven't managed it yet; I will look to complete one in the next week or so and when I do will update my blog with the link. Updated 8/5/14 - here is my video tutorial on how to make this card:
The best bits about this card: it's one of those projects where you don't have to deliberate over which side of your DSP to use, as you see both sides (dilemma avoided, for once) and also because of the closure, you don't need an envelope - this is a card and envelope in one! This style of card would work for lots of other occasions too - why not have a go and see what you come up with.
Back tomorrow with another project; until then, happy stampin'!
Stampin' Up! Supplies Used:
ea819749-b0b7-4e51-82ac-2f6a767b1ba6|0|.0|96d5b379-7e1d-4dac-a6ba-1e50db561b04
Tags: ABC-123 Sketch Alphabet & Numbers, Banner Punch, circle punch, See Ya Later, Shop online, Stampin' Up, Stampin' Up Card, Stampin' Up Card ideas, Stampin' Up Supplies, Typeset Alphabet, Scalloped Tag Topper Punch, Big Shot, Mother's Day, Gingham Garden
Cards | Stamping | Video Tutorials
by Joanne James19. March 2014 20:33Today I want to share with you another use for one of my new favourite punches - the scalloped tag top punch. This really is such a versatile punch that can be used in so many ways. There are lots of variations on how it can be used to make an unusual card closure - today's card is a fun, concertina style Mother's Day card, where the scalloped tag top punch is used to add detail to the closure. This is what the card looks like 'closed':
Ribbon is threaded through the punch out hole and around the card and tied in a bow to keep it shut, then when you undo the ribbon and open the card out, you see the message inside:
These cards are such fun to make and so easy. All you need is one sheet of 12" x 12" for the basic card. I used a sheet of the Gingham Garden DSP for my card, and layered the inside panels with Whisper White matted on Daffodil Delight. I cut the letters for 'Mothers' with my Typeset Alphabet die, but you could easily use an alphabet stamp set such as Morning Post or Notable Alphabet if you have one instead. I took the word 'Happy' from one of the 'See Ya Later' Sale-A-Bration stamp sets and the letters for 'Day' from my Sketched Alphabet individual stamps before punching out and layering on a mini banner. I then decorated with flowers stamped and punched from the Petite Petals bundle and the Itty Bitty Punches set in colours that co-ordinated with my chosen DSP. The last panel is left blank for you to write your personalised Mother's Day message.
I had intended to shoot a video tutorial on how to make one of these cards to accompany my series of Scalloped Tag Top Punch video tutorials, but time has not been on my side so I haven't managed it yet; I will look to complete one in the next week or so and when I do will update my blog with the link.
The best bits about this card: it's one of those projects where you don't have to deliberate over which side of your DSP to use, as you see both sides (dilemma avoided, for once) and also because of the closure, you don't need an envelope - this is a card and envelope in one! This style of card would work for lots of other occasions too - why not have a go and see what you come up with.
Back tomorrow with another project; until then, happy stampin'!
Stampin' Up! Supplies Used:
496e722e-02bc-47d9-8908-08b02d818f3c|0|.0|96d5b379-7e1d-4dac-a6ba-1e50db561b04
Tags: ABC-123 Sketch Alphabet & Numbers, Banner Punch, circle punch, See Ya Later, Shop online, Stampin' Up, Stampin' Up Card, Stampin' Up Card ideas, Stampin' Up Supplies, Typeset Alphabet, Scalloped Tag Topper Punch, Big Shot, Mother's Day, Gingham Garden
Cards | Stamping