
Springtime Joy Welcome Spring Bunny Card

by Joanne James29. March 2021 11:30

Today I have another card to share that I made using Julee's Mojo Monday layout and those yummy pastels over at The Color Throwdown this week: 


I needed a few more Easter cards and those bunny-ear cakes definitely lend themselves to a cute Easter card  - take a look:


Here's the low-down on today's card:

I used Highland Heather for my card base and gingham panel and used the sweet bunny from the 'Springtime Joy' stamp set as the focal point of my card, added some pretty colours to her flowers, then picked up the flower colour and detail in the horizontal border, by adding a trio of flowers made using the medium daisy punch. I finished each with some oversize retired sparkly gems and tucked in my 'Welcome Spring' sentiment that I stamped on an Everyday Label punched piece. I added another sentiment from the set to the inside of my card:


How sweet are those pretty colours? Gorgeous! I love the added sparkle from the gems too!


Here is the visual summary of the key products used on today's project for you to pin for easy reference:


You can see all of my 'How To' summaries on my 'How To - Tips and Techniques' Pinterest board in case you've missed any. 

That really is it from me today! Enjoy your day and I'll be back tomorrow with another project for the new challenge over at CAS Colours & Sketches where it's the double this week! Until then, happy stampin'!


Stampin' Up! Supplies Used:

Table built using Product Table Builder by The Crafty Owl - Independent Stampin' Up! Demonstrator.

Ornate Garden Love You Cards

by Joanne James29. March 2021 11:00

Today I'm sharing a couple more cards using Jen Timko's great sketch over at Freshly Made Sketches this week:

In my quest to continue using up DSP, I chose my favourite pattern in the Ornate Garden DSP pack, a non-floral metallic and decided to make another couple of cards, but this time flipping the design to use the DSP on one each of the panels and an alternative diecut sentiment using the Always Dies from the mini catalogue. Here's the first one:


For the second one, I used the DSP panel as the bottom border and switched out the colours for the diecut layers of the sentiment to create an even cleaner design:


On both I kept the sentiments simple, and went for a big, bold sentiment inside my card, keeping the monochromatic colour scheme:


I like the idea that you can send an 'I love you' card at a time other than Valentine's, with no reds or pinks in sight. The second, cleaner card is definitely my favourite so that's the one I'm going to link up over at FMS - but what do you think? Here's both of them together:


This gold-embossed pattern is probably my favourite in the whole pack and is much more 'me' than the last pair I made using Jen's sketch. All were a great way to use up some retiring patterned paper, although having looked through the fabulous cards in the gallery, I know I could have been much more creative with this sketch!! 

Here is the visual summary of the key products used on today's project for you to pin for easy reference:


You can see all of my 'How To' summaries on my 'How To - Tips and Techniques' Pinterest board in case you've missed any. 


Enjoy your day and I'll be back later with another post. Until then, happy stampin'!


Stampin' Up! Supplies Used:

Table built using Product Table Builder by The Crafty Owl - Independent Stampin' Up! Demonstrator.


Ornate Garden Thank You Cards

by Joanne James29. March 2021 10:00

Today I'm sharing a couple of cards that I was meant to share on Saturday but having had a frustrating afternoon of creativity, ran out of time so thought I'd squeeze them in today! Jen Timko has a great sketch over at Freshly Made Sketches this week and I so wanted to play along:

I had been using one of the patterns in the Ornate Garden DSP pack, originally for my Paper Players card, although I ended up not really liking the end result so made a different one (in case you're getting confused, having already read yesterday's post!) Part of the problem was that these papers have such bold, bright colours that they really don't lend themselves to anything too layered and fussy in my view, so I decided to use them instead with Jen's sketch to make a couple of thank you cards with an altogether more clean and simple look. I made a couple of cards - here's the first one:


This one is my favourite with the daisy-only pattern, but I also made a second one using another of the busy floral papers in the pack:


On both I kept the sentiments simple, layering a couple of offset thanks diecuts from the retiring Well-Written Dies onto a stitched rectangle, with a border using the already out-of-stock retiring Ornate Borders die. So here's both of them together - do you have a preference?


I'm not sure I will ever love these papers, however I was pleased with these cards - more than the one I started out with, for sure!

Here is the visual summary of the key products used on today's project for you to pin for easy reference:


You can see all of my 'How To' summaries on my 'How To - Tips and Techniques' Pinterest board in case you've missed any. 

Enjoy your day and I'll be back shortly with another couple of posts - including another one using Jen's fabulous sketch! Until then, happy stampin'!


Stampin' Up! Supplies Used:

Table built using Product Table Builder by The Crafty Owl - Independent Stampin' Up! Demonstrator.

Arrange A Wreath Easter Card PP534

by Joanne James28. March 2021 09:00

Today it's Sunday and time for this week's new challenge over at The Paper Players! It's the turn of the fabulous Anne Marie to host this week and she has my favourite, a sketch challenge for you to work with:
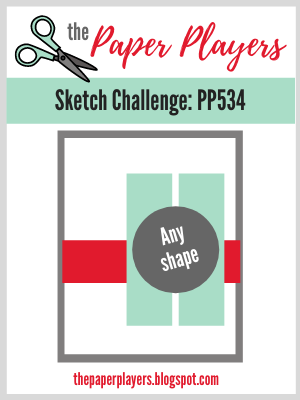
    

I got myself into something of a tizzy with this week's sketch and ended up making two cards - this one is for sure my favourite! I loved the inspiration photo over at Just Add Ink this week and thought an Easter wreath would be perfect for the shape in Anne Marie's sketch - take a look:
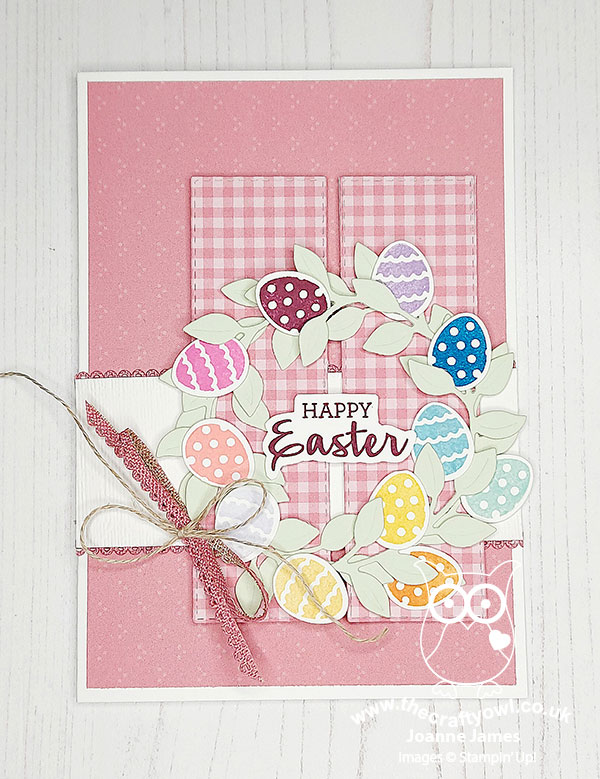
 

Here's the low-down on today's card:

Arrange A Wreath - The Arrange A Wreath bundle is perfect for an Easter wreath and this is the only type of wreath I think I've yet to make with this versatile set! I layered two pale green leaf wreath diecuts, then stamped a variety of rainbow-coloured Easter eggs and nestled them in between the leaves, mixing and matching the patterns:
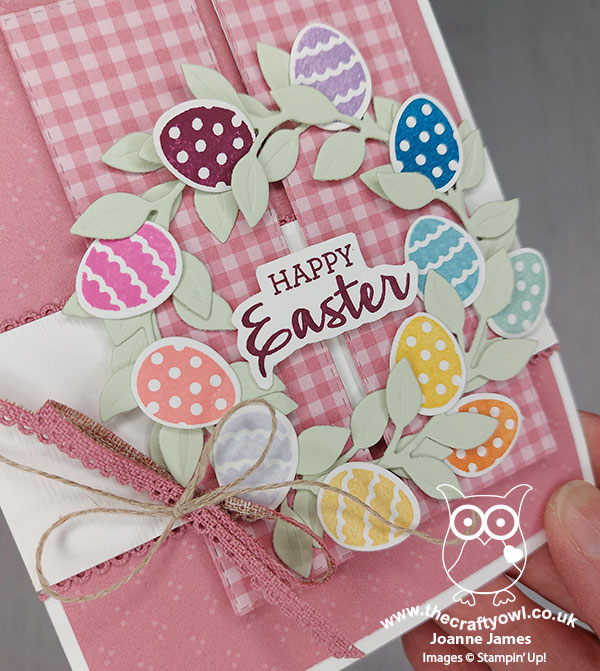
Pink Patterns - I decided to use a pink background for my wreath, again inspired by the JAI photo. I used a piece of Hydrangea Hill DSP in a soft Rococo Rose pattern. I wanted my vertical panels to co-ordinate but not be too busy, as I didn't want them to detract from the detail of my wreath, so I used some of last year's retired in-colour DSP in a gingham pattern.

Going, Going ... - Today's card features so many of my favourite things that will be retiring with the annual catalogue: The Arrange A Wreath stamp set and Wreath Builder Dies, the in-colour Rococo Rose in all its forms, and my favourite embossing folder, the Subtle 3D Embossing Folder. If these items are still on your wish list, you should snap them up now whilst you still can! You can find links to them in the online store below.

Here is the visual summary of the key products used on today's project for you to pin for easy reference:
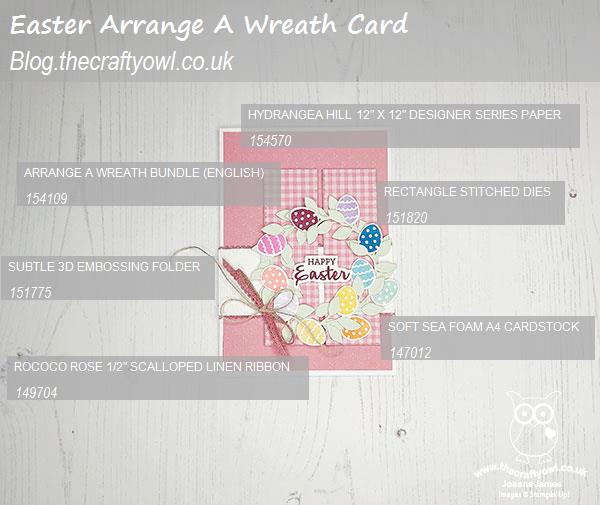
 

You can see all of my Product and 'How To' summaries on my 'How To - Tips and Techniques' Pinterest board in case you've missed any. 

Before you reach for your ink and papers, check out what our amazing team has created to inspire you this week:

Here's a quick recap of our challenge rules:
 
1.  Create a new paper project
2.  Upload your creation to your blog with a link back to us and provide a direct link to the post featuring your challenge submission.
3.  Please link your card to no more than four challenges, TOTAL.
4.  Have FUN!

You can see all of my 'How To' summaries on my 'How To - Tips and Techniques' Pinterest board in case you've missed any. 

Enjoy your day; if you're in the UK, did you remember to put your clocks back? Whilst we lose an hour, the additional hours of sunlight are always welcome - British Summer Time is here at last! I am planning on pottering in the garden today and may have to start eating the Easter eggs that are accumulating in the James household - I know Easter isn't until next weekend, but the temptation is proving too much! I'll be back tomorrow with another project. Until then, happy stampin'!


Stampin' Up! Supplies Used: 

Table built using Product Table Builder by The Crafty Owl - Independent Stampin' Up! Demonstrator.

Forever Fern Friendship Card TTT106

by Joanne James25. March 2021 17:00

Firstly, if you didn't see yesterday's post about the list of products that will be retiring with the current annual catalogue, please go and check it out here - the retiring lists are worth a look with big discounts to be had, long whilst supplies last! Then come back and read today's post too!

It's Thursday and time for a new challenge over at TicTacToe! It's the turn of Team X to host this week and the lovely LeAnne is our featured designer this week. This is the fun board that we are playing along with: 


I went down the last column with leaves, green and diecut for my card today with another card using those lovely Forever Greenery papers - take a look:


Here's the low-down on today's card:

Forever Greenery -  Today's card just like this one that I shared earlier this week features lots of elements from the Forever Greenery Suite. The Forever Greenery paper was once again the starting point for today's card. These papers have some beautiful patterns featuring lush greenery and today I chose a subtle background design combined with a busy foliage-filled designs, and layered them and used them as the inspiration for my foliage sprig. 

Forever Fern - I stamped similar pieces of leaf foliage from the Forever Fern stamp set in the same colours as those that feature on the papers and diecut it with the corresponding Forever Flourishing Dies. The detail on these stamps really is amazing - they are another of the Distinktive range that appear almost 3-dimensional when stamped. So pretty! 

Touches of Gold - I used some gold foil for a border and tiny foliage pieces, along with gold twine to embellish my card but the star of the show is the gold hoop embellishment that frames my sentiment - such a wow in real life:


I have really enjoyed working with this set this week and am so glad that it is carrying over to the new annual catalogue, even though the papers and gold elements in the suite aren't; it will give me lots more opportunity to play for sure.

Here is the visual summary of the key products used on today's project for you to pin for easy reference:


You can see all of my Product and 'How To' summaries on my 'How To - Tips and Techniques' Pinterest board in case you've missed any. 

A tictactoe board offers so many creative possibilities - how does this week's board inspire you? Why not have a go? We would love to see you in the gallery and who knows - you might be selected for Designer's Choice and be eligible to be a guest designer on a future challenge. 

Enjoy your evening; I'll be back tomorrow with another project. Until then, happy stampin'!


Stampin' Up! Supplies Used: 

Table built using Product Table Builder by The Crafty Owl - Independent Stampin' Up! Demonstrator.

2020-21 Annual Catalogue Retiring Lists Are Here

by Joanne James24. March 2021 19:00

It's here - the list of products that will be retiring from this year's annual catalogue has been announced!

You can see and download the full list of items retiring from the current Annual catalogue by CLICKING HERE or alternatively view the information in a filterable Excel file HERE (this is often easier as you can filter by language, for example)

Retiring products are only available WHILE STOCKS LAST, so if you've still items on your wish list from this year's annual catalogue, you need to check the retiring lists and if they're on it put an order in pronto! Don't forget to add this month's online hostess code: 3XTNB243

If you want to stock up on any of the retiring in-colour items and you haven't already done so, especially re-inkers, I would urge you to do that sooner rather than later as they are always the first things to sell out and some cardstock colours are already out of stock.  

Remember too that this year's annual catalogue will finish on 2 May 2021, a whole month sooner than usual to make way for the new catalogue. Time is of the essence!

Hop online to get the latest on stock availability and place your orders. Some retiring items are discounted by up to 75% so these may well be snapped up quickly. 

I will be back tomorrow with a creative post and an update on the retiring list; until then, happy shopping!

Shades of Purple Ornate Borders Thank You Card CCS412

by Joanne James23. March 2021 12:00

It's Tuesday and time for a new challenge over at CAS Colours & Sketches. Can you believe it was exactly one year ago today that the UK went into lockdown; my how times have changed in the last year - thank heavens for crafting! This week's challenge is a sketch challenge and YoonYoung has asked that we create something with three vertical elements and a central sentiment as our focal point:


Feel free to flip or rotate the sketch when making your card. For my card today I decided to use a floral border die in shades of purple for my vertical elements - here's my card:


Here's the low-down on today's card:

Ornate Borders - Whilst designed for use along the edge of a card as the name suggests, I thought that the simplest of the floral borders would also work when layered into my design to create the three vertical lines of interest in the sketch. I measure them carefully so that they were placed an equal distance apart; I like the way that the flowers show through the colour beneath to add further interest to each diecut. 

Shades of Purple - Purples are a favourite of mine and were perfect for today's card, where I decided I needed three complimentary shades of one colour, to maintain something of a CAS feel; I used the soon-to-be retiring Purple Posy, Highland Heather and Gorgeous Grape. I am also playing along with a new-to-me challenge, The Flower Challenge, introduced to me by my blogging friend, the lovely Michele Ferguson of I Card Everyone who has just joined their team of designers, where they are looking for flowers in shades of purple too. Mine are diecut as opposed to stamped (I think that's still allowed!) and if you are a purple-lover too, you should check out their gallery - there are some fabulous purple stamped creations to peruse!


Inside Detail - I chose a super simple 'thanks' from the co-ordinating 'Ornate Thanks' stamp set in a stitched oval for the front of my card, in an effort to increase my proportion of 'white space' and maintain a clean and simple feel, and finished it on the inside of my card, adding a flower made up from the pieces leftover from the diecuts on the front:

So what do you think? Is purple friend or foe in your cardmaking and how will you interpret those verticals on our sketch this week? I'm looking forward to finding out!

Here is the visual summary of the key products used on today's project for you to pin for easy reference:


You can see all of my 'How To' summaries on my 'How To - Tips and Techniques' Pinterest board in case you've missed any. 

As a reminder, for our colour challenges, you must use all of the stated challenge colours. You may also use neutral colours; however, the challenge colours should be the most noticeable ones featured on your card. We use Stampin' Up! color names for reference, but you are welcome to use any other companies' products as long as you match the challenge colours as closely as possible.

Enjoy your day and I'll be back tomorrow with another project. Until then, happy stampin'!


Stampin' Up! Supplies Used:

Table built using Product Table Builder by The Crafty Owl - Independent Stampin' Up! Demonstrator.

A Forever Greenery Hello in Just Jade and Soft Sea Foam

by Joanne James22. March 2021 18:40

As promised, I had a little extra crafty time at the weekend so I have another card to share today, this time using the current Fab Friday sketch and this week's colour palette over at The Color Throwdown:


As I was pondering two shades of green with gold and white, I was drawn to a suite from the annual catalogue that I've had for some time but barely used - take a look:


Here's the low-down on today's card:

Forever Greenery - Today's card features lots of elements from the Forever Greenery Suite. The Forever Greenery paper was the starting point for today's card. These papers have some beautiful patterns featuring lush greenery and I chose one of the simpler designs, a washed Just Jade paper with a single repeating Soft Sea Foam leaf stem. 

Forever Fern - I stamped a similar piece of leaf foliage from the Forever Fern stamp set in Just Jade onto Soft Sea Foam cardstock and diecut it with the corresponding Forever Flourishing Dies. The detail on these stamps is amazing - they are another of the Distinktive range that appear almost 3-dimensional when stamped. So pretty! 

Forever Gold - I paired my stamped stem with a couple of decorative stems from the Forever Gold laser-cut paper that is also part of the suite. I used one outline and one solid leaf stem for contrast. Along with a sprinkling of gilded gems, I think they really lift the detail in this corner of the card:

A simple 'hello' sentiment and a piece of Just Jade ribbon finish my card. I love greens and must confess that having made this card I wondered to myself why I hadn't used it more. Not that you need to restrict yourself to greens with this set; my dear friend Jan Clothier in New Zealand has made many a fabulous card with the Forever Fern stamp set and many of them in colours other than green; you can check out her Thinking Stamping blog here if you'd like to see some of her Forever Fern creations. That said, I hope you've enjoyed my greens today, as I've another card featuring this suite to share with you later this week!

Here is the visual summary of the key products used on today's project for you to pin for easy reference:


You can see all of my 'How To' summaries on my 'How To - Tips and Techniques' Pinterest board in case you've missed any. 

this is me done for today; enjoy your evening and I'll be back tomorrow with another project for our new challenge over at CAS Colours and Sketches. Until then, happy stampin'!


Stampin' Up! Supplies Used:

Table built using Product Table Builder by The Crafty Owl - Independent Stampin' Up! Demonstrator.

Sweet Strawberry Thank You Card

by Joanne James22. March 2021 14:30

I've had a busy start to my week, with a run and a class featuring the beautiful 'Friends are like Seashells' bundle. Today I have a couple of blog posts, the first one using the sketch over at Hand Stamped Sentiments:


Such a great sketch! I decided to switch out the square for a circle to soften the edges and feature some yummy-looking strawberries and the Sweet Strawberry bundle - take a look:


Here's the low-down on today's card:

I cut up some of my Sale-A-Bration Berry Delightful DSP for my focal cluster of strawberries and blossoms, punching out the shapes with my Strawberry Builder Punch - I just love the easy watercoloured look of these papers, and added some tone-on-tone stamping of additional blossom and leaves from the Sweet Strawberry stamp set in Granny Apple Green onto my Soft Sea Foam base and blended in some extra Soft Sea Foam ink with my blending brush, before running through my Subtle Embossing Folder for some added light texture. I embossed my sentiment in white onto a contrasting Real Red banner, adding some twine and pearls to finish.


Here is the visual summary of the key products used on today's project for you to pin for easy reference:


You can see all of my 'How To' summaries on my 'How To - Tips and Techniques' Pinterest board in case you've missed any. 

I'm also liking today's card up over at SUO Challenges where they have the theme of 'sweet things - food and drink'. These strawberries definitely look good enough to eat, which will have to do for a few months yet until the real thing comes into season here in the UK in mid June.

Enjoy your day; I'm off on the school run but I'll be back later with another card from my crafty weekend endeavours! Until then, happy stampin'!


Stampin' Up! Supplies Used:

Table built using Product Table Builder by The Crafty Owl - Independent Stampin' Up! Demonstrator.

Miss You Hot Dog Clean and Simple Card PP533

by Joanne James21. March 2021 09:00

Today it's Sunday and time for this week's new challenge over at The Paper Players! It's the turn of the fabulous Ann to host this week and she has a fun clean and simple challenge for us to work with:


I decided to open an as-yet unused stamp set for a fun clean and simple card - take a look:


Here's the low-down on today's card:

I thought this sweet dachshund would make the perfect focal point for my card today! I gave him a plaid coat using some retired Plaid Tidings DSP left over from last season and did some selective masking so that he could carry a resin-heart embellished note, having coloured my heart a peach colour using my Calypso Coral Blends:


Both my choice of canine and sentiment were chosen with the current challenge over at CASology, where the codeword is  'long' - a sausage dog and a 'miss you' sentiment seemed the perfect fit! I also used the Color Dare TicTacToe Challenge colours in the first column (peach, peacock, cinnamon). I added a little extra detail to the inside of my card too:


I have made a stack of these cards and decided to pop them in the post this week to friends that I haven't had the opportunity to catch up with for some time. Here's hoping they brighten someone's day!

Here is the visual summary of the key products used on today's project for you to pin for easy reference:


You can see all of my Product and 'How To' summaries on my 'How To - Tips and Techniques' Pinterest board in case you've missed any. 

Before you reach for your ink and papers, check out what our amazing team has created to inspire you this week:

  
 And remember - it's Clean and Simple week, so:
  • Minimal layers
  • Little or no embellishments
  • Lots of white space (no pattern)
 
Here's a quick recap of our challenge rules:
 
1.  Create a new paper project
2.  Upload your creation to your blog with a link back to us and provide a direct link to the post featuring your challenge submission.
3.  Please link your card to no more than four challenges, TOTAL.
4.  Have FUN!

You can see all of my 'How To' summaries on my 'How To - Tips and Techniques' Pinterest board in case you've missed any. 

Enjoy your day; I'll be back tomorrow with another project. Until then, happy stampin'!


Stampin' Up! Supplies Used: 

Table built using Product Table Builder by The Crafty Owl - Independent Stampin' Up! Demonstrator.
 

Mini Catalogue

BROWSE THE CATALOGUE

The mini catalogue is now live! Read and download your copy here.

Shop Online

Access my online shop 24 x 7, 365 days of the year:

Current April hostess code:

VDKNV7BH

Shop Online

Join My Team

It's always a great time to join Stampin’ Up! New team members can get £130 worth of products for only £99 + free business supplies + free shipping + all the fun being a part of Stampin’ Up! Stampin' Up! has something for everyone: join my growing team and benefit from my support to enjoy Stampin' Up! however you choose.

If you're interested, call me for a chat to understand how I can help you realise your goals. Alternatively, if you have already decided to sign up and you just can't wait, please click here for the link to the online form where you can sign up and order your starter kit right away! 

Latest Kit!

Stampin Cut and Emboss

The Rock Legend Kit has all you need to make 8 cards with coordinating envelopes. Along with the new Panda Friends Kit, both are available from January 4th for just £14 each - get yours here!

2023-24 Annual Catalogue

BROWSE THE CATALOGUE

Click on the catalogue for a full list of current SU! supplies - if you would like to order any of the items featured, please drop me a line at [email protected] or give me a call on 07773 421446 - I'd be happy to help.

New Online Exclusives

There are new products available exclusively in the online store from 5 March - check them out here.

About Me

Hi I'm Joanne and live in Northampton and when I'm not looking after my husband and two beautiful children, am an avid crafter with a passion for all things Stampin' Up!

I must confess that I have never been a big rubber stamper - until I discovered Stampin' Up! that is. I love the fact that I can get such great results with co-ordinating stamps, inks, papers and punches - the possibilities are endless! Join me on my stamping journey as I share the things I love and be inspired to create amazing things yourself!

Follow Me

Monthly Newsletter

Box Builder

Click the button above to use Box Buster to create your custom box design using the Envelope Punch Board!

Kits Collection Now Available!

Stampin Cut and Emboss

The new Kits Collection from Stampin' Up! is now available!

Click here to see the current kits available and order yours online today.

I Design For


Stampin' Up Stuff

This is my personal blog and is not endorsed by Stampin’ Up! I hope you find it a plentiful source of ideas and personal inspiration but please don't copy my designs for contest submission or use for classes, publication or sale without express permission.