Around The Bend CAS Thank You Card CCS 504

by Joanne James7. February 2023 13:00

It's Tuesday and time for a new challenge over at CAS Colours & Sketches. We are into the second month of the year and I am your hostess for February! Our first challenge is a colour challenge: 


For my card today I took the opportunity to have another play with my Around the Bend Dies and create a clean and simple thank you card - take a look:


Here's the low-down on today's card:

Today's card features the detailed corner die. I added a piece of Country Gingham Balmy Blue check to my Balmy Blue card base, then overlaid a piece of white featuring the corner diecut on top. Onto this white panel, I stamped a simple 'thanks' from the 'Biggest Wish' stamp set and added a diecut flower with leaves using other dies in the set:

 I love the embossed detail on the diecuts in this set - it adds interest and allows a single flower to take centre stage, with nothing else needed to compliment that pretty corner detail.

Here is the visual summary of the key products used on today's project for you to pin for easy reference:


You can see all of my 'How To' summaries on my 'How To - Tips and Techniques' Pinterest board in case you've missed any. 

As a reminder, for our colour challenges, you must use all of the stated challenge colours. You may also use neutral colours; however, the challenge colours should be the most noticeable ones featured on your card. We use Stampin' Up! color names for reference, but you are welcome to use any other companies' products as long as you match the challenge colours as closely as possible.

Enjoy your day; I'm looking forward to catching up on some crafting before a super-late school run this evening; the youngest of the James Juniors is having to forgo his weekly club hockey practice in order to participate in a whole school House Singing competition. Apparently his house is singing 'I Will Survive' by Gloria Gaynor - having listened to the practice, I'm not sure the audience will, but there we are!!

I'll be back tomorrow with another project. Until then, happy stampin'!


Stampin' Up! Supplies Used:

Table built using Product Table Builder by The Crafty Owl - Independent Stampin' Up! Demonstrator.
 

Sweet Songbirds Thank You Card PP626

by Joanne James5. February 2023 08:00

Today it's Sunday and time for this week's new challenge over at The Paper Players! It's the turn of the fabulous LeAnne to host this week and she has a fun theme challenge for you to work with:


I  used Jen's layout over at Freshly Made Sketches and the fresh colour palette over at Color Dare (I used all of the colours except Linen) and made a thank you card featuring a sweet songbird - take a look:


Here's the low-down on today's card:

I used a stencil I had made previously using one of the Basic Border Dies along with a blending brush to create a cloudy sky using Pool Party ink, then added a solid panel in the same colour that I had embossed with music using the Merry Melody 3D Embossing Folder as the backdrop for my songbird. I stamped my branch and the bird's legs onto a piece of white cardstock and fussy cut them, then stamped my bright blue songbird in Tahitian Tide, punched it out using my co-ordinating Songbird Builder Punch and popped the bird up on dimensionals for a little extra lift. A stamped punny musical greeting and a trio of additional music notes complete my scene:

I like the addition of the texture behind the bluebird and love that this bundle worked for our music theme - I haven't used it nearly enough! Not to mention I was a little pressed for time this week, so I was pleased that this card came together quite easily. I wanted to make a few in alternative colourways, but they will have to wait for another time!

If the Sweet Songbirds bundle is on your wishlist, you might be pleased to know that the Songbird Builder Punch can now be yours FREE with a £45 purchase as one of the additional products that are available this month as part of Stampin' Up!'s Sale-A-Bration promotion - for full details read last week's post here.

Here is the visual summary of the key products used on today's project for you to pin for easy reference:


You can see all of my Product and 'How To' summaries on my 'How To - Tips and Techniques' Pinterest board in case you've missed any. 

Before you reach for your ink and papers, check out what our amazing team has created to inspire you this week:

Here's a quick recap of our challenge rules:
 
1.  Create a new paper project
2.  Upload your creation to your blog with a link back to us and provide a direct link to the post featuring your challenge submission.
3.  Please link your card to no more than four challenges, TOTAL.
4.  Have FUN!

Enjoy your day; ours will be a homework-filled one! I'll be back tomorrow with another project. Until then, happy stampin'!


Stampin' Up! Supplies Used: 

Table built using Product Table Builder by The Crafty Owl - Independent Stampin' Up! Demonstrator.

New Wreath of Blooms Home Decor Kit Now Available

by Joanne James3. February 2023 13:15

Get ready for the latest addition to the Kits Collection by Stampin’ Up! The Wreath of Blooms Kit gives you everything you need to make your own home decor piece and it's now available in the online store. Roll and shape the pre-cut pieces and put your wreath on display!


This kit includes:

  • One 8" (20.3 cm) diameter chipboard wreath.
  • Pre-cut paper pieces that can be rolled and shaped into three-dimensional blossoms.
  • Multicoloured brads to keep everything together.
  • Thick twine to hang your wreath.
  • Enough adhesive* to complete the project.
  • Coordinating colours: Cajun Craze, Calypso Coral, Crumb Cake, Garden Green, Night of Navy, Pear Pizzazz, Petal Pink, So Saffron, white.

*Please note that you will need a hot glue gun for this project, which is not included in the kit.

If you would like to see this kit in more detail, please check out the video below:

This is such a beautiful kit - and would you believe, only £13 - this is an absolute bargain for a home decor kit! No excuse to not add a touch of Spring colour to your home and enjoy a little creativity in the process! 

Get yours in my online store today - just click on the link below:

Table built using Product Table Builder by The Crafty Owl - Independent Stampin' Up! Demonstrator.
 
This kit would also be a great little project for a crafty get-together with friends too; if you would like to arrange one, do get in touch!

More Reasons To Sale-A-Brate - New FREE Products Added

by Joanne James3. February 2023 12:50

We are in our second and final month of this year's Sale-A-Bration promotion: you all know that this year's Sale-A-Bration promotion will end on 28th February and in addition to hosting and joining benefits (you can read about those here) you also earn a free product for every £45/90 spend - you can see the existing items here.

Good news: from now until the 28th February, there are more reasons to celebrate! You will also be able to choose from the catalogue items below (you must use the special code as detailed as opposed to the usual item code to get one of these items free with a £45/90 spend):


Remember, you need to use the special Sale-A-Bration item code for each product - these are different to the standard product codes for these items, which are still available to purchase in the annual catalogue. 

If you have your eye on any of the other Sale-A-Bration items, do bear in mind that they will only be available whilst stocks last - it is possible that they could run out before the end of the promotion, so don't leave it to0 late to place your order. 

I'll be back soon with another project. Until then, happy shopping!


Love Cats Hanging Out For FF127

by Joanne James3. February 2023 09:00

Today I have my card for the new challenge over at Festive Friday Card Making and Paper Crafting Challenge


The challenge that we are celebrating this week is 'Galentine's Day' which is on 13th February. This celebration, falling the day before Valentine's Day, is all about celebrating female friendships. Remember the fun thing is that at Festive Friday you do not need to actually celebrate the occasion; your goal is to simply use three or more items from the inspiration list on your project. This week I really went to town and used a friendship sentiment, hearts, pink, purple, twine and something shiny and this is what I came up with:


Here's the low-down on today's card:

I wanted to use another of the comical felines in the 'Love Cats' stamp set for today's card and chose the one that paired best with the sentiment I wanted to use. I think 'I love hanging out with you' is the perfect sentiment to share some female love and let your bestie know how much you enjoy their company, don't you? 

I had a whole other layout originally planned for this card, until I saw the Try Stamping on Tuesday sketch layout - I rotated it through 90 degrees and thought the curve would be perfect for my acrobatic cat. In order to tuck the banner underneath the front of the cat to preserve the sense of perspective, I stamped the cat twice and carefully fussy cut the top half of one, so that I could adhere the banner and then add the upper portion of the cat over the top If you look closely you can see how I did this below:

I aligned the banner with the wire and stamped the sentiment in one straight line rather than as it is laid out on the original stamp as I wanted a long slim banner. It does make for a long banner, but I love the effect - and the long twine bow that ties my heart trinket follows the same contours, so I think it works. I found this little shiny heart in my retired embellishment stash and it was the exact same size as the stamped one, so was a perfect fit - serendipity indeed!

My colour scheme was inspired by the Dandy Designs designer paper I used on my car base - one of my favourite Sale-A-Bration free items this year - have you earned yours yet? You still have one more month to take advantage of the current Sale-A-Bration promotion. so don't miss out.

Finally, I'm also linking today's card up for a second entry over at Global Design Project #GDP379 where their theme this week is 'love'.

Here is the visual summary of the key products used on today's project for you to pin for easy reference:


You can see all of my 'How To' summaries on my 'How To - Tips and Techniques' Pinterest board in case you've missed any. 

How does our board inspire you? I can’t wait to see what YOU create! For more inspiration, be sure to visit the rest of the Festive Friday Card Making and Paper Crafting Challenge Design team:

 Enjoy your day and I'll be back tomorrow with another project. Until then, happy stampin'!


Stampin' Up! Supplies Used:

Table built using Product Table Builder by The Crafty Owl - Independent Stampin' Up! Demonstrator.

This Birthday Piggy CCS503 Double

by Joanne James31. January 2023 12:00

It's Tuesday and time for a new challenge over at CAS Colours & Sketches. Since we have a fifth Tuesday in January (where did this month go?!), we have a retro double challenge for you!  As a reminder, this is where we pair one of our previous colour combinations with an old sketch and you have to use both to make your card. You don't have to use an old set too (although you are welcome to!) - I decided these colours and the layout were perfect for 'This Birthday Piggy' which also means I can play along with my friends over at Just Us Girls this week where they are celebrating with clean and simple birthday cards.


As a point of note, the Just Us Girls badge this week has a great reminder of the definition of 'clean and simple' - one point of interest, lots of open space, minimal layers and few embellishments. These are the same criteria we use at CAS Colours & Sketches too so players, take note!  

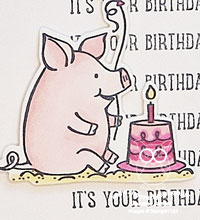
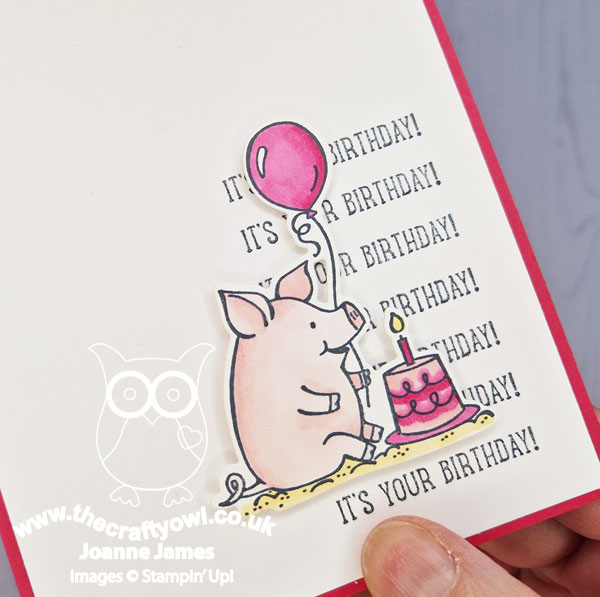
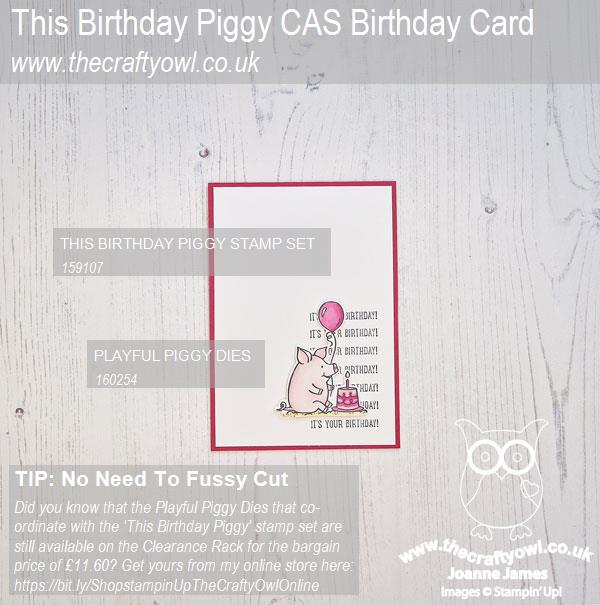
I repeated my 'It's Your Birthday!' sentiment, stamped in Tuxedo Black, in the corner of my white panel and for my focal point I used that super-sweet piggy celebrating his birthday, complete with cake and balloon:


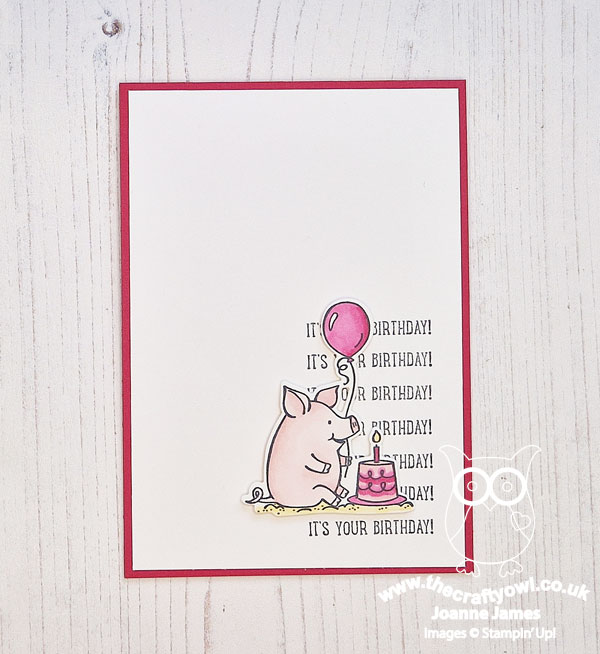
I coloured my image with my Stampin' Blends (colours substituted with the closest ones in my collection: Pink Pirouette (retired), Lovely Lipstick (retired) and So Saffron). I cut out my image using the Playful Piggy Dies - did you know these are still available here in Europe on the Clearance Rack, for the bargain price of £11.60 (reduced from £29)? This image could easily be fussy cut too, but there are so many great dies in this set in addition to those that cut out the images, they are definitely worth the purchase:

That's all there is to it - an easy, fun clean and simple birthday card!

Here is the visual summary of the key products used on today's project for you to pin for easy reference:


You can see all of my 'How To' summaries on my 'How To - Tips and Techniques' Pinterest board in case you've missed any. 

As a reminder, for our colour challenges, you must use all of the stated challenge colours. You may also use neutral colours; however, the challenge colours should be the most noticeable ones featured on your card. We use Stampin' Up! color names for reference, but you are welcome to use any other companies' products as long as you match the challenge colours as closely as possible.

Enjoy your day and I'll be back tomorrow with another project. Until then, happy stampin'!

Edited to add: My cute birthday piggy was Chic of The Week over at Just Us Girls - woohoo!


Stampin' Up! Supplies Used:

https://www.stampinup.uk/products/playful-piggy-dies?demoid=5006714

Table built using Product Table Builder by The Crafty Owl - Independent Stampin' Up! Demonstrator.

Dainty Delights For A White Wedding

by Joanne James31. January 2023 11:14

Today I'm squeaking in another entry for the challenge over at Time Out that was also inspired by the current AAA Cards Challenge of white on white and this week's Global Design Project #GDP379 theme of Love:


I love that Beth Pearson quote on the Time Out badge and it got me thinking about love in the context of weddings - the time when everyone should feel this way about the person they are standing in front of, right? I love the purity of white for a wedding card so couldn't resist the opportunity to create a clean and simple wedding card featuring a little of 'something old, something new' take a look:


Here's the low-down on today's card:

All About Texture - When working with white-on-white, it's good to think about layers and texture to create interest. For a clean and simple card, there's a need to create interest without overwhelm and still preserve unpatterned 'white space'. The new Dainty Delight Dies are perfect for adding a delicate touch; each of the skinny flowers and stems has a subtle embossed detail that is perfect for clean and simple cards. I created a bough of flowers and greenery, and tucked it under my diecut sentiment and allowed it to flow freely across the front of my card. 

Forever and Always - I used a sentiment from the retired 'Forever and Always' bundle, heat-embossing the words 'Forever &' in silver and then adding the large diecut 'Always' as the main focus of my card. I do love a good sentiment diecut and can honestly say I will never part with my 'Always' dies. 

A Standout Cut - I adhered my thick white cardstock to a foam adhesive sheet before cutting out the word 'Always' as I wanted to create a little height another way to add interest to an all-white, clean and simple white-on-white card:


I really love this card - all I need now is the good news that anyone I now is getting married so that I have the opportunity to send it!

Here is the visual summary of the key products used on today's project for you to pin for easy reference:


You can see all of my 'How To' summaries on my 'How To - Tips and Techniques' Pinterest board in case you've missed any. 

Enjoy your day and I'll be back tomorrow with another project. Until then, happy stampin'!


Stampin' Up! Supplies Used:

Table built using Product Table Builder by The Crafty Owl - Independent Stampin' Up! Demonstrator.

Love For You Trifold Valentines Card PP625

by Joanne James29. January 2023 08:00

Today it's Sunday and time for this week's new challenge over at The Paper Players! It's my turn to host this week and I have my favourite, a sketch challenge, for you to work with:


I took my inspiration from the pink and red hearts and flowers in the top right corner of the Hand Stamped Sentiments inspiration board and decided to make a slightly fancier card for a loved one today featuring the Love For You bundle - take a look:


Here's the low-down on today's card:

Today's card is a trifold card. I wanted to use the Love For You layered dies in a different way, so decided to make a two-colour tri fold card and cut each piece out of the alternating layers. I cut the largest aperture from the front section, then cut the second aperture from the second flap, having first added a piece of gingham to the centre of the panel:


 The last skinny set of diecuts were adhered to the inside of the card, with the 'so much love' being adhered with foam sheets for added dimension. I also added a small stamped sentiment and a sprinkle of hearts. The card has a double ribbon bow tie closure, tied through a couple of diecut slits. Here's another photo of the front that shows the detail of the layering, depth and dimension, along with the the pretty stamped pearl-centred flowers and diecut leaves that I used to accent my focal sentiment:


 A few hearts and a sprinkle of in-colour dots complete my card. I love the layered effect of these dies and the trifold really steps it up, yet is easy to achieve. What do you think? I'd love to hear your thoughts - do leave me a comment below.

Here is the visual summary of the key products used on today's project for you to pin for easy reference:


You can see all of my Product and 'How To' summaries on my 'How To - Tips and Techniques' Pinterest board in case you've missed any. 

Before you reach for your ink and papers, check out what our amazing team has created to inspire you this week:

Here's a quick recap of our challenge rules:
 
1.  Create a new paper project
2.  Upload your creation to your blog with a link back to us and provide a direct link to the post featuring your challenge submission.
3.  Please link your card to no more than four challenges, TOTAL.
4.  Have FUN!

Enjoy your day; I'll be back tomorrow with another project. Until then, happy stampin'!


Stampin' Up! Supplies Used: 

Table built using Product Table Builder by The Crafty Owl - Independent Stampin' Up! Demonstrator.

Love For You Love You So Much Valentine AYSI291

by Joanne James27. January 2023 12:00

Today I'm sharing my design team card for our new challenge over at As you See It where it's time for a colour challenge, chosen by me:


I love this colour combo, but when I saw the fabulous creations by the rest of the team I did wonder if my creation truly did them justice! I went for another Valentine's card - inspired by the words over at Time Out and perfect for the challenge over at Paper Craft Crew where I haven't played for a while and love is in the air too - and created another card for someone I love; take a look:


 Here's the low-down on today's card:

I went with a skinny diecut sentiment courtesy of the Love For You Dies and allowed it to overhang my diecut circle, and decorated the edge with a selection of hearts and flowers stamped and cut from the same bundle. I thought the blues were a nice contrast to the pinks and great for a not-too-girly Valentine's or anniversary card; I added some of the new Essentials Enamel Dots in Night of Navy to the centre of my flowers for added embellishment: 

For my card base I used one of the Tea Boutique pre-printed notelets in Turquoise Tide - I love the faux-texture of the finish on this paper. The same pattern can be found in the Tea Boutique DSP pack too if you wanted to make your own base. 

I really love the combination of these colours and can't wait to see what everyone does with them for this challenge!

Here is the visual summary of the key products used on today's project for you to pin for easy reference:


You can see all of my 'How To' summaries on my 'How To - Tips and Techniques' Pinterest board in case you've missed any. 

Here's a summary of our challenge rules:

  • Create any card, scrapbooking page, 3D project or packaging project that fits the challenge.
  • Please include the challenge graphic and link back to the challenge in your blog post. Turn off word verification so we can leave you lots of lovely comments. Make sure you link the post not the whole blog to the Linky. Use #AYSIXXX when uploading to a public gallery.
  • If you’re unsure about ‘the rules’, check the details under the Challenge Guidelines tab on the As You See It Challenge homepage.
  • In a colour challenge, black or other neutral can be used in outlines and sentiments but no other colours should be included. Stampin’ Up colours are used for reference but colours that are a close match are welcome.
We look forward to seeing your creations in the AYSI gallery.

Enjoy your day and I'll be back tomorrow with another project. Until then, happy stampin'!


Stampin' Up! Supplies Used:

Table built using Product Table Builder by The Crafty Owl - Independent Stampin' Up! Demonstrator.

Adorable Owls You're So Cute Valentines Card TTT194

by Joanne James26. January 2023 16:00

It's Thursday and time for a new challenge over at TicTacToe! It's the turn of Team X to host this week and I am the featured designer this week. This is the fun board that we are playing along with: 


I went down the first column with diecut, heart and patterned paper and had another play with those Adorable Owls, taking my inspiration too from the scattering of red hearts in the inspiration photo over at Hand Stamped Sentiments - take a look:


Here's the low-down on today's card:

I went with a similar layout to the card I shared with you previously, as I wanted to create another sentiment using my Alphabet A La Mode Dies. This time I added my 'Hoot!' having stamped a shower of hearts behind the 'O', and finished my sentiment with a heat-embossed one from the Adorable Owls stamp set. I used the other two owls in the set, again coloured with my Stampin' Blends and popped up on dimensionals on wither side of the central panel: 

I used a piece of the Country Lane Floral DSP for my base this time as I wanted even more hearts - it is a Valentine's Day card, after all!

Here is the visual summary of the key products used on today's project for you to pin for easy reference:


You can see all of my Product and 'How To' summaries on my 'How To - Tips and Techniques' Pinterest board in case you've missed any. 

A tictactoe board offers so many creative possibilities - how does this week's board inspire you? Why not have a go? We would love to see you in the gallery and who knows - you might be selected for Designer's Choice and be eligible to be a guest designer on a future challenge. 

Enjoy your day; I'll be back tomorrow with another project. Until then, happy stampin'!


Stampin' Up! Supplies Used: 

Table built using Product Table Builder by The Crafty Owl - Independent Stampin' Up! Demonstrator.

Mini Catalogue

BROWSE THE CATALOGUE

The mini catalogue is now live! Read and download your copy here.

Shop Online

Access my online shop 24 x 7, 365 days of the year:

Current April hostess code:

VDKNV7BH

Shop Online

Join My Team

It's always a great time to join Stampin’ Up! New team members can get £130 worth of products for only £99 + free business supplies + free shipping + all the fun being a part of Stampin’ Up! Stampin' Up! has something for everyone: join my growing team and benefit from my support to enjoy Stampin' Up! however you choose.

If you're interested, call me for a chat to understand how I can help you realise your goals. Alternatively, if you have already decided to sign up and you just can't wait, please click here for the link to the online form where you can sign up and order your starter kit right away! 

Latest Kit!

Stampin Cut and Emboss

The Rock Legend Kit has all you need to make 8 cards with coordinating envelopes. Along with the new Panda Friends Kit, both are available from January 4th for just £14 each - get yours here!

2023-24 Annual Catalogue

BROWSE THE CATALOGUE

Click on the catalogue for a full list of current SU! supplies - if you would like to order any of the items featured, please drop me a line at [email protected] or give me a call on 07773 421446 - I'd be happy to help.

New Online Exclusives

There are new products available exclusively in the online store from 5 March - check them out here.

About Me

Hi I'm Joanne and live in Northampton and when I'm not looking after my husband and two beautiful children, am an avid crafter with a passion for all things Stampin' Up!

I must confess that I have never been a big rubber stamper - until I discovered Stampin' Up! that is. I love the fact that I can get such great results with co-ordinating stamps, inks, papers and punches - the possibilities are endless! Join me on my stamping journey as I share the things I love and be inspired to create amazing things yourself!

Follow Me

Monthly Newsletter

Box Builder

Click the button above to use Box Buster to create your custom box design using the Envelope Punch Board!

Kits Collection Now Available!

Stampin Cut and Emboss

The new Kits Collection from Stampin' Up! is now available!

Click here to see the current kits available and order yours online today.

I Design For


Stampin' Up Stuff

This is my personal blog and is not endorsed by Stampin’ Up! I hope you find it a plentiful source of ideas and personal inspiration but please don't copy my designs for contest submission or use for classes, publication or sale without express permission.