Friends Are Like Seashells Glossy Shell Trio Card

by Joanne James21. June 2021 19:25

I've had a busy day today, having spent the morning with a group of lovely ladies hosting my latest online class. That was all about pansies; the card I'm sharing here today though is all about seashells for the current Fusion challenge:

I used both the sketch and the jar of seashells as my inspiration and this is what I came up with:


Here's the low-down on today's card:

This card really did evolve as I made it. The starting point for my card was the sand dollar-patterned DSP I used on my card base and I decided to use the same colours for my trio of shells. Rather than stamp them though, I fussy cut them from another of the sheets of Sand and Sea DSP as I wanted to use these shell designs but not ones that were as large as the stamped versions. I fussy cut my shells, embossed them with the Seashells 3D embossing folder, added some frosted white shimmer paint then added clear Crystal Effects to give them a glossy shine:


Having heat-embossed my sentiment in white, I added a shadow by stamping again in Early Espresso to make the words stand out a little better against the sandy background. A few opal rounds complete my card.

I really love the effect of those glossy shells - with the frosted shimmer inside and the embossed detail beneath the glossy exterior, they really are quite eye-catching in real life.

Here is the visual summary of the key products used on today's project for you to pin for easy reference:


You can see all of my 'How To' summaries on my 'How To - Tips and Techniques' Pinterest board in case you've missed any. 

Enjoy your evening and I'll be back tomorrow with another project. Until then, happy stampin'!


Stampin' Up! Supplies Used: 

Table built using Product Table Builder by The Crafty Owl - Independent Stampin' Up! Demonstrator.

Clean and Simple Sweet Strawberry Card PP546

by Joanne James20. June 2021 08:00

Today it's Sunday and time for this week's new challenge over at The Paper Players! It's my turn to host this week and I have a clean and simple challenge for you to work with:


Fruit and berries - you can use either, or both, on your card this week but remember to keep it clean and simple! I decided to go with strawberries for my fruit today and paired them with this week's Color Throwdown colours and the CAS(E) The Designer challenge over at Global Design Project #GDP296 this week - take a look:


Here's the low-down on today's card:

I was intrigued by the idea of CASEing the lovely Emma Goddard's card and decided to use the strawberry blossom stamp and single strawberry from the 'Sweet Strawberry' stamp set in stamped-off Gray Granite to create the soft stamped panel that forms the basis of my card front. I added a panel of block stripes using the CTD colours which are perfect for strawberries along the left-hand side. I added a white-on-black heat-embossed sentiment onto a stitched label from the Tasteful Labels Dies and mounted it on some (retired) Poppy Parade ribbon. A trio of clear sequins complete my clean and simple card:

I haven't made a card like this before but I really like the effect. I think it could be quite addictive - I can think of lots of sets that would work in this way. 

Here is the visual summary of the key products used on today's project for you to pin for easy reference:


You can see all of my Product and 'How To' summaries on my 'How To - Tips and Techniques' Pinterest board in case you've missed any. 

Before you reach for your ink and papers, check out what our amazing team has created to inspire you this week:

Here's a quick recap of our challenge rules:
 
1.  Create a new paper project
2.  Upload your creation to your blog with a link back to us and provide a direct link to the post featuring your challenge submission.
3.  Please link your card to no more than four challenges, TOTAL.
4.  Have FUN!

You can see all of my 'How To' summaries on my 'How To - Tips and Techniques' Pinterest board in case you've missed any. 

Enjoy your day; as it's Father's Day that will be the focus here today. I'm not sure that it will be dry enough for a BBQ - the last few days have been quite a bit cooler, but either I'm sure there will be fun in store! I'll be back tomorrow with another project. Until then, happy stampin'!

Stampin' Up! Supplies Used:

Table built using Product Table Builder by The Crafty Owl - Independent Stampin' Up! Demonstrator.

Sweet Strawberry Thank You Card FMS490

by Joanne James19. June 2021 20:37

Happy Saturday - it's the weekend! Today I'm sharing a card inspired by Jen B's layout over at Freshly Made Sketches:

I had the Sweet Strawberry bundle out on my desk, so thought I'd combine a little something old with something new for today's card - take a look:


Here's the low-down on today's card:

Sweet Strawberries - I used the Sweet Strawberry stamp set and Strawberry Builder Punch as the focus for my card today, retaining Jen's circle and using it as a base for a couple of punched strawberries and leaves.  I also added a little additional decoration inside my card:

Something Old - My 'something old' is the Berry Blessings DSP that I used, that was one of the free gifts with Sale-A-Bration earlier this year. I used if for my card base and stitched rectangle, and also punched my strawberries from the paper. Don't you just love this bold red and green combo?

Something New - My 'something new' is the checked embossing folder I used on my white panel. This check reminds me of picnic baskets so I thought would work well with the summery strawberries! Not that there's much chance of a picnic here at the moment - our beautiful sunny weather has been replaced with torrential rain all day yesterday!

Here is the visual summary of the key products used on today's project for you to pin for easy reference:


You can see all of my 'How To' summaries on my 'How To - Tips and Techniques' Pinterest board in case you've missed any. 

Enjoy your evening and I'll be back tomorrow with another project. Until then, happy stampin'! 

Stampin' Up! Supplies Used:

Table built using Product Table Builder by The Crafty Owl - Independent Stampin' Up! Demonstrator.

In Colour Monochrome Sending Hugs Friendship Cards

by Joanne James17. June 2021 17:00

It's Thursday and time for a new challenge over at TicTacToe! It's the turn of Team X to host this week and the lovely Felicita our fearless leader is our featured designer this week. This is the fun board that we are playing along with: 


I went with the first column with Friendship/Any Colour/Sentiment and decided to make a set of cards for my in-colour club using one of my favourite new bundles - take a look:


Here's the low-down on today's card:

Sending Hugs - This is the second time I've used the Sending Hugs bundle - you can see my previous card here. Today's card is similar in layout, but today I went full-on monochrome, stamping the large floral cluster tone-on-tone before adding my diecut sentiment. This is a great way to use this stamp set if you don't want to do a lot of colouring of the individual elements. 

Layering Hugs Dies - The Layering Hugs Dies are so beautiful and really do all the work on this card to turn it into something special. I paired my 'HUGS' with a stamped 'sending you', this time cut with a little label die that also comes in the set - so useful! How pretty is the layering on this card?


In-Colour Club - Whilst Fresh Freesia is my personal favourite of the new 2021-23 In-Colours, I made this card in each of the new in-colours to include in last month's In-Colour Club packs. Here are some of the other colourways (minus Soft Succulent):


Do you have a favourite new in-colour? Do leave me a comment below - I'd love to hear your thoughts.

Here is the visual summary of the key products used on today's project for you to pin for easy reference:


You can see all of my Product and 'How To' summaries on my 'How To - Tips and Techniques' Pinterest board in case you've missed any. 

A tictactoe board offers so many creative possibilities - how does this week's board inspire you? Why not have a go? We would love to see you in the gallery and who knows - you might be selected for Designer's Choice and be eligible to be a guest designer on a future challenge. 

Enjoy your evening; I'll be back tomorrow with another project. Until then, happy stampin'!


Stampin' Up! Supplies Used: 

Table built using Product Table Builder by The Crafty Owl - Independent Stampin' Up! Demonstrator.

Suite Sampler Fine Art Florals Just To Say CCS424

by Joanne James15. June 2021 12:00

It's Tuesday and time for a new challenge over at CAS Colours & Sketches. Shannon is hosting this month and this week we have another colour challenge: 


For my card today I decided to highlight a stamp set that will soon be leaving us, but you might not have even noticed in the January-June mini catalogue. Do you recognise this flower?


Here's the low-down on today's card:

Suite Sampler - The flower stem on today's card looks like the flowers in the Art Gallery stamp set that is part of the Fine Art Florals Suite, and don't worry - those stamps have been carried over to the annual catalogue so they're not leaving anytime soon! - but it actually comes from the exclusive host set, Suite Sampler. This stamp set has a selection of images, each of which co-ordinates with one or other of the suites that feature in the mini catalogue. I really like this double-blossomed stem; not only does it give more mileage to my Art Gallery set, but it is also great for clean and simple cards. This set will retire at the end of the month, so if you like it you still have time to put in a big order or gather some orders between friends and earn the hostess rewards needed to be able to add it to your shopping basket. 

Ink Blending - I loved Shannon's colour choices this week and I thought the Mango Melody and Polished pink would make a lovely two-tone flower, so I used a combination of ink, Stampin' Write markers direct to stamp and a sponge dauber to gently apply the ink and blend the colour. I loved the effect so much, I cleaned my stamp and repeated the stamping, both on my envelope and the inside of my card:


Just To Say - I paired my flower with a negative 'just to say' cut using the large single die in the Floral Gallery Dies set. I will pair it with a stamped sentiment on the inside of my card from the Art Gallery set but for the time being I have left it blank so that I can stamp it to suit when my card is needed. Don't you just love that Polished Pink peeking through?

I really like the simplicity of this card - if I can find the time I'm going to make a few more in alternative colours. It's a great one to have on standby so that the greeting can be adapted as needed.

Here is the visual summary of the key products used on today's project for you to pin for easy reference:


You can see all of my 'How To' summaries on my 'How To - Tips and Techniques' Pinterest board in case you've missed any. 

As a reminder, for our colour challenges, you must use all of the stated challenge colours. You may also use neutral colours; however, the challenge colours should be the most noticeable ones featured on your card. We use Stampin' Up! color names for reference, but you are welcome to use any other companies' products as long as you match the challenge colours as closely as possible.

Enjoy your day and I'll be back tomorrow with another project. Until then, happy stampin'! 

Stampin' Up! Supplies Used:

Table built using Product Table Builder by The Crafty Owl - Independent Stampin' Up! Demonstrator.

Loose Flower Flourishes In Colour Gingham Card

by Joanne James14. June 2021 15:58

I've had a super busy day today but I managed to squeeze in a quick 30 minutes of crafting earlier to whip something up for Linda's sketch over at Freshly Made Sketches this week and I've just time to quickly type this and link up under the wire:


I was intrigued by the wide open space and those small circles/dots and having spent best part of the last week mulling over my options this is what I eventually found time to make - take a look:


 Here's the low-down on today's card:

 Whilst the sketch is a guide to be interpreted, I decided to 'stay small' with those dots and use them to showcase the pretty in colour Loose Flower Flourishes in the new catalogue. I paired them with some Fresh Freesia gingham from the Pansy Petals DSP pack and an oldie-but-goodie sentiment from 'Dressed to Impress', which I diecut with one of the new Scalloped Contours Dies and stamped in another of the new in-colours, Polished Pink. I also added a little ribbon behind and another pair of those flower embellishments - how pretty are they, right?! 

Since the front of my card was (relatively) understated, I went big with my sentiment on the inside and chose this one from 'Happiest of Birthdays':

This card was quite quick to put together, which was perfect since I was so strapped for time. It felt good to make just enough time to get it out of my head and onto paper - do you ever feel like that?

Here is the visual summary of the key products used on today's project for you to pin for easy reference:


You can see all of my 'How To' summaries on my 'How To - Tips and Techniques' Pinterest board in case you've missed any. 

Enjoy your day and I'll be back tomorrow with another project for this week's CAS Colours & Sketches challenge. Until then, happy stampin'!

Stampin' Up! Supplies Used:

Table built using Product Table Builder by The Crafty Owl - Independent Stampin' Up! Demonstrator.

Perennial Petals In Bloom Birthday Card PP545

by Joanne James13. June 2021 08:00

Today it's Sunday and time for this week's new challenge over at The Paper Players! It's the turn of the fabulous Claire to host this week and she has a colour challenge for us to work with:


I am a big lover of 'Brights' so Claire's colour choices this week were right up my street! I decided to pair them with this week's TGIF Challenges sketch to create a (slightly larger) birthday card for someone rather special who will be sweet sixteen this week - take a look:


Here's the low-down on today's card:

I decided to get another use out of my Perennial Petals Dies before they retire at the end of the month and used them to cut a large layered flower and leaf stem to flank a Bermuda Bay label cut with the Tasteful Labels Dies that is the basis for my sparkly diecut 16 numbers (retired Large Numbers Framelits - still so, so useful!). I overlaid my three elements with a heat-embossed sentiment from the 'In Bloom' stamp set that I cut in half horizontally, adding the upper portion to the outside and the lower portion to the inside of my card:

I love the TGIF sketch this week; I did take a more liberal interpretation on this one, although I think you can clearly see how it influenced the layout of my card this week. I'd like to give a shout out to the TGIF team who selected this card as their winner for Bree Renwick's Stampin' Blends challenge a couple of week's ago - thanks ladies!


This card is for the oldest of the James Juniors who turns 16 on Tuesday - where did that time go?! I'm safe to blog today as she doesn't read my blog, but I won't be sharing it to my social media channels until the big day; she has been helping me get to grips with Instagram and so checks that feed every day, so no spoiling the surprise!!

Here is the visual summary of the key products used on today's project for you to pin for easy reference:


You can see all of my Product and 'How To' summaries on my 'How To - Tips and Techniques' Pinterest board in case you've missed any. 

Before you reach for your ink and papers, check out what our amazing team has created to inspire you this week:

Here's a quick recap of our challenge rules:
 
1.  Create a new paper project
2.  Upload your creation to your blog with a link back to us and provide a direct link to the post featuring your challenge submission.
3.  Please link your card to no more than four challenges, TOTAL.
4.  Have FUN!

You can see all of my 'How To' summaries on my 'How To - Tips and Techniques' Pinterest board in case you've missed any. 

Enjoy your day; we spent the day at hockey and cricket respectively yesterday, so are looking forward to a day at home today, catching up on garden jobs and enjoying more of this glorious weather we are having before it breaks later this week. I'll be back tomorrow with another project. Until then, happy stampin'!


Stampin' Up! Supplies Used:

Table built using Product Table Builder by The Crafty Owl - Independent Stampin' Up! Demonstrator.

A Cut Above Pair For Father's Day AYSI 252

by Joanne James11. June 2021 12:00

Today I'm sharing my design team card for our new challenge over at As you See It where it's time for a theme challenge:


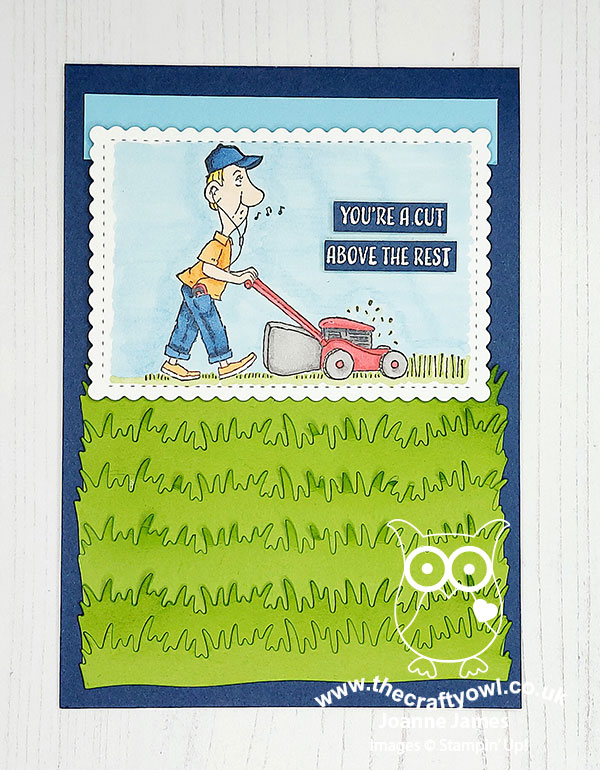
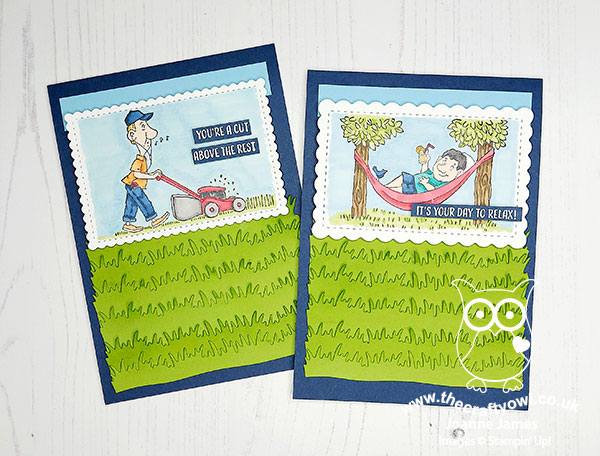
With Father's Day around the corner our masculine theme this week gave me the perfect opportunity to get organised and make my cards. It also allowed me to take some time out of my super-busy week to spend some time relaxing with my Stampin' Blends and indulge in a little colouring. I actually have two cards for you today, featuring each of the main images in the 'A Cut Above' stamp set. Take a look at the first one:


This is the card I made for my Dad and I coloured the hair, etc. accordingly - I love how you cam customise when you stamp your own card! And here's the second card I created:


Here's the low-down on today's cards:

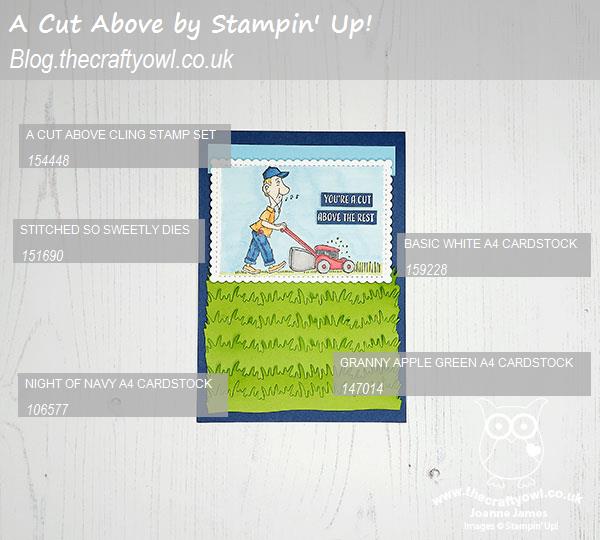
A Cut Above - Both of my cards today feature images and sentiments from the 'A Cut Above' stamp set, a stand-alone stamp set that features in the January-June mini catalogue and will be retiring at the end of the month. Whilst I'll be sad to see this set go, as I think these images work for lots of recipients, so if this set is on your wish list, snap it up now before it's too late! These images are great to colour - I've listed all of the blends I used in my product table below. I don't profess to be an expert colourist, however I do find it wonderfully relaxing.

A Growing Garden - The layout for my card today was inspired by a TGIF Challenges sketch from a few weeks ago that I didn't play along with, but kept because I thought it would work well with my image panel. I added a strip of sky at the top of my panel, then below my image I added a number of strips of Granny Apple Green grass (cut with a retired Picnic Builders Die - you could also create something similar with fringe scissors or your paper snips if you don't have a grass die) that I had lightly sponged on the tips. Given that both of the images feature grass, I thought this was a fun way to add extra detail. I'm also linking up over at Global Design Project #GDP295 this week where their theme is 'Growing Garden' - I don't know about you, but of all the things in our garden, the grass is definitely the thing that grows the quickest, closely followed by the weeds! During the early summer months, our grass definitely resembles my card:

I know my husband will definitely see the funny side of this card - he spends many hours mowing the lawn!

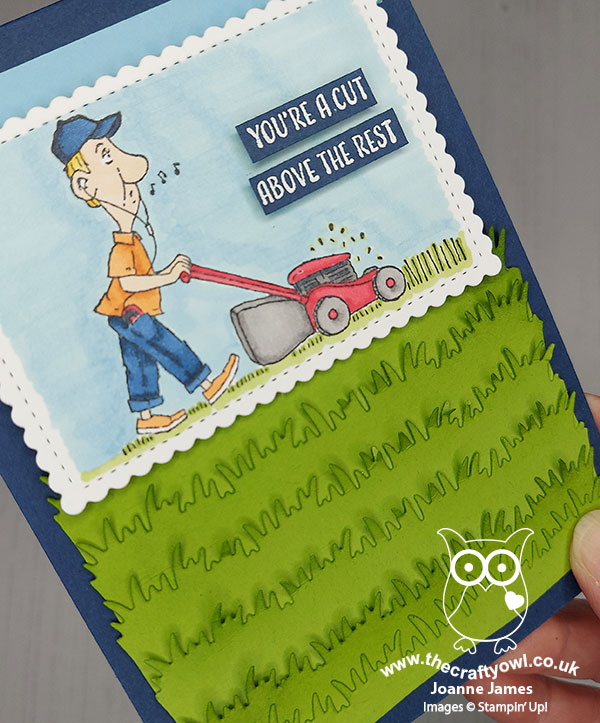
A Die Comparison - The eagle-eyed amongst you will have noticed I used two different stitched scalloped rectangles on my cards. The card above uses one of the stitched rectangles in the Stitched So Sweetly Dies set; the card below uses one of the new stitched rectangles from the Scalloped Contours Dies. You will notice that the scallop detail is much larger on the card below; in addition to this detail, some of the other dies in this new set have cut outs or alternative stitched patterning, in addition to the overall sizes being larger. I wanted to show you the difference on two similar cards so that you can see how the new dies differ:


Here's both cards together - which one do you prefer? I like them both but would love to hear your thoughts, so do leave me a comment below.


The lovely team over at SUO Challenges are asking us to create projects created using markers, so I'll also be linking up over there too.

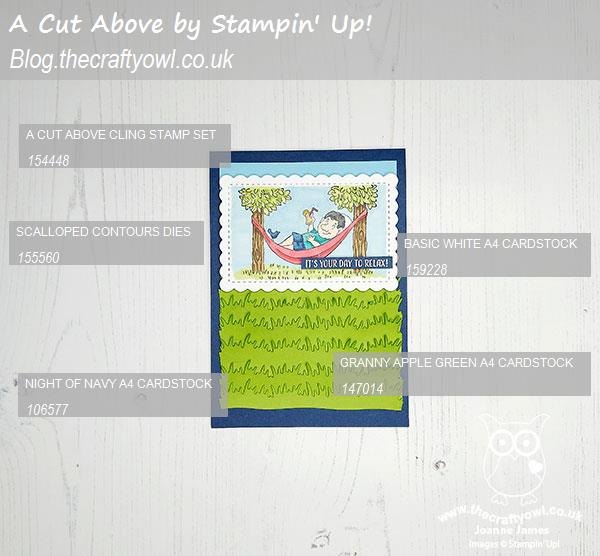
Here is the visual summary of the key products used on today's projects for you to pin for easy reference:


 And my second card:


You can see all of my 'How To' summaries on my 'How To - Tips and Techniques' Pinterest board in case you've missed any. 

Here's a summary of our challenge rules:

  • Create any card, scrapbooking page, 3D project or packaging project that fits the challenge.
  • Please include the challenge graphic and link back to the challenge in your blog post. Turn off word verification so we can leave you lots of lovely comments. Make sure you link the post not the whole blog to the Linky. Use #AYSIXXX when uploading to a public gallery.
  • If you’re unsure about ‘the rules’, check the details under the Challenge Guidelines tab on the As You See It Challenge homepage.
We look forward to seeing your creations in the AYSI gallery.

Enjoy your day; mine is set to be filled with housework, laundry and all that to the background of my piano being tuned - wish me luck! I'll be back tomorrow with another project. Until then, happy stampin'!


Stampin' Up! Supplies Used:

Table built using Product Table Builder by The Crafty Owl - Independent Stampin' Up! Demonstrator.


Friends Are Like Seashells Monochromatic Pink CAS Card CCS423

by Joanne James8. June 2021 12:00

It's Tuesday and time for a new challenge over at CAS Colours & Sketches. Apologies that I'm a little later going live with my post this week - I'm blaming the sunshine! This week's challenge is a sketch challenge and Shannon has asked that we use a trio of shapes to anchor a horizontal strip. Feel free to flip or rotate the sketch when making your card.


For my card today I decided to go pink and create something that suits the 'Beach' challenge over at Addicted to CAS too - take a look:


Here's the low-down on today's card:

Sketch Liberties - I did take a couple of liberties with Shannon's sketch this week: I decided to use 2 shells and a stitched circle for my trio of shapes and instead of using 3 shells and adding my sentiment to the horizontal panel, I stamped it onto my stitched circle. This was primarily because I wanted to use this specific sentiment and it fitted better on a circle! The basic elements of the sketch are all visible though and it's easy to see how it inspired my card. I used another of the sentiments from the 'Friends Are Like Seashells' stamp set on the inside of my card - this set has such lovely sayings:


A Question of CAS - I used a piece of Sand and Sea designer series paper for the horizontal panel of my card. There is a school of thought that says DSP shouldn't be used on a CAS card, however this patterned paper lover is of the view that it's ok if it's used sparingly, and there is still plenty of 'white space' on the remainder of the card and other general rules of clean and simple card making, such as minimal layers and embellishments are also adhered to. What do you think? Is there a place for DSP on a CAS card? I'd love to hear your thoughts.

Monochromatic Pink - One of my favourite techniques to maintain a CAS feel to a card is to use a monochromatic colour scheme. Today's card used the Flirty Flamingo pink that features in my patterned paper. I stamped my sentiment in it and heat embossed my sand dollar and starfish in white onto Flirty Flamingo cardstock, adding varying degrees of sponged white kraft ink to mute it and create some subtle colour variation. A trio of tiny (retired) white and pink faceted gems complete my card:


I am also linking up today's card over at Less Is More where it's lucky dip week and they are asking us to feature our favourite CAS card technique - I think using a monochromatic colour scheme is a useful technique when creating a clean and simple card (I'm just hoping they think there's enough white space to justify that DSP - the LIM team have high CAS standards!)

Here is the visual summary of the key products used on today's project for you to pin for easy reference:


You can see all of my 'How To' summaries on my 'How To - Tips and Techniques' Pinterest board in case you've missed any. 

Right - off to prepare the dinner prior to the school run, piano lessons and an extra hockey match on the schedule today - thank heavens for in-car air conditioning! Enjoy your day and I'll be back tomorrow with another project. Until then, happy stampin'!


Stampin' Up! Supplies Used:

Table built using Product Table Builder by The Crafty Owl - Independent Stampin' Up! Demonstrator.

Ice Cream Corner Treat Yourself Birthday Card PP544

by Joanne James6. June 2021 09:00

Today it's Sunday and time for this week's new challenge over at The Paper Players! It's the turn of the fabulous Ann to host this week and she has a seasonal theme challenge for us to work with:


We have a fun challenge for you this week - 'signs of summer'. As the weather has warmed up here in the UK this past week I am definitely seeing signs of summer in my garden! The swimming pool is out, the parasol is up and the BBQ is lit. One of my main indulgences when summer comes is ice cream - I love it! - so I decided that should definitely feature on my card today. I paired mine with the sketch layout over at Global Design Project to create a card good enough to eat - take a look:


Here's the low-down on today's card:

Sweet Ice Cream - My triple-scoop ice cream cone comes courtesy of the Sweet Ice Cream bundle: a stamp set and co-ordinating ice-cream cone builder punch. Punches are great for quick and easy cards and my ice cream came together really quickly as a result. I added some spots to the scoops and waffle detailing to the cone and fussy cut a sentiment from the same set for the front of my card, which I finished off with a birthday greeting inside:

Ice Cream Corner - The colours on my card today were taken from the Ice Cream Corner designer series paper. Whilst the Sweet Ice Cream stamp set and punch is carrying over into the annual catalogue, the paper isn't. This is now sold out in the UK; there are lots of bundles carrying over from the suites that feature in the January-June mini catalogue, but the papers and accessories often don't. Lots of them are now discounted whilst stocks last, so if you like any of them, now is a good time to stock up before they are gone for good.

Ice Cream Texture - Once I'd stamped my scoops of ice cream, I ran them through my diecutting machine with the Painted Texture Embossing Folder for some added texture and detail - you can just see it on the photo below:

I don't need any reason to treat myself when it comes to ice cream, so I might need to send this card to myself!

Here is the visual summary of the key products used on today's project for you to pin for easy reference:


You can see all of my Product and 'How To' summaries on my 'How To - Tips and Techniques' Pinterest board in case you've missed any. 

Before you reach for your ink and papers, check out what our amazing team has created to inspire you this week:

Here's a quick recap of our challenge rules:
 
1.  Create a new paper project
2.  Upload your creation to your blog with a link back to us and provide a direct link to the post featuring your challenge submission.
3.  Please link your card to no more than four challenges, TOTAL.
4.  Have FUN!

You can see all of my 'How To' summaries on my 'How To - Tips and Techniques' Pinterest board in case you've missed any. 

Enjoy your day; I'll be spending my day in the garden hoepfully enjoying the sunshine before the James Juniors are back to school again tomorrow. I'll be back tomorrow with another project. Until then, happy stampin'!


Stampin' Up! Supplies Used:

Table built using Product Table Builder by The Crafty Owl - Independent Stampin' Up! Demonstrator.

Mini Catalogue

BROWSE THE CATALOGUE

The mini catalogue is now live! Read and download your copy here.

Shop Online

Access my online shop 24 x 7, 365 days of the year:

Current April hostess code:

VDKNV7BH

Shop Online

Join My Team

It's always a great time to join Stampin’ Up! New team members can get £130 worth of products for only £99 + free business supplies + free shipping + all the fun being a part of Stampin’ Up! Stampin' Up! has something for everyone: join my growing team and benefit from my support to enjoy Stampin' Up! however you choose.

If you're interested, call me for a chat to understand how I can help you realise your goals. Alternatively, if you have already decided to sign up and you just can't wait, please click here for the link to the online form where you can sign up and order your starter kit right away! 

Latest Kit!

Stampin Cut and Emboss

The Rock Legend Kit has all you need to make 8 cards with coordinating envelopes. Along with the new Panda Friends Kit, both are available from January 4th for just £14 each - get yours here!

2023-24 Annual Catalogue

BROWSE THE CATALOGUE

Click on the catalogue for a full list of current SU! supplies - if you would like to order any of the items featured, please drop me a line at [email protected] or give me a call on 07773 421446 - I'd be happy to help.

New Online Exclusives

There are new products available exclusively in the online store from 5 March - check them out here.

About Me

Hi I'm Joanne and live in Northampton and when I'm not looking after my husband and two beautiful children, am an avid crafter with a passion for all things Stampin' Up!

I must confess that I have never been a big rubber stamper - until I discovered Stampin' Up! that is. I love the fact that I can get such great results with co-ordinating stamps, inks, papers and punches - the possibilities are endless! Join me on my stamping journey as I share the things I love and be inspired to create amazing things yourself!

Follow Me

Monthly Newsletter

Box Builder

Click the button above to use Box Buster to create your custom box design using the Envelope Punch Board!

Kits Collection Now Available!

Stampin Cut and Emboss

The new Kits Collection from Stampin' Up! is now available!

Click here to see the current kits available and order yours online today.

I Design For


Stampin' Up Stuff

This is my personal blog and is not endorsed by Stampin’ Up! I hope you find it a plentiful source of ideas and personal inspiration but please don't copy my designs for contest submission or use for classes, publication or sale without express permission.