Clean and Simple Striped Floral Square Die Card

by Joanne James30. August 2021 08:00

Happy Bank Holiday Monday to all my UK readers! It's the last holiday before Christmas so I hope you're going to make the most of it - maybe even squeeze in a little extra crafty time! Today I'm sharing another card featuring the Floral Squares Dies that I used on yesterday's card; this time using the sketch over at Fusion and colour inspiration from the fabulous photo over at Just Us Girls:


I love the Fusion sketch, which is a great layout for a wide variety of styles. I rotated the sketch through 90 degrees for my card and decided that I would focus on simple lines of block colour to draw the eye to just one of those gorgeous Floral Dies - take a look:


Here's the low-down on today's card:

I added interest by tilting my diecut square and weaving my central stripe through the die and heat-embossed my sentiment from the 'Art Gallery' stamp set in white:


Super simple and another great way to feature those floral square dies!

Here is the visual summary of the key products used on today's project for you to pin for easy reference:


You can see all of my 'How To' summaries on my 'How To - Tips and Techniques' Pinterest board in case you've missed any. 

Enjoy your day and I'll be back tomorrow with another project. Until then, happy stampin'!


Stampin' Up! Supplies Used:

Table built using Product Table Builder by The Crafty Owl - Independent Stampin' Up! Demonstrator.

Floral Squares Autumn Quartet PP556

by Joanne James29. August 2021 09:00

Today it's Sunday and time for this week's new challenge over at The Paper Players! It's the turn of the fabulous Jaydee to host this week and since it is the fifth Sunday of the month we have a tic-tac-toe challenge for you to work with:


I was spoilt for choice this week! In the end I decided to follow the diagonal and go with florals/diecut/square card and use four of the colours on the Color Dare palette to create a card to showcase my favourite Floral Squares Dies from the annual catalogue - take a look:


Here's the low-down on today's card:

Three of the colours in the Color Dare palette feature in one of my favourite plaid designs in the now retired Plaid Tidings DSP from this time last year, but I still have some left so decided it would make a great frame to surround a central square showcasing each of the Floral Squares Dies. I backed each of my squares in the corresponding solid colour and stamped a two-part sentiment in Cajun Craze that finishes inside my card:


My card also features the retired in-colour Pretty Peacock, but it looks so good with those autumnal browns and yellows I just couldn't resist:

This card could be easily recreated with other papers or colours though, so if you don't have these ones in your stash, get creative with what you have!

Here is the visual summary of the key products used on today's project for you to pin for easy reference:


You can see all of my Product and 'How To' summaries on my 'How To - Tips and Techniques' Pinterest board in case you've missed any. 

Before you reach for your ink and papers, check out what our amazing team has created to inspire you this week:

Here's a quick recap of our challenge rules:
 
1.  Create a new paper project
2.  Upload your creation to your blog with a link back to us and provide a direct link to the post featuring your challenge submission.
3.  Please link your card to no more than four challenges, TOTAL.
4.  Have FUN!

You can see all of my 'How To' summaries on my 'How To - Tips and Techniques' Pinterest board in case you've missed any. 

Enjoy your day; we have a long weekend here in the UK so will be making the most of the last public holiday before Christmas. The forecast is good - it might even be BBQ weather! I'll be back tomorrow with another project. Until then, happy stampin'!


Stampin' Up! Supplies Used: 

Table built using Product Table Builder by The Crafty Owl - Independent Stampin' Up! Demonstrator.

For An A Teacher Thank You Card

by Joanne James28. August 2021 20:52

Today I'm sharing a quick card that uses the sketch layout at Paper Craft Crew (I substituted the square with a circle) and this week's colours over at Colour Throwdown:


I love those bright primary colours and I couldn't resist the adorable inspiration photo! I decided to use some retired product and dug out my Harvest Hellos stamp set and Apple Builder Punch to create a teacher card for my stash - take a look:


A super simple design, I created a base of floating lines in blue and green and added my apple behind my heat-embossed sentiment:


No supplies list as the key items featured are retired, but if you have any specific queries, then pop a comment below and I will happily answer them.

Enjoy your evening and I'll be back tomorrow with another project. Until then, happy stampin'!


A Colourful Biggest Birthday Wish TTT128

by Joanne James26. August 2021 18:00

It's Thursday and time for a new challenge over at TicTacToe! It's the turn of Team X to host this week and our fearless leader Felicita is our featured designer this week. This is the fun board that we are playing along with: 


I loved Felicita's board this week and I could have chosen so many routes! I ended up using this week's Global Design Project #GDP306 sketch for my layout and going diagonally across the board from bottom left to top right with birthday/free/balloon (it also fits the second row of any colour ink/free/any shape die) for a simple and colourful birthday card - take a look:


Here's the low-down on today's card:

Pattern Party - I used a sheet of fun, colourful stripey paper from the Pattern Party host pack as the background for my card - this totally inspired my bright colour scheme today! I love the way this frames my central scalloped panel.

Ombre Biggest Wish - My central panel is cut with one of the Scalloped Contours Dies and I used it to create a focal point ombre 'happy' sentiment overlaid with a fussy-cut birthday, both from the 'Biggest Wish' stamp set. Love these big, bold fonts, that are useful in lots of ways.

What No Penguin? - The balloons I featured on my card are from the 'Penguin Place' stamp set - and yes, not a penguin in sight! When I originally started my card, I was intent on adding one but in the end decided I liked it just like this. I fussy cut my balloons and strings and added them to my panel for a final pop of colour.

Here is the visual summary of the key products used on today's project for you to pin for easy reference:


You can see all of my Product and 'How To' summaries on my 'How To - Tips and Techniques' Pinterest board in case you've missed any. 

A tictactoe board offers so many creative possibilities - how does this week's board inspire you? Why not have a go? We would love to see you in the gallery and who knows - you might be selected for Designer's Choice and be eligible to be a guest designer on a future challenge. 

Enjoy your day; I am taxi service to hockey training this evening -  we are starting to ramp up as the new season approaches! I'll be back tomorrow with another project. Until then, happy stampin'!


Stampin' Up! Supplies Used: 

Table built using Product Table Builder by The Crafty Owl - Independent Stampin' Up! Demonstrator.

Whimsy and Wonder Mint Macaron Christmas Tree for FMS500

by Joanne James26. August 2021 10:00

Today will be a two post day! I will be back later with my TicTacToe inspiration for our new challenge, but first I'm sharing a card that I made for a very special occasion: the fabulous team over at Freshly Made Sketches are celebrating their 500th challenge and a decade of sketch inspiration - how amazing is that?! These wonderful ladies are a constant source of challenge and inspiration and I play along whenever I can and certainly couldn't miss out on the opportunity to play with Linda's fabulous sketch this week!


I decided to pair with the new mini catalogue inspiration over at TGIF Challenges, which I had been mulling over as I have been playing with a CASE of one of the cards in their inspiration photo. It wasn't really working for me so instead I decided to take that vertical panel of the FMS sketch and instead take my inspiration from the featured Whimsy & Wonder Suite - take a look at what I came up with:


Here's the low-down on today's card:

All About The Layers - Linda's card has five layers, one for each of the decades the challenge team are celebrating. I wanted to feature the beautiful tree print in the Whimsy & Wonder specialty designer paper for my third layer, but didn't want to obscure it completely with layer 4, as I wanted the tree that is layer 5 to feel 'part' of it. So I used vellum to create my layer 4 panel, cut with one of the Ornate Layers Dies. It provides a distinct background for my focal point diecut tree, but ensures my background whilst softened can still be seen.

Trimming The Tree - I diecut the largest tree in the Christmas Tree Dies set in Mint Macaron, then added a garland cut from (retired) sparkly white glimmer paper and added tiny baubles cut from the silver holographic striped paper in the Whimsy & Wonder pack, to tie in with the holographic stars on the background paper design. I almost didn't add the baubles, but the tree definitely looks better with than without! 


Finishing Touches - I added a simple 'joy' sentiment and underpinned this with a piece of white glittered organdy ribbon tied with some silver twine. I love the addition of the subtle sparkle to complete the final element of my design.

This is my first outing with the Whimsy and Wonder Suite but I think I'll be using it again very soon!

Here is the visual summary of the key products used on today's project for you to pin for easy reference:


You can see all of my 'How To' summaries on my 'How To - Tips and Techniques' Pinterest board in case you've missed any. 

Enjoy your day and I'll be back tomorrow with another project. Until then, happy stampin'!


Stampin' Up! Supplies Used:

Table built using Product Table Builder by The Crafty Owl - Independent Stampin' Up! Demonstrator.

Penguin Place CAS Reindeer Christmas CCS 434

by Joanne James24. August 2021 12:00

This week's challenge is a sketch challenge and Bhavya has asked that we overlay a repeating sentiment with a focal point shape. Feel free to flip or rotate the sketch when making your card.


The eagle-eyed amongst you will already have noticed that I used this sketch layout for my CAS Colours & Sketches last week; I really liked this layout and couldn't wait to have a play with it! For my card today I went with a Christmassy theme:


Here's the low-down on today's card:

I stamped a repeating sentiment from the 'Penguin Place' stamp set and a punched penguin, all dressed up as a reindeer, complete with red Rudolf nose:

Super simple and so cute! I really like this layout for a clean and simple card and will definitely be using it again. I can't wait to see what entries we have in the gallery this week!

Here is the visual summary of the key products used on today's project for you to pin for easy reference:


You can see all of my 'How To' summaries on my 'How To - Tips and Techniques' Pinterest board in case you've missed any. 

We are off to visit friends today for lunch and to catch up on our holiday news. Whatever your plans, enjoy your day and I'll be back tomorrow with another project. Until then, happy stampin'!


Stampin' Up! Supplies Used:

Table built using Product Table Builder by The Crafty Owl - Independent Stampin' Up! Demonstrator.

Bloom Where You're Planted Thank You Card

by Joanne James23. August 2021 09:00

Today I'm sharing a card that uses Lou's fabulous sketch over at Just Add Ink this week and is also my entry for the current challenge over at SUO Challenges titled 'plant life':


Before I show you my card, I need to say a big thank you to the team over at Just Add Ink for choosing my Dahlia card as their Top Pick last week - thank you ladies! If you missed that card, you can see it here. For this week's card, I was tempted to go with something clean and simple but instead decided that the ribbon divider on the sketch would give me the perfect focal point for a row of leafy plants - take a look:


Here's the low-down on today's card:

I've been wanting to fussy cut some of the plants from the 'Bloom Where You're Planted' designer paper for ages, so added a brick wall bottom border edged with some (retired) green ribbon, then added a selection of fussy cut, leafy pot plants:


I added a simple thank you sentiment from the 'Art Gallery' stamp set to complete my card - you can never have enough thank you cards!

Here is the visual summary of the key products used on today's project for you to pin for easy reference:


You can see all of my 'How To' summaries on my 'How To - Tips and Techniques' Pinterest board in case you've missed any. 

We are shopping for new school shoes amongst other things today - that can only mean one thing, the start of term is drawing near! Enjoy your day and I'll be back tomorrow with another project. Until then, happy stampin'!


Stampin' Up! Supplies Used:

Table built using Product Table Builder by The Crafty Owl - Independent Stampin' Up! Demonstrator.

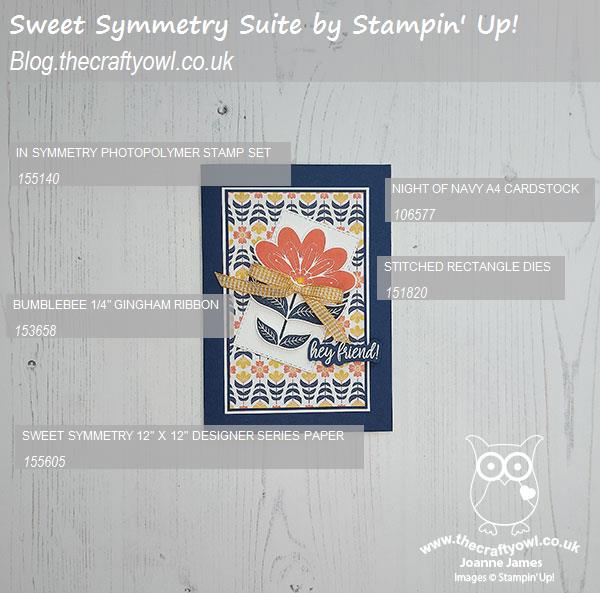
Sweet Symmetry Hey Friend Card PP555

by Joanne James22. August 2021 09:00

Today it's Sunday and time for this week's new challenge over at The Paper Players! It's the turn of our queen of diecuts, the lovely Laurie to host this week and she has my favourite, a sketch challenge, for you to work with:
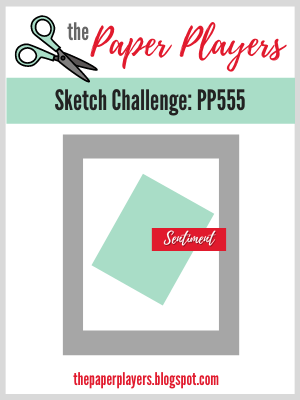
    

I loved the layering of Laurie's sketch and decided it was a great layout to showcase some pretty designer series paper - and I've always got plenty of that! In addition to my patterned paper, I added layers (6 in total!) and a gingham ribbon bow for my three items from this week's Festive Friday inspo list to create my bright and cheery card - take a look:
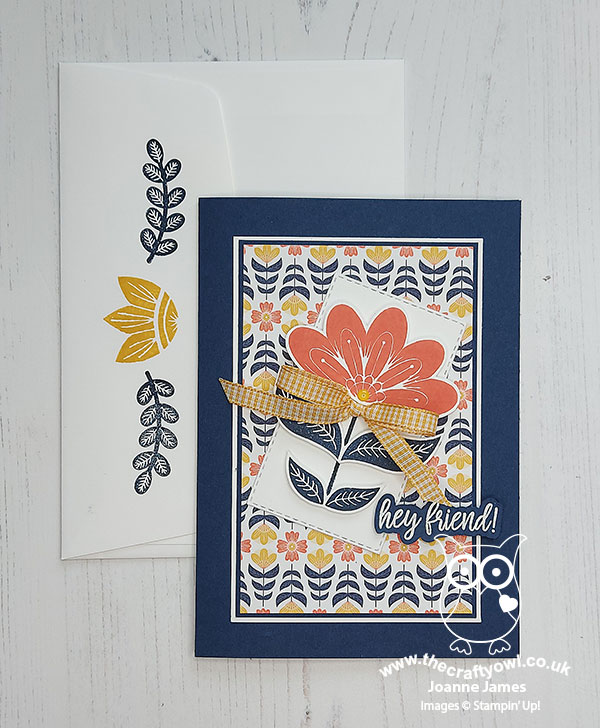
 

Here's the low-down on today's card:

In Symmetry - A big Calypso Coral flower with a double set of Night of Navy leaves make up the flower from the 'In Symmetry' stamp set that features on my angled panel today. I fussy cut the leaves and flower head and popped them up on dimensionals, adding a Bumblebee enamel dot and some Bumblebee gingham ribbon for a pop of yellow too. 

Envelope Detail - I added another of the flowers from the stamp set inside my card and added some extra stamped detail to the back of the co-ordinating envelope flap; no naked envelopes here! 

Sweet Symmetry Backdrop - The colours of my stamped flower were taken from the Sweet Symmetry designer series paper pattern that featured on the main background panel of my card. This is one of my favourite papers in this pack - I just love these bold, retro papers; they remind me of the patterns synonymous with the Irish fashion designer, Orla Kiely, don't you think?
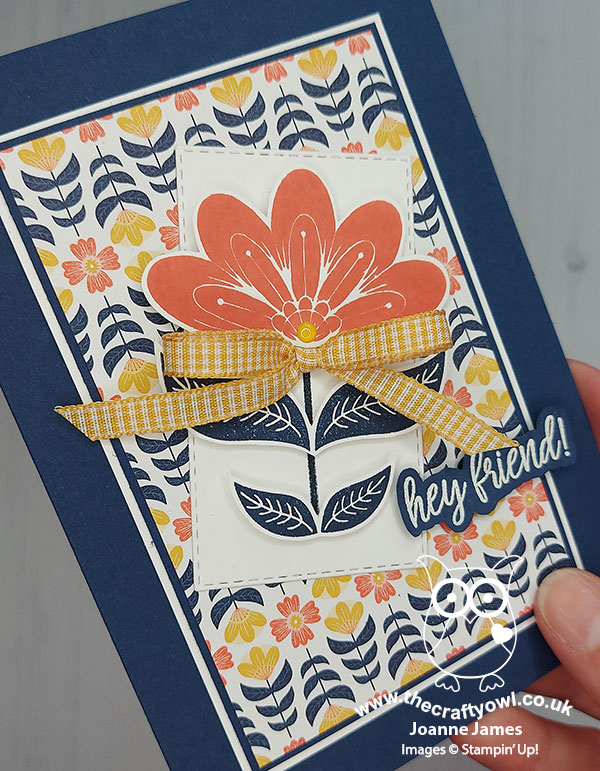
 

I just love this card, even with the quirky angled panel which I thought I might struggle with, but it turns out not a bit!

Here is the visual summary of the key products used on today's project for you to pin for easy reference:
 

You can see all of my Product and 'How To' summaries on my 'How To - Tips and Techniques' Pinterest board in case you've missed any. 

Before you reach for your ink and papers, check out what our amazing team has created to inspire you this week:

Here's a quick recap of our challenge rules:
 
1.  Create a new paper project
2.  Upload your creation to your blog with a link back to us and provide a direct link to the post featuring your challenge submission.
3.  Please link your card to no more than four challenges, TOTAL.
4.  Have FUN!

You can see all of my 'How To' summaries on my 'How To - Tips and Techniques' Pinterest board in case you've missed any. 

Enjoy your day; yesterday the weather was unexpectedly dire here, so if it brightens up today I will be looking forward to spending some time in the garden. I'm hoping to squeeze in a little crafting time too. I'll be back tomorrow with another project. Until then, happy stampin'!


Stampin' Up! Supplies Used: 

Table built using Product Table Builder by The Crafty Owl - Independent Stampin' Up! Demonstrator.

Christmas Season Corner Detail Card

by Joanne James21. August 2021 20:06

A quick card from me this evening that was inspired by Jen Mitchell's great sketch over at Freshly Made Sketches this week and the festive inspiration at Inspired By:


I thought those corners would be great for some layered foliage to frame a festive sentiment - take a look at what I came up with:


Lots of foliage, holly, pine cones and berries stamped and cut using the 'Christmas Season' stamp set and dies, and layered to frame a sentiment from the 'Merriest Moments' stamp set:


I wanted to add in a couple of candy canes too, but do you think I could find my retired candy cane dies? Nope, not anywhere! Too many craft supplies and not enough office space, that's my issue!!

Here is the visual summary of the key products used on today's project for you to pin for easy reference:


You can see all of my 'How To' summaries on my 'How To - Tips and Techniques' Pinterest board in case you've missed any. 

Enjoy your evening and I'll be back tomorrow with another project for our new challenge over at The Paper Players. Until then, happy stampin'!


Stampin' Up! Supplies Used:

Table built using Product Table Builder by The Crafty Owl - Independent Stampin' Up! Demonstrator.
 
Delighted that this card was chosen by Jen T as Perfect Princess over at Freshly Made Sketches for Challenge 499 this week!
 

Harvest Meadow Sending Thanks AYSI 257

by Joanne James20. August 2021 12:00

Hello everyone! A few blog-free days as I've been busy enjoying time with the James Juniors, cycling and activities with friends as we continue to enjoy the summer vacation. Today I'm back though and I'm sharing my design team card for our new challenge over at As you See It where it's time for a recipe challenge:


Heather came up with today's recipe and I really like it, although I did struggle with one element of it! Here's my card - can you tell which ingredient had me stumped?


Here's the low-down on today's card:

I dry embossed my background panel with the Tasteful Textile 3D Embossing Folder (tick) and then added a collection of strips of Harvest Meadow designer paper in Crumb Cake (tick) and Misty Moonlight, both of which feature wheat (tick) as does my sentiment from the 'Thinking Thanks and Peace' stamp set. I threaded my diamond weave ribbon with some linen twine (tick) and tied in a bow. Which just leaves gingham! I did struggle a little with this one, as I didn't have any gingham patterns that I could make work with the other recipe elements, so I resorted to some Crumb Cake monochrome plaid as my closest substitute and used it to back my sentiment, so there is just a thin border of it showing - it could pass for gingham, right?!


I really like the colour combo that I ended up using today; this background of strips is also great for using up those leftover scraps and offcuts and would work with lots of other patterned papers too.

Here is the visual summary of the key products used on today's project for you to pin for easy reference:


You can see all of my 'How To' summaries on my 'How To - Tips and Techniques' Pinterest board in case you've missed any. 

Here's a summary of our challenge rules:

  • Create any card, scrapbooking page, 3D project or packaging project that fits the challenge.
  • Please include the challenge graphic and link back to the challenge in your blog post. Turn off word verification so we can leave you lots of lovely comments. Make sure you link the post not the whole blog to the Linky. Use #AYSIXXX when uploading to a public gallery.
  • If you’re unsure about ‘the rules’, check the details under the Challenge Guidelines tab on the As You See It Challenge homepage.
We look forward to seeing your creations in the AYSI gallery.

Enjoy your day and I'll be back tomorrow with another project. Until then, happy stampin'!


Stampin' Up! Supplies Used:

Table built using Product Table Builder by The Crafty Owl - Independent Stampin' Up! Demonstrator.
 
 
Challenges: I used this week's sketch over at The Paper Craft Crew for my layout today.

Mini Catalogue

BROWSE THE CATALOGUE

The mini catalogue is now live! Read and download your copy here.

Shop Online

Access my online shop 24 x 7, 365 days of the year:

Current April hostess code:

VDKNV7BH

Shop Online

Join My Team

It's always a great time to join Stampin’ Up! New team members can get £130 worth of products for only £99 + free business supplies + free shipping + all the fun being a part of Stampin’ Up! Stampin' Up! has something for everyone: join my growing team and benefit from my support to enjoy Stampin' Up! however you choose.

If you're interested, call me for a chat to understand how I can help you realise your goals. Alternatively, if you have already decided to sign up and you just can't wait, please click here for the link to the online form where you can sign up and order your starter kit right away! 

Latest Kit!

Stampin Cut and Emboss

The Rock Legend Kit has all you need to make 8 cards with coordinating envelopes. Along with the new Panda Friends Kit, both are available from January 4th for just £14 each - get yours here!

2023-24 Annual Catalogue

BROWSE THE CATALOGUE

Click on the catalogue for a full list of current SU! supplies - if you would like to order any of the items featured, please drop me a line at [email protected] or give me a call on 07773 421446 - I'd be happy to help.

New Online Exclusives

There are new products available exclusively in the online store from 5 March - check them out here.

About Me

Hi I'm Joanne and live in Northampton and when I'm not looking after my husband and two beautiful children, am an avid crafter with a passion for all things Stampin' Up!

I must confess that I have never been a big rubber stamper - until I discovered Stampin' Up! that is. I love the fact that I can get such great results with co-ordinating stamps, inks, papers and punches - the possibilities are endless! Join me on my stamping journey as I share the things I love and be inspired to create amazing things yourself!

Follow Me

Monthly Newsletter

Box Builder

Click the button above to use Box Buster to create your custom box design using the Envelope Punch Board!

Kits Collection Now Available!

Stampin Cut and Emboss

The new Kits Collection from Stampin' Up! is now available!

Click here to see the current kits available and order yours online today.

I Design For


Stampin' Up Stuff

This is my personal blog and is not endorsed by Stampin’ Up! I hope you find it a plentiful source of ideas and personal inspiration but please don't copy my designs for contest submission or use for classes, publication or sale without express permission.