Detailed Deer Wrapped in Plaid Card and Gift Box

by Joanne James25. November 2019 21:30

I've had a busy day today and a fun evening spent Christmas crafting with a group of local Brownie Guides and Rainbows so I'm back late with a quick post to share another card that uses my sketch over at The Paper Players that I used for yesterday's card (you can see that card here if you missed it), this time for the challenges over at Festive Friday (my card has a woodland creature, glitter, gold and twine from the Inspo List) and Inkspire Me where metallics are the order of the day:

   # 406 - 21.11.2019 Christmas-Special METALLIC - Heike 406_we10

I decided to go all-out with the sparkle for today's card and combined a leaping gold glimmer deer cut with the Detailed Deer Thinlits combined with some festive Wrapped in Plaid designer series paper - take a look:


I used the same sentiment from 'Itty Bitty Christmas' stamp set that I used on yesterday's card, this time heat embossed in gold onto Cherry Cobbler cardstock. I even customised one of the Gold Mini Pizza Boxes to make a matching gift box:


I think they look really great together - I especially like the addition of the jingle bells to the deer on the gift box for an extra festive touch.


Here is the visual summary of the key products used on today's project for you to pin for easy reference:


You can see all of my 'How To' summaries on my 'How To - Tips and Techniques' Pinterest board in case you've missed any. 

Enjoy your evening and I'll be back tomorrow with another project. Until then, happy stampin'!


Stampin' Up! Supplies Used:

Table built using Product Table Builder by The Crafty Owl - Independent Stampin' Up! Demonstrator.

Bloom And Grow Simply Wonderful AYSI 214

by Joanne James22. November 2019 12:00

Today I'm sharing my design team card for our new challenge over at As You See It where we have a rather interesting colour challenge:


These were definitely not colours for Christmas but were perfect for a congratulations card that I needed to make for a dear friend of mine - take a look:


Here's the low-down on today's card:

Bloom And Grow - I adore the 'Bloom & Grow' stamp set - it's right up there as one of my favourite floral sets and is a cinch to cut out with the co-ordinating budding Blooms Dies. This particular floral bough that I've used today is a great one when you have only three colours to play with too. I used a piece of in-colour designer series paper (last year's design) to tone down the brightness of the Pineapple Punch card base and for the first time used the scalloped pieces in the dies set to create a channel either side of my stamped sentiment and tucked the florals in, similar to one of the samples on page 131 of the Stampin' Up! annual catalogue. 

Let's Celebrate Today - I love that larger than life ' you are simply wonderful' sentiment in this stamp set and combined it with another of the word stamps in this set 'let's celebrate you' on the inside of my card. This card is headed overseas to none other than my fabulous AYSI teamie Jan Clothier of Thinking Stamping fame; this week she was crowned as one of the Stampin' Up! Artisan designers for 2020 and I couldn't be more pleased for her - a definite cause for celebration! There's also reason for you, the reader, to celebrate today - if you don't already own the 'Bloom and Grow' bundle you might be please to know that it is available at a 15% discount as part of the current Online Extravaganza that ends tonight; so don't delay, pop your set into your shopping basket right away by clicking on the link at the bottom of this post! 

Just Choose Two - In addition to playing along at Time Out (I did not go for the optional extra of one layer on this occasion but may come back to this another time!) I am also playing along with the lovely peeps over at Just Add Ink where they have a great 'Just Take Two' challenge this week. My two were spots (on my DSP) and sparkle - this is unfortunately not as obvious in the photograph to see, but each of those yellow flowers is brushed liberally with clear Wink of Stella and the blue berries each have a coating of Shimmery Crystal Effects - trust me, in real life this card is so sparkly!!

Here is the visual summary of the key products used on today's project for you to pin for easy reference:


You can see all of my 'How To' summaries on my 'How To - Tips and Techniques' Pinterest board in case you've missed any. 

Enjoy your day; I'm off to the hospital for a second procedure to try and sort out my constantly aching and rather immobile frozen shoulder - wish me luck! Depending on my mobility I may or may not be back tomorrow with another project. Until then, happy stampin'!


Stampin' Up! Supplies Used:

Table built using Product Table Builder by The Crafty Owl - Independent Stampin' Up! Demonstrator.

A Clean and Simple Christmas Crowd for PP468

by Joanne James17. November 2019 09:00

Today it's Sunday and time for this week's new challenge over at The Paper Players! It's the turn of the fabulous Jaydee to host this week and she has a great seasonal Clean and Simple challenge for you to work with:


Since this challenge theme was the North Pole, I had to go with a Santa and his festive friends - take a look:


Here's the low-down on today's card:

I used this week's CAS(E) This Sketch for my layout and heat embossed my sentiment in white onto my Real Red card base before stamping my single stamp image from 'Christmas Crowd' in Tuxedo Black Memento ink onto my top layer of Whisper White and colouring with my Stampin' Blends. I added some clear Wink of Stella to the fur on Santa's suit and a sprinkling of snowflake sequins, before popping my panel up on dimensionals and attaching to the front of my card base. I also stamped the outline image on the inside of my card behind my sentiment:

Now I know not all of Santa's Christmas crowd can be normally found in the North Pole (cue the penguin!!) however I think for such a cute bunch we can make an exception and grant a little creative licence!

Here is the visual summary of the key products used on today's project for you to pin for easy reference:


You can see all of my Product and 'How To' summaries on my 'How To - Tips and Techniques' Pinterest board in case you've missed any. 

Before you reach for your ink and papers, check out what our amazing team has created to inspire you this week:

Here's a quick recap of our challenge rules:
 
1.  Create a new paper project
2.  Upload your creation to your blog with a link back to us and provide a direct link to the post featuring your challenge submission.
3.  Please link your card to no more than four challenges, TOTAL.
4.  Have FUN!

You can see all of my 'How To' summaries on my 'How To - Tips and Techniques' Pinterest board in case you've missed any. 

Enjoy your day; we had a day packed with sport yesterday so today will be about homework and baking for tomorrow's school charity bake sale. I have a busy week ahead but I have managed to make and photograph some other projects, so I'll be back tomorrow with more Christmas goodness to share. Until then, happy stampin'!


Stampin' Up! Supplies Used: 

Table built using Product Table Builder by The Crafty Owl - Independent Stampin' Up! Demonstrator.

Inspiring Mermaid Lunch Box Love Note

by Joanne James12. November 2019 20:00

Today I'm sharing a card that uses a fun technique that is inspired by the theme and photo inspiration for the current FUSION challenge:


I love that fabulous colourful mermaid tail cupcake and took that as my inspiration rather than the sketch this week, as I also wanted to try out a fun technique inspired by a rather unusual household item. Here's my card:


Here's the low-down on today's card:

A Magical Mermaid ... Or Two Or Three - I created a mermaid-patterned cardfront using the small solid mermaid image from the 'Magical Mermaid' stamp set; I stamped each image freehand as I wanted the spacing close than I could achieve with my stamp positioning tool. I haven't used this stamp in this set before - I usually use the large mermaid image - so it was a good opportunity to use the set in a different way. 

A Fun Technique - to achieve the multi-coloured effect, I revisited the 'oldie but goodie' baby wipe technique. I created two separate stamp pads using baby wipes and drops of three reinkers on each, then alternated stamping with each one to create my pattern. This is such a fun technique if you are trying to create variegated colour; no two stamped images are the same so it makes for colourful patterns. 

Unusual Inspiration - You may be wondering where I got my rather eclectic colour inspiration from this week; all is revealed in the photo below:


Yes, one of Rebecca's bedsets! She loves these brightly coloured mermaids and since my card is a little notecard that I slipped into her school bag as a surprise note as I sometimes do, I knew she would instantly recognise the inspiration. The thing I love most about the finished card is the watery effect of the blended colours, which seems fitting for my nautical mermaid. 

Here is the visual summary of the key products used on today's project for you to pin for easy reference:


You can see all of my 'How To' summaries on my 'How To - Tips and Techniques' Pinterest board in case you've missed any. 

So as you can see, inspiration really can be found in the most unusual of places. What is your most unusual source of inspiration in your crafting? Do leave me a comment below - I would love to know.

Enjoy your evening and I'll be back tomorrow with another project. Until then, happy stampin'!


Stampin' Up! Supplies Used:

Table built using Product Table Builder by The Crafty Owl - Independent Stampin' Up! Demonstrator.


Festive Birds of a Feather for PP467

by Joanne James10. November 2019 09:00

Today it's Sunday and time for this week's new challenge over at The Paper Players! It's the turn of the fabulous Claire to host this week and she has a great colour challenge for you to work with:


I decided I would make another Christmas card for my stash using this week's colours using the cute 'Birds of a Feather' stamp set - take a look:


Here's the low-down on today's card:

I did some layering onto my card base with a piece of Bermuda Bay DSP (this is last year's design but a current one would work just as well), along with a strip of retired glimmer paper for a pop of sparkly green, before my stitched rectangle. I did take a liberty here and used a piece of Pool Party; my birds were originally stamped on Whisper White, but the finished result was too 'white' so I fussy cut my birds and then paper-pieced two of them into a couple of outlines stamped directly onto the Pool Party rectangle, which works much better. The last birdy I popped up on dimensionals between the other two. Each of them was coloured with my Stampin' Blends and whilst it's difficult to see in the photo, I gave the fur on their Santa hats a liberal dose of clear Wink of Stella for some extra sparkle and shine. I added a couple of Granny Apple green glitter enamel dots and inked my partial sentiment with my Stampin' Write markers. I completed my sentiment by adding the last line inside my card, along with a trio of masked outlined birdies:


I was pleased with the finished card, until it occurred to me that there are four in the James 'flock' not three, and whilst I think odd numbers look better than even on a card front, it might make the recipient think we have reduced in numbers as the year has progressed! What to do? I think I need to add another birdie to the front of my envelope at least for the avoidance of doubt!! 

Here is the visual summary of the key products used on today's project for you to pin for easy reference:


You can see all of my Product and 'How To' summaries on my 'How To - Tips and Techniques' Pinterest board in case you've missed any. 

Before you reach for your ink and papers, check out what our amazing team has created to inspire you this week:

Here's a quick recap of our challenge rules:
 
1.  Create a new paper project
2.  Upload your creation to your blog with a link back to us and provide a direct link to the post featuring your challenge submission.
3.  Please link your card to no more than four challenges, TOTAL.
4.  Have FUN!

You can see all of my 'How To' summaries on my 'How To - Tips and Techniques' Pinterest board in case you've missed any. 

Enjoy your day; we have a day of homework and housework and the arrival of the muddy kit as the boys return from their rugby tour to York. Thankfully the weather stayed dry when it counted and all matches were played without incident. Alas the same couldn't be said for the female counterparts of Year 8, who were on a hockey tour to Wales this weekend and had play stopped yesterday afternoon due to - heavy SNOW!! It looks like winter has well and truly arrived here in the UK this week.

I'll be back tomorrow with another project. Until then, happy stampin'!


Stampin' Up! Supplies Used: 

Table built using Product Table Builder by The Crafty Owl - Independent Stampin' Up! Demonstrator.

Pumpkin Thankful Seasonal Wreath for AYSI 213

by Joanne James8. November 2019 12:00

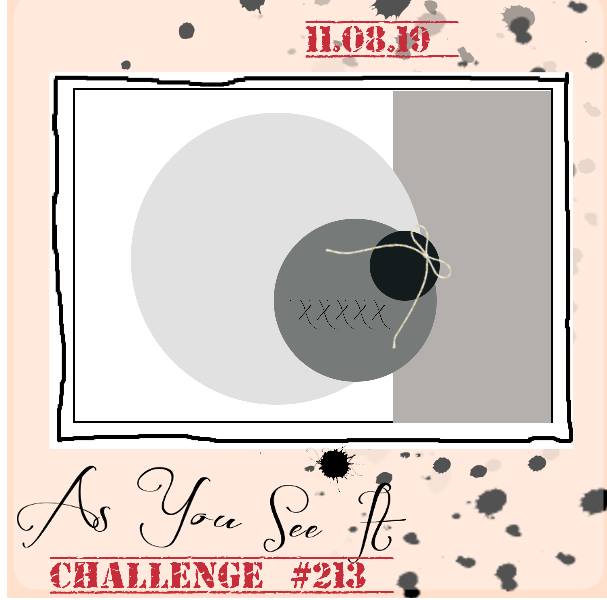
Today I'm sharing my design team card for our new challenge over at As You See It where it's time for my favourite, a sketch challenge:
       RRCB 123

 I considered a number of options before settling on using this week's muted palette over at Color Throwdown to create an autumnal thank you card - take a look:
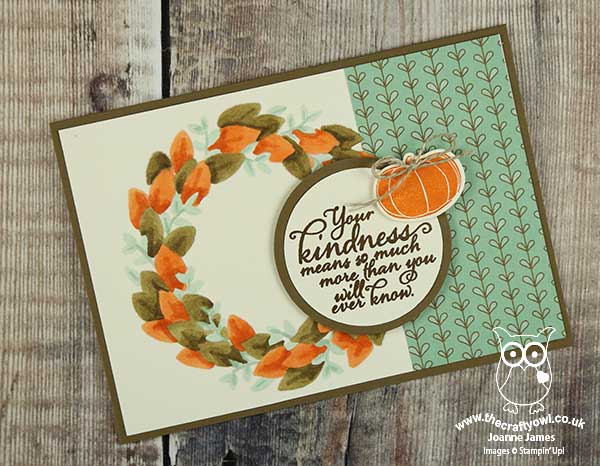
 

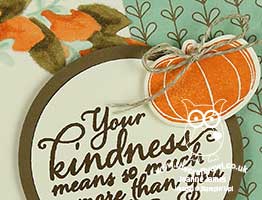
The sketch gave me the opportunity to do something that I've been wanting to try for a while with my Seasonal Wreath embossing folder. I'm also linking up with the Retro Rubber Challenge since they currently have an 'anything goes' theme. I am making a concerted effort to use up more of my retired papers and give some old favourite stamp sets some love so their theme this week is perfect: my card uses a piece of left over retired DSP and a bunch of products that are all more than a year old - read on to see just how old! Here's the low-down on today's card:

A Blended Embossed Wreath - The Seasonal Wreath is in my 'top 5' of favourite embossing folders, especially for Christmas cards. I've had mine since it was launched in 2018 and I do feel it's one of those annual catalogue 'unsung heroes' - lost in the pages at the back of the book, buried amongst the other patterns, but it's great for quick cards and works for all seasons depending on how you decorate/embellish it. I usually use it as a straight forward emboss, but I wondered what it would look like if I coloured it. I decided to try Blends in the first instance and I actually quite like the effect. It isn't as easy to see the dimension from a distance, but even in just three colours I think it gives it a new look.  

Thanks and Appreciation - The sentiment on my card comes from probably my most favourite fall stamp set ever: Painted Harvest. I've had this stamp set since it's launch in 2017 and I can't ever imagine parting with it. Such wonderful thankful sentiments and sunflower stamps that are pretty much foolproof to use and look fabulous in a wide variety of colour combinations. The best thing about it is this set features in the current Stampin' Up! annual catalogue and is still available to purchase :-) The other stamp I've used on my card today is my orange pumpkin embellishment; this stamp is from one of my old sets, 'Pick A Pumpkin', also from 2017 but now retired. I held onto this set and the co-ordinating Patterned Pumpkin Thinlits as they contain some nice pumpkin shapes that work for both fall and Halloween-themed cards alike.

Other 'Oldie but Goodies' - Other items that I've used on today's card that I've had for longer than I can remember are the circle punches I used to layer my sentiment and that piece of Paisley and Posies DSP, which is from Autumn-Winter 2016 - not that I'm a hoarder of patterned paper or anything ...!

I debated whether to add anything else to this card, but decided to leave it 'as is' and allow the wreath to take centre stage. I am enjoying experimenting a little this week and with this card it certainly felt good to use up some bits and pieces, albeit just a few - not sure I made enough of a dent to justify a shopping spree!

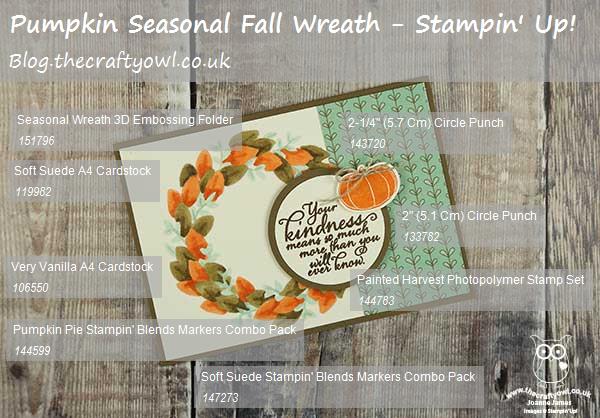
Here is the visual summary of the key products used on today's project for you to pin for easy reference:
 

You can see all of my 'How To' summaries on my 'How To - Tips and Techniques' Pinterest board in case you've missed any. 

Do check out the cards by the other members of the As you See It design team - we have all interpreted the sketch differently so there is a ton of creative inspiration!

Enjoy your day; I have a date with the ironing basket before heading out on the swim run this evening. What are your plans for the weekend? We are having a split one in the James household: the girls are at home looking forward to a weekend full of hockey, GCSE coursework and crafting, whilst the boys are on the school rugby tour to York via Nottingham. Hopefully the pitches won't be too waterlogged to play - I am looking forward to unpacking the kit bags on Sunday already!!

I'll be back tomorrow with another project. Until then, happy stampin'!


Stampin' Up! Supplies Used:

Table built using Product Table Builder by The Crafty Owl - Independent Stampin' Up! Demonstrator.

Believe in Santa with a Holly Jolly Christmas

by Joanne James7. November 2019 13:36

Today I'm sharing a card that I am hoping to squeeze in for this week's Fab Friday Challenge:


They have a great sketch and I was working on something else when I had a sudden flash of inspiration - take a look:


I decided to use my Seasonal Wreath embossing folder for that large circle as a background for my jolly Santa, which offered some theraputic colouring with my Stampin' Blends. A simple sentiment also from the 'Holly Jolly Christmas set completes my card.

Here is the visual summary of the key products used on today's project for you to pin for easy reference:


You can see all of my 'How To' summaries on my 'How To - Tips and Techniques' Pinterest board in case you've missed any. 

Enjoy your day; I have a host of things to get done today, which thankfully are indoors, unlike poor Rebecca who is outdoors taking part in a hockey tournament all day. I made sure she was dressed for the weather and I know she will be perfectly happy with her lot, but honestly it's been so cold here this last few days I would definitely rather her than me!

I'll be back tomorrow with another project for our new challenge over at As You See It. Until then, happy stampin'!


Stampin' Up! Supplies Used:

Table built using Product Table Builder by The Crafty Owl - Independent Stampin' Up! Demonstrator.

Beautiful Boughs Meets Rooted in Nature for a Woodland Christmas PP466

by Joanne James3. November 2019 09:00

Today it's Sunday and time for this week's new challenge over at The Paper Players! It's the turn of the fabulous Anne Marie to host this week and she has a fun theme challenge for you to work with:


I had a few ideas for Ann Marie's 'woodsy' theme today and decided to really go all-out to incorporate as many wood-themed elements into my card as possible. I decided to continue with another Christmas card to add to my collection and ended up creating something a little different (for me!) - take a look:


Here's the low-down on today's card:

Knock on Wood - My card has lots of elements that tie in to the wood theme: some woodland background dry embossing, a panel of retired Wood Textures DSP, the tree trunk stamp from Rooted in Nature (stamped in Crumb Cake and then sponged with Early Espresso around the edge), as well as some greenery and a couple of pine cones that could easily be spotted on a walk through the woods.

Texture, Texture - There are lots of layers and textural elements on today's card too: in addition to the dry embossing, I added shimmery white embossing paste to my greenery for  textured snow and the glimmer paper and twine bow also adds contrast. I originally started out using Jen's sketch over at Freshly Made Sketches (you can see that sketch here), but ended up adding so many layers and bits and pieces I rather lost my usual 'clean' look. Whilst I love the finished result, I will need to go back to the drawing board if I'm to put in an FMS entry this week!

Woodland Sparkle - All that wood made for a rather neutral card, with only the greens adding colour to the mix of browns. I decided to add a silver glimmer 'merry' diecut for some festive sparkle, along with some frosted epoxy droplet 'berries' and a silver and linen twine bow. I really like the finished effect.

Here is the visual summary of the key products used on today's project for you to pin for easy reference:


You can see all of my Product and 'How To' summaries on my 'How To - Tips and Techniques' Pinterest board in case you've missed any. 

I'm also linking up today's card to the Festive Friday Challenge (my card features silver, wood, texture, circles and green from the inspo list) and the challenge over at Paper Craft Crew where I went across the middle of the board: embossing paste/rustic/gone wild and the top left-bottom right diagonal: found in the forest/rustic/sponging)

Before you reach for your ink and papers, check out what our amazing team has created to inspire you this week:

Here's a quick recap of our challenge rules:
 
1.  Create a new paper project
2.  Upload your creation to your blog with a link back to us and provide a direct link to the post featuring your challenge submission.
3.  Please link your card to no more than four challenges, TOTAL.
4.  Have FUN!

Enjoy your day; we are enjoying the last day of the half-term holiday before returning the school tomorrow. We have some hockey planned and a trip to the farm shop, along with preparations for my classes this week. I'll be back tomorrow with another project. Until then, happy stampin'!


Stampin' Up! Supplies Used: 

Table built using Product Table Builder by The Crafty Owl - Independent Stampin' Up! Demonstrator.

The New Stampin' Up! Trimmer Is Here And The Exclusive Christmastime Is Here Suite Now Available

by Joanne James1. November 2019 08:00

It's the first of November and with that comes two exciting announcements! Following the withdrawal of our previous trimmer due to Stampin' Up!'s inability to obtain a reliable source of blades, I am pleased to announce that our brand new paper trimmer is available to all customers today and I can honestly say it’s excellent!


Demonstrators have had the last month to order and fall in love with it and let me tell you, fall in love I did. I LOVED the old trimmer and never thought it could be improved. But I was wrong. This one has awesome larger blades that cut like a knife through butter. The new trimmer has some of the great features of the old trimmer and some new ones of its own, in particular a great detailed grid cutting guide, no removable cutting track and an improved ruler across the join of the extendable arm. The attendees at my recent weekend craft retreat also road-tested the trimmer and were extremely positive about its performance.

The new trimmer is a great price too at only £23 which is cheaper than our last one. The trimmer is available now from 1st November but packs of additional blades will not be launched for sale till January. They will be sold in packs of 4 blades for £11.25 and I will remind you when they are available to buy in the New Year.


Christmastime Is Here Suite

There is also a new exclusive product suite being launched today called 'Christmastime Is Here' which has the most beautiful Christmas Rose stamps, dies, patterned paper with matching accessories. It is available whilst stocks last and is not in any publication.

You can purchase the whole bundle or purchase your favourite products from the bundle, whichever you prefer. There is even a limited edition bracelet which would make a lovely Christmas gift for someone or a treat for yourself maybe.

Links to my online store for all of the configurations of the Christmastime Is Here suite can be found below. You can go to the item in my shop by clicking the photo or simply search for 'Christmastime is Here' (Christmastime is one word with no gap in between).

If you are considering treating yourself to the whole bundle and the new trimmer a starter kit would be a great option: you will receive £130 worth of any products of your choice and it only costs £99, so there's there option to add something else in too and still make a saving. If you'd like to take advantage then click here to join my team or get in touch to discuss further - I would love to welcome you.

Back soon with another post, including some lovely makes featuring this suite. In the meantime, happy shopping!


Table built using Product Table Builder by The Crafty Owl - Independent Stampin' Up! Demonstrator.


A Pair of Tropical Chic Floating Frame Cards JAI480

by Joanne James29. October 2019 19:00

We are still on half term here so I have been spending time with the James Juniors this week and am resting my shoulder so have not managed much in the way of crafting. I have a quick post for you today to share a card for the current challenge over at Just Add Ink:

The ladies are asking us to 'just add a technique' so I decided to have another go at a Floating Frame Card - or rather, pair of floating frame cards. Here's the first one with contains the inside of the frame:


And here's the second one with the outer floating frame:

Here's the low-down on today's cards:

The floating frame technique is really easy to create with a few basic tools: some 'Press and Seal' food wrap or similar, a framelit - I used my Tropical Chic stamps and co-ordinating dies and Rectangle Stitched Framelits Dies - and lots of dimensionals! You simply stamp and punch/diecut your images, lay them out, cover with Press and Seal, trim to frame size and cut out your central piece, before adhering dimensionals to the back of the diecut pieces and adhering to your chosen card base. Finally you remove the Press and Seal and your floating shapes remain in place.  

Add a sentiment and you're done! These cards are quite time-consuming, but they are fun. I'm thinking I might have to have another go with some other supplies to create a festive version  - watch this space!

Here are the visual summaries of the key products used on today's projects for you to pin for easy reference:


You can see all of my 'How To' summaries on my 'How To - Tips and Techniques' Pinterest board in case you've missed any. 

Enjoy your evening and I'll be back tomorrow with another project. Until then, happy stampin'!


Stampin' Up! Supplies Used:

Table built using Product Table Builder by The Crafty Owl - Independent Stampin' Up! Demonstrator.

Mini Catalogue

BROWSE THE CATALOGUE

The mini catalogue is now live! Read and download your copy here.

Shop Online

Access my online shop 24 x 7, 365 days of the year:

Current April hostess code:

VDKNV7BH

Shop Online

Join My Team

It's always a great time to join Stampin’ Up! New team members can get £130 worth of products for only £99 + free business supplies + free shipping + all the fun being a part of Stampin’ Up! Stampin' Up! has something for everyone: join my growing team and benefit from my support to enjoy Stampin' Up! however you choose.

If you're interested, call me for a chat to understand how I can help you realise your goals. Alternatively, if you have already decided to sign up and you just can't wait, please click here for the link to the online form where you can sign up and order your starter kit right away! 

Latest Kit!

Stampin Cut and Emboss

The Rock Legend Kit has all you need to make 8 cards with coordinating envelopes. Along with the new Panda Friends Kit, both are available from January 4th for just £14 each - get yours here!

2023-24 Annual Catalogue

BROWSE THE CATALOGUE

Click on the catalogue for a full list of current SU! supplies - if you would like to order any of the items featured, please drop me a line at [email protected] or give me a call on 07773 421446 - I'd be happy to help.

New Online Exclusives

There are new products available exclusively in the online store from 5 March - check them out here.

About Me

Hi I'm Joanne and live in Northampton and when I'm not looking after my husband and two beautiful children, am an avid crafter with a passion for all things Stampin' Up!

I must confess that I have never been a big rubber stamper - until I discovered Stampin' Up! that is. I love the fact that I can get such great results with co-ordinating stamps, inks, papers and punches - the possibilities are endless! Join me on my stamping journey as I share the things I love and be inspired to create amazing things yourself!

Follow Me

Monthly Newsletter

Box Builder

Click the button above to use Box Buster to create your custom box design using the Envelope Punch Board!

Kits Collection Now Available!

Stampin Cut and Emboss

The new Kits Collection from Stampin' Up! is now available!

Click here to see the current kits available and order yours online today.

I Design For


Stampin' Up Stuff

This is my personal blog and is not endorsed by Stampin’ Up! I hope you find it a plentiful source of ideas and personal inspiration but please don't copy my designs for contest submission or use for classes, publication or sale without express permission.