by Joanne James10. January 2014 19:45Evening lovely blog readers! So big news of the day: my voice is (almost) back! Great news for me, not so great for my youngest when he announced he had lost his trainers following his PE lesson just 3 days into the new term - but that's a story for another time!
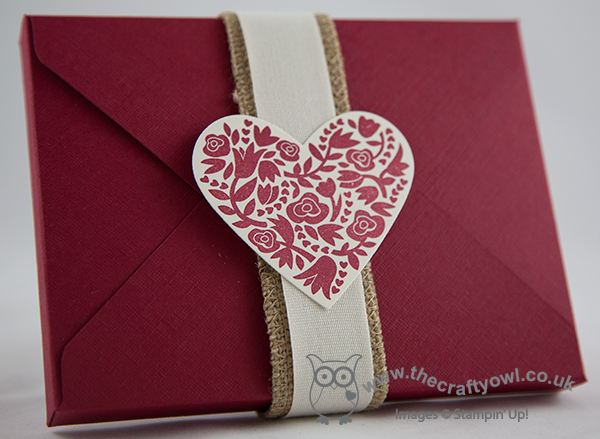
Today I'm going to share the last of this week's class projects: a gift card holder, once again made with the Envelope Punch Board. I've seen a few holders made in this way on the internet, but I adapted mine slightly to enable me to make it from half a sheet of A4, using metric measurements. So here is the finished gift card holder from the outside:

No apologies for once again using the Flowerfull Heart stamp (I still love it!), this time overlaid with 'love' cut from gold foil using the Expressions Thinlits die (don't forget these are only available to purchase until the 1st February). There's also another sneak peek of new product available in the Spring-Summer catalogue that launches on 28th January; did you spot it? Yes, it's the lovely gold washi tape which I paired here with Very Vanilla to make my pocket. There are lots of silver and gold items in the new catalogue, so if this is your thing, stay tuned - there will be more to come. The flap closure for the gift card holder is the bit you need the Envelope Punch Board for - it makes the two notches that enable the holder to stay closed and keep the gift card firmly in place.
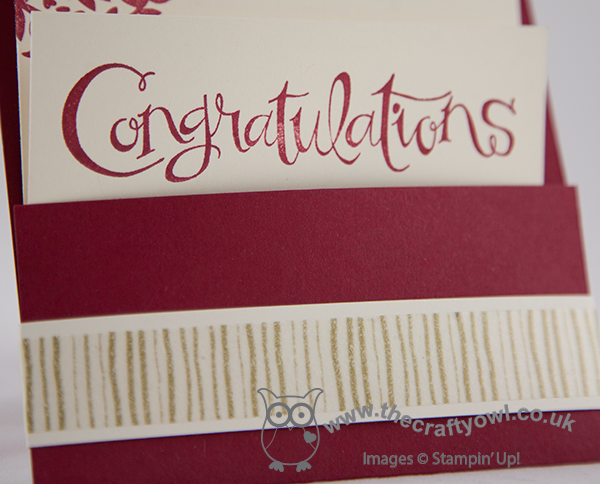
When you unclasp the flap, this is what you see inside:
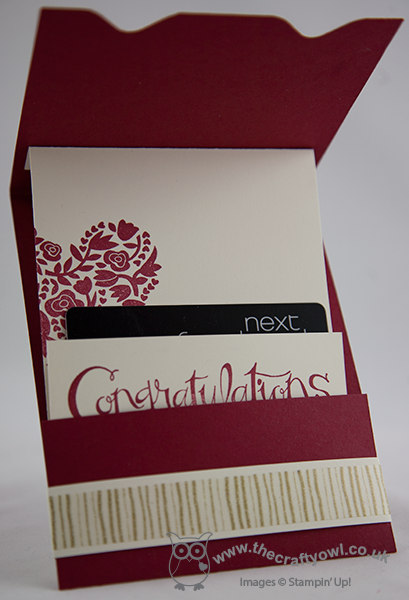
The insert is attached to the opening flap so that it slides out of the pocket as you open it and presents the gift card. I designed my gift card holder with a wedding or engagement gift in mind - vouchers or money seem very popular gifts these days, but you could easily adapt it for a birthday or other occasion. One thing is for sure - when it's as easy to make as this, there's really no excuse for a simply sticking a voucher in an envelope or worse still a carrier bag (believe me, it happens!!)
That's all the projects from my classes this week - I hope they've inspired you to go and be adventurous with your Envelope Punch Board. If you live local to me in Northampton and would like to attend any of my Stampin' Up! papercraft and card classes, you can find the current schedule of my card and project classes on my website here; please contact me for further information regarding location and any equipment you will need to bring. Classes must be booked at least 2 weeks in advance of the class date.
Back tomorrow with a Sale-A-Bration sneak peek; until then, happy stampin'!
Stampin' Up! Supplies Used:
2cbf2591-39f6-471a-9a05-7822cc150877|1|5.0|96d5b379-7e1d-4dac-a6ba-1e50db561b04
Tags: 3D Projects, Classes, Envelope Punch Board, Flowerfull Heart, Gift Voucher, Sassy Salutations, Shop online, Stampin' Up, Stampin' Up Card, Stampin' Up Card ideas, Stampin' Up Supplies, Weddings, Valentines
3D Projects | Cards | Classes | Envelope Punch Board | Stamping
by Joanne James9. January 2014 21:37Today I've another of this month's Envelope Punch Board class projects to share with you - a rectangular box notecard holder and a set of notecards. So here is the box, complete with belly band:
The box is made from Cherry Cobbler textured cardstock, which is great for boxes as it's really thick and has a lovely quality feel. In this photo I've finished with a belly band made from burlap and cotton ribbon; in class, we also made bows from Modern Medley paper using the Envelope Punch Board and created belly bands with bows on. Inside the box, we made a set of simple notelet cards, in co-ordinating vanilla and Cherry Cobbler and paired with Crumb Cake envelopes:
We used the Sweet Essentials sentiment stamps; this is a great set with sentiments to suit a variety of occasions. This set would make a lovely gift for someone and depending on the sentiment, it could be for a birthday or even created as a set of wedding thank you or acceptance cards.
The finished box base measures 5 3/4" x 4 3/8" and was made from a starter piece of 9" x 9" card stock. As with all boxes, whether square or rectangular, the piece of card you start with needs to be perfectly square; it's the points at which you punch and score that determine the finished dimensions of the box. To create this box, we punched and scored at 3 1/2" and 4 1/2".
Back tomorrow with another project; until then, happy stampin'!
Stampin' Up! Supplies Used:
7b96fc59-7eaf-47b6-9c78-2a8c064af419|2|5.0|96d5b379-7e1d-4dac-a6ba-1e50db561b04
Tags: 3D Projects, boxes, Envelope Punch Board, Flowerfull Heart, Hearts Framelits, Shop online, Stampin' Up, Stampin' Up Card, Stampin' Up Card ideas, Stampin' Up Supplies, Sweet Essentials
Boxes | Cards | Classes | Envelope Punch Board | Stamping
by Joanne James18. December 2013 22:07Well, what can I say - a seven day absence from my blog - unheard of!! I know this is a busy time of year and I've certainly no shortage of lovely things to share with you, but my real issue has been keeping up, both with the photography (lots of makes are leaving the house before being photographed!) and blog writing itself. The James juniors have finished school for the Christmas holidays already, and in addition to all of the usual pre-Christmas preparations, I have been having so much fun with them I've had little time for anything else this past week.
No festive project to share today - instead the alternative trio of cards made following the same layout used in my December Christmas card class (you can see the Christmas versions here) but with distinctly non-Christmas card designs. So here they are:
This one uses some of the Print Poetry paper stack that is currently available to buy on the clearance rack, whilst stocks last. The second one:
This one has quite a retro feel, with the colour scheme inspired by the retired Sycamore Street SAB paper - my customers love this paper, so are still looking for ideas and ways to use it. Lastly, the third card featuring a bow made with the Gift Bow Bigz Die:
This card actually uses a couple of the things we used to make the Christmas card version - the Seasons of Style paper stack paper and the 'Wishing You' stamp set and proves that these things can be used for non-Christmas as well as Christmas cards if you use alternative colours.
I liked the way all three of these cards turned out and the fact that they gave me a few cards to add to my stash ready for the year ahead. This really is a quick post from me, but before I go I thought I'd share one festive picture of the masterpiece created by my super-creative children today - our very first gingerbread house, from scratch! We made the house yesterday and they built and decorated it today. I'm pleased to say it's all their own work - I for one, think it's rather impressive:
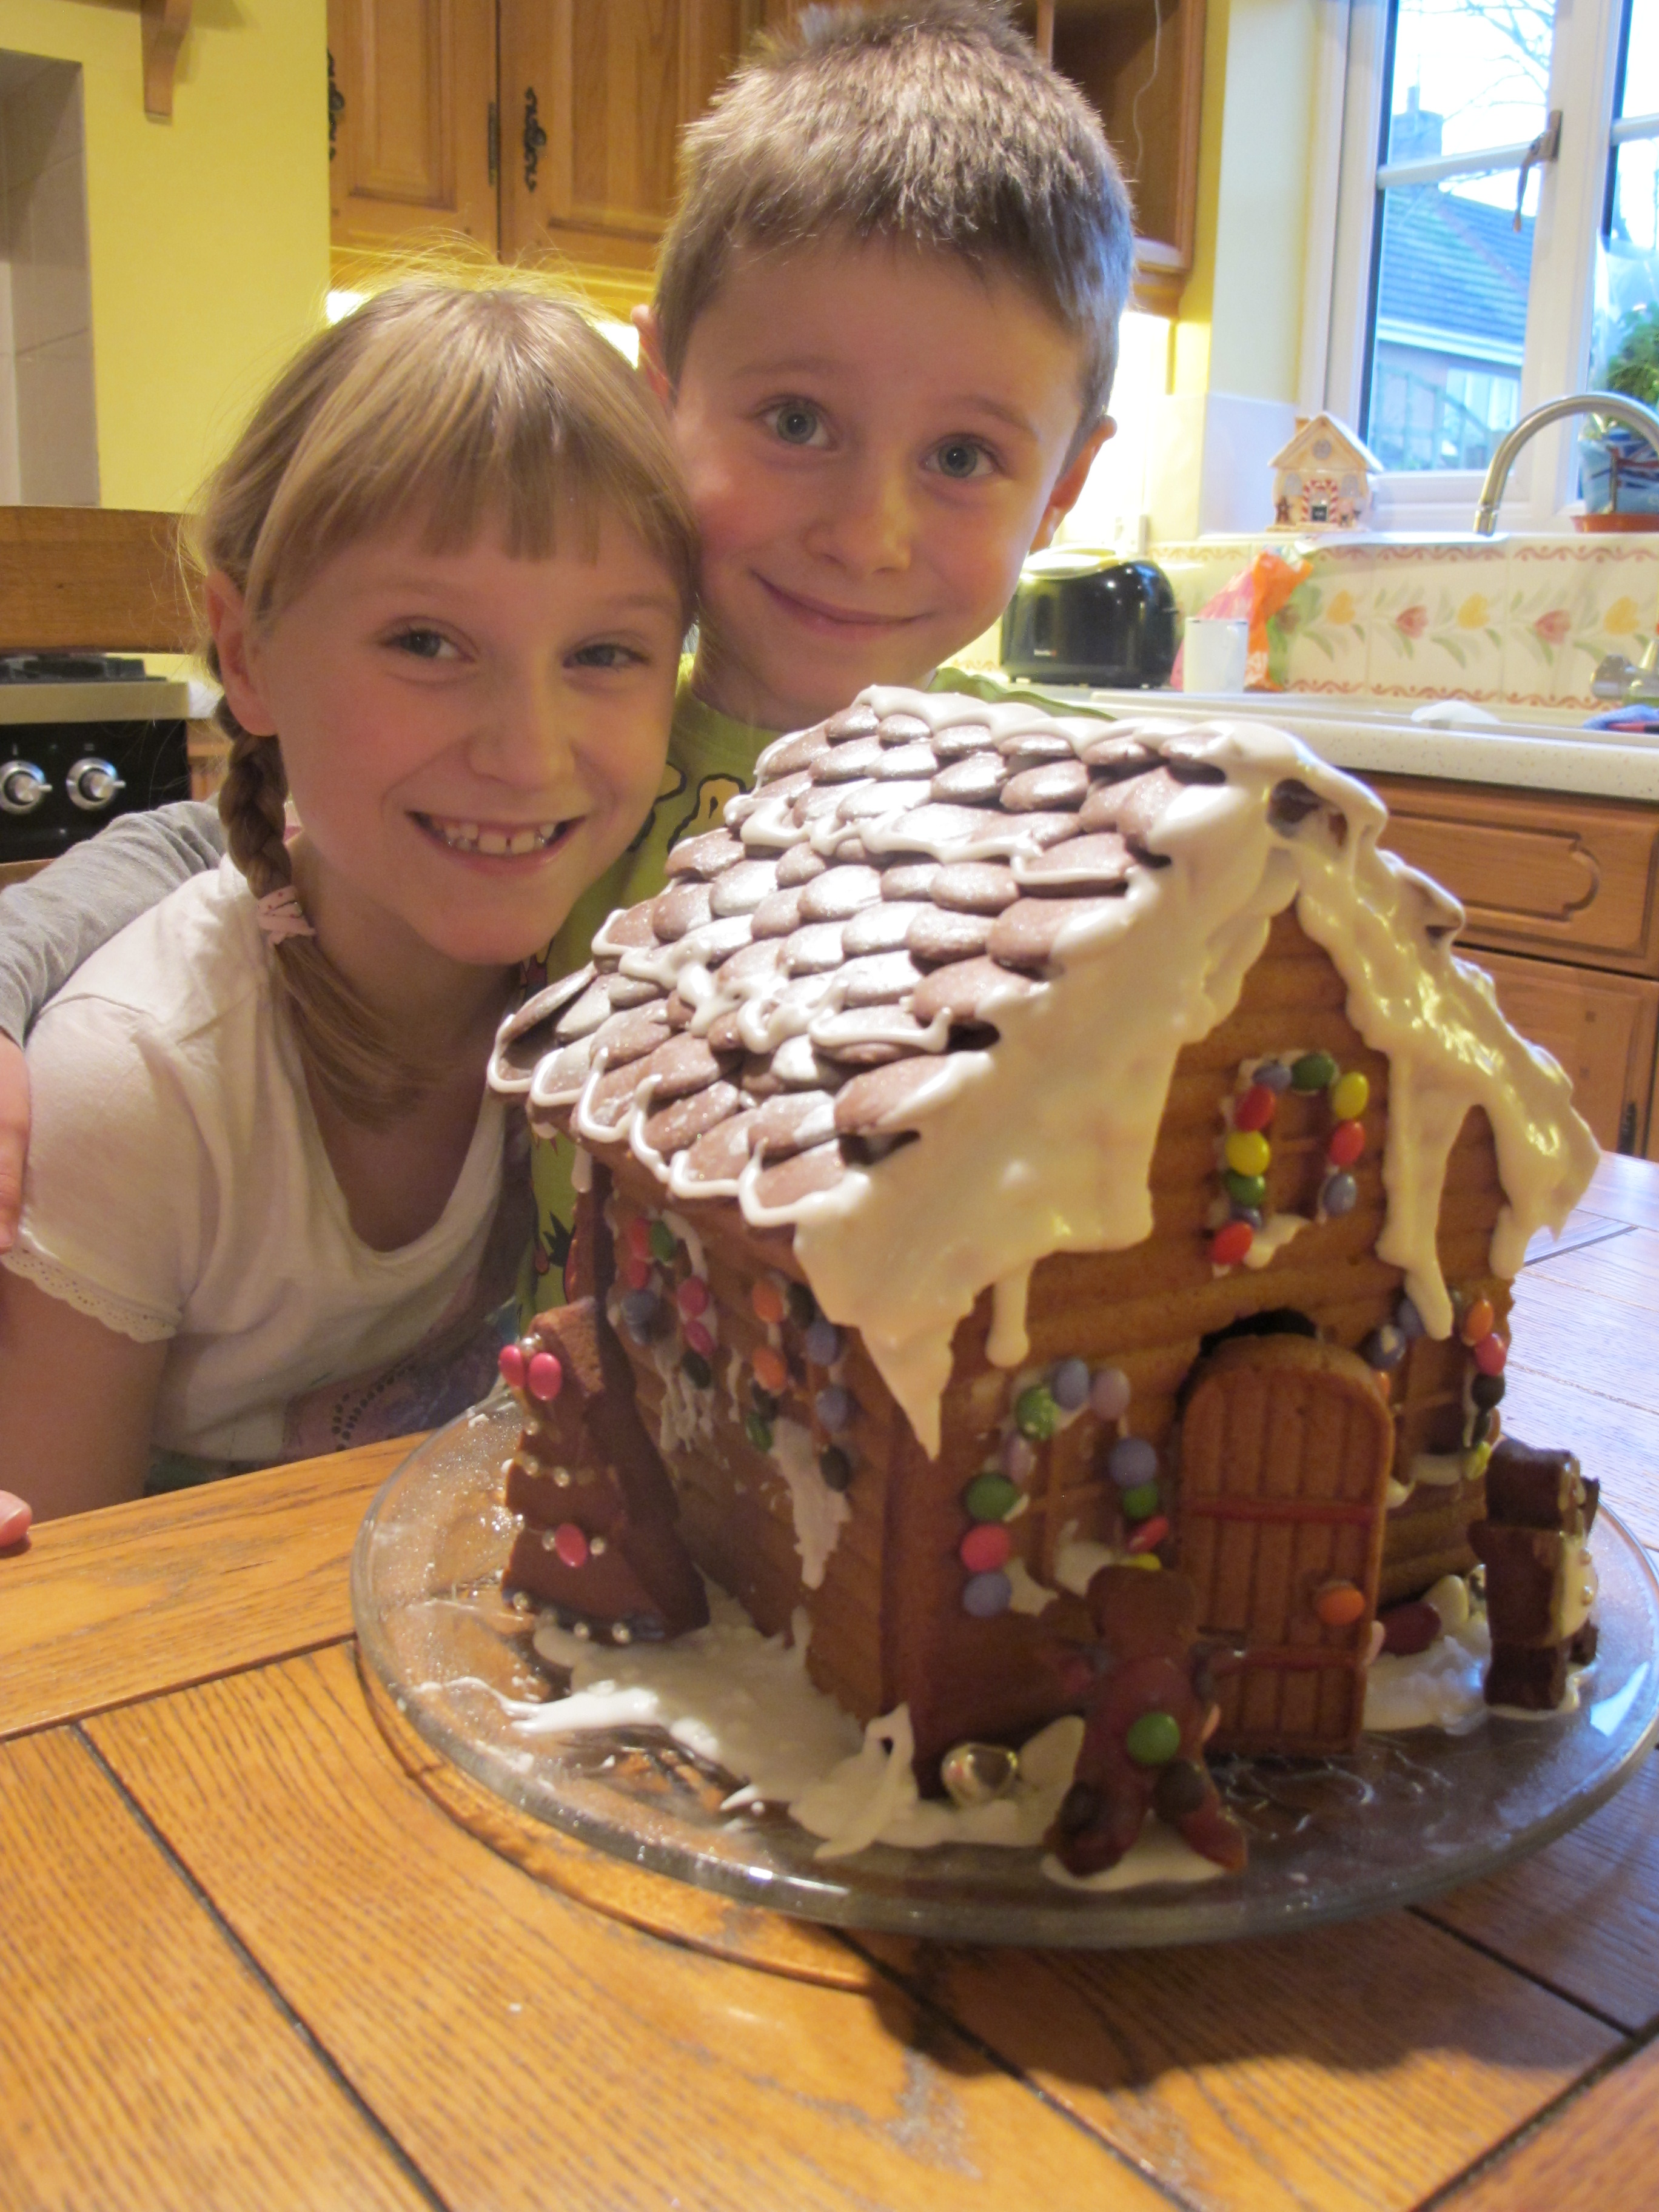
Complete with gingerbread boy and girl and Christmas tree in the garden and following a considerable 'snowfall', of course! Tomorrow I have a day of present wrapping in store, so with Christmas music and tape in hand will be a woman on a mission!
I will hopefully not leave it so long before my next post; until next time, happy stampin'!
Stampin' Up! Supplies Used:
0782b84f-9198-49ec-bf47-7345f1d2c2eb|0|.0|96d5b379-7e1d-4dac-a6ba-1e50db561b04
Tags: circle punch, Deco Labels Framelits, Gift Bow Bigz L Die, Flower Shop, Magnetic Platform, Wishing You, Stampin' Up, Stampin' Up Card, Stampin' Up Card ideas, Shop online, Season of Style, Print Poetry, Feel Goods, Express Yourself
Cards | Classes | Stamping
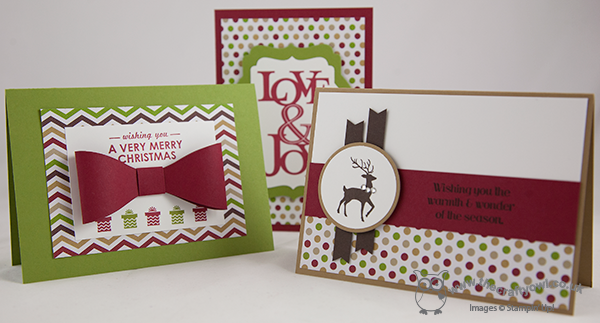
by Joanne James6. December 2013 22:23Another busy day today so a late post - I'm still putting the final touches to a couple of video tutorials that I've prepared to go with my next couple of posts, so meanwhile I'm going to share with you three of the Christmas cards that we made at this month's card class. Each one features the Season of Style paper and a variety of different stamps. So here is the first one:
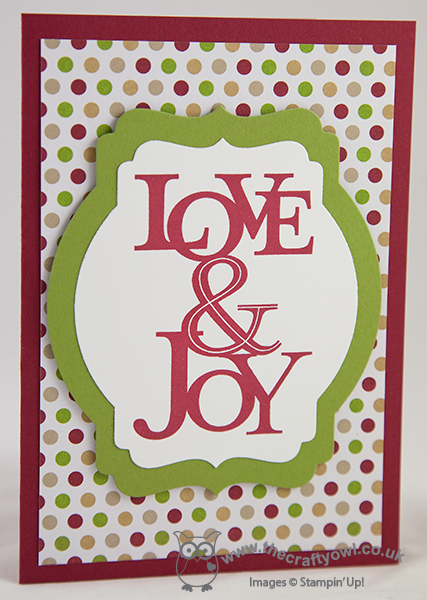
This card uses the 'Love and Joy' single stamp on a set of layered pieces cut with the Deco Labels framelits. This was our second card:
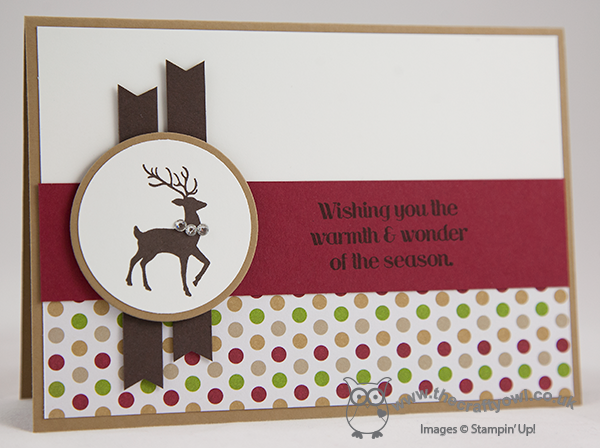
This card uses the 'Warmth and Wonder' hostess set and is a CASE of a card I fell in love with by Mary Fish, who created a similar card using the Winter Frost colour scheme; you can see her original card here. Here is the third card that we made:
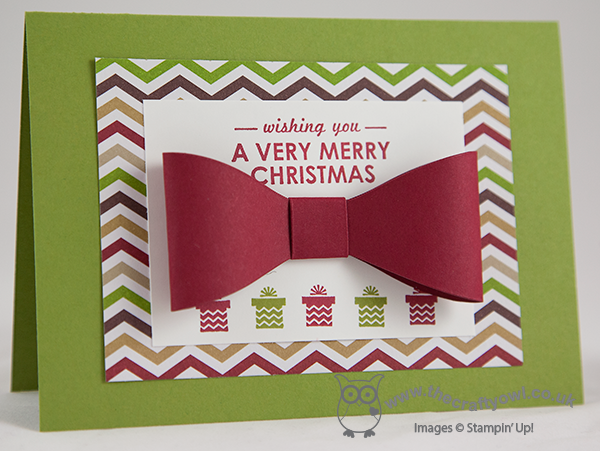
This uses a similar layout to one of the cards featured in the seasonal catalogue that showcases the 'Wishing You' stamp set, but I incorporated a small bow made with the Gift Bow Bigz Die for added impact. The last card was the Midnight Muse circle thinlit card I made a while ago featuring a bauble and two ways to make labels using the mosaic punch; the ladies in my class loved this card when they first saw it and were keen to have a go at it themselves. If you missed this card and would like to see it, you can find it here.
I also made alternative non-Christmas cards that followed each of the above design layouts, as I had a customer who didn't want to make Christmas cards (far too organised!); I'll share these cards with you next week.
I hope you liked the above cards, especially the last one - I love my Gift Bow Die and I have some great projects to share with you over the next few days using this useful product. Until next time, happy stampin'!
Stampin' Up! Supplies Used:
8aee8ace-2226-4541-ac31-54ddf6a189fe|0|.0|96d5b379-7e1d-4dac-a6ba-1e50db561b04
Tags: Christmas, circle punch, Circles Framelits, Big Shot, Warmth and Wonder, Love and Joy, Wishing You, Deco Labels Framelits, Gift Bow Bigz L Die, Shop online, Stampin' Up, Stampin' Up Card, Stampin' Up Card ideas, Stampin' Up Supplies, Season of Style
Cards | Classes | Stamping
by Joanne James12. November 2013 15:24Today is Digital Download Tuesday so I'm doing a quick digital-focused post with a link to both this week's and last week's weekly digital downloads (I forgot to post last week's links with all of the Digital Scrapbooking Days offers going on):


If you look at this week's downloads, you will see a new and exciting development for those of us new to MDS - online project classes! Three have been added to the store today, with a new class to be added on every last Tuesday of the month. These classes will vary in price depending on what is included in the accompanying brushsets and they are great as a means to learn both beginner and more advanced techniques. Here's a quick look at the brushsets for the first three classes to be released - click on the images for more information:
Theses video classes are not meant as a replacement for the many technique-based videos available free of charge at MyDigitalStudio.net, rather they will supplement these. Instead of focusing on one technique only they will cover a number of different aspects through the creation of a variety of projects. To access these classes, you simply purchase via my online store then download your file and log into MDS as usual.
Lastly, follow the link from my Facebook page (it would be great if you 'liked' my page first if you haven't already!) or go directly to the My Digital Studio Facebook page here and enter the competition to win the November bonus class absolutely free!
Back shortly with today's creative post; until then, happy digital stampin'!
by Joanne James7. November 2013 20:31As promised, today's creative post features another of this month's class cards and also uses the Snow Day stamp set that I featured earlier in the week, but this time there's not a snowman in sight! Take a look at the card to see what I mean:
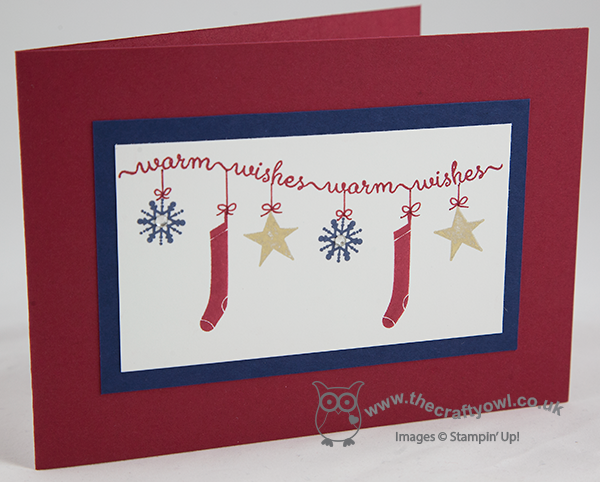
I cased the idea for this card from one made by Monica Gale (you can see her original card here), although mine looks quite different to hers I think with a much richer colour palette. The 'warm wishes' sentiment becomes a garland here, with the accessory pieces from this stamp set hanging from it; the only other thing that's needed is a fireplace!
I also did a reverse-coloured version of this card, with a seam binding ribbon bow:
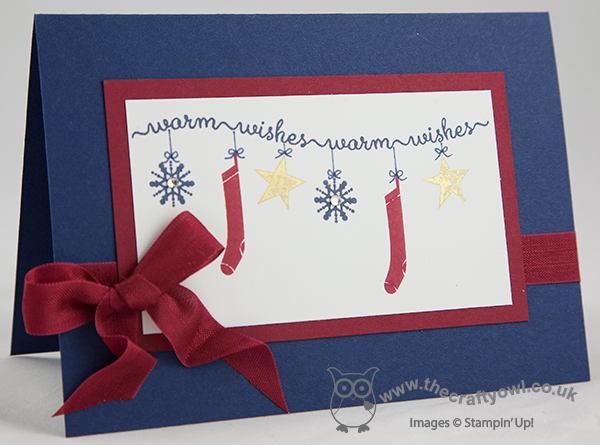
Which one do you prefer? I'm favouring the clean lines of the first one, but like the second one too. Either way, it's always nice to be able to use one stamp set in a variety of different ways and I think this stamp set is more versatile than you might think at first glance. I have a few other ideas up my sleeve too, so check back for future posts on other ways you can use this fun set.
I have a jam-packed couple of days ahead, starting with the excitement tomorrow of a night out to hear Billy Joel in concert. I've always wanted to hear him sing live, so I'm very much looking forward to it. Before I go though, I will be back with the last of the Digital Scrapbooking Days 50% off offers and another creative post; until tomorrow, happy stampin'!
Stampin' Up! Supplies Used:
by Joanne James5. November 2013 22:19A quick creative post from me today - this is one of the cards we are making in this week's card classes, a one layer card using the Snow Day stamp set:
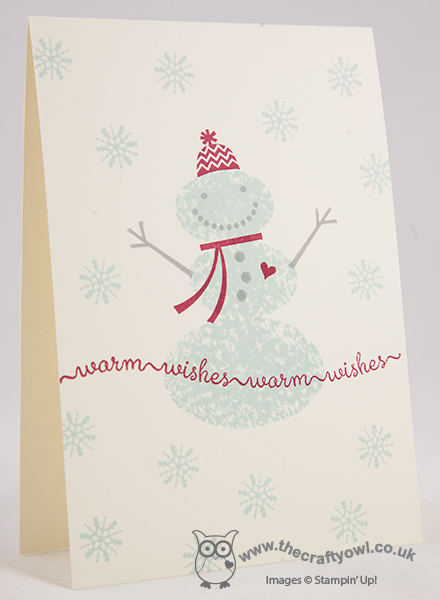
I love this cute snowman set and there are so many ways you can stamp him, but he's really great for a one layer card which is handy if you need to produce lots of cards in one go. Despite the fact that he's a snowman, I avoided using white on this card; my chosen colour combination was inspired by a recent challenge over at Create with Connie and Mary and I like the effect of the Soft Sky on Very Vanilla, with a little Smoky Slate and Raspberry Ripple for impact.
Check back next time for another card using this stamp set, that looks completely different. Until then, happy stampin'!
Stampin' Up! Supplies Used:
by Joanne James4. November 2013 21:26Today's post features one of the cards that I'm making in my classes this week: it's a 3" x 4" notelet card, with co-ordinating DSP bespoke envelope made with the new Envelope Punch Board. This really is a great piece of kit and can be used for so much besides envelopes, but before we get ahead of ourselves I thought I would shoot a short video to show you just how easy it is to make a simple envelope to fit a card that isn't a 'standard' size.
So here is the card I made:
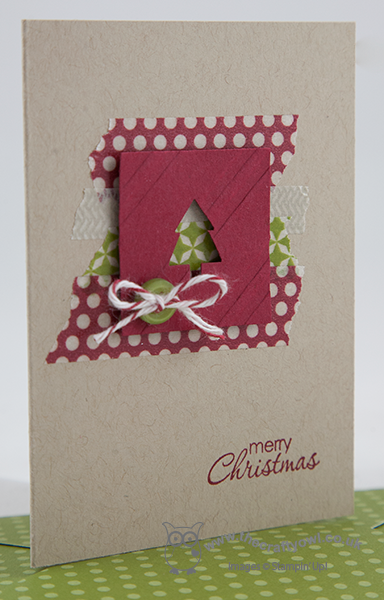
The card itself is very simple, with some festive washi tape and a small punched square, that has been embossed with the Stylish stripes TIEF and had a little Christmas tree punched out using one of the Merry Minis punch trio. Then a tiny button and twine bow to finish and a simple sentiment and done. The great thing is that with the new envelope punch board a co-ordinating envelope really can be created in minutes - just watch the video below to see how easy it is:
Isn't that great? The ladies at my class today couldn't believe just how easy it was to create a perfect envelope. It was a good job this was our last card of the class, otherwise I think they would have spent the whole afternoon making envelopes and not cards! The envelope board can be used for so much more though; watch out for more videos showing you how to get the most out of this great new tool.
I'm also linking today's card up with the colour challenge over at Create with Connie and Mary, where this week's challenge is to make a card using my featured colours:
If you would like to be inspired, pop over to their blog and see how other designers have used this colour combination in a variety of different ways. Back tomorrow with another project; until then, happy stampin'!
Stampin' Up! Supplies Used:
b5216d1f-d0d1-4af8-9a83-6ec0e9ddcd01|0|.0|96d5b379-7e1d-4dac-a6ba-1e50db561b04
Tags: Merry Minis, Washi Tape, Stylish Stripes TIEF, Stampin' Up Supplies, Stampin' Up Card ideas, Stampin' Up Card, Stampin' Up, Shop online, Petite Pairs, video tutorial, Envelope Punch Board
Cards | Classes | Promotions | Stamping | Video Tutorials
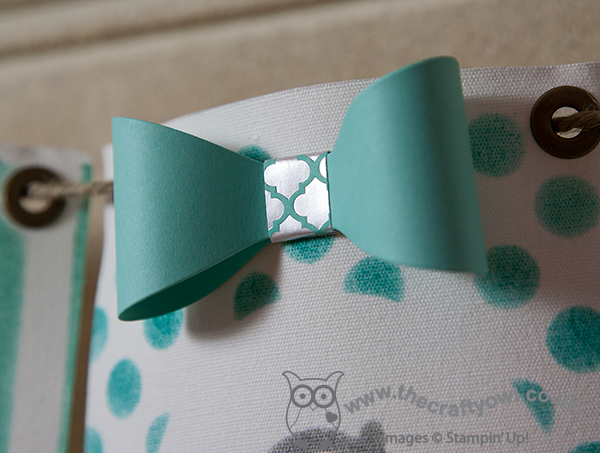
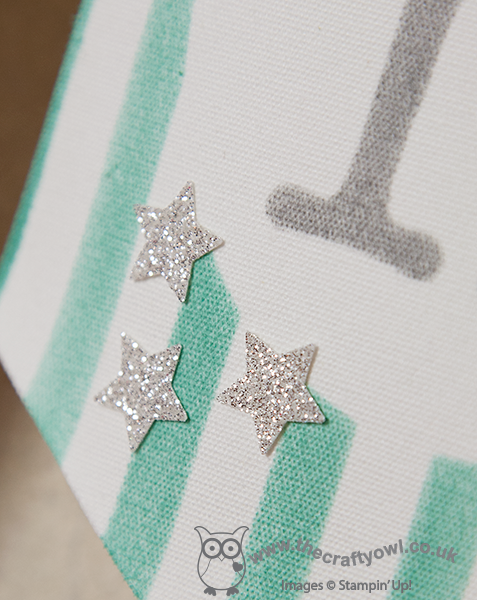
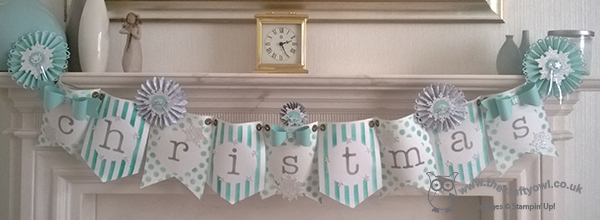
by Joanne James20. October 2013 20:51Well, today has been a fun day with a Christmas Build a Banner project class this morning. Following many laughs and giggles and a fair number of inky fingers, the lovely ladies attending my class each made a festive banner using a variety of papers and embellishments and the Build a Banner set. So there are lots of photos in this post! First of all, here is my finished banner that served as their inspiration:
My colours are Bermuda Bay and Coastal Cabana, with rosettes made from some of the lovely Winter Frost DSP and Smoky Slate chevron ribbon and finished with Coastal Cabana bows. Here's some close-ups of the rosettes - the grey one:
And here's one of the Pool Party ones:
Here's a close up of one of the bows, so easy to put together using the new Bow Bigz Die:
And lastly one showing some of the added glimmer on the flag itself:
Here are two of the ladies' lovely finished banners. Firstly, Kathy's, also in the grey/blue colourway:
And this one is Julie's, in the red-green colourway with champagne glimmer accents:
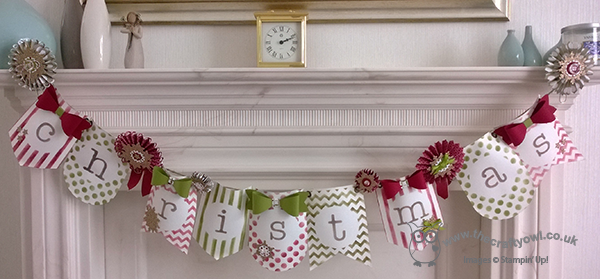
Aren't they just beautiful? I didn't manage to get photos of the other two, but I can assure you they were just as lovely. We are all feeling a little more ready for Christmas now, with one more thing ticked off our Christmas home décor list. The Build A Banner kits are great and come highly recommended; at £17.95 for the full kit including stencils and just £8.95 for the basic set, they are great value. Rebecca has put first dibs on the remaining 9 pieces in my banner kit for a name banner for her bedroom (pictures will no doubt follow in due course!). I can see me having to buy another one so that Ben can have one too ...
If you live in or around Northampton and would like a current class schedule
Back tomorrow with another project; until then, happy stampin'!
Stampin' Up Supplies Used:


0e05a67d-baaf-4e06-9547-98092151d1e6|0|.0|96d5b379-7e1d-4dac-a6ba-1e50db561b04
Tags: 3D Projects, Christmas, Classes, Festive Flurry Framelits, Gift Bow Bigz L Die, circle punch, scallop circle punch, Season of Style, Shop online, Stampin' Up, Stampin' Up Supplies, Winter Frost
3D Projects | Classes
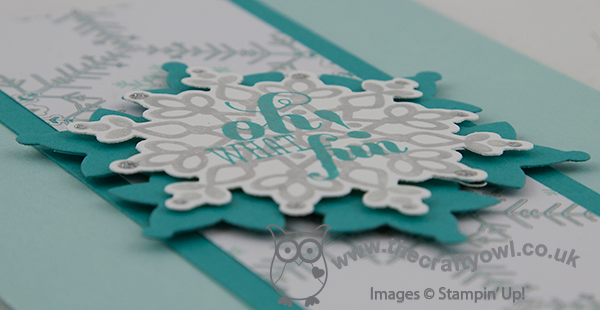
by Joanne James11. October 2013 19:53Today I'm sharing another of this week's class cards using the Festive Flurry stamp set and framelits bundle. Another simple layout featuring the Winter Frost paper stack. Here's the card we made:
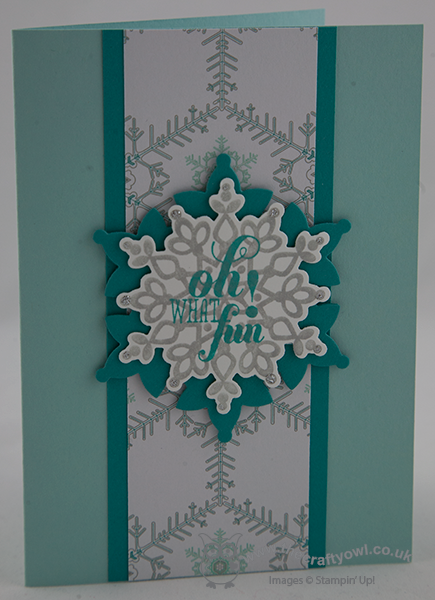
This time we layered the snowflakes and overstamped on the top one (the snowflake was stamped in Smoky Slate, having been stamped off once first onto scrap paper to give a softer background). Bermuda Bay cardstock adds a real striking background and gives this colourway quite a modern feel. Some silver Dazzling Details on the tips of the snowflake adds a little finishing sparkle.
We used both of the seasonal colourways in our class, and I'm really undecided as to which one I prefer most. Which one do you like the most?
Back with another card tomorrow; until then, happy stampin'!
Stampin' Up Supplies Used:


6a2ba4c3-2cd4-4294-9958-badb0e698470|0|.0|96d5b379-7e1d-4dac-a6ba-1e50db561b04
Tags: Big Shot, Christmas, Festive Flurry, Festive Flurry Framelits, Christmas Messages, Magnetic Platform, Shop online, Stampin' Up, Stampin' Up Card, Stampin' Up Card ideas, Stampin' Up Supplies, Winter Frost
Cards | Classes | Stamping