I Did It! A Simple Thank You Card for #TGIFCTD01

by Joanne James23. June 2015 22:47

I'm late today so a quick blog post from me, but none the less an important one; I finally made a card for the TGIF Challenge Throwdown that doesn't break any rules! It's similar to my first attempt (you can read all about that one here) albeit using a different thinlit and no contraband product from my pantry! Here's a reminder of the basket and pantry items:


Once again I managed to use all of the basket items for my card, along with some of the pantry items - here's my card:

I went with a simple white card base, this time stamped with the smaller, squat Work of Art stamp three times across the middle, then die cut my 'hello' out of a top layer of Whisper White and used the negative space so that the colour swatches show through. I finished my sentiment with the 'you' from Work of Art, and added a larger than life, rather over the top gold thinlit butterfly to finish. 

I love using the negative space of thinlits as much as the positive and this sentiment combination reminds me of a particular friend of mine who always says this to me by way of greeting and it never fails to make me smile. The butterfly is such a statement against the clean lines of the rest of the card, yet it looks as if it has just flown in and landed there over the greeting.

Simple, yet not without considerable thought! If you would like to see lots of other ways to use the above product combinations, do pop over to the #TGIFCTD01 page and check out the work of both the design team and the other gallery entrants - there is some great inspiration to be had.

That's me done for today; back tomorrow with another project. Until then, happy stampin'!


Stampin' Up! Supplies Used:

Table built using Product Table Builder by The Crafty Owl - Independent Stampin' Up! Demonstrator.


Congrats Expressions Not So Naturals Elements Wedding Card

by Joanne James22. June 2015 09:09

Good morning everyone - it's Monday! I am saying that with more optimism than I feel, but as usual there is lots to achieve this week so I'd best get on! Today I'm here with a card that I made for the challenge over at TGIF Challenge! this week, however firstly a big thank you to James Weber and the TGIF Team for choosing me as their TGIF Fave for my Build a Birthday card last week:

WINNER BUTTON!

If you missed it, you can see my winning card here. I am honoured to be a fave pick of this talented bunch of designers; I also got a shout out for my rule-breaking card for the TGIF Throwdown challenge; you can see my card here. There is still the rest of the month to enter this one, so watch this space for my bona fide entry which is still to come! Meanwhile onto today's card which is as mentioned for this week's TGIF Challenge where the theme is 'Togetherness', so weddings, anniversaries and the like; I also used this week's Colour Q colour palette and the sketch over at Pals Paper Arts as inspiration for my card:

      PPA256kwb

Without further ado, let me get to today's card:

I saw the Colour Q colours this week and thought they would work really well for a wedding or engagement card and I was particularly inspired by the inspiration photo of those patterned straws, which immediately took me to my gold Fancy Foil Designer Vellum. I used the new Whisper White Thick cardstock for my base (p. 149 of the catalogue with the speciality cardstocks in case you missed it) - did I tell you already how much I LOVE this cardstock? It makes such great card bases and is beautifully thick for one layer cards. I used a mat of Night of Navy and another of Blushing Bride, before adhering a layer of heart-embossed gold foil vellum over the top. This mutes the pink slightly and creates a real feeling of luxury, which I think is important for a wedding or celebratory card. I layered my banners, all punched with the new triple banner punch, again layering vellum over the navy ones, this time in gold stripes and leaving the bottoms visible for contrast. My cross panel is Night of Navy layered on a piece of Gold Foil Sheet, with two offset layered hearts - one gold foil, one Blushing Bride with one of the heart stamps from the 'Hello Life' set embossed in gold in the centre and some of the lovely new gold metallic thread wound in between. To finish, I added my sentiment which is the thing I probably love most on this card: it's one of the new Expressions Natural Elements wooden diecuts, which I decided to double heat-emboss in gold to tie in with the rest of my card. I love these in their natural wood finish, but they are fun to jazz up too!

This is one of those cards that I didn't have a clear idea about when I started work and it sort of evolved as I went along. I love it though - I just need someone to announce their engagement or get married so that I can send it now!

I hope you like today's card' I'll be back tomorrow with another project, so stay tuned. Until then, happy stampin'!


Stampin' Up! Supplies Used:

Table built using Product Table Builder by The Crafty Owl - Independent Stampin' Up! Demonstrator.

Tags: , , , , , , ,

Cards | Stamping | Weddings

Strawberries And Cream - A Summer Sweet Treat!

by Joanne James21. June 2015 10:00

It's Sunday, my favourite day of the week and time for a new challenge over at The Paper Players. Thank you to everyone who played along with Sandy's colour challenge last week - so many fabulous cards in the gallery. This week it is the turn of my talented good friend Claire who has a great clean and simple challenge for us:


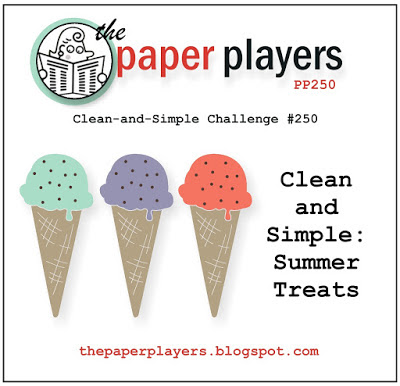
Summer treats - yum! When I started thinking about my card, I was all set to go down the ice-cream route, as in our lovely badge this week. Then two things happened: I saw this week's sketch over at Freshly Made Sketches and I received my SU! order containing some new DSP. Let me show you my card and I will explain what I mean:

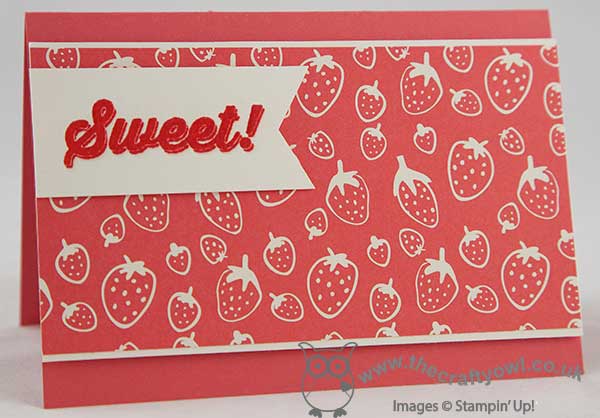
I was swooning over my new DSP purchases, determined to open and use more of it than ever before (hoarding is no longer allowed!) when I came across the strawberry pattern  - hidden away in the 'Sweet L'il Things' DSP. I say hidden away, because when I saw this pack I thought the papers would be very baby-themed, yet this really isn't the case - there are some lovely patterns in there that can be used on all kinds of cards. For me, strawberries and cream are a quintessential part of the British summer and with the Wimbledon Tennis Tournament just around the corner we will all be eating them in vast quantities! The sketch layout was perfect for a CAS card to showcase this paper - a simple Very Vanilla mat and a banner stamped with my sentiment, from the 'Bravo' stamp set (I stamped it in Watermelon Wonder on Very Vanilla then stamped it again in Versamark over the top and heat embossed it with clear embossing powder for added shine).

So that's my CAS take on a summer treat! Before you reach for your ink and papers, check out what our amazing team has created to inspire you this week:

The Paper Players Design Team
 
 
Here's a quick recap of our challenge rules:
 
1.  Create a new paper project
2.  Upload your creation to your blog with a link back to us and provide a direct link to the post featuring your challenge submission.
3.  Please link your card to no more than three challenges, TOTAL.
4.  Have FUN! 

I look forward to seeing your summer treats in the gallery this week. I have a reasonably relaxing day planned today, which will make a nice change. Although today is Father's Day of course, so there will be a fair amount of pampering of the Dad in our household. Happy Father's Day to all the other Dads out there!

Back tomorrow with another project; until then, happy stampin'!


Stampin' Up! Supplies Used:

Table built using Product Table Builder by The Crafty Owl - Independent Stampin' Up! Demonstrator.


Giggle Greetings Meets Cherry on Top

by Joanne James20. June 2015 20:58

Hello lovely blog readers! Today I have a card to share that is for this week's Mojo Monday challenge. Before I share it though I wanted to give a congratulations shout out to Justin Krieger and Lori Tecler who were both recently selected to become members of the Mojo Monday Design Team. I admire both of their work and am so pleased they will be joining with the talented Julee and other DT members to provide Mojo inspiration. So here is this week's sketch:

I decided those circles would be great to try something I've had in mind ever since I saw the Cherry on Top DSP stack - take a look:

I've been wanting to pair that bowl of cherries image from the Giggle Greetings stamp set with the cheery DSP in the Cherry on Top DSP stack and this layout was a great way to try it out. I used Cucumber Crush for my base then cut a partial circle out of my Whisper White mat using my Circles Framelits and placed a piece of cherry DSP beneath it. I added the flags in Cucumber Crush and Watermelon Wonder and stamped the sentiment in two parts, one on each, having masked off the rest of the stamp:

I added another circle of patterned paper from the Cheery on Top DSP stack and then lastly added the circle with the bowl of cherries, which I stamped in Memento Black onto Whisper White and coloured with a combination of my Blendabilities for the cherries and my Stampin' Write markers and mounted on a circle of Cucumber Crush.

I love this fresh colour combo and such a fun way to combine old and new product. That's all from me today; I'm off to catch a movie! Back tomorrow with a new challenge over at the Paper Players; until then, happy stampin'!


Stampin' Up! Supplies Used:

Table built using Product Table Builder by The Crafty Owl - Independent Stampin' Up! Demonstrator.


Sprinkles of Life Layered Cherry On Top Card

by Joanne James19. June 2015 07:00

It's Friday - the end of the week already! The somewhat strange title of my blog post today is as a result of the card that I'm sharing. it's another Sprinkles of Life birthday card, this time using the sketch over at Retrosketches, which has lots of layers this week:

I decided to go for a real mix and match approach with my Cherry on Top DSP stack - this is what I came up with:


A Pool Party base and borders of Cucumber Crush are the perfect background for the birthday candles paper. For the banner and layers, I chose some of the bold patterns in the pack and kept my cupcake in solid colours with a few sprinkles to tie the cake in with the rest of my card. A paper-pieced candle, some sequin sprinkles and done! I made this card for Ben to give to Rebecca on her birthday earlier this week - she has a real love for bold patterns and colours and is not afraid to mix and match so this card is very her.

That's all from me today; I am treating myself to a rare day of pampering with a couple of friends, with whom I am visiting the spa to enjoy a day of relaxation. Back tomorrow with another project; until then, happy stampin'!


Stampin' Up! Supplies Used:

Table built using Product Table Builder by The Crafty Owl - Independent Stampin' Up! Demonstrator.


Wetlands Thinking Of You

by Joanne James18. June 2015 08:00

It's Thursday and time for this week's new challenge over at Create With Connie and Mary. This week we have a colour challenge for you:

I found this quite a difficult colour combo to work with (I think it was the brown and grey together that did it for me), although the brown and grey duo did remind me of Canadian geese, so in the end I went with a rather safe masculine card using my Wetlands set: 

I combined this trusted favourite, which I stamped in Chocolate Chip on watercolour paper and coloured in all three inks using my Aquapainter, with some of the new Chocolate Chip Neutrals DSP Stack with the polka dot pattern. My Island Indigo circle is also embossed with the Large Polka Dots embossing folder, although it is difficult to see in the photo. A little background Gorgeous Grunge, some threads of jute ribbon and a candy dot finish my card.

Do pop over and see what the other designers have come up with  - there are some great examples of how this trio can be combined on your cards! Don't forget to check out the challenge rules too before entering :-)

I'll be back tomorrow with a bright and colourful birthday card; until then, happy stampin'!


Stampin' Up! Supplies Used:

  • Big Shot
  • Magnetic Platform
  • Wetlands Clear Stamp Set
  • 2" Circle Punch
  • Watercolor Paper
  • Aqua Painters
  • White 1-1/4" (3.2 Cm) Jute Ribbon
  • Gorgeous Grunge Clear-Mount Stamp Set
  • Polka Dot Textured Impressions Embossing Folder
  • Island Indigo Classic Stampin' Pad
  • Island Indigo A4 Cardstock
  • Chocolate Chip Classic Stampin' Pad
  • Chocolate Chip A4 Cardstock
  • Smoky Slate Classic Stampin' Pad
  • Smoky Slate A4 Cardstock
  • Regals Candy Dots


Work of Art Butterfly Thinlit Card and a Cautionary Tale

by Joanne James17. June 2015 09:51

Mid-week is here - hurrah! Today I'm sharing a card that I set out to make for the TGIF Throwdown Challenge - an intriguing concept where you have to use at least 4 things from a basket of items to make your card whilst also being allowed to use items from the pantry - just like some of the cooking programmes you see on TV! Here is the challenge badge and the basket list:


You have a month to enter so when I sat down at the weekend I thought I would have a go - here's what I came up with using this eclectic mix of products:

I needed a birthday card for my sister-in-law who celebrated her birthday yesterday so thought these colours would make for a lovely feminine card. You know how much I love the 'Hello You' Thinlit dies and decided to go for a rather ambitious paper-pieced affair, using the negative space of the multiple die cut 'happy' to show the wash of colour from the Work of Art stamp set. I merrily stamped, paper pieced, punched and coloured, adding my showcase gold foil butterfly and finishing my sentiment with the two words from the 'Crazy About You' stamp set and the 'you' from Work of Art, the last of which I punched out with my 1 3/4" circle punch and added a couple of solid colour circles beneath my butterfly to balance the design and finishing with a few gold sequins. My overhanging elements necessitated a bespoke envelope - not troubled by that, as Envelope Expert enabled me to make one of those from some co-ordinating DSP in a jiffy. 

So I was feeling suitably pleased with my card and the fact that I'd used not only four but all of the #TGIFCTD01 basket items, when I read yesterday's TGIF blog post and realised I had overlooked one small but important thing when I read the initial challenge post - the pantry items!! Not only do you need to use the basket items, you are restricted in terms of pantry items .... and when I checked before writing this post, I realised my use of the 1 3/4" circle punch, the 'Crazy About you' stamp set  to complete my sentiment, white ink and my sequins causes me to step outside the pantry and fall foul of the TGIF challenge rules - oh bother!

As someone who designs for two challenge teams, you would think I would know better!! I won't therefore be linking up with TGIF for the Throwdown Challenge - those guys and gals are strict enforcers of their challenge rules! - but wanted to share my card with you anyway, as I rather like it! I thought it worth sharing the story behind today's card though for the moral of 'if you are going to enter a challenge, make sure you read and understand ALL of the rules before you start' - if any of you reading this have found your card deleted from a challenge gallery without notification, it's probably because you didn't follow the rules :-) I say this as someone who moderates boards, so trust me - I know what I'm talking about! Maybe I'll try and squeeze in another rule-abiding attempt before next week's deadline - watch this space...

Back tomorrow with our new challenge over at Create With Connie and Mary; until then, happy stampin'!


Stampin' Up! Supplies Used:

Table built using Product Table Builder by The Crafty Owl - Independent Stampin' Up! Demonstrator.


Tags: , , , , , , ,

Cards | Stamping

Build A Cake 3D Washi Birthday Card

by Joanne James16. June 2015 15:28

As promised, I'm back today to share with you the birthday card I made for Rebecca to celebrate her tenth birthday yesterday. I used this week's sketch layout at TGIF Challenges as my inspiration:

Whilst most of her birthday cards had a distinctly 'pink' theme, Rebecca loves bright colours and patterns and I wanted to create something based around the colours of the new Cherry On Top DSP stack and the co-ordinating washi tape - here's what I came up with: 

Bright, right?! I used Watermelon Wonder as my base and Bermuda Bay for my mat layers, then created a panel of stripes using each of the Cherry On Top washi tapes. On my central panel, I stamped the sentiment and cake stand directly onto the base, then created a 3D cake by stamping each of the 'Build A Birthday' cake layers onto a separate piece of Whisper White and curving with my bone folder before adhering to my card. I topped my cake with a trio of washi tape flags and added a Cucumber Crush blossom accent, complete with rhinestone, to finish. Check out my cute little flags below - so easy to make by wrapping a piece of washi tape around the end of a cocktail stick and snipping to create flag shapes: 

I used the positioning of the stars on the sketch to hold a handcrafted birthday badge that could be removed - when your birthday is on a school day, a badge is most definitely a part of birthday uniform! I simply stamped a 1 3/4" circle with age, sentiment and a birthday balloon and popped it into a badge kit - here's a close up: 

The verdict? Rebecca loved it, so mission accomplished! She had a lovely day at school and the we all went out for dinner with grandparents before coming home to open yet more presents. Oh to be ten again!

Back tomorrow with this week's Wednesday Deals and another card for the TGIF Challenge, only this time the Monthly Throwdown. Until then, happy stampin'!


Stampin' Up! Supplies Used:

Table built using Product Table Builder by The Crafty Owl - Independent Stampin' Up! Demonstrator.


Irresistibly Yours Stars and Stripes Patriotic Card

by Joanne James15. June 2015 13:27

Happy Monday everyone! It is a happy one here in the James Household as the oldest of my James Juniors is 10 years old today! I will share her birthday card tomorrow, but for today I have another rather patriotic-themed card for this week's challenge over at Colour Me where they have the following striking colour combination: 

This was definitely calling for an all-out stars and stripes combo - so I dug out my SAB Irresistibly Yours paper and got sponging! I am also linking up with SUO Challenges again today as this card fits their theme of stars and stripes perfectly. Here's my card:

I just love how this card turned out! Some simply sponged panels in the challenge colours and the paper really does all the work - I'm so glad we now have the Colour Me Irresistible paper in the annual catalogue too. The stripes in the pack are diagonal so I cut the paper at an angle to straighten them up, added a 'Bravo!' stamp from the set of the same name and some stars cut with my Big Shot and star framelits to finish. Simply but I hope you agree, rather effective! 

That's all from me today - lots to do! Back tomorrow with a rather special birthday card to share; until then, happy stampin'!


Stampin' up! Supplies Used:

Table built using Product Table Builder by The Crafty Owl - Independent Stampin' Up! Demonstrator.


Congrats! Star Card

by Joanne James14. June 2015 10:00

It's Sunday and time for a new challenge over at the Paper Players. Thank you to everyone who played along with my challenge last week - your entries were awesome! This week it is the turn of the super talented Sandy and she has a fun colour challenge for us:


With the 4th of July not far away, there are lots of patriotic themed cards floating about the internet. Thought of American independence and the stars on this week's badge inspired me to create my card this week:

I chose to use the Congrats! stamp from the 'Bravo!' stamp set as my focal sentiment, stamped in Island Indigo onto my Pool Party base, and die cut some stars around it using my Big shot and Stars framelits to decorate. I used a couple of snippets of retired DSP behind the negative space (the indigo stripes are from the 'All Abloom' pack and the red stripes from the 'Fresh Prints' DSP stack) and popped some stars up on dimensionals for a little extra lift. A red glimmer star punched with my Itty Bitty star punch and a single rhinestone finish my card. 

This card is ready for one of my lovely team who is close to promoting this month; I am willing her to get there so am thinking positively and I know I'll be sending this out real soon. I'm also linking up to SUO Challenges where the challenge is appropriately 'stars and stripes'. Before you reach for your ink and papers, check out what our amazing team has created to inspire you this week:

The Paper Players Design Team
 
 
Here's a quick recap of our challenge rules:
 
1.  Create a new paper project
2.  Upload your creation to your blog with a link back to us and provide a direct link to the post featuring your challenge submission.
3.  Please link your card to no more than three challenges, TOTAL.
4.  Have FUN! 

I look forward to seeing your colourful creations in the gallery this week. I'm off to begin a couple of days of birthday celebrations - we are starting early and making the most of it - after all, you're only 10 once!

Back tomorrow with another project; until then, happy stampin'!


Stampin' Up! Supplies Used:

Table built using Product Table Builder by The Crafty Owl - Independent Stampin' Up! Demonstrator.


Mini Catalogue

BROWSE THE CATALOGUE

The mini catalogue is now live! Read and download your copy here.

Shop Online

Access my online shop 24 x 7, 365 days of the year:

Current April hostess code:

VDKNV7BH

Shop Online

Join My Team

It's always a great time to join Stampin’ Up! New team members can get £130 worth of products for only £99 + free business supplies + free shipping + all the fun being a part of Stampin’ Up! Stampin' Up! has something for everyone: join my growing team and benefit from my support to enjoy Stampin' Up! however you choose.

If you're interested, call me for a chat to understand how I can help you realise your goals. Alternatively, if you have already decided to sign up and you just can't wait, please click here for the link to the online form where you can sign up and order your starter kit right away! 

Latest Kit!

Stampin Cut and Emboss

The Rock Legend Kit has all you need to make 8 cards with coordinating envelopes. Along with the new Panda Friends Kit, both are available from January 4th for just £14 each - get yours here!

2023-24 Annual Catalogue

BROWSE THE CATALOGUE

Click on the catalogue for a full list of current SU! supplies - if you would like to order any of the items featured, please drop me a line at [email protected] or give me a call on 07773 421446 - I'd be happy to help.

New Online Exclusives

There are new products available exclusively in the online store from 5 March - check them out here.

About Me

Hi I'm Joanne and live in Northampton and when I'm not looking after my husband and two beautiful children, am an avid crafter with a passion for all things Stampin' Up!

I must confess that I have never been a big rubber stamper - until I discovered Stampin' Up! that is. I love the fact that I can get such great results with co-ordinating stamps, inks, papers and punches - the possibilities are endless! Join me on my stamping journey as I share the things I love and be inspired to create amazing things yourself!

Follow Me

Monthly Newsletter

Box Builder

Click the button above to use Box Buster to create your custom box design using the Envelope Punch Board!

Kits Collection Now Available!

Stampin Cut and Emboss

The new Kits Collection from Stampin' Up! is now available!

Click here to see the current kits available and order yours online today.

I Design For


Stampin' Up Stuff

This is my personal blog and is not endorsed by Stampin’ Up! I hope you find it a plentiful source of ideas and personal inspiration but please don't copy my designs for contest submission or use for classes, publication or sale without express permission.