It's Most Definitely Not Beginning To Feel A Lot Like Christmas!

by Joanne James24. July 2015 20:38

So as I type this sat in blisteringly hot temperatures (I'm not complaining - the sun is heavenly!) I can't quite believe that today I'm going to share a Christmas card with you. Yes, that's right - a Christmas card!! Today I've been able to get my first look at the new Autumn-Winter seasonal catalogue that will be available to customers September 1st - and all I can say is, my wish list is long!!! I will be sharing more on that in coming weeks once our pre-order period starts, however right now if you can't wait for your copy, then get in touch with me and lets chat about becoming a demonstrator - I would love you to join the 'ooos' and 'aaahs' that I'm having with my current team members as we drool over the catalogue sneak-peek together!

Meanwhile, you may have noticed that Stampin' Up! has reintroduced a permanent line of Christmas stamps and papers in our annual catalogue too - great news for those of us who like to prepare for Christmas all year round! - and some of the stamps included are some favourites from last Christmas, such as the one that features on today's card: Wondrous Wreath. I made this card at our recent team quarterly training session, which was all about making use of what is already avialable to get a jump start on preparing for the festive season. Here's my card:

This card was designed by Monica Gale and is similar in concept to one I designed last season which you can see here. This one is easier to recreate and uses the Woodgrain embossing folder to create the wooden effect on the door. It also features some other products that can now be found in the annual catalogue that are perfect for festive projects: the Bow Builder Punch, the Merry Moments DSP and my favourite Expressions Natural Elements.

That's all the festive fun I have for today - I'm off to get a cooling glass of Sangria after all that typing! Back tomorrow with another project; until then, happy stampin'!


Stampin' Up! Supplies Used:

Table built using Product Table Builder by The Crafty Owl - Independent Stampin' Up! Demonstrator.

A Whole Lot Of Lovely Pretty Petals Card

by Joanne James23. July 2015 08:00

Today it's time for a new challenge over at Create With Connie and Mary and this week we have a great sketch for you:

This is such a versatile sketch with so many possibilities, in the end though I settled for something that is a little unusual for me - take a look at today's card:

I was keen to use another of the papers on the Pretty Petals DSP stack as my background layer, so matted this on a base of Old Olive and Mint Macaron. I used Calypso Coral for my banner, effortlessly punched with my Triple Banner Punch (how did I ever manage without this in my life?!) and tucking a sliver of retired Old Olive ribbon beneath it (there is not a single ribbon in this colour in the current catalogue - let's hope that the Winter seasonal brings us something here in this staple colour!) I coloured my sentiment, from the 'A Whole Lot Of Lovely' hostess set (chat to me about booking a party or joining my next hostess club if you would like to own this set too!) in Pacific Point, Mint Macaron and Calypso Coral Stampin' Write markers and stamped onto Very Vanilla cardstock, that I cut out with my Big Shot and Oval Framelits.

Then for the bit that really isn't my usual style - I covered the back of the oval with Tear and Tape (how great is this product?! No more static red peel to stick to you!)and ruched some Mint Macaron lace trim all the way around the edge before adhering to my card front. I really love this pale green colour however was finding myself not really using is much in my card making, unlike it's counterparts Watermelon Wonder and Cucumber Crush (how did I ever live without these in my stamping cupboard?!) so this card is the first that seeks to rectify that. To finish, I added an Old Olive flower punched with the Petite Petals punch as leaves for the base of my Watermelon Wonder blossom accent - whilst not Calypso Coral, it is sufficiently close to compliment the coral elsewhere on my card.

So definitely more frilly than usual and this card would work just as well without the lace trim (and be more post-service friendly) but nice for a change I think! Do visit the other Design Team members to checkout their interpretations of this week's challenge sketch; and if you didn't read my Weekly Deals post yesterday, do check it out here - it contains a special offer exclusive to my customers!

Right, I'm off to top up my tan! Enjoy your day and I'll be back tomorrow with another project; until then, happy stampin'!


Stampin' Up! Supplies Used:

  • A Whole Lot Of Lovely Clear-Mount Stamp Set
  • Pretty Petals Designer Series Paper Stack
  • Big Shot
  • Ovals Collection Framelits Dies
  • Mint Macaron A4 Cardstock
  • Mint Macaron 1" Dotted Lace Trim
  • 2015-2017 In Color Stampin' Write Markers
  • 2015-2017 In Color Blossom Accents
  • Old Olive A4 Cardstock
  • Calypso Coral Stampin' Write Marker
  • Calypso Coral A4 Cardstock
  • Brights Stampin' Write Markers
  • Very Vanilla A4 Cardstock
  • Petite Petals Punch
  • Banner Triple Punch


Geek Is The New Chic CAS Card

by Joanne James19. July 2015 11:00

It's Sunday and time for a new challenge over at The Paper Players and this week the queen of die cuts, the lovely Laurie, has a fun CAS challenge for us:
 

I started out thinking of frames in the more traditional sense, but having seen some of the other Design Team cards I decided to change direction and use today's challenge to make a card for a specific purpose - here's my card:
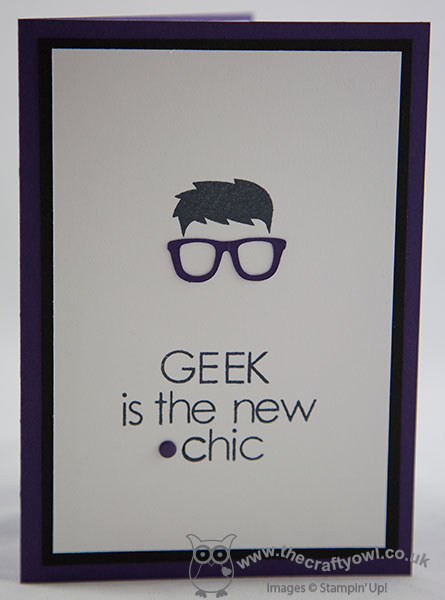
A simple black, white and purple combo that doesn't require a huge amount of explanation. The hair for the young man that features on my card is from the 'Calling All Heroes' photopolymer set that I used earlier this week (only available to US customers - thank you LeAnne ;-)) and the sentiment is stamped in Memento Black using the 'Back to Basics' alphabet with the addition of an Elegant Eggplant candy dot and some very cook 'geek' spectacles in purple cut with my e-cutter and adhered to the front of my card. 

This card is headed to my daughter's best friend Finley; he has recently joined the ranks of spectacle wearers, but is rather reluctant to wear his glasses at school, for fear of being labelled the 'class geek'. As a fellow specs wearer for over 30 years, I can empathise. Whilst his own specs aren't purple, it is his favourite colour and we are hoping this card will help him see that with his perfectly coiffed hair and charming good looks, he should wear his specs and be proud - geek, after all, is the new chic!

Before you reach for your ink and papers, check out what our amazing team has created to inspire you this week:

The Paper Players Design Team
Anne Marie Hile - on leave
 
 
Here's a quick recap of our challenge rules:
 
1.  Create a new paper project
2.  Upload your creation to your blog with a link back to us and provide a direct link to the post featuring your challenge submission.
3.  Please link your card to no more than three challenges, TOTAL.
4.  Have FUN! 

Whether you go with frames of the spectacles or picture variety, I look forward to seeing how you interpret Laurie's fun challenge in the gallery this week.As you read this I am on my way for a well-earned rest to sunnier climes with my family for a couple of weeks; rest assured there are lots of creative posts scheduled in my absence, so do continue to stop by as there will be plenty of paper crafting inspiration for you to see. 

Back tomorrow with another project; until then, happy stampin'!


Stampin' Up! Supplies Used:

Table built using Product Table Builder by The Crafty Owl - Independent Stampin' Up! Demonstrator.


Watercolour Wings and an as Light as Air Cotton Paper Butterfly

by Joanne James16. July 2015 08:00

It's Thursday and time for a new challenge over at Create With Connie and Mary, where this week we have a colour challenge for you:


I also used this week's sketch over at Mojo Monday as the inspiration for the layout of today's card, which features my first outing of my new Watercolour Wings stamp set: 

I used a base of Crushed Curry and a mat of Basic Black, combined with two co-ordinating papers from the Cherry on Top DSP stack. I embossed a solid panel of Watermelon Wonder using the new Flutterings embossing folder and added this on the left and chose to use the negative space of the Greetings Thinlit die cut for my top layer. I added my butterfly, on which I stamped each of the layers with one of the challenge colours - photopolymer really makes easy work of this kind of triple stamping. The Watermelon Wonder looked slightly orange over the yellow, so I decided to add a small diecut butterfly, cut with the smallest of the Bold Butterfly framelits out of some of the new Cotton Paper in Crushed Curry. This paper is so soft and delicate and perfect for this kind of layering, as well as for flowers and more besides. Here's a close up of the layered butterfly:

So very pretty - I can't wait to stamp this in lots of other colourways too. I hope you like today's card and those of the other Design Team members - we look forward to seeing what you do with this colour palette this week!

Back tomorrow with another project; until then, happy stampin'!


Stampin' Up! Supplies Used:

  • Greetings Thinlits Dies
  • Big Shot
  • Cherry On Top Designer Series Paper Stack
  • Fluttering Textured Impressions Embossing Folder
  • Butterflies Thinlits Dies
  • Bold Butterfly Framelits Dies
  • Basic Black A4 Cardstock
  • Crushed Curry Classic Stampin' Pad
  • Crushed Curry A4 Cardstock
  • Watermelon Wonder Classic Stampin' Pad
  • Watermelon Wonder A4 Cardstock
  • Whisper White A4 Cardstock
  • Cherry On Top Cotton Paper Assortment


Zoo Babies Goes Wild!

by Joanne James15. July 2015 22:15

A quick card today just in time for this week's sketch over at TGIF Challenge and also using the fun challenge over at Can You Case It? this week where you have to use black, white and one other colour:

   CYCI#78

I really like this sketch and haven't used a tag on a card in ages and when I saw the CYCI challenge I thought this would give me a great opportunity to break open my new 'Go Wild' DSP stack - here's my card:

I used Melon Mambo as my feature colour for the mat to frame the amazing zebra print paper, for my die cut sentiment and a pop of colour with the circle, cotton ribbon and the hearts (courtesy of my owl punch) floating up from my stamped zebra from the 'Zoo Babies' set. I used the ornate tag topper punch for my tag, cutting twice and layering one white on black for emphasis. I designed this card as a modern 'new baby' card, and was going to finish my 'hello' with 'sweet baby' stamped inside, but this was vetoed by everyone else in my household, all of whom liked the card but did not consider it suitable to welcome a baby - so a funky hello card it is then!

Back tomorrow with a new challenge over at Create With Connie and Mary; until then, happy stampin'!


Stampin' Up! Supplies Used:

Table built using Product Table Builder by The Crafty Owl - Independent Stampin' Up! Demonstrator.


Hello Baby with Silhouettes and Script

by Joanne James14. July 2015 15:17

I've had a mad busy day today and am late posting, so it's quite appropriate that today's card is for this week's challenge over at As You See It, where the challenge is to create a card in under 10 minutes in shades of pink! I also used this week's CAS(E) This Sketch as inspiration:

AYSIChallenge095    

I made my card in well under 10 minutes, even including two separate interruptions for hugs and kisses from my beloved James Juniors on their way to bed last night; I decided on a baby card using the Silhouettes and Script hostess stamp set:

I used a base of Pink Pirouette, then on my layer of Whisper White stamped a combination of the 'Hello' and 'Congrats' greetings in a combination of Pink Pirouette, the now retired Strawberry Slush and Melon Mambo, randomly across my card from then used my sponge daubers to create a blended ink effect on the baby bottle, stamped it then fussy cut and adhered with a dimensional. Lastly, I added a sprinkling of retired Strawberry Slush in-colour sequins to complete my card. Quick, fun and pink - this is a great set for speed stamping! It's also an exclusive hostess set - if you would like to earn this set, please get in touch to arrange a party, I would love to host one with you!

That's all from me; back tomorrow with this week's new weekly deals and another project. Until then, happy stampin'!


Stampin' Up! Supplies Used:

Table built using Product Table Builder by The Crafty Owl - Independent Stampin' Up! Demonstrator.


No Bones About It - It's Godzilla!

by Joanne James13. July 2015 09:06

Well, it's pouring down with rain here in the UK this morning but it can't dampen my spirits: we are counting down toward the end of term and the school holidays, in addition to which I have the most fun card to share with you today! I used Linda's sketch over at Freshly Made Sketches as my inspiration this week:

Now I changed the orientation for my card to landscape because I had this great idea for my new 'No Bones About It' stamp set and this sketch was perfect for trying it out - check out today's card: 

Is it a T-Rex? Is it a Stegasaurus? No, it's that all-time King of the Monsters - Godzilla! Whilst this card is quite simple in its final execution, it took several aborted attempts and absolutely ages to get right but I love it! I stamped the cityscape from the 'Calling All Heroes' stamp set in Memento Black directly onto my extra thick Whisper White card base (this set is not available in the UK but I am fortunate to own it due to the generosity of one of my American stamping buddies -thank you LeAnne!), then masked it off and stamped the sunburst stamp from the now retired 'So You' stamp set twice in Watermelon Wonder behind it. I partially inked the sentiment from the 'No Bones About It' in black and set it inside one of the action bubbles from the 'Calling All Heroes' set stamped in Crushed Curry and popped this up on a dimensional. Then for my Godzilla - I stamped the solid t-rex stamp from No Bones About It in Mossy Meadow and then inked the back plates only of the stegosaurus stamp and overlaid them along the t-rex's spine. I then fussy-cut the whole thing and added it to my city scene - simple! A simple sentiment and a black baker's twine bow and done - the perfect card for a nostalgic movie buff! What do think? I'd love to hear your views on my card today - did I successfully create a monster?

That's all from me today - I have a day of biscuit icing ahead of me - many apples in readiness for teacher's gifts this week. At least the cooler weather should prevent everything sliding into a sticky mess!

Back tomorrow with another project; until then, happy stampin'!


Stampin' Up! Supplies Used:

Table built using Product Table Builder by The Crafty Owl - Independent Stampin' Up! Demonstrator.


Awesomely Artistic for The Paper Players

by Joanne James12. July 2015 11:00

Yay it's Sunday and time for a new challenge over at The Paper Players where this week the lovely Jaydee has the following colour challenge for us:

   Paper Craft Crew Card Sketch 152. #stampinup #blogcandy #papercraftcrew

I also used this week's sketch over at The Paper Craft Crew as the basis for today's layout. I've been desperate to ink up my new Awesomely Artistic stamp set and decided that these colours would be perfect for a soft and subtle card. This is what I came up with:

I used Mint Macaron for my card base, added some grunge splatters and then a panel of Smoky Slate and Smoky Slate DSP - I love the script pattern! I then created my feature square, which contains a lot of detail for my normally rather CAS style! I used a piece of Mint Macaron, onto which I stamped the small fern in the stamp set in the same colour ink, stamping a few times without re-inking for added depth. I stamped the floral bloom in Smoky Slate onto Whisper White and used my blender pen to add some colour to the flowers in both Smoky Slate and Mint Macaron, before fussy cutting the whole thing. Yes, you read that correctly - I fussy cut the whole thing! I won't deny it was rather fiddly and took me absolutely ages, but I think it was worth it to make it really stand out. As if that wasn't enough, I then fussy cut a few extra flowers and popped them onto the base bloom with glue dots, as I wanted some height but not too much (hence they aren't that visible in the photograph - they are more obvious in real life). I added a few pearls here and there for a little extra interest. I stamped my sentiment panel in Smoky Slate on Smoky Slate and stamped the word 'Friend' in Versamark and heat embossed in white. I added some mint lace ribbon trim behind it before adhering to my card with dimensionals. Did you spot my Sahara Sand? I have used it sparingly, on the round element tucked behind the flower and the trio of candy dots, so you can be forgiven if you blinked and missed it at first glance! A scattering of a few more pearls, and done!

This card is much fussier than many I design, however I am very pleased with it and I love this stamp set - you will definitely be seeing more of it! Before you reach for your ink and papers, check out what our amazing team has created to inspire you this week:

The Paper Players Design Team
Anne Marie Hile - on leave
 
 
Here's a quick recap of our challenge rules:
 
1.  Create a new paper project
2.  Upload your creation to your blog with a link back to us and provide a direct link to the post featuring your challenge submission.
3.  Please link your card to no more than three challenges, TOTAL.
4.  Have FUN! 

I look forward to seeing how you use these colours when I visit your cards in the gallery this week. I am spending the day with my upline for a team training day today which should be fun; it's always nice to catch up with the wider team. I'm hoping the weather will continue to be warm and that I will be coming home to an evening BBQ (well, hoping!). 

Back tomorrow with another project; until then, happy stampin'!


Stampin' Up! Supplies Used:

Table built using Product Table Builder by The Crafty Owl - Independent Stampin' Up! Demonstrator.

Silhouettes and Script Meets Farmer's Market Anniversary Card

by Joanne James11. July 2015 18:04

I've been busy creating today and just have time for a quick post before I head out this evening for dinner with friends. Today's card uses this week's sketch over at Mojo Monday and showcases some of the the new Farmer's Market DSP so is perfect for linking up with SUO Challenges too where the theme is 'designer papers':

Here is my card - check out how perfectly these two paper designs from the Farmer's Market range co-ordinate with each other:

I used Old Olive for my base with a mat of Hello Honey - a colour I'm not overly fond of it has to be said, yet I think it takes on a lovely hue next to the greens on this card. The pear paper design is definitely the one on show here, yet the gingham across the bottom adds interest without overwhelming. I used a piece of Mossy Meadow for my diagonal, tied with some retired satin ribbon in the same colour then for my focal point I stamped the pear from the 'Silhouettes and Script' hostess set onto Whisper white, inking up with my sponge daubers to give the lovely shading effect then fussy cut one side and cut to other with my circle framelits. To finish I added a 'Congrats' from the same set in black and popped up on dimensionals. I just love the blended colouring on the pear - I'm going to have to do this with the other stamps in the set too!! What a fun alternative take for a wedding or anniversary card!

That's all from me today; I need to go and wash my hair and get ready for my night out! Back tomorrow with a new challenge over at The Paper Players. Until then, happy stampin'!


Stampin' Up! Supplies Used:

Table built using Product Table Builder by The Crafty Owl - Independent Stampin' Up! Demonstrator.


Cherry On Top Donuts Card

by Joanne James9. July 2015 08:00

It's Thursday and time for a new challenge over at Create With Connie and Mary! This week we have a great sketch challenge for you:


This was one of those sketches that the minute I saw it, I knew exactly what I was going to do with those 'flowers' - to me, they looked just like the donuts with a bit taken out that feature on both one of the Cherry on Top DSP stack patterns and the Sprinkles on Top stamp set on page 7 of the annual catalogue. I don't have the latter but am definitely in love with the former, so that's where I was headed for my card this week:

I stayed with the square shape for my card and used a base of Pool Party with mats in Whisper White and Bermuda Bay. I then used another of the patterns from the Cherry on top DSP stack as my top layer and stamped my sentiment from the 'Bravo' stamp set in Watermelon Wonder directly onto the DSP. I then used a long, slim panel of Bermuda Bay, with one corner rounded t echo the shape of the base card, then adhered four little donuts, punched out of the DSP using my 3/4" circle punch, onto the panel using dimensionals. I finished with a double loop of Whisper White baker's twine to complete my card. 

So what do think - is this card sweet to you? Do check out how the other design team members have interpreted this week's sketch as we've all taken a different approach. As for me, I'll be back tomorrow with another project to share. Until then, happy stampin'!


Stampin' Up! Supplies Used:

  • Bravo Photopolymer Stamp Set
  • Cherry On Top Designer Series Paper Stack
  • Whisper White Baker's Twine
  • Watermelon Wonder Classic Stampin' Pad
  • Bermuda Bay A4 Cardstock
  • Pool Party A4 Cardstock
  • Punch Corner Project Life
  • Whisper White A4 Cardstock
  • 3/4" Circle Punch


Tags: , , , , , , ,

Cards | Stamping

Mini Catalogue

BROWSE THE CATALOGUE

The mini catalogue is now live! Read and download your copy here.

Shop Online

Access my online shop 24 x 7, 365 days of the year:

Current April hostess code:

VDKNV7BH

Shop Online

Join My Team

It's always a great time to join Stampin’ Up! New team members can get £130 worth of products for only £99 + free business supplies + free shipping + all the fun being a part of Stampin’ Up! Stampin' Up! has something for everyone: join my growing team and benefit from my support to enjoy Stampin' Up! however you choose.

If you're interested, call me for a chat to understand how I can help you realise your goals. Alternatively, if you have already decided to sign up and you just can't wait, please click here for the link to the online form where you can sign up and order your starter kit right away! 

Latest Kit!

Stampin Cut and Emboss

The Rock Legend Kit has all you need to make 8 cards with coordinating envelopes. Along with the new Panda Friends Kit, both are available from January 4th for just £14 each - get yours here!

2023-24 Annual Catalogue

BROWSE THE CATALOGUE

Click on the catalogue for a full list of current SU! supplies - if you would like to order any of the items featured, please drop me a line at [email protected] or give me a call on 07773 421446 - I'd be happy to help.

New Online Exclusives

There are new products available exclusively in the online store from 5 March - check them out here.

About Me

Hi I'm Joanne and live in Northampton and when I'm not looking after my husband and two beautiful children, am an avid crafter with a passion for all things Stampin' Up!

I must confess that I have never been a big rubber stamper - until I discovered Stampin' Up! that is. I love the fact that I can get such great results with co-ordinating stamps, inks, papers and punches - the possibilities are endless! Join me on my stamping journey as I share the things I love and be inspired to create amazing things yourself!

Follow Me

Monthly Newsletter

Box Builder

Click the button above to use Box Buster to create your custom box design using the Envelope Punch Board!

Kits Collection Now Available!

Stampin Cut and Emboss

The new Kits Collection from Stampin' Up! is now available!

Click here to see the current kits available and order yours online today.

I Design For


Stampin' Up Stuff

This is my personal blog and is not endorsed by Stampin’ Up! I hope you find it a plentiful source of ideas and personal inspiration but please don't copy my designs for contest submission or use for classes, publication or sale without express permission.