The Very Hungry Caterpillar Birthday Card

by Joanne James26. May 2017 06:00

Happy Friday everyone! Today I'm sharing a fun card that I cased from one I saw on Pinterest by Belinda Neil a while ago but haven't got around to sharing - take a look:


You can see Belinda's original card here. I thought this was such a fun card, especially for those of you out there with children who have read Eric Carle's classic 'The Very Hungry Caterpillar' story book - probably, like me, many, many times!

This fun card is made using nothing more than inks, stamps and paper - specifically, the Balloon Builder stamp set. I made you a super simple, speedy video to show you how I created this card from start to finish:


Isn't that easy? Who would have thought that the Balloon Builder stamp set could be used to create something so fun? This is another one of those stamp sets that is retiring next week, so if you want to recreate this card, you'll need to click on the link below and hop over to the online store and put it into your basket!

Here is the visual summary of the key products used on today's project for you to pin for easy reference:


You can see all of my 'How To' summaries on my 'How To - Tips and Techniques' Pinterest board in case you've missed any. 

Enjoy your day; I'm spending mine at Rebecca's Sports Day watching javelin-throwing and the 200m sprint amongst other things and hopefully enjoying a picnic lunch and the glorious weather we have been blessed with here in the UK this week. I'll be back tomorrow with another project. Until then, happy stampin'!


Stampin' Up! Supplies Used:

Table built using Product Table Builder by The Crafty Owl - Independent Stampin' Up! Demonstrator.

So In Love Concertina Wedding Card

by Joanne James25. May 2017 06:00

Today I'm sharing a card from this month's technique class which featured the So In Love bundle and the beautiful Falling In Love designer series paper - take a look:


 Here's the low-down on today's card:

So Detailed Thinlits - The main feature on the front of these cards is the pair of diecut panels cut using the Big Shot and the largest of the So Detailed Dies. They really are so beautiful! I backed them with some of the Falling In Love designer series paper - these papers have some lovely subtle images, some of them photographic, that make a perfect background for these detailed diecuts. Unfortunately both of these items are now sold out here in the UK - I love this card though and just had to share it so hopefully for those of you who already have these items this will still serve as useful inspiration.

So In Love - I used the So In Love stamp set to stamp my greeting on my label wrap and to decorate the inside of my card. This card is larger than usual at 6" square and opens in a concertina style - this really shows the diecuts off to full advantage. 

A New Favourite - Yes, it's here again - I used the Pretty Label Punch for my sentiment panel on the front of my card, backed with a pinched circle - can you tell how much I LOVE this new punch?!

This card is subtle in colour, using only Very Vanilla and Sahara Sand - perfect for a wedding that doesn't have a strong colour scheme. It would work well and could be adapted as an invitation too, so lots of creative possibilities and it really is the Big Shot that does all the work on this one (a die brush is essential to poke all those little pieces out cleanly!)

Here is the visual summary of the key products used on today's project for you to pin for easy reference:


You can see all of my 'How To' summaries on my 'How To - Tips and Techniques' Pinterest board in case you've missed any. 

Enjoy your day and I'll be back tomorrow with another project. Until then, happy stampin'!


Stampin' Up! Supplies Used:

Table built using Product Table Builder by The Crafty Owl - Independent Stampin' Up! Demonstrator.

Label Me Pretty Navy Pattern Thank You

by Joanne James23. May 2017 06:00

Today I'm sharing a card for the current challenge over at Fusion:

I went with both the sketch and photo inspiration for my card today - I loved the navy and white colour combination and the strong pattern influence in the inspiration photo:


Here's the low-down on today's card:

Label Me Pretty - The focal point for my card is a layered label from the new Label Me Pretty set. I featured one of the other labels in this set in my Saturday post (if you missed it you can see it here); for today's card I punched out my main label using the new Pretty Label Punch and added some additional layering to the circles in the centre. 

Floral Boutique - I love the patterns in the Floral Boutique designer series paper pack and will be sorry to see this paper retire. Fear not though, there is a silver lining: 4 of the patterns in this pack are returning in the new In-Colour Fresh Florals Designer Series Paper Pack, including the one I've used on my card today. Hooray - now I can re-create my card in the new in-colours too!

An Added Detail - In addition to some retired Sale-A-Bration metallic ribbon, I added one final detail to my card today; well actually, to the envelope! I took a co-ordinating piece of paper from the Floral Boutique stack and added it to my envelope flap for some pretty additional detail. This is a nice way to add a touch of colour to an otherwise plain envelope - after all, envelopes should never be naked!

Here is the visual summary of the key products used on today's project for you to pin for easy reference:


You can see all of my 'How To' summaries on my 'How To - Tips and Techniques' Pinterest board in case you've missed any. 

Enjoy your day and I'll be back tomorrow with another project. Until then, happy stampin'!


Stampin' Up! Supplies Used:

Table built using Product Table Builder by The Crafty Owl - Independent Stampin' Up! Demonstrator.

Clean and Simple Watercolour Wings

by Joanne James21. May 2017 09:00

It's Sunday and time for this week's new challenge over at The Paper Players! It's the turn of our amazing and fearless leader Nance to host this week and she has a clean and simple challenge for us to work with:


I took the opportunity to use this week's Paper Craft Crew Sketch for my card today as I haven't played along over there for a while:

Paper Craft Crew Card Sketch 244. Play along at www.papercraftcrew.com #sketchchallenge #pcc2017

This simple layout was perfect for a clean and simple card with a feature butterfly - take a look:


Here's the low-down on today's card:

Watercolour Wings - I decided to use the larger of the Watercolour Wings butterflies to create the focal point on my card today. I used the same set for my sentiment, that I chopped up by hand. This is a great set for a clean and simple card - I really should use it more often!

Fluttering White Space - I wanted to keep my 'white space' white and uncluttered, however decided to add interest by embossing my background with my Fluttering Embossing Folder. 

Loving Lemon-Lime Twist - I decided to feature one of the new in-colours on my card today: Lemon-Lime Twist. I paired it with Dapper Denim and Night of Navy for my butterfly, along with a little Night of Navy baker's twine and Navy on Lime for my sentiment - I so love these two colours together! This green is so zingy and fresh - it is a definite new favourite of mine! Here's my colour combination in case you would like to try it on a future project:


Here is the visual summary of the key products used on today's project for you to pin for easy reference:


You can see all of my Product and 'How To' summaries on my 'How To - Tips and Techniques' Pinterest board in case you've missed any. 

Before you reach for your ink and papers, check out what our amazing team has created to inspire you this week:

The Paper Players Design Team
 
 
Here's a quick recap of our challenge rules:
 
1.  Create a new paper project
2.  Upload your creation to your blog with a link back to us and provide a direct link to the post featuring your challenge submission.
3.  Please link your card to no more than four challenges, TOTAL.
4.  Have FUN! 

I look forward to seeing your clean and simple creations in the gallery this week. Enjoy the rest of your weekend as it will be over all too quickly; I'll be back tomorrow with another project; until then, happy stampin'!


Stampin' Up! Supplies Used: 

Table built using Product Table Builder by The Crafty Owl - Independent Stampin' Up! Demonstrator.

Wood Words In-Colour Heat Embossed Thankyou

by Joanne James18. May 2017 20:00

I'm late posting today as I've been on the go and just haven't stopped to write until this evening. I'm sharing a card that I designed as a make and take for my team training that I held last Saturday - take a look:


Here's the low-down on today's card:

Wood Words - I used the large floral stamp from the forthcoming 'Wood Words' stamp set for my background today and stamped it in Versamark then heat embossed it in white onto Shimmery White cardstock, ready for my watercolouring. Wood Words is part of the Wood Textures suite that includes the Wood Crate framelit and some great wood textured papers, yet on today's card there's not a piece of wood in sight. My sentiment is from the same set too and is embossed in white on the new in-colour Berry Burst - I think this is actually my favourite of the new in-colours, a wonderful purple-pink shade that really pops with the copper foil behind too. I also added a coupe of flowers cut with the Seasonal Layers thinlits, one each in Powder Pink and Fresh Fig for added decoration.

In-Colour Watercolour - I used a trio of the new in-colours - Powder Pink, Berry Burst and Fresh Fig to create the watercoloured background for my white embossed flowers, working from one side to the other and fading out. Don't they look pretty together? I'm also linking today's card up with the team over at SUO Challenges this week where their challenge is all about watercolouring.

CASE The Kit - The design of my card was inspired by one of the cards in the forthcoming new 'Hello Friend' heat embossing product kit on page 16 of the new annual catalogue. One of the business topics we discussed at team training was how Stampin' Up!'s kits can benefit your business and our make and takes all included opportunities to practice the techniques and skills required to demonstrate with this kit effectively. There's nothing like being prepared and I'm sure my team would agree that team training is great for this kind of thing. As for me, I love getting together with my team - check out my Facebook page here if you'd like to see some of the other things we got up to last Saturday - we had the best ice-breaker activity I think I've ever participated in!

Here is the visual summary of the key products used on today's project for you to pin for easy reference:


You can see all of my 'How To' summaries on my 'How To - Tips and Techniques' Pinterest board in case you've missed any. 

I'll be back tomorrow with another project. Until then, happy stampin'!


Stampin' Up! Supplies Used:

Table built using Product Table Builder by The Crafty Owl - Independent Stampin' Up! Demonstrator.

Host A Stampin' Up! Party To Get Your Own Feathery Friends

by Joanne James17. May 2017 06:00

Wednesday already - this week is flying by! Today I'm sharing a card for this week's challenge over at CAS(E) This Sketch:

This is one of those sketches with so many possibilities. I decided to use one of my favourite hostess stamp sets in the new catalogue for my fun card today - take a look:


Here's the low-down on today's card:

Feathery Friends - One of the best things about getting a new catalogue is that it always contains a new set of exclusive hostess stamp sets - stamp sets that can only be purchased with Stampin' Rewards earned as a result of hosting a Stampin' Up! party (or placing a qualifying individual order of £150 or more). I love stamps that I can colour - with pencils, markers or inks and my trusty aquapainter - so this set with its quirky bird and flower images is perfect for me. Here I simply stamped two of the images in Archival Black ink onto watercolour paper and coloured it with my ink pads and an aquapainter. 

There's Never Been A Better Time To Host A Stampin' Up! Party - Hosting a party is a great way to earn free product and is a fun thing to do at any time. Great news: to coincide with the launch of the the new Stampin' Up! 2017-18 Annual Catalogue, there is a host promotion starting 1st June that means hostesses can earn an extra £30 Stampin' Rewards with qualifying party sales. There will be more details to follow nearer the time, however if you want to book your slot in my diary, feel free to get in touch now and be sure of those rewards - there's never been a better time to host a Stampin' Up! party! 

A Fresh Colour Combo - I chose to pair two colours from the Subtles family - Pool Party and Wild Wasabi - with a pop of bright Melon Mambo pink for today's card and added a single pink candy dot by way of embellishment to one of my flowers. Here is my colour combo if you would like to save it for future use:


Here is the visual summary of the key products used on today's project for you to pin for easy reference:


You can see all of my 'How To' summaries on my 'How To - Tips and Techniques' Pinterest board in case you've missed any. 

Enjoy your day and I'll be back tomorrow with another project. Until then, happy stampin'!


Stampin' Up! Supplies Used:

Table built using Product Table Builder by The Crafty Owl - Independent Stampin' Up! Demonstrator.

Serene Scenery Just Breathe And A Moment Of Mindfulness

by Joanne James16. May 2017 06:00

Today I'm sharing a card for this week's sketch over at CAS Colours & Sketches:  

Today's card turned out to be one of the easiest ever cards for you to recreate - and is perfect for the sentiment of the day! Check it out:


Here's the low-down on today's card:

Just Breathe - This beautifully scripted oversize sentiment is from a set that will be new in the forthcoming annual catalogue called 'Colorful Seasons': a selection of images and words that co-ordinate with a number of other products that form part of the new Colour Theory Suite. This will be a great set for memory keeping and traditional scrapbooking, as well as card making - it's incredibly versatile and I can't wait to share more of it with you. 

Serene Scenery - The art of mindfulness, that is focusing our attention on the present moment, has become very popular of late. It is a proven stress reliever and can be very effective in helping us to clear our mind, become more objective and therefore more able to move forward in a positive and constructive manner. Using mindfulness techniques for even 10 minutes a day can have beneficial effects; I was recently introduced to the Headspace mobile phone app by a friend of mine and can see why she is so evangelical about it - you can find out more here. When I want to relax my mind and 'just breathe' I am a blue sky thinker - literally. So this photographic image from the retiring Serene Scenery DSP stack made the perfect accompanying image. I wanted my card to deliberately have no other obvious focus other than the sentiment - sometimes when life gets too much we all have times where we need to be reminded to 'just breathe' and this card will be heading to a friend to say just that. 

Neutrals - I went with a largely neutral palette for my card today, using Island Indigo for my sentiment to pick up on the bold blue of the image. If you like this colour combination, feel free to save it for future use:


Here is the visual summary of the key products used on today's project for you to pin for easy reference:


You can see all of my 'How To' summaries on my 'How To - Tips and Techniques' Pinterest board in case you've missed any. 

This has to be one of the quickest cards ever; the funny thing is, I wasn't short on time when I made it. I guess a simple card for a simple sketch - sometimes words are enough. Of course if you disagree feel free to comment below - I'd love to hear your thoughts!

Enjoy your day and I'll be back tomorrow with another project. Until then, happy stampin'!


Stampin' Up! Supplies Used:

Table built using Product Table Builder by The Crafty Owl - Independent Stampin' Up! Demonstrator.

Urban District Best DAD Father's Day Card

by Joanne James15. May 2017 06:00

Happy Monday everyone! A nice early post from me to start the week with a card for this week's challenge over at Freshly Made Sketches:

I needed to get cracking on some Father's Day cards and this sketch gave me the perfect opportunity:


 Here's the low-down on today's card:

Urban District - The vertical panel was perfect to showcase the DAD letters of the Urban District stamp set. These letters are such fun and include so many fun images in relation to hobbies and past-times that Dads everywhere will be able to relate to. I stamped the letters in Versamark onto a piece of Urban Underground Specialty Designer Series Paper and heat embossed them in silver. This set also includes two of the best sentiments for a Dad card that I think I've ever seen (you know how much I love a good sentiment!) and I stamped this one inside my card:


Dynamic Hexagons - I decided to go for a textured foil background for the front of my card and ran a piece of silver foil in the Hexagons Dynamic Textured Impressions Embossing Folder through the Big Shot to give me a super shiny, amazing dimensional impression onto my cardstock. This card is larger than usual (it measures 8" by 4 1/4" finished size). Whilst my foil panel is the width of the embossing folder, it is also longer. Extending the embossed panel is really straightforward: all you need to do is emboss the length of the folder, then rotate the foil mat through 180 degrees and reposition the foil in the embossing folder, matching up the section already embossed with the pre-embossed pattern.

An Expert Envelope - An oversized card calls for an oversized envelope; this one is beyond the printed sizes on the Envelope Punch Board though. The answer? Why, my trusty Envelope Expert tool of course! Envelope Expert allows you to specify your desired envelope dimensions,  in either cm or inches, and it will then tell you what size paper you need and where to punch and score. I used a co-ordinating piece of Urban Underground paper for my envelope, Along with my Envelope Punch Board. If you don't have an Envelope Punch Board, I can't recommend you purchase one highly enough - they are so useful! Don't forget my Envelope Expert tool can be found on my website here and is free for you to use too, so don't be shy - make any size card you like and use Envelope Expert to produce an envelope to fit. 

I do like this modern, masculine set and will be disappointed to see it retire, along with Nailed It, at the end of this month.

Here is the visual summary of the key products used on today's project for you to pin for easy reference:


You can see all of my 'How To' summaries on my 'How To - Tips and Techniques' Pinterest board in case you've missed any. 

Enjoy your day and I'll be back tomorrow with another project. Until then, happy stampin'!


Stampin' Up! Supplies Used:

Table built using Product Table Builder by The Crafty Owl - Independent Stampin' Up! Demonstrator.

Lovely Friends and Lovely Laurel Pop-Up Card

by Joanne James14. May 2017 09:00

It's Sunday and time for this week's new challenge over at The Paper Players! It's my wonderful friend Claire's turn to host this week and she has a fun colour challenge for us to work with:


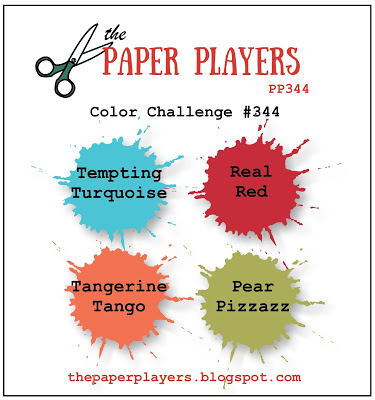
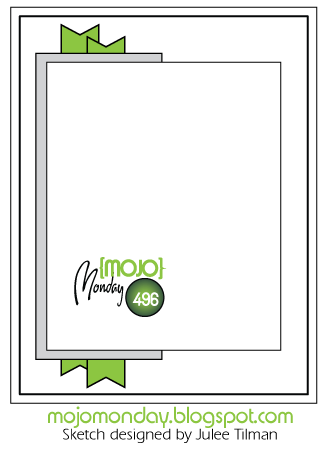
I love Claire's palette of bold, bright colours and took the opportunity to use some of my new pre-order products that have been bursting to get out of the box and create a card for a friend that uses this week's Mojo Monday sketch layout - take a look:


Here's the low-down on today's card:

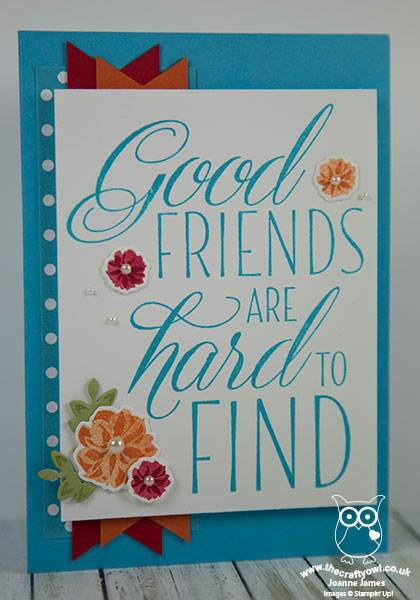
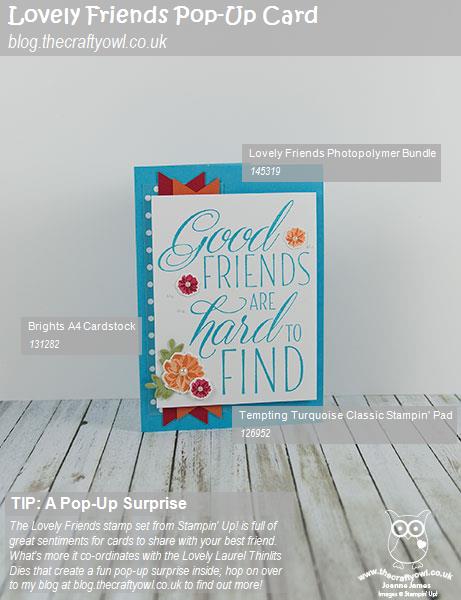
A Sentiment That Says It All - I chose to feature the largest sentiment in the new 'Lovely Friends' stamp set on the front of my card today. This is a stamp set choc-full of heartfelt sayings to put on a card to your very best friend (or friends - why stop at one?!) and this one is pretty much a card in itself. I incorporated the colours in a few added florals from the same set and the layering and banners behind, yet it is the sentiment that does all the work here. 

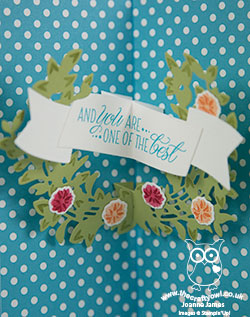
A Hidden Surprise - I could have stopped there; instead I chose to use the co-ordinating Lovely Laurel Thinlits Dies to create a fun pop-up inside my card. When you open this card, this is what you see:


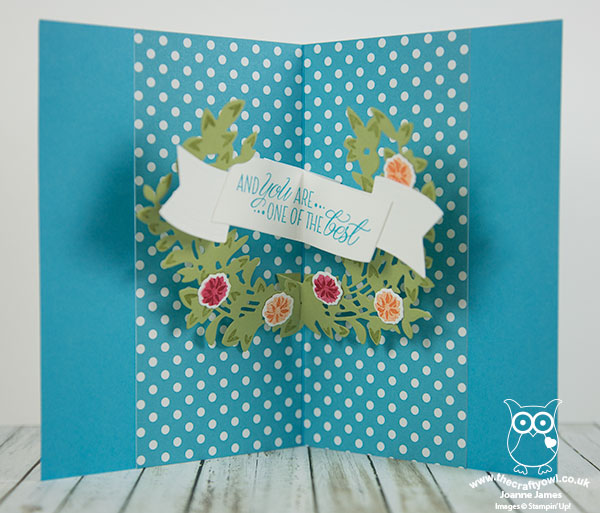
Isn't that just such a fun surprise? These thinlits are really easy to use and make light work of creating this impressive pop-up feature. I love the flowing script of the banner font too and the subtle embossed detail on the banner itself.

There's Nothing Blue About This Card - Ok, well other than the card itself, of course! I chose to use Tempting Turquoise as my dominant colour of those in Claire's palette today and I think it really allows the red and orange to pop and the lovely green laurel wreath to shine. This is one of those truly uplifting cards that is guaranteed to raise a smile - or maybe even a 'wow' when opened up and the surprise inside is revealed. I think this card is cheeriness in an envelope!

Here is the visual summary of the key products used on today's project for you to pin for easy reference:


You can see all of my Product and 'How To' summaries on my 'How To - Tips and Techniques' Pinterest board in case you've missed any. 

Before you reach for your ink and papers, check out what our amazing team has created to inspire you this week:

The Paper Players Design Team
 
 
Here's a quick recap of our challenge rules:
 
1.  Create a new paper project
2.  Upload your creation to your blog with a link back to us and provide a direct link to the post featuring your challenge submission.
3.  Please link your card to no more than four challenges, TOTAL.
4.  Have FUN! 

I look forward to seeing what you create with this week's colour palette. Happy Mother's Day to my fellow team mates and all my lovely readers who are stateside and have had to wait until today to celebrate and be celebrated; Mother's Day in the UK is in March and already seems like so long ago. Enjoy the rest of your weekend as it will be over all too quickly; I have a quiet few hours this afternoon so am going to get some things prepared to share with you next week in the hope that my normal blog schedule will be resumed. I'll be back tomorrow with another project; until then, happy stampin'!


Stampin' Up! Supplies Used: 

Table built using Product Table Builder by The Crafty Owl - Independent Stampin' Up! Demonstrator.

Balloon Adventures Shaker Birthday Card

by Joanne James11. May 2017 13:27

Apologies for my couple of blog-free days: I have had a combination of classes, preparation for a big team event at the weekend and new catalogue preparations that have simply left no time to share with you! Back to it today though with a card for this week's challenges over at As You See It and TGIF Challenge:


I took the AYSI sketch quite literally today and for my 'three of something' went with balloons and the retiring Balloon Pop-Up Thinlits Die to create a shaker, rather than a pop-up card, on this occasion using the bright colours of the TGIF palette this week:


Here's the low-down on today's card:

Balloon Adventures - Today's card is all about balloons of the party kind. The Balloon Pop-up thinlits make a great pop-up for the inside of a card, yet also work as a flat panel which, when backed with a piece of window sheet, can be transformed into a fun party shaker card. I stamped the balloons with the co-ordinating Balloon Adventures stamp set in each of the challenge colours then overlaid the corresponding diecuts. I also brushed the stamped area with my clear Wink of Stella for extra sparkle. The Balloon Adventures bundle has been very popular and I'm sad it's retiring; if you haven't got yours yet, get in quick before it's gone for good!

Shake, Shake, Shake - I filled my shaker with a combination of Emerald Envy mica flakes leftover from my Christmas projects (still available on the clearance rack), some gold sequins and a few retired in-colour sequins in Strawberry Slush for a hint of pink. 

Spots and Stripes - I decided to use some in-colour Emerald Envy designer series paper for my background striped panel, to tie in with the spots and stripes theme of my balloons. I find it easier to major in on two colours to maintain a co-ordinated look with such bold colours, as I've done here with the pink and green, with the Crushed Curry sparingly on a single balloon and to decorate my envelope and the inside of my card for a pop of sunny yellow.

Here is the visual summary of the key products used on today's project for you to pin for easy reference:


You can see all of my 'How To' summaries on my 'How To - Tips and Techniques' Pinterest board in case you've missed any. 

Enjoy the rest of your day and I'll be back tomorrow with another project. Until then, happy stampin'!


Stampin' Up! Supplies Used:

Table built using Product Table Builder by The Crafty Owl - Independent Stampin' Up! Demonstrator.

Mini Catalogue

BROWSE THE CATALOGUE

The mini catalogue is now live! Read and download your copy here.

Shop Online

Access my online shop 24 x 7, 365 days of the year:

Current April hostess code:

VDKNV7BH

Shop Online

Join My Team

It's always a great time to join Stampin’ Up! New team members can get £130 worth of products for only £99 + free business supplies + free shipping + all the fun being a part of Stampin’ Up! Stampin' Up! has something for everyone: join my growing team and benefit from my support to enjoy Stampin' Up! however you choose.

If you're interested, call me for a chat to understand how I can help you realise your goals. Alternatively, if you have already decided to sign up and you just can't wait, please click here for the link to the online form where you can sign up and order your starter kit right away! 

Latest Kit!

Stampin Cut and Emboss

The Rock Legend Kit has all you need to make 8 cards with coordinating envelopes. Along with the new Panda Friends Kit, both are available from January 4th for just £14 each - get yours here!

2023-24 Annual Catalogue

BROWSE THE CATALOGUE

Click on the catalogue for a full list of current SU! supplies - if you would like to order any of the items featured, please drop me a line at [email protected] or give me a call on 07773 421446 - I'd be happy to help.

New Online Exclusives

There are new products available exclusively in the online store from 5 March - check them out here.

About Me

Hi I'm Joanne and live in Northampton and when I'm not looking after my husband and two beautiful children, am an avid crafter with a passion for all things Stampin' Up!

I must confess that I have never been a big rubber stamper - until I discovered Stampin' Up! that is. I love the fact that I can get such great results with co-ordinating stamps, inks, papers and punches - the possibilities are endless! Join me on my stamping journey as I share the things I love and be inspired to create amazing things yourself!

Follow Me

Monthly Newsletter

Box Builder

Click the button above to use Box Buster to create your custom box design using the Envelope Punch Board!

Kits Collection Now Available!

Stampin Cut and Emboss

The new Kits Collection from Stampin' Up! is now available!

Click here to see the current kits available and order yours online today.

I Design For


Stampin' Up Stuff

This is my personal blog and is not endorsed by Stampin’ Up! I hope you find it a plentiful source of ideas and personal inspiration but please don't copy my designs for contest submission or use for classes, publication or sale without express permission.