Perfectly Paired Decoupage Welcome New Baby Card

by Joanne James3. May 2019 08:00

Today I'm sharing a card for the current baby theme challenge over at Inspire.Create:

 There are a couple of cute baby sets in the Spring-Summer catalogue and both are set to retire at the end of the month. I used my favourite, Perfectly Paired, to create a colourful and fun baby card - take a look:


Here's the low-down on today's card:

I've created a whole host of cards with the Perfectly Paired stamp set (check out this post here if you missed it) but they have all involved using the stamp in a single colour. This is such a fabulous stamp set to colour though and I spent a pleasant couple of hours with my Blends markers creating this card. I haven't listed them all out in the table below as I pretty much used all of them in one way or another! I stamped the image twice and coloured a few of the animals and fussy cut them and popped them up on dimensionals to create a fun decoupage detail. you can see that in this close up here:

I added a border using my favourite gingham paper and a stitched diecut edge using the Be Mine Stitched Framelits to finish my card.

Here is the visual summary of the key products used on today's project for you to pin for easy reference:


You can see all of my 'How To' summaries on my 'How To - Tips and Techniques' Pinterest board in case you've missed any. 

Enjoy your day and I'll be back tomorrow with another project. Until then, happy stampin'!


Stampin' Up! Supplies Used:

Table built using Product Table Builder by The Crafty Owl - Independent Stampin' Up! Demonstrator.

Copacobana Birthday Statements for ASYI

by Joanne James2. May 2019 07:00

Today I'm sharing a card for this week's colour challenge over at As you See It:

I've not managed to play along with this lovely group for a couple of weeks but when I saw this week's fabulous bright colour palette it was another one that I couldn't resist! Heather's inspiration photo is very 'copacabana' (yes, I have been signing the song ever since I read the challenge post!)  and I decided to try an idea that I saw on one of the samples in the Spring-Summer catalogue that I've never tried before - take a look:


Here's the low-down on today's card:

I like large single-image stamps as they can be great for clean and simple and more layered cards and both of the main stamps in the 'Birthday Statements' stamp set lend themselves to this. I don't usually stamp them in a bright colour though unless I'm leaving them uncoloured, so the sample on page 19 of the catalogue intrigued me. I stamped my image in Lovely Lipstick, then coloured it with a combination of light and dark Blends markers in Pineapple Punch, Pink Pirouette (retired but the closest I could get to Powder Pink) and light Lovely Lipstick. I decided to carry on the bright theme and mount my coloured panel on a Lovely Lipstick card base with a strip of Pineapple Punch in-colour DSP and finished the whole thing off with some Lovely Lipstick ribbon and a bow. 

I think I like this colour variation; it makes for one bright card, but I have plenty of soon-to-be-teenager classmates of Ben's that I know will love it!

Here is the visual summary of the key products used on today's project for you to pin for easy reference:


You can see all of my 'How To' summaries on my 'How To - Tips and Techniques' Pinterest board in case you've missed any. 

Enjoy your day and I'll be back tomorrow with another project. Until then, happy stampin'!


Stampin' Up! Supplies Used:

Table built using Product Table Builder by The Crafty Owl - Independent Stampin' Up! Demonstrator.

Everything Is Rosy Is Now Available To Buy - Order Yours Today!

by Joanne James1. May 2019 09:00

Just a quick post to let you know that the Everything Is Rosy Product Medley is now available to order. You can read all about this kit in my earlier post here; also here's a quick reminder of what is included:

Contact me to order yours or alternatively click on the link below that will take you directly to my online store to purchase:

Table built using Product Table Builder by The Crafty Owl - Independent Stampin' Up! Demonstrator.


The Everything Is Rosy Product Medley costs £74 and is available from today only whilst stocks last or until May 31st, whichever comes sooner. Order yours today - race you to the shop!


Purple Springtime Impressions Corner Card

by Joanne James1. May 2019 07:00

Today I'm sharing a quick clean and simple card for this week's challenge over at CAS(E) This Sketch that also works for another entry into the Addicted to CAS challenge which is all about contrasts:


This sketch was perfect for a tone-on-tone Springtime Impressions floral Corner diecut contrasted with a white front panel:


I diecut the edge of my white panel to but up to my gorgeous Grape diecut and adhered both pieces to my Highland Heather card base, paper-piecing a few of the flower centres and stamping my birthday sentiment to finish. I also trimmed the left-hand corner of the diecut to fit my portrait orientation.

That's all there is to it! 

Here is the visual summary of the key products used on today's project for you to pin for easy reference:


You can see all of my 'How To' summaries on my 'How To - Tips and Techniques' Pinterest board in case you've missed any. 

Enjoy your day and I'll be back tomorrow with another project. Until then, happy stampin'!


Stampin' Up! Supplies Used:

Table built using Product Table Builder by The Crafty Owl - Independent Stampin' Up! Demonstrator.

Butterfly Beauties in Blue For Just Add Ink

by Joanne James30. April 2019 07:00

Today I'm sharing a card for this week's colour challenge over at Just Add Ink:


I've not managed to play along with this lovely group for a couple of weeks but when I saw this week's fabulous bright colour palette I couldn't resist! I decided to go for a bold design to really make the most of all that colour and used my Butterfly Beauty Thinlits Dies for the very first time - take a look:


Here's the low-down on today's card:

A Blended Background - I wanted something with lots of colour for my background but not too much detail so as to detract from the butterflies, so decided to use the two lightest colours and apply them using a sponge dauber in a circular motion until the colours were blended and covered the whole layer. I used Shimmery White cardstock for my base; I find this helps the colours blend better and I also love the subtle shimmer it adds to the card. 

Butterfly Beauties Indeed - I loved these butterflies the moment I saw them and I've had them for months, so I'm not sure why it's taken me so long to get them out of the packet as they really are gorgeous and the star of the show for sure on today's card. I used both of the large dies and layered them together, with a smaller layered butterfly to anchor my sentiment; the set rally is choc-full of butterflies in all shapes and sizes though - lots of creative possibilities. I'm so glad these are carrying over into the main catalogue as it will give me lots more opportunities to play with them. Just a quick reminder that whilst both the Beauty Abounds stamp set and the Butterfly Beauty Thinlits Dies are carrying over, the 10% bundle discount price will not, so if you want to take advantage of that you need to order before the new catalogue goes live on 4th June.

Friendship Abounds - The dies in the Beauty Abounds bundle are rather spectacular, but the stamp set is rather special too: alongside some generic sentiments, it has two great pairs of sentiments that are just perfect for that special friend in you life. The one I used on my card today finishes on the inside with '...out of a whole world of people' (I forgot to take a photo so you'll have to take my word for it!!) How lovely is that?

Here is the visual summary of the key products used on today's project for you to pin for easy reference:


You can see all of my 'How To' summaries on my 'How To - Tips and Techniques' Pinterest board in case you've missed any. 

Enjoy your day. I'm early posting for a change and mine is shaping up to be a busy one. and I'll be back tomorrow with another project. Until then, happy stampin'!


Stampin' Up! Supplies Used:

Table built using Product Table Builder by The Crafty Owl - Independent Stampin' Up! Demonstrator.

Out of Africa Wild About You Animal Print Card

by Joanne James29. April 2019 19:15

Just a quick creative post from me today following on from my earlier share about the 'Everything Is Rosy' limited edition product medley that is coming later in the week (you can read all about that here if you missed it). I'm sharing a quick card that I made at the weekend that was initially inspired by last week's CASology challenge theme of 'Africa' (now closed but you can check out their amazing gallery here) that inspired me to use up some of my epic stash of retired designer series papers with this rather intriguing sketch from the CAS Colours and Sketches team:


So here is my card: 


A selection of 'Go Wild' retired animal print papers, inset beneath a trio of apertures cut using my rectangle stitched framelits dies and a sentiment from the retiring 'A Little Wild' stamp set - that's all there is to it! It definitely felt good to use up some of those retired papers too.

I'm also linking up my clean and simple card with the team over at Addicted To CAS where their current theme is 'contrast' and I think my varied animal skin-inspired prints are definitely that!


Here is the visual summary of the key products used on today's project for you to pin for easy reference:

You can see all of my 'How To' summaries on my 'How To - Tips and Techniques' Pinterest board in case you've missed any. 

I'll be back tomorrow with another project and compared to today's you might need sunglasses for it - bright is the word! Until then, happy stampin'!


Stampin' Up! Supplies Used:

Table built using Product Table Builder by The Crafty Owl - Independent Stampin' Up! Demonstrator.

Everything Is Rosy - Limited Edition Kit Available May 1st

by Joanne James29. April 2019 16:00

When I attended Onstage recently, we were updated on some exciting new Stampin' Up! developments, one of which was the development of a new concept called the 'product medley'. Product medleys are a concept based on demonstrator feedback. In addition to being filled to the brim with cute, coordinating products, they have been designed to provide you with endless creative possibilities.

The Everything Is Rosy Product Medley is our first product offering of this kind and this exclusive, limited-time collection of coordinating, petal-packed products has everything you need to let your creativity bloom.

The Everything Is Rosy Product Medley costs £74 and includes these exclusive products:


Here's a close-up of the stamp set detail:

And here's a selection of photos of projects made with the Everything Is Rosy Product Medley (there are more of these to view on my Facebook page that you can access here):


The nice people at the Stampin' Up! home office have also produced this short video that shows the products in the suite in more detail:

The set was shared with demonstrators at Stampin' Up!'s recent demonstrator-only Onstage event, however we have been unable to pre-order it so we will be waiting in line with you to get our hands on it! I can assure you the samples shared above really don't do this suite justice; having seen it in real life it really is beautiful, especially the rose gold elements. Everything is Rosy costs £74 and is available from May 1st until May 31st only or while supplies last, so if this set is for you, be ready to order as soon as it launches on May 1st as it is likely to be hugely popular!

2019-20 Annual Catalogue Sneak Peak - Introducing Mosaic Mood PP439

by Joanne James28. April 2019 09:00


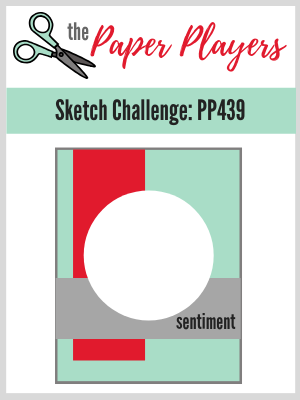
Today it's Sunday and time for this week's new challenge over at The Paper Players! It's the turn of the fabulous Claire to host this week and she has my favourite, a sketch challenge, for you to work with:


I decided today that I'd make a card with something old (my stamp set is the retiring 'Eastern Beauty') but mostly something new and share a sneak peek of some of the specialty designer series paper that will be coming along in the new annual catalogue - take a look:


Here's the low-down on today's card:

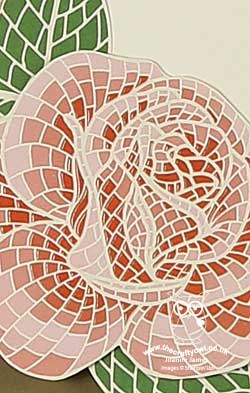
So today's card really is all about the paper! Due to ongoing EU Customs issues, European demonstrators who attended Stampin' Up!'s recent Onstage event were unable to place an early pre-order, so our only new goodies to play with were the products we came come with. One of those was a pack of the new Mosaic Mood Specialty Designer Series Paper though, which is perfect for backgrounds, borders and more! It has some gorgeous printed pages with roses, butterflies and hummingbirds that can be fussy cut to add as embellishments too and what's more they have some amazing UV detail that gives a great glossy, soft sheen - check it out on the rose below:

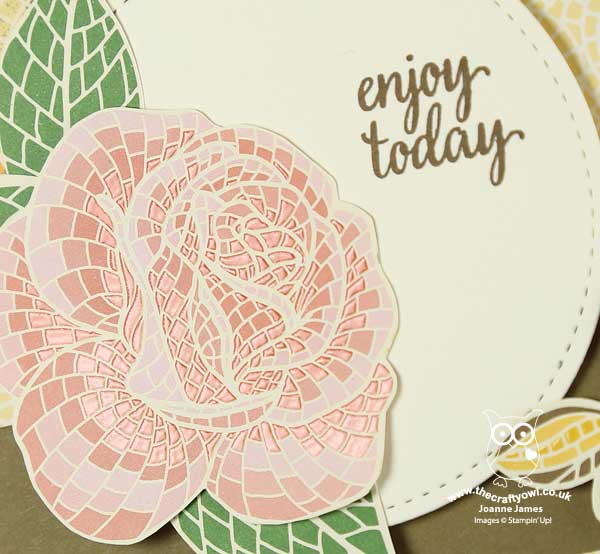
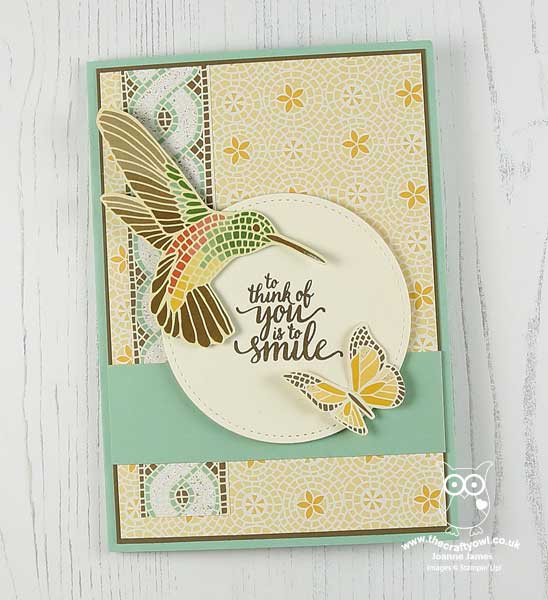
This detail really makes this paper shine! Since I featured my sentiment on the circle element of my sketch, I used a butterfly from the paper in place of the sentiment on the sketch to keep the whole thing balanced. I liked this card so much that I cut into a few more sheets and changed my base colour to create another card using the sketch that features a hummingbird that I cut from a different sheet of paper:


Again, here's a close-up of that gorgeous glossy detailing, this time on the whole of the bird:


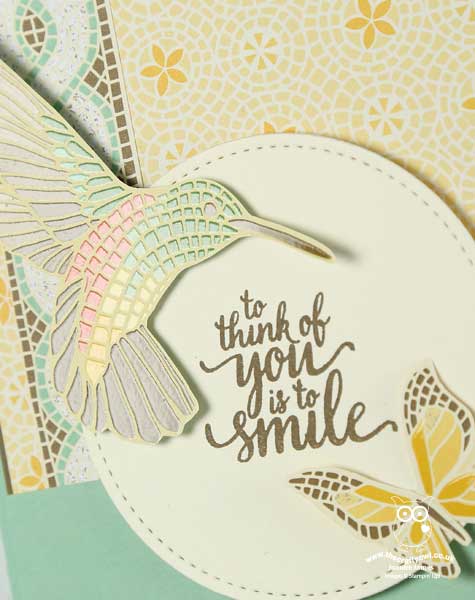
The colours are not as visible as the glossy finish is reflecting the light, but take my word for it this really makes these papers something special. 

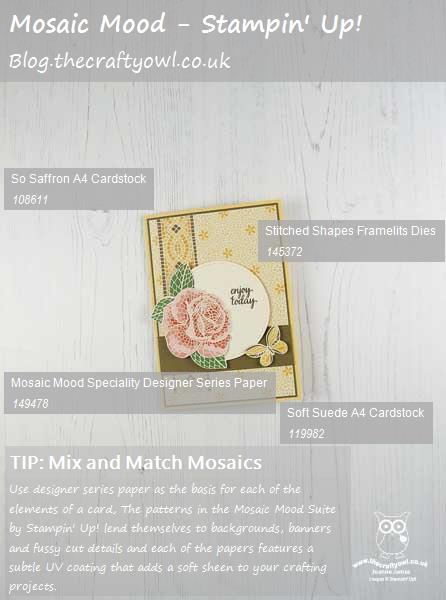
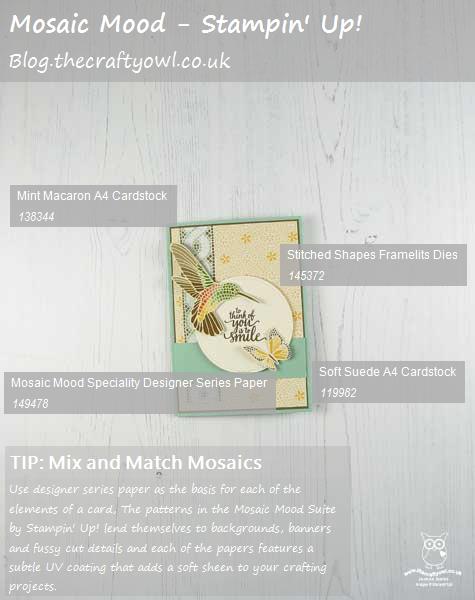
Here is the visual summary of the key products used on today's projects for you to pin for easy reference:


And my second card:


You can see all of my Product and 'How To' summaries on my 'How To - Tips and Techniques' Pinterest board in case you've missed any. 

Before you reach for your ink and papers, check out what our amazing team has created to inspire you this week:

Here's a quick recap of our challenge rules:
 
1.  Create a new paper project
2.  Upload your creation to your blog with a link back to us and provide a direct link to the post featuring your challenge submission.
3.  Please link your card to no more than four challenges, TOTAL.
4.  Have FUN!

You can see all of my 'How To' summaries on my 'How To - Tips and Techniques' Pinterest board in case you've missed any. 

Enjoy your day; one of the James Juniors has a birthday party to attend today, but otherwise we have a sport-free day so are looking forward to lunch and an afternoon indoors escaping the storm-force gales we have experienced the last couple of days! I'll be back tomorrow with another project. Until then, happy stampin'!


Stampin' Up! Supplies Used: 

Table built using Product Table Builder by The Crafty Owl - Independent Stampin' Up! Demonstrator.

Happiness Blooms Coral Flowers

by Joanne James27. April 2019 21:00

Today I've been battling a mountain of ironing and watching one of the James Juniors playing back-to-back hockey games in storm-grade winds (a dedicated sportswoman indeed!) so I'm late with today's post but wanted to share a quick card I made for the current challenge over at Inspire.Create where they have a great sketch to work with:

 No photo description available.

My card features stamp, papers, ribbon and a sentiment from the Memories and More kit from the Happiness Blooms Suite  - take a look:


I just love this suite and am so sad it is going to retire as it's one of my favourites from the Spring-Summer catalogue - i love the contemporary design and bright colours and the Bitty Blooms punch pack is super-useful too! 

Here is the visual summary of the key products used on today's project for you to pin for easy reference:


You can see all of my 'How To' summaries on my 'How To - Tips and Techniques' Pinterest board in case you've missed any. 

Enjoy your day and I'll be back tomorrow with my post for this week's new challenge over at The Paper Players. Until then, happy stampin'!


Stampin' Up! Supplies Used:

Table built using Product Table Builder by The Crafty Owl - Independent Stampin' Up! Demonstrator.

Needlepoint Elements Subtles Floral Thank You Card

by Joanne James25. April 2019 20:50

I had a class today featuring the Needlepoint Nook Suite so have been making lots of cards featuring these products in the last week or so as everything has been out on my desk. Today's card is a clean-and-simple one using the current sketch over at SUO Challenges and the colour challenge over at Less Is More:

My card features two of the dies from the Needlepoint Elements Framelits used in an unconventional way - take a look:


Here's the low-down on today's card:

A Floral Trio - When putting together one of my class cards, it occurred to me that the three leaf sprig and the three-looped piece when used together could make a sweet little flower. I had a little play and eventually decided to snip away my central green leaf before adding my pale pink flower petals, in which I left the diecut pieces in place. I created three of these flowers and added to my panel, with a little stitched edge detailing. I love it when I discover another use for a die or punch - so much versatility!

Super Subtles - I recently shared a colour family poll over on my Facebook page where I asked my followers to vote for their favourite of the Stampin' Up! colour families. I'm a Brights girl myself, however Subtles won with an overwhelming majority so for everyone who voted - this card is for you! I chose to feature Soft Sea Foam and Petal Pink on my card, possibly two of the most subtle colours in my collection and must admit the soft colours and calming green make this a favoured colour combination of mine. 

Simple Thanks - I added a simple tone-on-tone stamped sentiment to the front of my card and used my Stamparatus so that I could get ink good coverage and a strong stamped image. I just love this gadget!

Here is the visual summary of the key products used on today's project for you to pin for easy reference:


You can see all of my 'How To' summaries on my 'How To - Tips and Techniques' Pinterest board in case you've missed any. 

Enjoy your day and I'll be back tomorrow with another project. Until then, happy stampin'!


Stampin' Up! Supplies Used:

Table built using Product Table Builder by The Crafty Owl - Independent Stampin' Up! Demonstrator.


Mini Catalogue

BROWSE THE CATALOGUE

The mini catalogue is now live! Read and download your copy here.

Shop Online

Access my online shop 24 x 7, 365 days of the year:

Current April hostess code:

VDKNV7BH

Shop Online

Join My Team

It's always a great time to join Stampin’ Up! New team members can get £130 worth of products for only £99 + free business supplies + free shipping + all the fun being a part of Stampin’ Up! Stampin' Up! has something for everyone: join my growing team and benefit from my support to enjoy Stampin' Up! however you choose.

If you're interested, call me for a chat to understand how I can help you realise your goals. Alternatively, if you have already decided to sign up and you just can't wait, please click here for the link to the online form where you can sign up and order your starter kit right away! 

Latest Kit!

Stampin Cut and Emboss

The Rock Legend Kit has all you need to make 8 cards with coordinating envelopes. Along with the new Panda Friends Kit, both are available from January 4th for just £14 each - get yours here!

2023-24 Annual Catalogue

BROWSE THE CATALOGUE

Click on the catalogue for a full list of current SU! supplies - if you would like to order any of the items featured, please drop me a line at [email protected] or give me a call on 07773 421446 - I'd be happy to help.

New Online Exclusives

There are new products available exclusively in the online store from 5 March - check them out here.

About Me

Hi I'm Joanne and live in Northampton and when I'm not looking after my husband and two beautiful children, am an avid crafter with a passion for all things Stampin' Up!

I must confess that I have never been a big rubber stamper - until I discovered Stampin' Up! that is. I love the fact that I can get such great results with co-ordinating stamps, inks, papers and punches - the possibilities are endless! Join me on my stamping journey as I share the things I love and be inspired to create amazing things yourself!

Follow Me

Monthly Newsletter

Box Builder

Click the button above to use Box Buster to create your custom box design using the Envelope Punch Board!

Kits Collection Now Available!

Stampin Cut and Emboss

The new Kits Collection from Stampin' Up! is now available!

Click here to see the current kits available and order yours online today.

I Design For


Stampin' Up Stuff

This is my personal blog and is not endorsed by Stampin’ Up! I hope you find it a plentiful source of ideas and personal inspiration but please don't copy my designs for contest submission or use for classes, publication or sale without express permission.