Today it's Sunday and time for this week's new challenge over at The Paper Players! It's the turn of the fabulous Laurie to host this week and she has a fun theme challenge for you to work with:

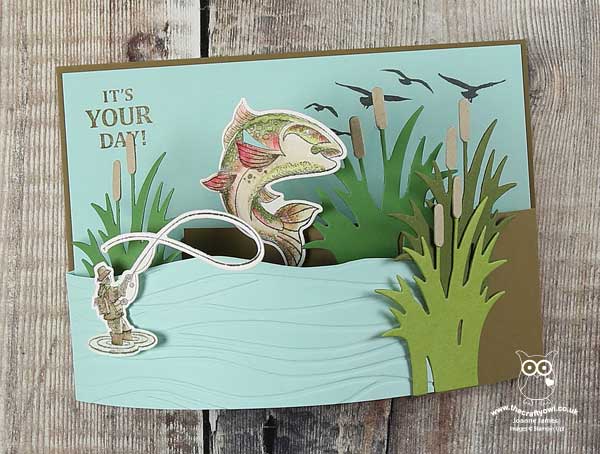
I held a class featuring the 'Best Catch' stamp set a few months ago when it was in the Spring-Summer catalogue. Since this set carried over into the new annual catalogue, today's challenge gave me the perfect opportunity to share one of the fun folds we made - take a look:
Here's the low-down on today's card:
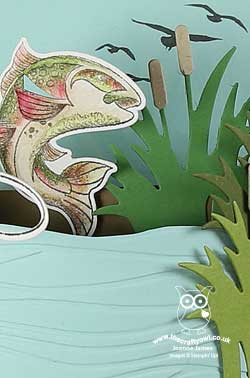
Best Catch - If you or someone you know is a fan of fishing, then the 'Best Catch' is perfect for you. When I think of watersports, I tend to think of swimming or scuba diving as they are the watersports that I love, yet angling is one of the most popular past-times globally, fly fishing in particular. There are some great images and sentiments in the set, and there is also a useful set of co-ordinating dies, 'Catch Of The Day', that make cutting out the shapes super quick and easy. My favourite image is the fish and he is definitely the star of this card; so many options to colour him, and when you use the framelits to cut him out you get a fun fin detail too that is great on a fancy fold card. I stamped my fisherman and fish on Shimmery White cardstock as this allowed me to watercolour them with inks and an aquapainter and gives the fish a nice sparkly sheen too - just like fish scales!
A Fancy Fold Bendi Card - A bendi-fold card seemed like a fun way to add extra dimension and interest to my fishing card. Using a standard sized A6 cardbase for my backpiece, I then added a narrow panel to each outside edge; one in brown the same colour as my card base, and the other in Pool Party to the other side. To made the bendi fold mechanism, I simply cut a small slit in the back panel approx. one third from the opposite edge and slid the edge of the brown panel into it, creating a bend, then repeated this on the other side with the blue panel, tucking it into the first brown fold (just under the bulrushes).
Making Waves - Aside from my fun fancy fold, I added some texture and interest to my 'river' by running my Pool Party section through my Big Shot with my (now retired) Seaside Embossing Folder. If you don't have this, the new High Seas 3D embossing folder could be used to create a similar effect. Along with some die cut bulrushes and a little stamping, this finished my scene.
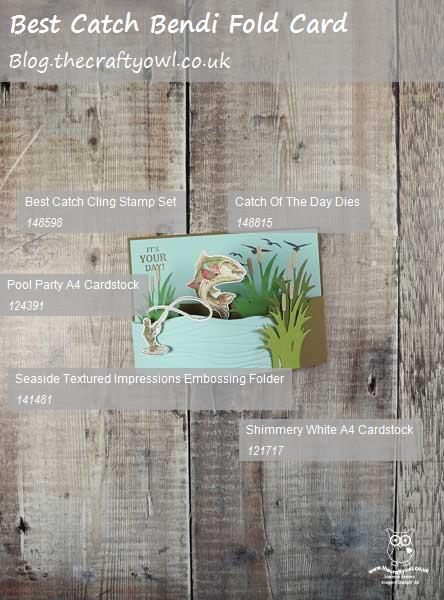
Here is the visual summary of the key products used on today's project for you to pin for easy reference:
You can see all of my Product and 'How To' summaries on my 'How To - Tips and Techniques' Pinterest board in case you've missed any.
So what do you think? Have you ever tried to make a bendi-card? What is your favourite type of fancy fold? Do let me know in the comments below - I love to read your thoughts.
Before you reach for your ink and papers, check out what our amazing team has created to inspire you this week:
The Paper Players Design Team
Here's a quick recap of our challenge rules:
1. Create a new paper project
2. Upload your creation to your blog with a link back to us and provide a direct link to the post featuring your challenge submission.
3. Please link your card to no more than four challenges, TOTAL.
4. Have FUN!
You can see all of my 'How To' summaries on my 'How To - Tips and Techniques' Pinterest board in case you've missed any.
Enjoy your day; we will be hoping the weather is slightly warmer than yesterday so that we can spend some time outside. I am also going to be busy getting the oldest of the James Juniors ready for her school exchange trip to Germany this week. I'll be back tomorrow with another project. Until then, happy stampin'!
Stampin' Up! Supplies Used: