Bring On The Sunshine #GDP135

by Joanne James28. April 2018 19:30

Well, the brief visit of warm weather here in the UK last week was short-lived; we are back to the cold and wet, with it having rained pretty much for two days straight! If this continues I think I'm going to have to issue my poor chickens with arm bands (aka water wings for my American readers!) In the hopes of willing a change in the forecast, I thought I'd play along today with the challenge over at Global Design Project, using the layout over at CAS Colours and Sketches too:


My card also fits the middle column of the board over at TicTacToe Challenge: metallic, free, stripes. I went bold, with a nice bright yellow and some crisp white for my clean and simple card - take a look:


Here's the low-down on today's card:

Bring Me Sunshine - This cute little 'button' from the A Good Day stamp set works perfectly for a 'Show Me The Sunshine' theme. I stamped it in Tuxedo Memento Black on Whisper White and again on Smoky Slate cardstock, then fussy cut and paper-pieced the clouds back in place. This gives a little detail without too much dimension and provides contrast to my ombre yellow sun behind, which I coloured with my Stampin' Blends.  

Deckchair Stripes - This yellow and white striped paper is from the Tutti Frutti designer series paper stack, which I bought primarily for the non-fruity designs. It works perfectly for my bright, sunny card - it reminds me of stripy deckchairs on the beach!

Raindrop Sparkles - To finish my card, I added some of the teardrop-shaped clear epoxy shapes to my raindrops; they are bigger than the stamped raindrops, but I like the added interest this gives to my focal point.

Here is the visual summary of the key products used on today's project for you to pin for easy reference:


You can see all of my 'How To' summaries on my 'How To - Tips and Techniques' Pinterest board in case you've missed any. 

Here's hoping today's card brings back Spring here, even if we have to wait a while for summer - I'm not sure it will be enough to do the trick though, the weatherman was prediciting icy temperatures again with an outside chance of snow again early next week - yuk!

Enjoy your evening and I'll be back tomorrow with another project. Until then, happy stampin'!


Stampin' Up! Supplies Used:

Table built using Product Table Builder by The Crafty Owl - Independent Stampin' Up! Demonstrator.

Sweet Soiree 18th Birthday Card

by Joanne James26. April 2018 20:30

I've had a few cards to make of late for milestone birthdays so thought I'd share one of them today, that uses last week's Freshly Made Sketches layout as inspiration - take a look:


I decided to use up some of the leftover bits and pieces from my Sweet Soiree Embellishment Kit (I just love this - it really does keep on going!) and layer a cake with some of the flowers, along with a silver doily, a circle of silver spotted acetate and a proper sparkly die cut sentiment  - so glad these 'Celebrate You' thinlits from this year's Sale-A-Bration offering are carrying over to the new annual catalogue. A background of co-ordinating Sweet Soiree paper and no stamping - well not on the front of my card anyway! I did stamp on the envelope and on the inside of my card:


I also added some numbers from the kit and a strip of foil washi tape to the inside of my card just to finish things off. Suitably special without being too over the top, I think - I'd love to hear your views, do feel free to leave me a comment below!

Here is the visual summary of the key products used on today's project for you to pin for easy reference:


You can see all of my 'How To' summaries on my 'How To - Tips and Techniques' Pinterest board in case you've missed any. 

I'll be back tomorrow with another project. Until then, happy stampin'!


Stampin' Up! Supplies Used:

Table built using Product Table Builder by The Crafty Owl - Independent Stampin' Up! Demonstrator.

Magical Mermaid for CTS268

by Joanne James25. April 2018 20:30

Another busy day today catching up on household admin today, but just time to share a card for this week's challenge over at CAS(E) This Sketch:

For some reason I had lots of ideas for this sketch, which is a pretty good job since the first card I made featured a couple of pens from the Crafting Forever set and a 'Just a Note' sentiment and my lovely Paper Players teamie and friend LeAnne posted one that was almost identical! You can see her card here; I decided that instead of posting my card that was so similar, I would work up one of my other ideas and got out my Magical Mermaid stamp set for some aquatic fun - take a look:


I stamped the seaweed twice and added my sentiment below as per the sketch, creating an ombre effect by sponging the sentiment stamp with Melon Mambo, Bermuda Bay and Tranquil Tide before stamping and fussy cutting a gold embossed starfish. The real star of this card though is the mermaid: I stamped her in Versamark and heat embossed in gold, then coloured her by sponging ink and blending lots of pinks and aquas to create her tail, before covering with a liberal does of clear Wink of Stella, fussy cutting and popping her on some dimensionals for extra lift. I also allowed her to sit slightly off the edge of the card for added interest.

This really is one of those cards where the photo doesn't do my card justice - it is so shimmery and sparkly in real life and the blended tail colour so pretty. Try as I might though I could capture the effect on film, so you'll just have to take my word for it! I did take a quick picture of the inside too, with its seaside border:


I think this is the first time I've blogged a card using this set, but it is actually getting lots of use as I've recently decorated Rebecca's room and one of her bed sets has mermaids on it, so we are in the process of using this set to create some fun wall art and home decor pieces. 

Here is the visual summary of the key products used on today's project for you to pin for easy reference:


You can see all of my 'How To' summaries on my 'How To - Tips and Techniques' Pinterest board in case you've missed any. 

I'll be back tomorrow with another project. Until then, happy stampin'!


Stampin' Up! Supplies Used:

Table built using Product Table Builder by The Crafty Owl - Independent Stampin' Up! Demonstrator.

A Little Wild Elephant Baby Boy Congratulations Card

by Joanne James24. April 2018 17:00

With the birth of a Royal baby yesterday, a second son and third child for the Duke and Duchess of Cambridge, it seemed only fitting today to share a card to welcome the arrival of a baby boy to the world that fits perfectly for the following challenges: 


I used both the sketch and photo inspiration over at Fusion and coloured my sweet baby elephant with my Smoky Slate Stampin' Blends for the challenge over at StampInkPaper - take a look:


 Here's the low-down on today's card:

A Little Wild Elephant - The little animals in the 'A Little Wild' stamp set are just the cutest and so perfect for a card to welcome a new arrival. Today's card just had to feature the elephant, given the Fusion photo inspiration; I also used a strip of retired designer series paper (from the A Little Foxy DSP stack) for my horizontal strip as it was perfect to tie my colours in together. 

It's All In The Curve - I decided to curve my sentiment to follow the line of my layered circle, so chose to use the 'congratulations' stamp from the Beautiful Bouquet set. It's photopolymer which means that even though it is a straight stamp, it is flexible enough to be moulded to an alternative shape.  

Fun On The Inside - One of the cute features of the 'A Little Wild' animal stamps is that as they are designed to work as a gift tag, they include both front and back of the animals. This doesn't preclude them from being used on cards - in fact, it's a fun way to decorate both the front and back of your envelope and the inside of your card. I added a sentiment from the same stamp set, a strip of left over DSP and a cute enamel heart  - and for once, I remembered to take a photograph to share it with you! Here it is:

How sweet is that?! The blues could easily be switched out for pinks to make a girl card with the same details - an idea for another day, perhaps!

Here is the visual summary of the key products used on today's project for you to pin for easy reference:


You can see all of my 'How To' summaries on my 'How To - Tips and Techniques' Pinterest board in case you've missed any. 

Enjoy your evening and I'll be back tomorrow with another project. Until then, happy stampin'!


Stampin' Up! Supplies Used:

Table built using Product Table Builder by The Crafty Owl - Independent Stampin' Up! Demonstrator.

Goodbye Birthday Marquee Messages For The Paper Players PP390

by Joanne James22. April 2018 09:00

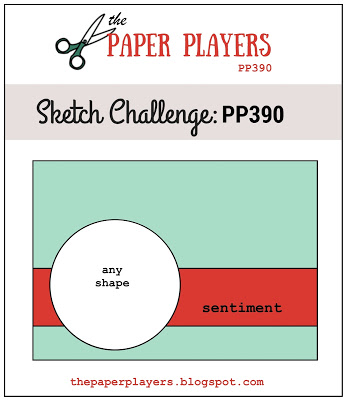
Apologies for the lack of blog posts this week but the weather has taken a turn for the better here in the UK so I have taken the opportunity to spend some time giving my garden some much-needed TLC and enjoying spending time outdoors with the youngest of my James Juniors who is still on Easter break until early next week. Today it's Sunday though and time for this week's new challenge over at The Paper Players! It's the turn of the wonderful Jaydee to host this week and she has my favourite, a sketch challenge, for you to work with:


So many ways I could have gone with this one! In the end I decided that having spent some time this week sorting through the old to make way for the new, it would be a great opportunity to share some retiring favourites with you  - take a look:


Here's the low-down on today's card:

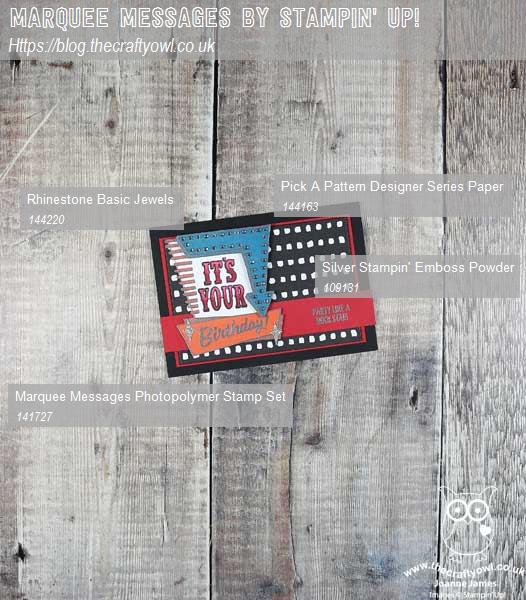
A Birthday Marquee Message - I have had a lot of fun with this stamp set: great for invitations, birthdays and more general celebrations, Marquee messages works for clean and simple and more detailed and layered cards. Here I've heat-embossed the outlines in silver and paper-pieced the various elements together, stamping the central wording with my Cherry Cobbler Stampin' Blends. To finish I added a whole bunch of rhinestones to the arrow - it made a fair dent in a new packet, but it was so worth it for the finished effect - after all, who doesn't want their birthday message up in lights?! 

Pick A Neutral Pattern - I decided to use something with a little pattern for my background, but that wouldn't detract from my focal point sign and this black and white pattern from the Pick A Pattern designer series paper collection was the perfect choice. 

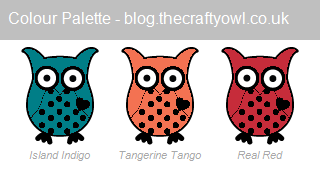
Colour Movers and Shakers - My card also features two colours that are about to retire and one that is about to move colour families as a result of the Colour Revamp. I will miss Island Indigo more than Tangerine Tango for sure, but am very exciting by the new colours that will be joining our new families in their place. My third colour, Real Red, is thankfully sticking around, but moving from Brights to Regals as part of the reshuffle. Here are today's colours should you wish to save this colour combo, but remember - you only have until May 7th to guarantee supplies of the retiring colours, so be sure to stock up before they're gone:


Here is the visual summary of the key products used on today's project for you to pin for easy reference:


You can see all of my Product and 'How To' summaries on my 'How To - Tips and Techniques' Pinterest board in case you've missed any. 

Before you reach for your ink and papers, check out what our amazing team has created to inspire you this week:

Here's a quick recap of our challenge rules:
 
1.  Create a new paper project
2.  Upload your creation to your blog with a link back to us and provide a direct link to the post featuring your challenge submission.
3.  Please link your card to no more than four challenges, TOTAL.
4.  Have FUN!

I can't wait to see what you create with this week's sketch and look forward to visiting your blogs this week! Enjoy the rest of your weekend as it will be over all too quickly. I am hoping to get out into the garden again and enjoy the rest of the nice weather before it departs and leaves us with cooler temperatures later this week. I'll be back tomorrow with another project; until then, happy stampin'!


Stampin' Up! Supplies Used: 

Table built using Product Table Builder by The Crafty Owl - Independent Stampin' Up! Demonstrator.

One Of A Kind Magical Day Rainbow Unicorn CAS Card

by Joanne James17. April 2018 20:50

Today I have another card that I made with this week's challenge over at The Paper Players in mind. 


I love the card that I used as my design team entry on Sunday, but wanted to try another idea that I had for that lovely magical unicorn that was a little more clean and simple - take a look: 


Here's the low-down on today's card:

Keep It CAS - Whilst still not entirely 'white space', I created a subtle repeating pattern of pale grey outline unicorns to add enough detail to allow me to highlight my unique 'one of a kind' unicorn and sentiment.

One Of A Kind Unicorn - I stamped and coloured another unicorn to anchor my sentiment, adding a rainbow mane and tail, a liberal dose of clear Wink of Stella and a sparkling gold unicorn horn. This unicorn is all about standing out from the crowd!

Rainbow Highlights - My unicorn anchors my rainbow sentiment, coloured with Stampin' Write markers in the same colours as my unicorn mane and backed with some gold glimmer paper. A pop of colour on my clean and simple card, created with just one stamp set and some inks - truly clean and simple.

Here is the visual summary of the key products used on today's project for you to pin for easy reference:


You can see all of my Product and 'How To' summaries on my 'How To - Tips and Techniques' Pinterest board in case you've missed any. 

Remember, you have until Friday to join our magical Clean and Simple challenge over at The Paper Players - we look forward to receiving your entries!

I'll be back tomorrow with another project; until then, happy stampin'!


Stampin' Up! Supplies Used: 

Table built using Product Table Builder by The Crafty Owl - Independent Stampin' Up! Demonstrator.

The Clearance Rack Has Updated - Grab A Bargain!

by Joanne James17. April 2018 08:00

What a great start to a Tuesday - I logged on this morning to find a surprise update to the Clearance Rack. There are now lots of new items available, some with as much as 60% off. As is always the case, popular items will sell out quickly, so don't spend too long deliberating - get in there quick! There are some great paper bargains, including many designer series papers, accessories, kits, framelits and even the odd punch. The gorgeous Painted Autumn DSP is there along with some great varieties of washi tape. I could go on, but the best thing you can do is hop on over and take a look.

Click here to go the clearance rack in my online store and grab a bargain whilst stocks last! Don't forget to include the current hostess code YDNWGUGS make sure that 'allow your demonstrator to contact you' is ticked in order that you receive your special 'thank you' in the post from me next month. 

Race you to the shop - first one there gets the bargains! Happy shopping! 

Farewell You've Got This

by Joanne James16. April 2018 12:00

Happy Monday everyone! It's a tad chilly here in the UK but the sun is trying to shine, so I'll take that as the start to a good week! Today is the last day of the Easter holidays for one of the James Juniors at least so we are making the most of it! I'm sharing a card that I made at the weekend for one of my favourite challenges, As You See It (it's been too long since I've played along with these lovely ladies!) and uses the fresh Spring colour palette over at The Color Throwdown:


My card today says farewell to one of my favourite florals from the Annual Catalogue - which makes it perfect for the current challenge over at SUO Challenges too - take a look:


Here's the low-down on today's card:

Farewell Flower - 'You've Got This' is one of my favourite florals and I will be sad to see it retire next month, I love that single peony-like bloom and the hatched background is so useful, both as a background for this flower and lots of other projects too. Here I've used it in one of my favourite ways, fussy cutting the flower and popping up on dimensionals. I stamped the background onto my white cardbase in Pool Party and coloured my flower with my Daffodil Delight Blends and retired Wild Wasabi Blendabilities alcohol markers.  

Raindrops On Petals - I added a few glitter epoxy raindrops onto my flower petals and leaves for a little sparkle and detail, without detracting from the flower itself. You can see them better on the close-up here:


As You See It - I was intrigued by the current As You See it sketch: whilst my hatched background is not as brave as some of the beautiful watercoloured or inked backgrounds of the design team, I think it does a good job of representing the idea of the sketch. The thing I like the most about the sketch though is the positioning of the sentiment; having rotated the sketch through 90 degrees, this put my sentiment running sideways along the central fold of my card. This is not a position that I would have naturally chosen for my wording, yet I think it really rings the changes and I love the finished card. I love how sketches encourage us to push the boundaries of convention sometimes.

Here is the visual summary of the key products used on today's project for you to pin for easy reference:


You can see all of my 'How To' summaries on my 'How To - Tips and Techniques' Pinterest board in case you've missed any. 

Yes, I will miss this stamp and the wonderfully uplifting and encouraging sentiments that go with it - I 'm not too sad though, a new catalogue always provides opportunities for new favourites to come along!

Enjoy your day and I'll be back tomorrow with another project. Until then, happy stampin'!


Stampin' Up! Supplies Used:

Table built using Product Table Builder by The Crafty Owl - Independent Stampin' Up! Demonstrator.

Unicorns Myths and Magic For The Paper Players PP389

by Joanne James15. April 2018 09:00

It's Sunday and time for this week's new challenge over at The Paper Players! It's the awesomely artistic Sandy's turn to host this week and she has a clean and simple challenge for you to work with and a fun 'magical' theme:


I used this week's sketch from Freshly Made Sketches again (Karren definitely came up trumps with this one!) and just had to go with unicorns for my card today - take a look:


Here's the low-down on today's card:

Myths And Magic - So I broke one of my 'clean and simple' rules with today's card in my use of designer series paper across the whole of my card front; this Myths and Magic DSP is to good to cut down though. I am happy to pass up my 'white space' for these sweet, sparkly unicorns - I love them! Each and every one of them shimmers with glitter. 

A Magical Unicorn Day - I stamped and coloured another unicorn to anchor my sentiment and covered the body of this one in Dazzling Diamonds glitter too - Wink of Stella wasn't enough for this one! I also added a trio of pearls that I coloured with my Pool Party Stampin' Blends. My unicorn had to be pink - this is headed for a girly girl, so nothing else would do.

Fairy Words - I added a solid banner of Melon Mambo to back my skinny sentiment, taken from the 'Fairy Celebration' set, as this suited the sketch better than those in Magical Day. 

Here is the visual summary of the key products used on today's project for you to pin for easy reference:


You can see all of my Product and 'How To' summaries on my 'How To - Tips and Techniques' Pinterest board in case you've missed any. 

I am so sad that this set is retiring at the end of May - it's one of my favourites in the current seasonal catalogue and I haven't used it nearly enough! Rebecca is obsessed with mermaids and unicorns, so I know I will get plenty more use from it yet; I definitely won't be parting with it anytime soon, for sure.

Before you reach for your ink and papers, check out what our amazing team has created to inspire you this week:

Here's a quick recap of our challenge rules:
 
1.  Create a new paper project
2.  Upload your creation to your blog with a link back to us and provide a direct link to the post featuring your challenge submission.
3.  Please link your card to no more than four challenges, TOTAL.
4.  Have FUN!

Don't forget the theme is clean and simple this week - so minimal layers and embellishments and aim for lots of white space. I can't wait to see what you create and look forward to visiting your blogs this week! Enjoy the rest of your weekend as it will be over all too quickly. We are finally getting some nice weather here in the UK so I will be aiming to spend as much time outdoors as possible; I think Spring may finally be on its way. I'll be back tomorrow with another project; until then, happy stampin'!


Stampin' Up! Supplies Used: 

Table built using Product Table Builder by The Crafty Owl - Independent Stampin' Up! Demonstrator.

This Little Piggy Believes Slider Card

by Joanne James14. April 2018 21:30

I managed to get into my craft room yesterday for the first time in over a week and spent a pleasant few hours attempting a few of my favourite challenges and creating some cards to share with you over the next few days. Today I'm sharing a card using this week's sketch from Freshly Made Sketches - the lovely Karren Johnson is hosting and the minute I saw her sketch an idea popped into my head which also fits the bill at CASology  this week:

This is a sketch with so many possibilities (I actually made a few different cards with it!) but I thought it would be perfect to create a fun slider card with a hidden message. Here is my card using one of the sweet little pigs from the 'This Little Piggy' stamp set - take a look:


I used a white cardbase and adhered a panel of Myths and Magic Specialty Designer Series Paper across the lower half, having first cut a channel to accommodate my slider and the first part of my message. I coloured my pig with Stampin' Blends and added a liberal coat of clear Wink of Stella to his wings, then fussy cut him and added him to my pull tab strip. When you pull the tab to the right, the little piggy 'flies' across the card and reveals the second part of the sentiment:


How fun is that?! A clean and simple card to wish someone good luck or congratulations, with a fun surprise element.

Here is the visual summary of the key products used on today's project for you to pin for easy reference:


You can see all of my 'How To' summaries on my 'How To - Tips and Techniques' Pinterest board in case you've missed any. 

Enjoy your day and I'll be back tomorrow with another project for this week's new challenge over at The Paper Players. Until then, happy stampin'!


Stampin' Up! Supplies Used:

Table built using Product Table Builder by The Crafty Owl - Independent Stampin' Up! Demonstrator.

Mini Catalogue

BROWSE THE CATALOGUE

The mini catalogue is now live! Read and download your copy here.

Shop Online

Access my online shop 24 x 7, 365 days of the year:

Current April hostess code:

VDKNV7BH

Shop Online

Join My Team

It's always a great time to join Stampin’ Up! New team members can get £130 worth of products for only £99 + free business supplies + free shipping + all the fun being a part of Stampin’ Up! Stampin' Up! has something for everyone: join my growing team and benefit from my support to enjoy Stampin' Up! however you choose.

If you're interested, call me for a chat to understand how I can help you realise your goals. Alternatively, if you have already decided to sign up and you just can't wait, please click here for the link to the online form where you can sign up and order your starter kit right away! 

Latest Kit!

Stampin Cut and Emboss

The Rock Legend Kit has all you need to make 8 cards with coordinating envelopes. Along with the new Panda Friends Kit, both are available from January 4th for just £14 each - get yours here!

2023-24 Annual Catalogue

BROWSE THE CATALOGUE

Click on the catalogue for a full list of current SU! supplies - if you would like to order any of the items featured, please drop me a line at [email protected] or give me a call on 07773 421446 - I'd be happy to help.

New Online Exclusives

There are new products available exclusively in the online store from 5 March - check them out here.

About Me

Hi I'm Joanne and live in Northampton and when I'm not looking after my husband and two beautiful children, am an avid crafter with a passion for all things Stampin' Up!

I must confess that I have never been a big rubber stamper - until I discovered Stampin' Up! that is. I love the fact that I can get such great results with co-ordinating stamps, inks, papers and punches - the possibilities are endless! Join me on my stamping journey as I share the things I love and be inspired to create amazing things yourself!

Follow Me

Monthly Newsletter

Box Builder

Click the button above to use Box Buster to create your custom box design using the Envelope Punch Board!

Kits Collection Now Available!

Stampin Cut and Emboss

The new Kits Collection from Stampin' Up! is now available!

Click here to see the current kits available and order yours online today.

I Design For


Stampin' Up Stuff

This is my personal blog and is not endorsed by Stampin’ Up! I hope you find it a plentiful source of ideas and personal inspiration but please don't copy my designs for contest submission or use for classes, publication or sale without express permission.