Mosaic Madness Christmas Card

by Joanne James1. August 2013 21:00

I know, I know - 145 days until Christmas, but as a crafter it pays to be prepared! I have been busy this week preparing for an all day Christmas workshop this weekend when we will be making a headstart on our 3D projects and gifts for the festive season.

As such, today seems like a good day to share another of our quarterly team training projects designed by Monica Gale: this time a Christmas card using the Mosaic Madness stamp set. I love this set and still have so many more projects to make with it. It is great for all kinds of cards, and the main mosaic shape does have something ornamental about it, so it works really well for a Christmas card. So here is the finished card:

 The hanging ornament is made by scoring four punched pieces vertically then adhering together around the bakers twine and is then suspended in the negative space of a punched circle. The nice thing about this card is that although it's very multi-dimensional, it still folds flat for posting. Also, if you're wondering where that piece of crumb cake DSP with the chevrons came from, you might be looking for some time as it's actually a strip cut from a Tag a Bag - these just have so many uses!

So the first of many Christmas cards and projects to come; I will share our weekend workshop projects next week, guaranteed to really get you in the festive spirit! This is also a good time to mention that Mosaic Madness is the stamp set that I'll be featuring in my September card classes. If you would like more information about my classes or to book a place, please get in touch to find out more.

Back tomorrow with another project; until then, happy stampin'!


Stampin' Up Supplies:

Stamps: Mosaic Madness, Greetings of the Season

Cardstock: Crumb Cake, Whisper White, Cherry Cobbler

Ink/Stampin' Write Markers: Coastal Cabana, Crumb Cake, Cherry Cobbler

Tools: Mosaic Punch, 1 3/4" Circle Punch, Scallop Trim Border Punch

Finishing Touches: Baker's Twine (Tag A Bag Accessory Kit), Tag A Bag

Angry Birds Spiral Pop-Up Birthday Card

by Joanne James27. July 2013 20:23

Today I have a very special card to share with you. As my regular blog followers are aware, my soon-to-be six year old son and his friends are Angry Bird mad; I swear if we didn't ration access to all touch devices in our house he would turn into one of those little feathered creatures!! Anyway, a friend of his celebrates his birthday today and in addition to the card I made from us, which I will share with you another time, his Mum also asked me if I would make him a special birthday card. I saw a very simple Angry Bird pop up card by Julie Davidson a while ago which I loved (you can see Julie's card that was the inspiration for mine here), but I must confess I had something much more 'explosive' in mind. So this was the front of my card:
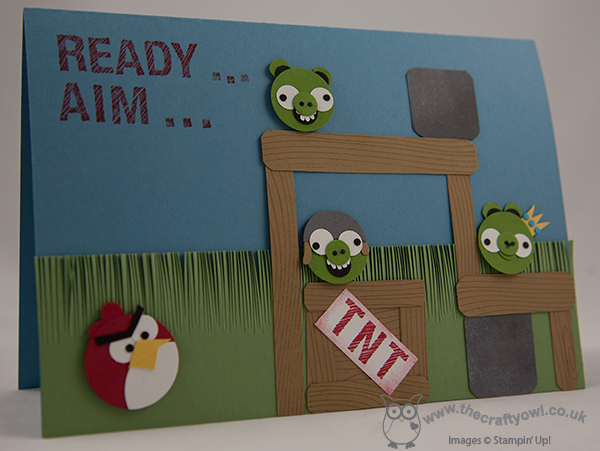
 

Lots of little pigs hiding amidst the wood and boulders, along with a box of TNT for good measure and a red Angry Bird ready for action. Open the card to reveal what happens once there's been a hit:
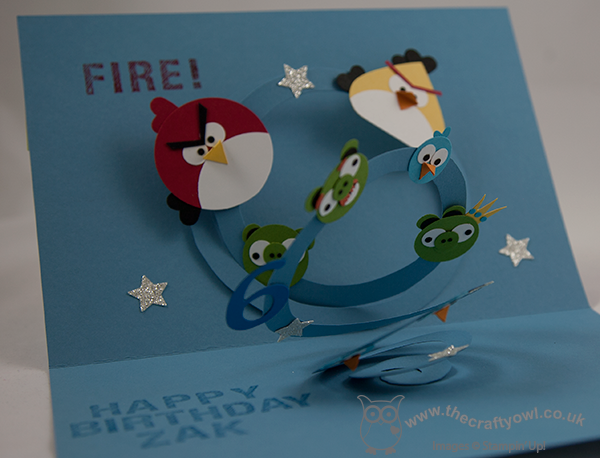
 

Birds, pigs and stars literally 'explode' out of the card. The decoration is all attached to a spiral pop-up, which is simply a large circle cut into a spiral with one end attached to each side of the card. Its really easy to do and if you made the spiral the same colour as the base card, it blends into the background and allows the birds to really 'fly'. Here's a close up of the pigs so that you can see what I mean:
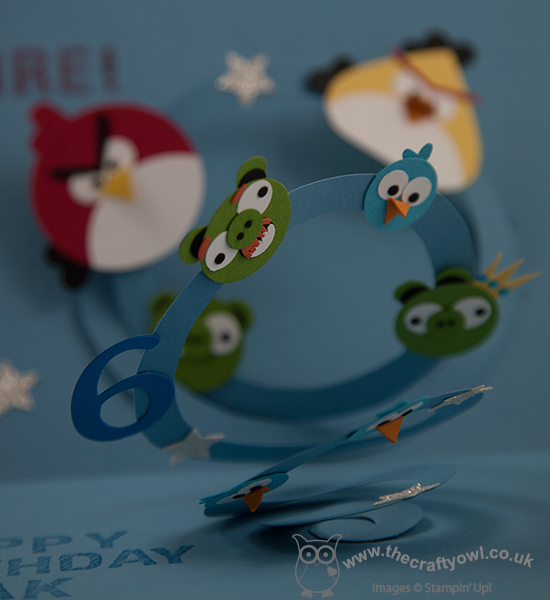
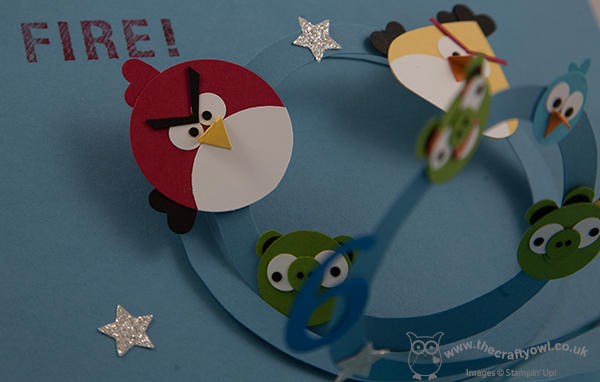
I added a number 6 and some glimmer stars and used the new Simply Sketched alphabet stamps to add the 'Ready, Aim ... Fire!' and a personalised message for the recipient. It has to be said, this card was something of a 'labour of love' - creating all the birds and pigs takes an absolute age, but it was so worth it for the impact of the resulting card, which I am reliably informed was well received!
It sounds like our very own TNT explosion in the garden at the moment; the thunder and lightening is flashing and crashing as I write and whilst lawns and gardens everywhere are I'm sure benefiting from the downpour, I'm personally hoping it is just a brief interlude in the glorious weather we've been having of late.

Back tomorrow with another project; until then, happy stampin'!


Stampin' Up Supplies:

Stamps: ABC-123 Sketch Alphabet & Numbers, Woodgrain

Cardstock: Real Red, Daffodil Delight, Basic Black, Whisper White, Crumb Cake, Gumball Green, Pumpkin Pie, Basic Grey, Marina Mist, Pacific Point, Tempting Turquoise

Inks: Real Red, Pacific Point, Chocolate Chip, Basic Grey, Whisper White

Tools: 1 3/4" Circle Punch, 1 1/4" Circle Punch, 3/4" Circle Punch, Handheld Circle Punch (retired), Small Heart Punch, Full Heart Punch, Owl Punch, Itty Bitty Shapes Punch (circle), Corner Punch, Merry Minis Punch (star), Sponge Dauber, Stamp-a-ma-jig

Finishing Touches: Silver Glimmer Paper


We're Going to Miss Your Style!

by Joanne James22. July 2013 21:27

Having just heard the Royal baby news, I really should be blogging a baby boy card today, but since I don't have one of those prepared I'm sharing a leaving card instead!

This card was a commission for someone who needed a leaving card for a colleague. The person in question is known for her keen sense of style and for always having a bag, jewellery and accessories to co-ordinate with any outfit, even her flipflops match; she is also known for her love of animal prints. With this in mind, I set about creating a card that would reflect her personality and one of the things her colleagues love and would miss most about her. This is what I came up with:


A tic-tac-toe of shoes, handbags and jewellery, ready to mix and match. Here's a close up of the flipflops (I made a template by hand for these) - aren't they just the cutest?

The handbags were made using either a3/4" circle the vest from the owl punch, or in the case of the one below the cupcake builder punch and the petite curly label punch:

I used Basic Black and More Mustard as my base colours and created a custom sentiment. If you're looking at the sentiment panel and thinking it's the right shape but the wrong size for the Decorative Label Punch, you would be right; I created a custom label using My Digital Studio (MDS) and printed it out on my computer. You may have noticed the advert for MDS on the back cover of the new annual catalogue; as demonstrators we are getting early access to this new software and I'm really enjoying playing with it. I'll have more to share in the coming months, but for now it was the ideal solution to finding just the right words to finish off my card.

Back tomorrow with another project. Until then, happy stampin'!


Stampin' Up Supplies:

Cardstock: Whisper White, Basic Black, More Mustard (retired), Animal Print Papers - from my craft box (non SU)

Ink/Stampin' Write Markers: Basic Black

Tools: 1" Square Punch, 1 1/4" Square Punch (retired), Owl Builder Punch, Petite Curly label Punch, Cupcake Builder Punch

Finishing Touches: Mini Brads, Basics Rhinestones


Tags: , , , , , , ,

Cards | Punch Art

Storytime Friends

by Joanne James13. July 2013 20:29

So shout 'yay!' if you've been enjoying the sunshine today - what a scorcher! I've spent much of it in my craft room preparing my swaps for quarterly team training tomorrow, but I'm not complaining! I'll be sharing swaps tomorrow, but today I'm sharing this post which was scheduled for earlier this week when I was cutting up my Storytime paper, but in the business of my week I totally forgot to post - go figure!

So here is today's creative post: another card I made this week as a 'friendship' card for Rebecca to give to one of her little friends who left school at the end of term:

The layout is simple and I know the red wagon is very American (we actually have friends stateside who have one of these - I think it's great!), but I love the feeling of friendship that the image gives. The check background also works to bring the whole card design and colours together.

Back tomorrow with news of quarterly training and pictures of my swaps. Until then, happy stamping'!


Stampin' Up Supplies:

Stamps: Sweet Essentials

Cardstock: Real Red, Pool Party, Night of Navy, Storytime DSP

Ink/Stampin' Write Markers: Real Red

Tools: 1 3/4" Circle Punch, 2 3/8" Scallop Circle Punch

Finishing Touches: Pool Party Baker's Twine

Tags: , , , , , , ,

Cards | Stamping

An Apple for the Teacher

by Joanne James12. July 2013 20:45

That's it for another year - school is officially out! Where does the time go? Today I'm sharing some of my teacher thank you gifts with you. I love to create handmade gifts and as some of my readers know, one of my other hobbies is biscuit making. So for my end of year teacher gifts, I decided to make apple-shaped chocolate iced biscuits, presented in the fab new Tag a Bag Gift Boxes and finished with a decorated tag from the co-ordinating accessory kit:

I often make mini-cookies and present in glass jars, but on this occasion these gift boxes were the perfect size and shape to hold ten of my apple biscuits. These boxes are great value at £6.25 for eight boxes and as they're food safe they are perfect for biscuits, cupcakes or other edible as well as non-edible gifts. I also made use of my accessory kit to seal and label the boxes. Here's a close up of one of the tags:

Wondering how I made the apples? I used the heart from my Hearts a Flutter framelits and then removed the bottom point with my Petite Curly Label Punch, added a leaf and stalk and done. A quick stamped and cut Bitty Banner 'thank you' and some Gumball Green ribbon added the finishing touch. One more photo for you with one of the biscuits out of the box so that you can see exactly what they look like:

Hoping to be back tomorrow with another project; have a busy day making tomorrow, as I have swaps to prepare for quarterly team training on Sunday and I haven't even started yet - oops! Until then, happy stampin'!


Stampin' Up Supplies:

Stamps: Bitty Banners

Cardstock: Whisper White, Real Red, Gumball Green, Chocolate Chip

Ink/Stampin' Write Markers: Real Red

Tools: Hearts a Flutter Framelits, Bitty Banners Framelits, 3/4" Circle Punch

Finishing Touches: Tag a Bag Gift Boxes, Tag a Bag Accessory Kit, White Baker's Twine

Pop Up Teacher Thank You Card

by Joanne James9. July 2013 21:38

Back again with the last of my teacher cards (I think!) this year - this time a pop-up card using my dress up framelits. The credit for this design goes to Fran Sabad; you can see her original card, a teacher birthday card, here. If you're looking for ways to use your Dress Up Framelits, I thoroughly recommend you check out Fran's blog - she has made some amazing cards using the Pop 'n' Cuts base and co-ordinating framelits. I thought this card would work equally well as a teacher thank you card with a few minor alterations and give me yet another opportunity to get stuck in to my Storytime DSP. So here is the outside of my card:

It's the inside that is the real star of the show though - a teacher mannequin in her classroom, in front of a traditional blackboard:

I absolutely love this card, complete with all the little details - check out the apple on the corner of the teacher's desk - how cute is that?! In case you're wondering about the glimmer paper 'brooch' pinned to the teacher's blouse, I know it looks a little out of place against the muted colours and traditional classroom feel, but Rebecca's teacher has what can only be described as a glitter obsession - she can't complete an art project without using tons of the stuff, so I know she wouldn't think this card complete without just a little bit of 'bling'. I wish I could convert her to the benefits of SU no-shed glimmer paper; well, Ben is likely to have her as his teacher the year after next, so there's still time!

The funniest thing about this card was when I showed it to Rebecca to see if it met with her approval; she said, "I love it - but why is there a blackboard? We've never had one of those in the classroom Mummy, all our classrooms have interactive whiteboards". What can I say? A sign of the times and made me feel quite old!

Back tomorrow with something different; until then, happy stampin'!


Stampin' Up Supplies:

Stamps: Word Play (retired), For My Family (retired)

Cardstock: Cherry Cobbler, Baja Breeze, Wild Wasabi, So Saffron, Pumpkin Pie, Pink Pirouette, Gumball Green, Crumb Cake, Storytime DSP

Ink/Stampin' Write Markers: Cherry Cobbler

Tools: 1 3/4" Circle Punch, 2 3/8" Scallop Circle Punch, Large Scallop Edgelits, Dress Up Framelits, Pop 'n' Cuts Card Base

Finishing Touches: White Baker's Twine, Silver Glimmer Paper

Blackboard Teacher Thank You Card

by Joanne James3. July 2013 20:51

Apologies for a few blog-less days - lots going on in the James household, and most of it not at home! Both James juniors have had their sports day this week and Rebecca has just finished a three night run singing in her school musical 'Bugsy Malone'; I honestly feel like I've been running around like a mad thing these last few days. Having put up tents and got out the sand and garden play toys this morning, I spent a couple of hours finishing my ironing before it got too hot (I'm not complaining - I love that summer has arrived at last!) and following a pleasant lunch in the garden, I'm now taking the opportunity to catch up with my blogging whilst cheering on Andy Murray in the Wimbledon Men's Final.

So, another teacher thank you card from me today - this time an old fashioned blackboard, which gave me the opportunity to have a little go at the 'chalkboard' technique that is so on-trend in the world of papercrafting at the moment. So here is my card:

It's based on a teacher Valentine's card that I saw on Pinterest but I think it makes a nice simple teacher thank you card. Once I stamped the sentiment, I just used a sponge to smudge some of the white ink across the card to give the impression of chalk dust. I stamped the inside with a bright red 'Thanks a MILLION' from the retired 'Word Play' stamp set, to pick up the red of the apple - well, it is for a teacher, right?!

I also made another teacher thank you card using my Storytime designer series paper - check it out:

I think this paper really lends itself to teacher thank you cards. I'm having fun creating these in between playing with some of the stamp sets from the new annual catalogue.

Should be back on course now with another project to post tomorrow; until then, enjoy the sunshine and happy stampin'!


Stampin' Up Supplies (Blackboard Card):

Stamps: For My Family

Cardstock: Crumb Cake, Basic Black, Whisper White, Real Red, Gumball Green, Chocolate Chip

Ink/Stampin' Write Markers: White, Real Red

Tools: Corner Punch, 1/2" Circle Punch, Sponge Dauber

Tags: , , , , , , , ,

Cards | Stamping

Teacher Thank You Cards

by Joanne James1. July 2013 20:30

I've had a busy day today, amongst other things shooting a video to share with you my absolute favourite new products from the new Stampin' Up! annual catalogue out tomorrow; but you're going to have to wait until tomorrow to see that!

For anyone reading this with children of school age, you will no doubt be looking forward to (or dreading - it depends on your perspective!) the long summer holidays that wigiftll be with us in a few weeks time. With that in mind, I've been making some teacher thank you cards for both of my children to take in and give to their teachers along with a small token of appreciation for their help and support throughout the year. I'll share the gift nearer the end of term, but today I thought I'd share the first two cards I've made. here is the first one:

This is a CASE of a Jen Arkfeld card that I saw on Pinterest and was perfect to use up some of my leftover Storytime DSP. This paper showcases some great images from childhood that make lovely teacher thank yous or even 'best friend' cards and requires very little actual stamping. Having made the above card, I then made a second one that had more of a masculine feel - perfect for my son to give to his teacher:

I even used a strip of the handwriting paper in the background, as this has been one of his key areas of focus this year and something I'm sure his teacher will remember him for!

I hope you like these cards; I have a few more ideas for teacher thank yous that I will be sharing in the next week or so, interspersed with lots of great projects using products from the new annual catalogue. Back tomorrow with the official launch of the new annual catalogue - I can't wait!

Until then, happy stampin'!


Stampin' Up Supplies:

Stamps: For My Family

Cardstock: Pool Party, Very Vanilla, Midnight Muse, Storytime DSP

Ink/Stampin' Write Markers: Midnight Muse

Tools: 1 3/4" Circle Punch, 2 3/8" Scallop Circle Punch

Finishing Touches: Natural Linen Thread, Brights Designer Buttons, Sycamore Street Buttons (Sale-a-bration - retired)


Tags: , , , , , , ,

Cards | Stamping

Happy Birthday Sister

by Joanne James18. June 2013 20:30

Today I'm back with the birthday card I promised yesterday: this time the card I made from her little brother. I saw a great card by Wendy Cranford on Pinterest a while ago and whilst this was for a LaLa Loopsy doll, I thought I could make a great likeness of Rebecca from it. Here's the link to Wendy's original card where she also provides a great video tutorial with step-by-step instructions on how she created her version. Now for my card:

I made my hair blonde and cut in a fringe - don't you just love the hair tied in bunches?! Also, instead of buttons for eyes, I used some punched navy circles and painted with Crystal Effects to make them shiny. Another sentiment courtesy of 'For My Family', this time pairing 'sister' with the 'Happy Birthday' from Wacky Wishes. Another set I'll be sorry to see go; if you would like to own this set, you need to host a party before the end of the month so get in touch!

Here's a close up of the little girl's face again:

I know, totally impractical for putting in an envelope, but I love the hair! So simple to recreate - just cut the card using paper snips into thin strands, then curl around a pencil - but so effective. The perfect card for little girls and I love that you can make them individual to look like the recipient. To be fair, this photo looks more like 'baby Rebecca' than my now 8 year-old - this is the photo that inspired my version of this card:

I guess in my mind's eye she will always look this way to me - beautiful!

Back tomorrow with another project - until then, happy stampin'!


Stampin' Up Supplies:

Stamps: For My Family, Wacky Wishes

Cardstock: Whisper White, Real Red, Daffodil Delight, Rich Razzleberry, Night of Navy, Blushing Bride, Summer Smooches Parade Designer Series Paper

Ink/Stampin' Write Markers: Real Red, Melon Mambo, Whisper White Kraft Ink

Tools: Circles #2 Originals Die, Small Heart Punch, Corner Punch, Dress Up Framelits, Itty Bitty Punches (circle), Small Oval Punch, Stamp-a-ma-jig

Finishing Touches: Basics Rhinestones

Oh, Whale! Party Invitations

by Joanne James17. June 2013 22:00

So something different today - birthday invitations! I was going to share a birthday card with you today but changed my mind (bloggers prerogative!) As already mentioned this week, it was Rebecca's 8th birthday last Saturday. She is having a swimming pool party next Sunday to celebrate with her friends and so water-themed invitations were the order of the day. She decided that 'Oh, Whale' was to be the stamp set of choice for the task, I saw this lovely Valentine card here and loved the layout, so decided to use this as the basis for my party invitation design. Here are the finished invitations:

I switched out the hearts, went for a darker blue whale and couldn't miss the opportunity to use my Cloudy Day Embossing Folder to add texture to the circle behind the whale. I really like the mix of circle styles on this card and the way the DSP, punched circle and paper piercing bring the whole design together. I then used the 'Make a Wish' set to make light work of the details on the inside of the card (no photo of this though - oops!)

Back tomorrow with another project; until then, happy stampin'!


Stampin' Up Supplies:

Stamps: Oh Whale, Make a Wish

Cardstock: Whisper White, Real Red, Polka Dot Parade Designer Series Paper (Marina Mist)

Ink/Stampin' Write Markers: Night of Navy, Marina Mist, Real Red

Tools: Circles #2 Originals Die, Cloudy Day Textured Embossing Folder, Small Heart Punch, Essentials Paper Piercing Pack, Stamp-a-ma-jig


Mini Catalogue

BROWSE THE CATALOGUE

The mini catalogue is now live! Read and download your copy here.

Shop Online

Access my online shop 24 x 7, 365 days of the year:

Current April hostess code:

VDKNV7BH

Shop Online

Join My Team

It's always a great time to join Stampin’ Up! New team members can get £130 worth of products for only £99 + free business supplies + free shipping + all the fun being a part of Stampin’ Up! Stampin' Up! has something for everyone: join my growing team and benefit from my support to enjoy Stampin' Up! however you choose.

If you're interested, call me for a chat to understand how I can help you realise your goals. Alternatively, if you have already decided to sign up and you just can't wait, please click here for the link to the online form where you can sign up and order your starter kit right away! 

Latest Kit!

Stampin Cut and Emboss

The Rock Legend Kit has all you need to make 8 cards with coordinating envelopes. Along with the new Panda Friends Kit, both are available from January 4th for just £14 each - get yours here!

2023-24 Annual Catalogue

BROWSE THE CATALOGUE

Click on the catalogue for a full list of current SU! supplies - if you would like to order any of the items featured, please drop me a line at [email protected] or give me a call on 07773 421446 - I'd be happy to help.

New Online Exclusives

There are new products available exclusively in the online store from 5 March - check them out here.

About Me

Hi I'm Joanne and live in Northampton and when I'm not looking after my husband and two beautiful children, am an avid crafter with a passion for all things Stampin' Up!

I must confess that I have never been a big rubber stamper - until I discovered Stampin' Up! that is. I love the fact that I can get such great results with co-ordinating stamps, inks, papers and punches - the possibilities are endless! Join me on my stamping journey as I share the things I love and be inspired to create amazing things yourself!

Follow Me

Monthly Newsletter

Box Builder

Click the button above to use Box Buster to create your custom box design using the Envelope Punch Board!

Kits Collection Now Available!

Stampin Cut and Emboss

The new Kits Collection from Stampin' Up! is now available!

Click here to see the current kits available and order yours online today.

I Design For


Stampin' Up Stuff

This is my personal blog and is not endorsed by Stampin’ Up! I hope you find it a plentiful source of ideas and personal inspiration but please don't copy my designs for contest submission or use for classes, publication or sale without express permission.