Fairies and Cherries For The Paper Players PP406

by Joanne James19. August 2018 09:00

Another week of school summer vacation in the James household this week! Today it's Sunday and time for this week's new challenge over at The Paper Players. It's the first challenge for our returning Paper Players designer, the lovely Anne-Marie Hile, this week so be sure to pop by her blog with a friendly 'hello'. It's the turn of the super-talented Sandy to host this week and she has a clean and simple challenge for us to work with:


Remember in addition to the theme of "fruits and vegetables", this week is a Clean-and-Simple (CAS) challenge!  What do we mean by CAS?

  • Minimal layers and embellishments
  • Plenty of open space, aka "white" space
  • Simple and uncluttered

Having trawled through my collection of current stamps, it turns out I have very few with fruit (or veg!) for that matter, so a little creative stamping was called for. I actually found some fruit 'hidden' in the Fairy Celebration stamp set - take a look:


Here's the low-down on today's card:

This little fairy happens to be hanging from a cherry tree, so a little watercolouring using my new watercolour pencils and an aquapainter (I am so happy that we have more of these now, the new colours in the second pack available exclusively this month extend the variety of colours and allow much greater flexibility - don't leave it too late to get yours!) was all I needed to create a focal point for my card. I added some clear Wink of Stella to the fairy wings and some fine tip glue to the cherries to give them a glossy finish - both of which are difficult to see from the photos, but add subtle detail in real life.

I decided to use the sketch over at CAS(E) This Sketch this week for my layout, and used a couple of pieces cut with my Stitched Labels Framelits then trimmed to add interest behind my main image. I have seen these Stitched Labels Framelits used on some fabulous cards elsewhere on the internet and hold my Paper Player team mate LeAnne responsible for me 'needing' to add them to my own collection (check out her blog for some great examples of how to use them!) so thought I would try something a little different with them. The two blocks of colour mirror the colouring on my cherries and leaves and add detail, without encroaching too much into my white space and maintaining my overall clean and simple feel.

And that's all there is to it: clean and simple - done!

Here is the visual summary of the key products used on today's project for you to pin for easy reference:


You can see all of my Product and 'How To' summaries on my 'How To - Tips and Techniques' Pinterest board in case you've missed any. 

Before you reach for your ink and papers, check out what our amazing team has created to inspire you this week:

Here's a quick recap of our challenge rules:
 
1.  Create a new paper project
2.  Upload your creation to your blog with a link back to us and provide a direct link to the post featuring your challenge submission.
3.  Please link your card to no more than four challenges, TOTAL.
4.  Have FUN!

You can see all of my 'How To' summaries on my 'How To - Tips and Techniques' Pinterest board in case you've missed any. 

Enjoy your day and I'll be back tomorrow with another project: a Christmas card featuring some sneak peeks of some great new products from the forthcoming seasonal catalogue. Do come back then, you won't want to miss it. Until then, happy stampin'!


Stampin' Up! Supplies Used: 

Table built using Product Table Builder by The Crafty Owl - Independent Stampin' Up! Demonstrator.

Blended Seasons Time-Limited Exclusive Bundle Available Whilst Stocks Last!

by Joanne James1. August 2018 09:00

This is my second post today - read all about Bonus Days in my previous post here. As promised, this post has a little more detail about the fabulous new  exclusive limited time stamp set and framelits bundle called the Blended Seasons Bundle that has also been released to customers today, along with a new assortment of Watercolour Pencils. Whilst the pencils will be available in a future catalogue, the Blended Seasons stamp set and Stitched Seasons framelits will not - available now until 31 August or whilst stocks last, you have just one month to get your hands on this exclusive bundle! Here's a close up of the images and framelits in more detail:


We haven't had a set like this since Thoughtful Branches (one of my all-time favourites!) and I'm sure this one will be equally popular, so don't delay in placing your order - I wouldn't want you to be disappointed. If you order the bundle, you will earn yourself a Bonus Days coupon to use in September too - an added bonus indeed! Don't forget if you are placing an order online to also include this month's hostess code K6VBCUXK to receive a free thank you gift from me too! 

Here are some photos from Stampin' Up! that really demonstrate the versatility of this fabulous set:


This really is a set suitable for every season! One of the things I love the most is the framelits, that add a stitched detail to both the label and the negative space. This is something that I've featured on my card today, that features the gorgeous palette of greens with a hint of pink over at Fab Friday currently:

I used an old sketch over at As You See It for my layout to create my aperture and layered label with the Stitched Seasons on the front of my card, and then added some of the little diecuts to embellish the front, along with a banner of the Share What you Love designer paper:


You can just see a glimpse of that fabulous floral that I then stamped and coloured on the inside, using my ink pads and a blender pen:


I really am loving this bundle and can't wait to create more with it this month. If you have any questions on any of the above, then please do get in touch - I am always happy to help!

Here is the visual summary of the key products used on today's project for you to pin for easy reference:


You can see all of my 'How To' summaries on my 'How To - Tips and Techniques' Pinterest board in case you've missed any. 

Enjoy your day and I'll be back tomorrow with another project. Until then, happy stampin'!


Stampin' Up! Supplies Used: 

Table built using Product Table Builder by The Crafty Owl - Independent Stampin' Up! Demonstrator.

Bonus Days Are Back!

by Joanne James1. August 2018 09:00

It's the first of August and as the recruitment and designer series paper promotions end, I have news of two more fabulous specials for you for the month of August!

First things first: BONUS DAYS ARE BACK! Do you remember this promotion from last year? It was so successful, Stampin' Up! have decided to repeat it this year.


For every £45.00 you spend between 1 August and 31 August (before delivery), you’ll get a £4.50 Bonus Days coupon that you can use between 1 and 30 September. Our new annual catalogue has been out for a couple of months now, so I'm sure you will still have some items on your wish list; this is a great opportunity to shop from it and make savings when you shop again in September with your coupons! You could even use your coupons to shop from the new Autumn-Winter catalogue, which launches on 5 September - perfect timing!

There are some details in terms of small print that you need to take note of, as follows: 

  • Promotion period: 1–31 August 2018
  • Redemption period: 1–30 September 2018
  • An email address is required to participate in this promotion; Bonus Days coupon codes can only be delivered via email.
  • It is strongly recommended that you both save emails containing their Bonus Days coupon codes AND write down the coupon codes in a safe place. Codes cannot be resent if the email is lost, and lost codes cannot be recovered.
  • Bonus Days coupon codes can be redeemed for any product, excluding Starter Kits.
  • There is no limit to the number of coupons you can receive per order or throughout the duration of the promotion.
  • There is no limit on the number of coupons you can use on an order during redemption.

As a demonstrator I am able to pre-order items from the new Autumn-Winter catalogue from today and I am looking forward to collecting some bonus days coupons to make a further dent on my own wishlist in September! 


Today also sees the release of an exclusive limited time stamp set and framelits bundle called the Blended Seasons Bundle and a new set of Waterpencil colours. Whilst the pencils will be available in a future catalogue, the stamp set and framelits will not - available now until 31 August or whilst stocks last, you have just one month to get your hands on this set and its co-ordinating framelits too! Here's a close up of the images and framelits in more detail:


We haven't had a set like this since Thoughtful Branches (one of my all-time favourites!) and I'm sure this one will be equally popular, so don't delay in placing your order - I wouldn't want you to be disappointed. If you order the bundle, you will earn yourself a Bonus Days coupon to use in September too - an added bonus indeed! Don't forget if you are placing an order online to also include this month's hostess code K6VBCUXK to receive a free thank you gift from me too! 

For more information on this set, please see today's second post here, which also includes a card made using this gorgeous bundle.

If you have any questions on any of the above, then please do get in touch - I am always happy to help!

Back shortly with my second post of the day; until then, happy shopping!


Table built using Product Table Builder by The Crafty Owl - Independent Stampin' Up! Demonstrator.

Umbrella Weather Rainbow Watercolour And Glitter Raindrops

by Joanne James11. April 2018 12:00

I have another information post lined up for you today with even more information on the Colour Revamp and the new ink pads, but first it's time for a little creative inspiration for this week's challenge over at Addicted to CAS that will hopefully bring a little colour to yet another grey, wet and miserable UK day as far as the weather is concerned:

My card is super simple with a loose, watercoloured rainbow background - take a look:


Here's the low-down on today's card:

Watercolour Rainbow - To create my background, I simply took a selection of inks - Real Red, Pumpkin Pie, Daffodil Delight, Old Olive, Pacific Point, Rich Razzleberry - and using my aquapainter, wet my watercolour paper and brushed the various colours across the background, allowing them to blend as I painted. No science to it - as simple as that! 

Farewell, Umbrella Weather - Once dried, I used my Umbrella Weather Framelits to cut out some clouds from my watercolour panel to reveal the grey clouds below. My black diecut umbrella is from the same set. Both the framelits and co-ordinating 'Weather Together' stamp set are retiring at the end of May, so if these are on your wishlist still you need to purchase them now before they are gone for good.

Epoxy Glitter Raindrops - These little glittery raindrops from the seasonal catalogue really are so pretty and really make this card; they catch the light and reflect the rainbow of colours beneath. 

This is one of those cards that definitely looks better in real life - so pretty with the variagated colour and the sparkly raindrops! A lovely pick-me up to brighten someone's day.

Here is the visual summary of the key products used on today's project for you to pin for easy reference:


You can see all of my 'How To' summaries on my 'How To - Tips and Techniques' Pinterest board in case you've missed any. 

Enjoy your day and I'll be back soon with another project. Until then, happy stampin'!


Stampin' Up! Supplies Used:

Table built using Product Table Builder by The Crafty Owl - Independent Stampin' Up! Demonstrator.

Mediterranean Moments Cafe Card

by Joanne James29. January 2018 21:00

Today I'm back with an annual catalogue faithful and sharing a card I made using a set that has been sitting on my shelf rather neglected for a little while, so I thought I would remedy that and enter a couple of online challenges at the same time:


I love the CAS Colours and Sketches sketch this week and then surprised myself by choosing the colours over at Just Add Ink to go with it - take a look:


Here's the low-down on today's card:

Mediterranean Moments - Mediterranean Moments first appeared in last year's Spring-Summer seasonal catalogue and fortunately carried over into the annual catalogue. I love these sketched images, inspired by Million Sales Achiever Susan Nygaard - the one I've used today though is the only one in my set that I've never used before. When I saw this colour combination I wasn't sure what to make of it, despite the lovely design team cards, and then I was flicking through my catalogue looking for something else and suddenly there it was - I could see the green metal cafe chairs and I knew this stamp would be perfect! 

A Little Watercolouring - I decided to stamp my image in Versamark and heat emboss it in white, and ring the changes with a Crumb Cake card base, then give the whole thing a wash of white craft ink before watercolouring with my greens and a little more Crumb Cake ink. This was a good way to incorporate my neutral and allow my greens to blend with each other. I hand-doodled my border using my white gel pen.

A Sentiment Combination - My sentiment combination is a trimmed stamped 'hello' from the 'oh hello' stamp in the Colour Me Happy set, along with the word 'friend' snipped from the Lovely Word Thinlits. A fun pairing that is just right for the intended recipient of my card. 

Here is the visual summary of the key products used on today's project for you to pin for easy reference:


You can see all of my 'How To' summaries on my 'How To - Tips and Techniques' Pinterest board in case you've missed any. 

This post was really meant for tomorrow but I'm putting it live early as I want to catch the CAS Colours and Sketches link up. So for Tuesday - enjoy your day and I'll be back tomorrow with another project. Until then, happy stampin'!


Stampin' Up! Supplies Used:

Table built using Product Table Builder by The Crafty Owl - Independent Stampin' Up! Demonstrator.

Beautiful Bouquet Watercolour Stampin' Up! Annual Catalogue CASE

by Joanne James8. August 2017 15:10

Well, you can tell the children must be on their school summer holiday here in the UK as it's pouring with rain with no signs of let up! We have had an aborted trip to the zoo today and had to make do with indoor swimming and trampolining instead, which the James Juniors seem to have enjoyed despite the constant drizzle. It also means we are home slightly earlier than planned leaving me time to share a quick project with you and the lovely ladies over at As You See It who have a fun challenge theme this week:

It made me smile as this is definitely something I can identify with! I usually lose my mojo when I get delivery of a large new box of goodies during the pre-order period of a new Stampin' Up! catalogue; I have all these wonderful new sets and papers to play with and suddenly don't know where to start! When I get like this, I often turn to my Stampin' Up! catalogue for inspiration and CASE (Copy And Selectively Edit) a card from within. This is usually enough to get me back on track and get the ideas flowing. Here is one such card:


The eagle-eyed amongst you will recognise my card as a CASE of the card on page 93 of the 2017-18 Stampin' Up! Annual Catalogue that features the Beautiful Bouquet stamp set. I've changed a few things: I used a different palette of colours, layered my sentiment on a stitched circle and added some Powder Pink ribbon as opposed to linen thread along with a couple of sparkly faceted gems for good measure, but the basic layout and the loose spritzed watercolour technique is the same. 

Here is the visual summary of the key products used on today's project for you to pin for easy reference:


You can see all of my 'How To' summaries on my 'How To - Tips and Techniques' Pinterest board in case you've missed any. 

'CASE-ing the catalogue' is also a great way to try something different - this sample encouraged me to think about using the Beautiful Bouquet set in different ways, rather than simply stamping and die cutting. I am expecting delivery of my Autumn-Winter catalogue pre-order tomorrow, so I give it about 24 hours before the loss of crafting mojo kicks in and you can guess where I will be headed - yes, the pages of my new seasonal catalogue for inspiration!

Enjoy your day and I'll be back soon with another project. Until then, happy stampin'!


Stampin' Up! Supplies Used:

Table built using Product Table Builder by The Crafty Owl - Independent Stampin' Up! Demonstrator.

Last Orders And A Fairy Celebration!

by Joanne James31. May 2017 07:00

Public service announcements first today - bear with me, there will be a creative post below for those that are here for the pretty stuff!

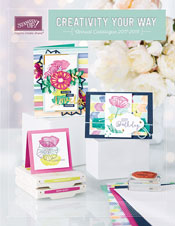
Counting down now - only 1 day to go until the new 2017-18 Annual Stampin' Up! catalogue launches!


I have sent out copies to everyone on my catalogue mailing list who has purchased from me in the last 6 months - if you're not on this list but would like to receive one, then do give me a call on 07773 421446 or drop me an email and I will pop one in the post to you today.

This also means the following: 

Today is the last day that you can order from the 2016-17 Stampin' Up! catalogue - this includes any of the 'Bundle and Save 10%' bundles. Even though many of the products they contain are being carried over to the new annual catalogue, they will not be available as a discounted bundle.

Spring/Summer 2017

Today is the last day that you can order from the 2017 Spring-Summer Seasonal Stampin' Up! catalogue - a number of the products in this brochure are being carried over to the new annual catalogue, however we willbe saying goodbye to many items. There are still a number of stamp sets and accessories available at a discount on the Retiring List here - today is your last chance to grab a bargain!  they will not be available as a discounted bundle.

Eastern Palace Suite Bundles

Today is also the final day to purchase either of the special Eastern Palace Suite bundles. You can read more about these fabulous bundles in my blog post here which also contains the link to the store should you wish to purchase either bundle. Whilst all of the items contained in each bundle will be available to purchase individually once the new annual catalogue launches, the bundles along with the free gifts won't. So if you have been swept up in the Eastern Palace craze, get yours today!

If you are placing an order online today, don't forget to use this month's online hostess code DXFJQZPN to receive a little thank you from me. This code will close this afternoon at 2pm, so be sure to have placed your orders online before this to benefit. If you are local to me and wish to save on postage, please ensure you have your order to me by midday to be included on this order.

That's the announcements and reminders done - now for the pretty! Today I'm sharing a card for this week's challenge over at Less Is More:

I haven't managed to play along with the lovely ladies over at LIM for a little while but having been perusing my depleted collection of stamp sets I came across another uninked one that I thought would be perfect for this week's challenge - take a look:


Here's the low-down on today's card:

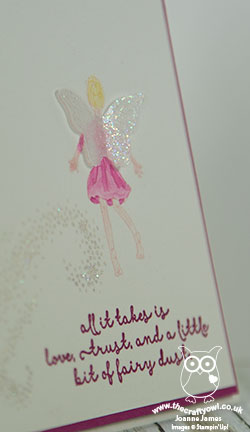
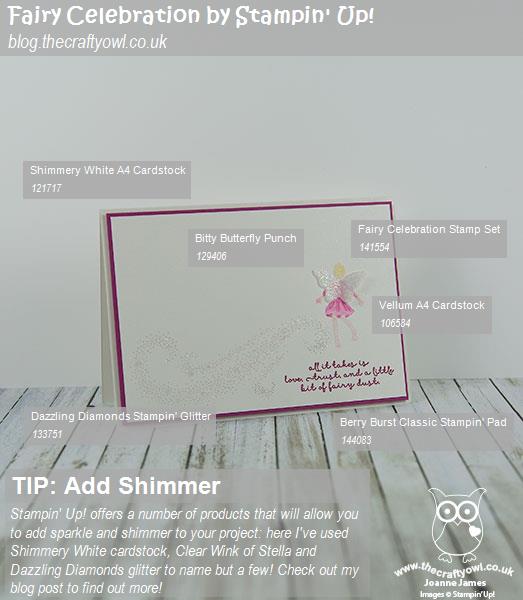
Fluttering Fairies - As with yesterday's card, I'm rediscovering sets that have been sitting unused on my shelf as we transition from one catalogue to another. The 'Fairy Celebration' stamp set is new to me - I love the little whimsical fairies that are perfect for colouring and as someone who often creates with and for children, I knew this set would have lots of appeal. I also love how for the fairy that I featured on my card today you can punch out the wings with the retiring Bitty Butterfly punch for a 3D effect. 

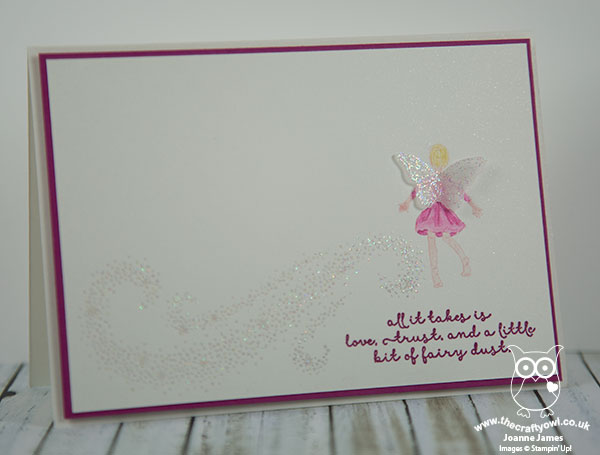
Shimmer, Shimmer - When I thought about the word 'shimmer', I immediately thought Shimmery White cardstock, clear Wink of Stella and Dazzling Diamonds glitter - and fairy wings of course! I used all of the above products on my fairy card, heat embossing the stardust trail and glittery fairy wings and adding additional Wink of Stella to the vellum wings to add further iridescence. Along with the Shimmery White card base, I must confess this is one of those cards where it is difficult to capture how very pretty and shimmery this card is in real life - you will just have to take my word for it!

No Line Watercolouring - I stamped the fairy in Powder Pink and watercoloured her using the no-line watercolouring technique as I wanted her to be rather undefined and allow the shimmer to take centre stage. 

Here is the visual summary of the key products used on today's project for you to pin for easy reference:


You can see all of my 'How To' summaries on my 'How To - Tips and Techniques' Pinterest board in case you've missed any. 

We are off for a picnic in the park today with friends; the weather hasn't been as warm this last few days, but if it stays dry I'm sure plenty of fun will be had by all. Enjoy your day and I'll be back tomorrow with the official launch of the new 2017-18 Stampin' up! Annual Catalogue - how exciting! Until then, happy stampin'!


Stampin' Up! Supplies Used:

Table built using Product Table Builder by The Crafty Owl - Independent Stampin' Up! Demonstrator.

Wood Words In-Colour Heat Embossed Thankyou

by Joanne James18. May 2017 20:00

I'm late posting today as I've been on the go and just haven't stopped to write until this evening. I'm sharing a card that I designed as a make and take for my team training that I held last Saturday - take a look:


Here's the low-down on today's card:

Wood Words - I used the large floral stamp from the forthcoming 'Wood Words' stamp set for my background today and stamped it in Versamark then heat embossed it in white onto Shimmery White cardstock, ready for my watercolouring. Wood Words is part of the Wood Textures suite that includes the Wood Crate framelit and some great wood textured papers, yet on today's card there's not a piece of wood in sight. My sentiment is from the same set too and is embossed in white on the new in-colour Berry Burst - I think this is actually my favourite of the new in-colours, a wonderful purple-pink shade that really pops with the copper foil behind too. I also added a coupe of flowers cut with the Seasonal Layers thinlits, one each in Powder Pink and Fresh Fig for added decoration.

In-Colour Watercolour - I used a trio of the new in-colours - Powder Pink, Berry Burst and Fresh Fig to create the watercoloured background for my white embossed flowers, working from one side to the other and fading out. Don't they look pretty together? I'm also linking today's card up with the team over at SUO Challenges this week where their challenge is all about watercolouring.

CASE The Kit - The design of my card was inspired by one of the cards in the forthcoming new 'Hello Friend' heat embossing product kit on page 16 of the new annual catalogue. One of the business topics we discussed at team training was how Stampin' Up!'s kits can benefit your business and our make and takes all included opportunities to practice the techniques and skills required to demonstrate with this kit effectively. There's nothing like being prepared and I'm sure my team would agree that team training is great for this kind of thing. As for me, I love getting together with my team - check out my Facebook page here if you'd like to see some of the other things we got up to last Saturday - we had the best ice-breaker activity I think I've ever participated in!

Here is the visual summary of the key products used on today's project for you to pin for easy reference:


You can see all of my 'How To' summaries on my 'How To - Tips and Techniques' Pinterest board in case you've missed any. 

I'll be back tomorrow with another project. Until then, happy stampin'!


Stampin' Up! Supplies Used:

Table built using Product Table Builder by The Crafty Owl - Independent Stampin' Up! Demonstrator.

Rainbow Watercolour Butterfly Thinlit Card

by Joanne James1. May 2017 11:00

Happy Monday everyone, and for those of you in the UK a Bank Holiday too! Lots happening today - first things first, I'm sharing a card for the current Fusion challenge (photo inspiration) using this week's sketch over at Freshly Made Sketches:


I loved the look of the rainbow watercolouring of the inspiration photo so thought I'd have a go at this fun technique - take a look at my finished card:


Here's the low-down on today's card:

Watercolour Rainbow - I masked off the circle shape in the sketch using a round post it on a piece of retired music note paper that I had in my stash and then using my aquapainter, allowed the colours to flow and bleed into one another and away from the masked area. It really wasn't tricky; the most important thing is to not over-blend the colours so that they remain true and don't end up all brown and muddy. The paper did warp a little, but I used Fast Fuse liberally to adhere it to my mat when dry and this seemed to do the trick.

A Sparkly Butterfly - I used my Butterfly Thinlits to cut out a simple butterfly in Basic Black cardstock and brushed it liberally with clear Wink of Stella. You can see a little of the shine in the photogragh, but believe me in real life this is super sparkly and looks great against the rainbow coloured background.

Just A Note - My sentiment is from the Flourishing Phrases stamp set - it seemed appropriate with the musical background paper! I added a Pumpkin Pie enamel shape heart for an added pop of colour against the black.

So a fun card that wasn't overly difficult to create and looks so very pretty in real life.

Here is the visual summary of the key products used on today's project for you to pin for easy reference:


You can see all of my 'How To' summaries on my 'How To - Tips and Techniques' Pinterest board in case you've missed any. 

This is one of two posts today - you can read my second post regarding the early release of some great new Annual Catalogue product - the Eastern Palace Suite - here. 

Enjoy your day and I'll be back tomorrow with another project. Until then, happy stampin'!


Stampin' Up! Supplies Used:

Table built using Product Table Builder by The Crafty Owl - Independent Stampin' Up! Demonstrator.

Hot Glue Embossed Moon Watercolour

by Joanne James21. February 2017 07:00

Today I'm sharing a card for the current challenge over at As You See It -  so happy to see these fabulous ladies back up and running and thank you for choosing me for the Featured Artist spot last week with this card

My second colour challenge this week - a rare thing! I find with colours as my starting point it takes me longer to come up with an idea (so glad that AYSI is on a two week challenge schedule now, it gives my ideas time to percolate!) I had so much fun making my card for Nance's challenge over at The Paper Players a couple of weeks ago (you can see that card here) and received such a lot of interested comments about the technique that I used - hot glue embossing - I thought I would make another card using the same idea but this time inspired by the AYSI challenge photo, I created a moonscape over the water - take a look:


Here's the low-down on today's card:

A Fun Technique - I used the same layout and technique as for my previous card here, but this time embossed my hot glue in silver with a moon in my pinky-purple twilight sky. I then blended the pink and purple with the Dapper Denim blue for the water and reflection below the horizon using my re-inkers and aquapainter. I added a liberal does of Clear Wink of Stella to the sea to finish - this adds a wonderful sparkle that is difficult to see in the photo, but trust me, it's there!

Love Sparkles - The colours of this card I thought lent themselves to a more romantic card, so I decided to use the sparkly 'Love' sentiment from the Love Sparkles stamp set and turn this into an anniversary card for my husband since it was our 18th wedding anniversary yesterday. I'm not sure my husband was as impressed with my handiwork, but then I think he sees so many of my cards theses days he just takes it all in his stride! 

All Heart - I added a tiny pink enamel heart shape to finish my card in keeping with my theme and also stamped the inside of the card and the envelope to co-ordinate.

Here is the visual summary of the key products used on today's project for you to pin for easy reference:


You can see all of my 'How To' summaries on my 'How To - Tips and Techniques' Pinterest board in case you've missed any. 

So what do you think - does the card say 'romance' to you? I'd love to hear your comments and thoughts below.

Enjoy your day and I'll be back tomorrow with another project. Until then, happy stampin'!


Stampin' Up! Supplies Used:

Table built using Product Table Builder by The Crafty Owl - Independent Stampin' Up! Demonstrator.

Mini Catalogue

BROWSE THE CATALOGUE

The mini catalogue is now live! Read and download your copy here.

Shop Online

Access my online shop 24 x 7, 365 days of the year:

Current April hostess code:

VDKNV7BH

Shop Online

Join My Team

It's always a great time to join Stampin’ Up! New team members can get £130 worth of products for only £99 + free business supplies + free shipping + all the fun being a part of Stampin’ Up! Stampin' Up! has something for everyone: join my growing team and benefit from my support to enjoy Stampin' Up! however you choose.

If you're interested, call me for a chat to understand how I can help you realise your goals. Alternatively, if you have already decided to sign up and you just can't wait, please click here for the link to the online form where you can sign up and order your starter kit right away! 

Latest Kit!

Stampin Cut and Emboss

The Rock Legend Kit has all you need to make 8 cards with coordinating envelopes. Along with the new Panda Friends Kit, both are available from January 4th for just £14 each - get yours here!

2023-24 Annual Catalogue

BROWSE THE CATALOGUE

Click on the catalogue for a full list of current SU! supplies - if you would like to order any of the items featured, please drop me a line at [email protected] or give me a call on 07773 421446 - I'd be happy to help.

New Online Exclusives

There are new products available exclusively in the online store from 5 March - check them out here.

About Me

Hi I'm Joanne and live in Northampton and when I'm not looking after my husband and two beautiful children, am an avid crafter with a passion for all things Stampin' Up!

I must confess that I have never been a big rubber stamper - until I discovered Stampin' Up! that is. I love the fact that I can get such great results with co-ordinating stamps, inks, papers and punches - the possibilities are endless! Join me on my stamping journey as I share the things I love and be inspired to create amazing things yourself!

Follow Me

Monthly Newsletter

Box Builder

Click the button above to use Box Buster to create your custom box design using the Envelope Punch Board!

Kits Collection Now Available!

Stampin Cut and Emboss

The new Kits Collection from Stampin' Up! is now available!

Click here to see the current kits available and order yours online today.

I Design For


Stampin' Up Stuff

This is my personal blog and is not endorsed by Stampin’ Up! I hope you find it a plentiful source of ideas and personal inspiration but please don't copy my designs for contest submission or use for classes, publication or sale without express permission.