Half Full For The Paper Players PP403

by Joanne James29. July 2018 09:00

Another busy week in the James household with little time for crafting - too busy having holiday fun with the Juniors and putting everything back into my fabulous new kitchen which is pretty much finished at last! I Today it's Sunday and time for this week's new challenge over at The Paper Players - yay! It's the turn of my awesome friend Claire to host this week and she has my favourite, a sketch challenge, for you to work with:


A card with a tag - I haven't made one of those in a while! I decided that the sketch layers lent themselves to a card using the Half Full stamp set which I haven't yet used for a non-Christmas card, along with a little DSP too - take a look:


Here's the low-down on today's card:

Half Full And An Old Faithful - My starting point for today's card was the tag and I decided to use the ready-to-stamp one that comes with the half Full stamp set. This makes the tag element really easy to create, with the sentiment, decoration and border all laid out. Not only that, it perfectly co-ordinates with one of my most-used punches, the fabulous Scalloped Tag Topper Punch, which makes tag creation a breeze. I fussy-cut the bunch of grapes for extra interest and also used the single glass and bottle stamps to create a tone-on-tone background panel and to decorate the inside of my card and the envelope, whilst I stamped the row of glasses in white kraft ink to create a contrasting border too. I am quite partial to a glass of red (or white!) so this set is perfect for cards for my wine-loving friends and also to quickly dress-up a bottle to say thank you to a party hostess, for example.

Tranquil Textures Colour Combo - I often use colour combinations straight from Stampin' Up!'s designer series papers as the basis for my cards and today as I looked for something with a non-descript pattern that would compliment my various stamped layers and tag I decided upon this Night of Navy, Whisper White and Fresh Fig combination from the Tranquil Textures pack. Here is the colour combo for you to save should you wish to use it as inspiration for your future projects too:

Whilst this pack is designed to co-ordinate with the Tranquil Textures Suite, which has an under-the-sea theme, I wasn't constrained by this. The pack has lots of interesting textured designs that can be used in many other ways too. This is my 'twist' for the challenge over at Just Add Ink this week, although it is a little more tenuous than some of those that the JAI design team have come up with - check them out to see which items they have used in a different way on their projects. Don't forget these papers are available for just 3 more days as part of the current 'buy 3, get 1 free' DSP offer that is running this month; if you missed the details, you can read all about it here.

A Trellis Textured Border - The final element to my card was some actual texture, courtesy of the Garden Trellis Textured Impressions Embossing Folder on the navy border panel. It creates just enough interest to differentiate and separate the layers, without detracting from the stamped images.

Here is the visual summary of the key products used on today's project for you to pin for easy reference:


You can see all of my Product and 'How To' summaries on my 'How To - Tips and Techniques' Pinterest board in case you've missed any. 

Before you reach for your ink and papers, check out what our amazing team has created to inspire you this week:

Here's a quick recap of our challenge rules:
 
1.  Create a new paper project
2.  Upload your creation to your blog with a link back to us and provide a direct link to the post featuring your challenge submission.
3.  Please link your card to no more than four challenges, TOTAL.
4.  Have FUN!

You can see all of my 'How To' summaries on my 'How To - Tips and Techniques' Pinterest board in case you've missed any. 

Enjoy your day; I will be spending mine in London at the Vitality Hockey Women's World Cup with the rest of the James family, as we have tickets to watch the India v USA and England v Ireland matches that are taking place this afternoon. I'm hoping we will escape the thunderstorms and it will stay dry for us and the players, although I'm sure they will appreciate the slightly cooler temps that we have been having this week.

I'll be back tomorrow with another project. Until then, happy stampin'!


Stampin' Up! Supplies Used: 

Table built using Product Table Builder by The Crafty Owl - Independent Stampin' Up! Demonstrator.

Cancer Support Ribbon CAS Card for PP402

by Joanne James22. July 2018 09:00

It's Sunday and time for this week's new challenge over at The Paper Players! It's the turn of our wonderful leader Nance to host this week and she has a clean and simple challenge for you to work with:


Remember in addition to the theme of "negative space", this week is a Clean-and-Simple (CAS) challenge!  What do we mean by CAS?

  • Minimal layers and embellishments
  • Plenty of open space, aka "white" space
  • Simple and uncluttered

Now I love to use negative space on a card - if you browse my blog you will find tons of examples. Today though I have a card that is super quick and easy to recreate using a thinlit I haven't used before, that also showcases a glimpse of one of the fabulous designer series papers that is on offer as part of this month's 'buy 3, get 1 free' paper promotion - take a look:


Here's the low-down on today's card:

Negative Space - I am a big fan of using dies to create 'negative space' as I think it creates real interest on a clean and simple card. Today I chose to use the largest die in my Support Ribbon Framelits. This die cuts a ribbon shape and in order to retain this shape when you are using the negative, you need to remember to retain and add in the extra piece that forms the centre of the loop. This will be loose once you've made your diecut - the easiest way to ensure you get it in the right place is to place the positive diecut back into the gap to align the centre piece and stick it in place, before the removing the positive diecut once more. 

Impressionist Pinks - I decided to add interest to my ribbon by using designer series paper in my negative space, and chose this gorgeous impressionist pattern of pinks from the Garden Impressions DSP set. I think this is my current favourite paper; good job it's in the 'buy 3, get 1 free' set so that I can stock up and save at the same time! Patterned paper should be used sparingly with lots of white (or in my case pink!) space surrounding it, to ensure a 'CAS' feel is retained.

Hope and Courage - I overlaid my negative space with a stacked diecut of the word 'hope' from the Sunshine Wishes thinlits set, which I felt fitted with the theme of my card. Cancer is such a vicious disease, hope is essential for those diagnosed with it. It also tied in perfectly with the stamped inside of my card (the only stamping on today's card!), courtesy of the Ribbon of Courage stamp set:


I hope this card will be uplifting for the recipient and brighten their day.

Here is the visual summary of the key products used on today's project for you to pin for easy reference:


You can see all of my Product and 'How To' summaries on my 'How To - Tips and Techniques' Pinterest board in case you've missed any. 

Before you reach for your ink and papers, check out what our amazing team has created to inspire you this week:

Here's a quick recap of our challenge rules:
 
1.  Create a new paper project
2.  Upload your creation to your blog with a link back to us and provide a direct link to the post featuring your challenge submission.
3.  Please link your card to no more than four challenges, TOTAL.
4.  Have FUN!
 
I can't wait to see your clean and simple creations and look forward to visiting your blogs this week! Enjoy the rest of your weekend - it looks like we are going to enjoy another day of sunshine here in the UK so I will be looking forward to spending some time in my garden, amongst other things. I'll be back tomorrow with another project; until then, happy stampin'!


Stampin' Up! Supplies Used: 

Table built using Product Table Builder by The Crafty Owl - Independent Stampin' Up! Demonstrator.

Serene Garden PP401 & GDP146

by Joanne James15. July 2018 09:00

It's Sunday and time for this week's new challenge over at The Paper Players! Firstly, I would like to say a big thank you to everyone who joined in with our 400th anniversary celebration theme challenge these past two weeks - what an amazing gallery! You made it very difficult for us to choose our 'cut aboves' and the headliner this week for sure. We will be announcing the results of our random.org draw and the winners of all those amazing prizes donated by our generous sponsors on Wednesday; meanwhile, it's my turn to host this week and I have a bold and vibrant colour challenge for you to work with:


I've had the Serene Garden stamp set and Garden Scene Framelits out on my desk preparing for my next technique class, so decided to use them for my card today, which also uses this week's Global Design Project sketch for my layout:


Here's the low-down on today's card:

A Peek of Granny Apple Green - I've been getting to grips with the new inks in my collection following the recent colour revamp by Stampin' Up! and I chose three of my new favourite bold and bright colours for my challenge this week. That said, my card today features a lot of white in order to balance these colours and keep my card feeling light and bright and not too garish. I've stamped each of the elements of my design - leaves, flowers and butterfly - in one of the challenge colours. The colour that features most is the fresh Granny Apple Green, since I stamped the leafy corner on a mat in the same shade and then used the Garden Scene Framelits to cut out the leaf sections, to reveal the tone-on-tone image below. I toyed with stamping the flowers and butterfly tone-on-tone too, but when I put it together I decided I preferred the colours on white with a little more added with a blender pen - an altogether more subtle affair.

Words of Courage - The Serene Garden stamp set is sentiment-free, so I rooted through my stamp collection and decided these words from the Ribbon of Courage stamp set fit perfectly with my layout and immediately gave me an intended recipient too, which is always nice. The swirly font fits nicely with this stamp set, although I'm sure there will be many others that work well with it too.

Polka Dots and an Embellishment Cheat - When it came to embellishing my card, I added a strip of Lovely Lipstick cardstock with a couple of notches punched out with my 1/2" circle punch to hold my pretty white polka dot tuille. I also added a trio of one of my favourite new embellishments, the glitter enamel dots, around my sentiment and yes, here's the cheat: they are actually Gorgeous Grape and Melon Mambo in colour. They tone in beautifully with the colour scheme though,so I went with it (I know my secret is safe with you!)

Here is the visual summary of the key products used on today's project for you to pin for easy reference:


You can see all of my Product and 'How To' summaries on my 'How To - Tips and Techniques' Pinterest board in case you've missed any. 

I love this colour combo and know it's one I will use again; the tuille bow is a little fussy for my generally clean style, but I do love how easy it is to work with and adds a real touch of pretty to the finished card.

Before you reach for your ink and papers, check out what our amazing team has created to inspire you this week:

Here's a quick recap of our challenge rules:
 
1.  Create a new paper project
2.  Upload your creation to your blog with a link back to us and provide a direct link to the post featuring your challenge submission.
3.  Please link your card to no more than four challenges, TOTAL.
4.  Have FUN!

I can't wait to see what you create with this week's colours and look forward to visiting your blogs this week! Enjoy the rest of your weekend as it will be over all too quickly. Today I will be waving off the eldest of my James Juniors for a 2 week sports tour of South Africa to play hockey and netball and experience all of the tourist delights this fascinating country has to offer. As for me, I will be at home braving week 2 of the summer vacation with the youngest of the James Juniors and continuing to monitor progress on the kitchen renovation project - I know where I would rather be, for sure! I have at least managed to get a little making done over the last few days so I'll be back tomorrow with another project; until then, happy stampin'!


Stampin' Up! Supplies Used: 

Table built using Product Table Builder by The Crafty Owl - Independent Stampin' Up! Demonstrator.

A Little Elephant As We Continue to Celebrate PP400

by Joanne James8. July 2018 10:00

It's Sunday and time for a reminder that we are still celebrating over at The Paper Players! It's our 400th birthday and our theme challenge is running for two weeks in total, to give you all plenty of time to play along. Some of us are back with some additional mid-theme inspiration for you, where we continue to be all about celebration:


Before I get to my card, a reminder of all of the fabulous prizes you can win - so many prizes!! 40 in fact, from our many generous sponsors across the crafting community - check out our post for more details but here is the full list to whet your appetite:

Listed in alphabetical order:

  1. Altenew - $30 gift card
  2. Atenew Academy - $20 gift card  - compliments of Jaydee
  3. Avery Elle - $20 store credit
  4. Butterfly Reflections - Breathe Rainbows Stamp Set (US only)
  5. CAS-ual Fridays - $25 store credit
  6. Cheery Lynn - $20 gift card  
  7. Cheery Lynn - $20 gift card - compliments of Laurie
  8. Concord & 9th - $25 gift card
  9. Craftin Desert Diva's - $10 store cedit
  10. Dies R Us - $15 gift card
  11. Ellen Hutson -  20 gift cards - compliments of Annie 
  12. Ellen Hutson $20 gift card - compliments of Eliz
  13. Happy Little Stampers - $20 store credit
  14. Heffy Doodle - Sticky Friends Stamp Sets (exclusive - not available for purchase)
  15. Heffy Doodle - Sticky Friends Stamp Set (exclusive - not available for purchase)
  16. Heffy Doodle - Sticky Friends Stamp Set (exclusive - not available for purchase)
  17. Heffy Doodle - Sticky Friends Stamp Set (exclusive - not available for purchase)
  18. Lawn Fawn - $25 gift card
  19. My Favorite Things - $25 store credit
  20. Neat & Tangled - $15 store credit 
  21. Newton's Nook - $20 store credit
  22. Pink & Main - $20 store credit
  23. Power Poppy - $10 store credit
  24. Stampendous - $20 rewards cards (US only)
  25. Stampendous - $20 reward card (US only)
  26. Stampendous - $20 reward card (US only)
  27. Stamplorations - $20 gift certificate
  28. Stampin' Up - $20 gift certificates compliments of Nance (US only)
  29. Stampin' Up! $20 gift certificate - compliments of LeAnne (US only)
  30. Stampin' Up! £20 gift certificate - compliments of Joanne (UK only)
  31. Stampin' Up! $20 gift certificate - compliments of Claire (US only)
  32. Stampin' Up $20 gift certificate - compliments of Jan (NZ only)
  33. Technique Tuesday - $20 gift card
  34. The Foiled Fox - $25 store credit
  35. Trinity Stamps - Let it Grow and Lady Liberty Stamp Sets
  36. Tutti Designs - $15 gift card
  37. Uniko - any in-stock stamp set of winner's choice
  38. Verve Stamps - stamp & accessory bundle - compliments of Sandy (US only)
  39. Verve Stamps - stamp & accessory bundle - compliments of Sandy (US only)
  40. Waffle Flower - $15 gift card

Isn't that fantastic?! All prizes will be awarded randomly between challenge participants - so if you enter, you are in with a chance of winning!

I was fairly short on time this week, having had a class, a bunch of end of term activities for one James Junior and a wedding to attend this weekend, so clean and simple was most definitely the order of the day. Unintentionally I ended up with another card with balloons too - take a look:


How cute is that little elephant?! 

I reached for my new Little Elephant stamp set and along with my co-ordinating Elephant Builder punch and a few favourite colours, I set to work. I punched out the elephant and his ear for added dimension and added some balloons punched with my now retired tiny balloon punch, added some clear Wink of Stella and then done! This is one of those great quick cards that is a simple combination of stamps, ink and paper and can be put together in a jiffy - great when you are short on time!

Here is the visual summary of the key products used on today's project for you to pin for easy reference:


You can see all of my Product and 'How To' summaries on my 'How To - Tips and Techniques' Pinterest board in case you've missed any. 

Before you reach for your ink and papers, check out what our amazing team has created to inspire you this week:

Here's a quick recap of our challenge rules:
 
1.  Create a new paper project specifically for this challenge.
2.  Upload your creation to your blog with a link back to us and provide a direct link to the post featuring your challenge submission.
3.  Please link your card to no more than four challenges, TOTAL.
4.  Please be considerate of our requests; entries that do not follow any of these rules will be deleted without notification and will not be eligible for our prizes.
5.  Have FUN!
 
We also have an additional rule for this challenge only: please do not submit more than TWO cards for this challenge. This is simply so that everyone can have an equal opportunity to win a prize.
 
Remember: PP400 is running for two weeks (the challenge closes on Friday 13th July). All challenge winners will be announced on Saturday, June 14th. All prizes awarded to participants will be drawn from random.org from ALL participants and announced with our reminder post for challenge PP401 on Wednesday 18th July.

There are already some fabulous cards in the gallery but there's still more time for you to enter. Whatever you're celebrating, share it with us! Enjoy the rest of your weekend - I'll be returning from the wedding and spending the day painting before the kitchen fitting begins this week. I'll be back soon with another project; until then, happy stampin'!


Stampin' Up! Supplies Used: 

Table built using Product Table Builder by The Crafty Owl - Independent Stampin' Up! Demonstrator.

Hand Delivered Balloons Pop-Up Slider Card To Celebrate The Paper Players 400th Birthday!

by Joanne James1. July 2018 09:00

It's Sunday and time for this week's new challenge over at The Paper Players! It's the turn of  the lovely Jaydee to host this week and we have something very special in store for you as The Paper Players is celebrating our 400th birthday - how awesome is that?! It is only right therefore that our theme challenge FOR THE NEXT TWO WEEKS - yes, we are running our challenge for two weeks in total, is all about celebration:


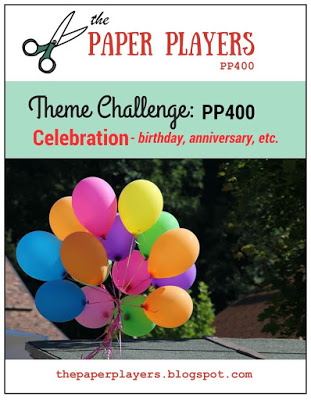
First and foremost, we are celebrating all of the lovely people who play along with The Paper Players challenge each week for 50 weeks of the year - it is for you and because of you that we are still going strong! It is without doubt the best team I have ever worked with - these gals are simply THE BEST! For our special celebration challenge this week, we are also joined by two of the original members of the Paper Players team: Ann Schach and Anne Marie Hile. And there are PRIZES this week - so many prizes!! 40 in fact, from our many generous sponsors across the crafting community - check out our post for more details but here is the full list to whet your appetite:

Listed in alphabetical order:

  1. Altenew - $30 gift card
  2. Atenew Academy - $20 gift card  - compliments of Jaydee
  3. Avery Elle - $20 store credit
  4. Butterfly Reflections - Breathe Rainbows Stamp Set (US only)
  5. CAS-ual Fridays - $25 store credit
  6. Cheery Lynn - $20 gift card  
  7. Cheery Lynn - $20 gift card - compliments of Laurie
  8. Concord & 9th - $25 gift card
  9. Craftin Desert Diva's - $10 store cedit
  10. Dies R Us - $15 gift card
  11. Ellen Hutson -  20 gift cards - compliments of Annie 
  12. Ellen Hutson $20 gift card - compliments of Eliz
  13. Happy Little Stampers - $20 store credit
  14. Heffy Doodle - Sticky Friends Stamp Sets (exclusive - not available for purchase)
  15. Heffy Doodle - Sticky Friends Stamp Set (exclusive - not available for purchase)
  16. Heffy Doodle - Sticky Friends Stamp Set (exclusive - not available for purchase)
  17. Heffy Doodle - Sticky Friends Stamp Set (exclusive - not available for purchase)
  18. Lawn Fawn - $25 gift card
  19. My Favorite Things - $25 store credit
  20. Neat & Tangled - $15 store credit 
  21. Newton's Nook - $20 store credit
  22. Pink & Main - $20 store credit
  23. Power Poppy - $10 store credit
  24. Stampendous - $20 rewards cards (US only)
  25. Stampendous - $20 reward card (US only)
  26. Stampendous - $20 reward card (US only)
  27. Stamplorations - $20 gift certificate
  28. Stampin' Up - $20 gift certificates compliments of Nance (US only)
  29. Stampin' Up! $20 gift certificate - compliments of LeAnne (US only)
  30. Stampin' Up! £20 gift certificate - compliments of Joanne (UK only)
  31. Stampin' Up! $20 gift certificate - compliments of Claire (US only)
  32. Stampin' Up $20 gift certificate - compliments of Jan (NZ only)
  33. Technique Tuesday - $20 gift card
  34. The Foiled Fox - $25 store credit
  35. Trinity Stamps - Let it Grow and Lady Liberty Stamp Sets
  36. Tutti Designs - $15 gift card
  37. Uniko - any in-stock stamp set of winner's choice
  38. Verve Stamps - stamp & accessory bundle - compliments of Sandy (US only)
  39. Verve Stamps - stamp & accessory bundle - compliments of Sandy (US only)
  40. Waffle Flower - $15 gift card

Isn't that fantastic?! All prizes will be awarded randomly between challenge participants - so if you enter, you are in with a chance of winning!

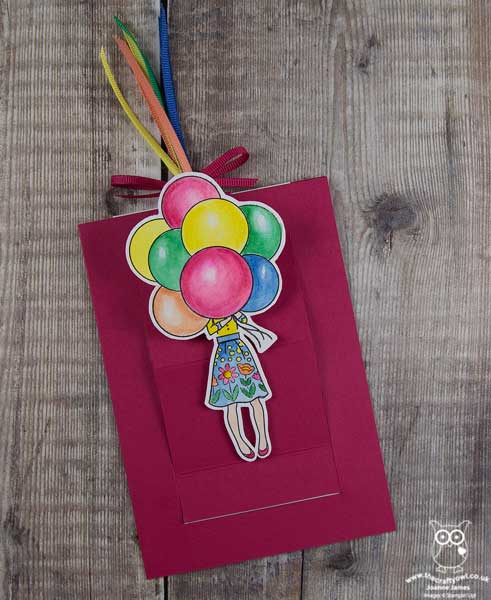
Whilst balloons are not mandatory for this challenge, I couldn't help but be inspired by the wonderful badge Nance created for us this week, so I pulled out my Hand Delivered hostess set and set to work on a fun fold for you - take a look:


Here's the low-down on today's card:

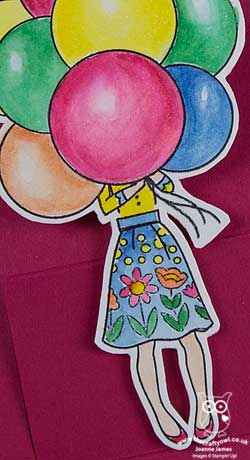
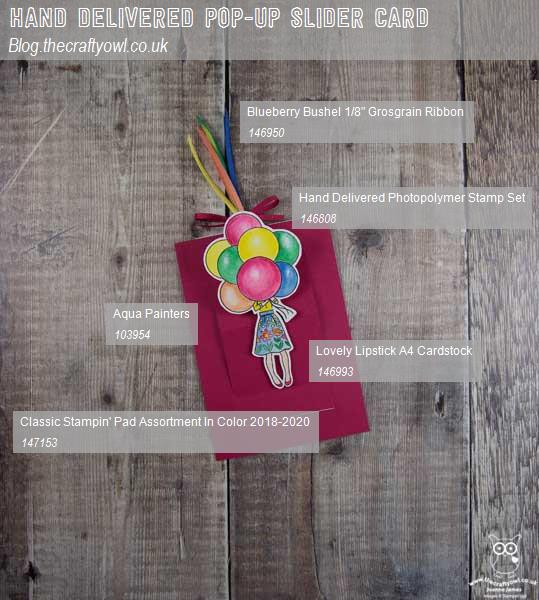
Hand Delivered - I used my favourite of the new hostess sets, Hand Delivered, for my card today. I love the way the pieces of this set mix and match; I've used the balloons again on today's card, but unlike my previous versions, this birthday girl is wearing the flowered skirt - so pretty! This is a great set with lots of variety - I used the birthday sentiments from this set on my card too, as you can see in the picture below. It's worth hosting a Stampin' Up! party just to get your hands on this set, so if you would like to talk to me about hosting one so that you can get your hands on exclusive hostess sets like this one, then do get in touch.

Pop-Up Slider Fancy Fold Card - I decided I would mimic the 'hidden' nature of the young lady behind her balloon with a pop-up slider card. I haven't made one of these cards in ages, but I loved the idea of a hidden message too. When the card is 'closed' it lies flat as in the picture above; when you pull the ribbons upwards, the girl moves into a vertical position and the hidden messages are revealed:

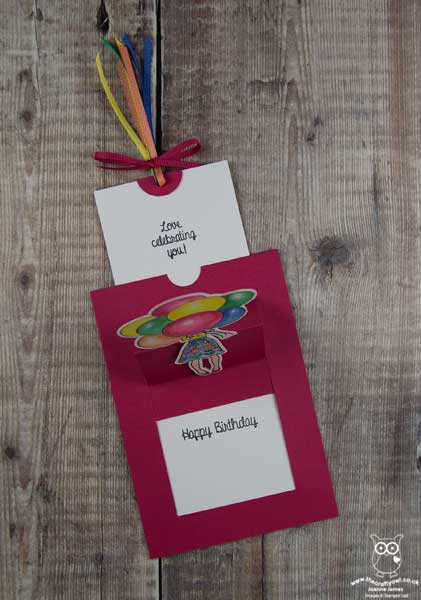
Isn't that fun?! And space still available to write a personalised message too.

New In Colours - I really love the palette of 2018-20 in colours; so much so, since I still can't decide which ones I like best I used them all! They work really well together and the bright colours definitely appeal to me. I used Lovely Lipstick for my cardbase, then used a combination of all 5 colours to colour the lady with my aquapainter. I also used ribbon in all 5 colours to create my pull tassel. Lastly, a liberal coat of Wink of Stella finished my balloons. I'm also linking up my card with the team over at Fab Friday, since they are featuring the new in colours too:

Here is the visual summary of the key products used on today's project for you to pin for easy reference:


You can see all of my Product and 'How To' summaries on my 'How To - Tips and Techniques' Pinterest board in case you've missed any. 

Before you reach for your ink and papers, check out what our amazing team has created to inspire you this week:

Here's a quick recap of our challenge rules:
 
1.  Create a new paper project specifically for this challenge.
2.  Upload your creation to your blog with a link back to us and provide a direct link to the post featuring your challenge submission.
3.  Please link your card to no more than four challenges, TOTAL.
4.  Please be considerate of our requests; entries that do not follow any of these rules will be deleted without notification and will not be eligible for our prizes.
5.  Have FUN!
 
We also have an additional rule for this challenge only: please do not submit more than TWO cards for this challenge. This is simply so that everyone can have an equal opportunity to win a prize.
 
Remember: PP400 will run for two weeks (the challenge closes on Friday 13th July)- the Design Team will be posting a second card for our theme next Sunday, to give you even more inspiration and encouragement to participate All challenge winners will be announced on Saturday, June 14th. All prizes awarded to participants will be drawn from random.org from ALL participants and announced with our reminder post for challenge PP401 on Wednesday 18th July.

I can't wait to see how you interpret this week's theme and look forward to visiting your blogs this week and next! Enjoy the rest of your weekend - I'll be hoping to have a slightly more restful one than of late, catching up on a few chores and hopefully enjoying some of the lovely sunshine we've been having here in the UK these past few weeks. I'll be back soon with another project; until then, happy stampin'!


Stampin' Up! Supplies Used: 

Table built using Product Table Builder by The Crafty Owl - Independent Stampin' Up! Demonstrator.

Wild About You Animal Expedition PP399

by Joanne James24. June 2018 09:00

Another busy week in the James household with little time for crafting - boohoo! I did have a great technique class earlier this week where we made cards using the 'Share What You Love' Suite and have had the opportunity to chat with lots of my lovely customers this week as they have been collecting their new catalogue orders, so it's not all bad. And today it's Sunday and time for this week's new challenge over at The Paper Players - yay! It's the turn of our very own queen of diecuts, the lovely Laurie, to host this week and she has my favourite, a sketch challenge, for you to work with:


I decided that the sketch layers lent themselves to featuring some new designer series paper and having just taken delivery of the Animal Expedition papers I had to start cutting them up for my card this week - take a look:


Here's the low-down on today's card:

Animal Antics - My card today contains very little stamping - it really is all about the paper. Oh and how I love designer series paper! I used two different designs from the Animal Expedition DSP on my card: a background panel featuring a selection of cute animals, including the animals to be found in the co-ordinating 'Animal Outing' stamp set along with a few extras too, including crocodiles and a sloth. For my circle element, I used one of the other paper designs featuring larger versions of the same animals and cut out a sloth with a circle framelit, allowing the fussy cut edges to overhang the border of my mount - isn't he just the cutest?

Wild About ... My Everyday Label - The only stamped element on my card is the sentiment. I punched this out using my Everyday label punch by feeding the cardstock into the punch from the back in order to create the longer rectangle, then snipped off the circular elements top and bottom in order to create a uniform shape that was easier to mount. 

A Bright Colour Combo - I chose to use Lemon Lime Twist for my card base and label, to provide a bright contrast to my busy patterned paper. I mounted all of my panels on Rich Razzleberry, pulling the colour from the little purple bird that is chatting to the sloth. I also added a thin border of Old Olive to frame my sloth. Feel free to save this colour combination for your future projects:

Here is the visual summary of the key products used on today's project for you to pin for easy reference:


You can see all of my Product and 'How To' summaries on my 'How To - Tips and Techniques' Pinterest board in case you've missed any. 

Before you reach for your ink and papers, check out what our amazing team has created to inspire you this week:

Here's a quick recap of our challenge rules:
 
1.  Create a new paper project
2.  Upload your creation to your blog with a link back to us and provide a direct link to the post featuring your challenge submission.
3.  Please link your card to no more than four challenges, TOTAL.
4.  Have FUN!

I can't wait to see what you create with this week's sketch and look forward to visiting your blogs this week! Enjoy the rest of your weekend as it will be over all too quickly. We have the last bits of the kitchen to pack away before major building work starts tomorrow on the new one, along with another school project - last week it was Eid cards, this time a map of the Tour de France route - to assist in the completion of. Thank heavens for Stampin' Up! and a ready stash of onhand craft supplies! I'm hoping to get some crafting done this week in between making copious cups of builders tea so will be back soon with more projects sharing some new makes.

Either way, you are definitely going to want to pop by next Sunday for the next Paper Players challenge; we will be celebrating our 400th anniversary and have a ton of fun in store for you! Until next time, happy stampin'!


Stampin' Up! Supplies Used: 

Table built using Product Table Builder by The Crafty Owl - Independent Stampin' Up! Demonstrator.

Pick A Pennant and Spot The Birdie for PP398

by Joanne James17. June 2018 09:00


Hello everyone! Did you miss me? My extended blogging break wasn't anticipated. I have had a few big things on of late: a girly weekend, a thirteenth birthday to prepare for and celebrate and I was performing in Joseph and his Technicolour Dreamcoat along with the youngest of my James Juniors on Friday evening. Add to that a persistent knee injury from running that finally resulted in me needing an extended course of physiotherapy to put right, along with a spell of single parenting and well, as you can probably tell, family and school life has somewhat got in the way! I still held a couple of wonderful launch parties to welcome the arrival of the new catalogue, my class schedule is uninterrupted and I have been finalising the details for my next 2 retreats (I will blog these another time but meanwhile you can read all about them here) but blogging has had to take something of a back seat.

However, today is Sunday and time for this week's new challenge over at The Paper Players! I'm a little late but here nevertheless! It's the turn of the marvellous Jaydee to host this week and she has a clean and simple challenge for you to work with:


Thank heavens this week was clean and simple - although I must confess I had a couple of aborted attempts in order to achieve today's card - not enough time spent in my craft room, methinks! I eventually settled on a bright and colourful thank you card  - take a look:


I decided to go with a thank you card (we always need those, right?!) and some bright and colourful banners courtesy of the 'Pick a Pennant' stamp set and this week's challenge colours over at Just Add Ink featuring amongst others the new vibrant Granny Apple Green - love it! Now I know the challenge is 'clean and simple - birds' and there's only one feathered friend present amongst all those banners, but he's there and so I'm hoping that counts! I stamped my banners directly onto my one layer card, stamping the backgrounds off once to better highlight the patterns, whilst fussy cutting my bird and bows as I'm still waiting for my framelits to arrive.

Here is the visual summary of the key products used on today's project for you to pin for easy reference:


You can see all of my Product and 'How To' summaries on my 'How To - Tips and Techniques' Pinterest board in case you've missed any. Today's card really is clean and simple - stamps, ink and paper: the 3 things Stampin' Up! do best!

Before you reach for your ink and papers, check out what our amazing team has created to inspire you this week:

Here's a quick recap of our challenge rules:
 
1.  Create a new paper project
2.  Upload your creation to your blog with a link back to us and provide a direct link to the post featuring your challenge submission.
3.  Please link your card to no more than four challenges, TOTAL.
4.  Have FUN!

I can't wait to see your clean and simple creations and look forward to visiting your blogs this week! Enjoy the rest of your weekend as it will be over all too quickly. I'll be back as soon as I can with another project; until then, happy stampin'!


Stampin' Up! Supplies Used: 


Table built using Product Table Builder by The Crafty Owl - Independent Stampin' Up! Demonstrator.

My First Animal Outing For The Paper Players PP396

by Joanne James3. June 2018 09:00

It's Sunday and time for this week's new challenge over at The Paper Players! It's my turn to host this week and I have a fun theme challenge for you to work with - I used the sketch over at CAS(E) This Sketch and the colour palette at TGIF Challenges as the basis for my card too:


I chose my theme for this challenge ages ago but knew as soon as I received the set 'Animal Outing' in my bag at Onstage that it would have to be my set of choice for my card today - take a look:


Here's the low-down on today's card:

Animal Antics - I didn't think it was possible for a rhino to look cute, but the chap on my card today with his birdie friend is definitely a cutie to me! Along with a koala-carrying kangaroo, a giraffe and a frog, this pair make up the collection of animals in the 'Animal Outing' stamp set, which forms part of the Animal Expedition suite - a bundle of animal themed stamps and framelits with a range of sentiments that make this set work for a variety of of occasions: thank you, new baby, friend, birthday, anniversary and more. There are also co-ordinating papers, leaf ribbon and wooden frames elements - this is a set that I'm sure I'm going to get lots more use out of in the coming months so watch this space for more projects! I stamped my cute pair onto a stitched circle and coloured them with my Stampin' Blends.

Layered Leaves - I layered my stitched circle onto a rectangle of Old Olive cardstock, embossed with the Lovely Leaves embossing folder - this is a firm favourite of mine, it adds great detail and texture and I really like the way the random leaf pattern. There is just enough detail to add interest behind the image whilst still retaining an overall CAS feel to my card.

A New Trio - My embellishments are minimal, in fact just some Night of Navy baker's twine, but I did want to point out something that you might have missed both on my card and in the new catalogue: I rounded the corners on my embossed panel, as per the sketch, using the new Detailed Trio Punch. Found on page 211 of the new catalogue, this punch rounds corners, creates an oval-shaped eyelet and a pretty trio of petals that will add a subtle detail to your layers. Very useful!

Here is the visual summary of the key products used on today's project for you to pin for easy reference:


You can see all of my Product and 'How To' summaries on my 'How To - Tips and Techniques' Pinterest board in case you've missed any. 

Before you reach for your ink and papers, check out what our amazing team has created to inspire you this week:

Here's a quick recap of our challenge rules:
 
1.  Create a new paper project
2.  Upload your creation to your blog with a link back to us and provide a direct link to the post featuring your challenge submission.
3.  Please link your card to no more than four challenges, TOTAL.
4.  Have FUN!

I can't wait to see how you interpret this week's theme and look forward to visiting your blogs this week! Enjoy the rest of your weekend as it will be over all too quickly. I'll be back tomorrow with another project; until then, happy stampin'!


Stampin' Up! Supplies Used: 

Table built using Product Table Builder by The Crafty Owl - Independent Stampin' Up! Demonstrator.

Pink Abstract Impressions For The Paper Players PP395

by Joanne James27. May 2018 09:00

It's Sunday and time for this week's new challenge over at The Paper Players! It's the turn of my awesome friend LeAnne to host this week and she has my favourite, a sketch challenge, for you to work with:


I struggled a little with my card this week; I think too much time spent on admin and not enough crafting, coupled with new catalogue syndrome (so many new things to play with and a ton of things on their way out, sometimes it's hard to know where to start!) left me feeling a little stuck for inspiration. Eventually I decided to go pink and have a play with my stamps and papers from the new Garden Impressions Suite - take a look:


Here's the low-down on today's card:

Garden Impressions - The new Garden Impressions Suite is a collection of papers and images inspired by Impressionist art. The abstract florals and paper patterns are reminiscent of Monet's fabulous flowers and garden at Giverny, with broad brushstrokes and bold use of colour. I know this is going to be one of my favourite sets in the new catalogue.

Abstract Flowers - Having chosen the pink floral paper, I set about creating a single stamped abstract flower on a layered circle, stamping off the first layer and stamping layers two and three at full strength. These stamps are super-easy to line up and I just love the loose abstract effect. 

A Pink Pair - I used a combination of white and the two pinks in the designer series paper, melon Mambo and Powder Pink, as the colours for my card today - here they are if you would like to save them for your future inspiration:


Here is the visual summary of the key products used on today's project for you to pin for easy reference:


You can see all of my Product and 'How To' summaries on my 'How To - Tips and Techniques' Pinterest board in case you've missed any. 

I'm still not sure about this card - I added the ribbon as I felt it needed a little something, but I don't know if it works? Maybe it's just too pink?! I do love that sentiment though.

Before you reach for your ink and papers, check out what our amazing team has created to inspire you this week:

Here's a quick recap of our challenge rules:
 
1.  Create a new paper project
2.  Upload your creation to your blog with a link back to us and provide a direct link to the post featuring your challenge submission.
3.  Please link your card to no more than four challenges, TOTAL.
4.  Have FUN!

I can't wait to see what you create with this week's sketch and look forward to visiting your blogs this week! Enjoy the rest of your weekend - we have a Bank Holiday here in the UK so are looking forward to an extra day and hopefully some BBQ weather too. I'll be back tomorrow with another project; until then, happy stampin'!


Stampin' Up! Supplies Used: 

Table built using Product Table Builder by The Crafty Owl - Independent Stampin' Up! Demonstrator.

Farewell Definitely Dahlia, Hello Pineapple Punch PP394

by Joanne James20. May 2018 09:00

It's Sunday and time for this week's new challenge over at The Paper Players! I'm back following my week off and raring to go. It's the turn of the wonderful Laurie to host this week and she has a clean and simple challenge for you to work with:


Remember in addition to the theme of "blooms", this week is a Clean-and-Simple (CAS) challenge!  What do we mean by CAS?

  • Minimal layers and embellishments
  • Plenty of open space, aka "white" space
  • Simple and uncluttered

I have a couple of cards of cards to share with you today (and another tomorrow!) that fit this week's theme. I decided to use the retiring 'Definitely Dahlia' stamp for my cards today, and was very much inspired by our badge this week created by the oh-so-talented Nance. Here's my single clean and simple bloom:


Here's the low-down on today's card:

Farewell Definitely Dahlia - I will miss the 'Definitely Dahlia' background stamp, as it is so great for CAS cards. Whether you simply stamp 'as is' (see my uber-CAS card below) or do as I have here, where I inked with two colours to create a two-tone effect, this is a stamp that needs little else for a clean and simple card - the stamp really does much of the work.

Hello Pineapple Punch - I used one of the new in-colours, Pineapple Punch, to create the base layer of colour for my dahlia, stamping off once before adding some Melon Mambo pink with a sponge dauber to the petal edges to create a pretty two-tone effect. This adds a little more depth and interest to the final stamped image. I really like the new in-colours this year - they work so well as a collection and compliment many of the other colours in our palette.

Amazing You - I finished my card with a stamped and diecut sentiment from the 'Celebrate You' thinlits set - can't wait for these to become available in the new catalogue, you know how much I love a diecut thinlit :-) 

Here is the visual summary of the key products used on today's project for you to pin for easy reference:


You can see all of my Product and 'How To' summaries on my 'How To - Tips and Techniques' Pinterest board in case you've missed any. 

Before I go, here's another version of the same card, this time super clean-and-simple in style, that I made for the current mix it up challenge over at Sugar Pea Designs, using both sketch and photo inspiration:

Whilst I didn't choose a rose for my flower, I did go with the pale pink and a single bloom, and I used the sketch. Here's my card:


I simply stamped my dahlia in retiring Pink Pirouette ink, stamping off once to get a pale flower, heat embossed my sentiment from another retiring stamp set, Remarkable You, in silver and mounted on a Pink Pirouette card base. 

Here is the visual summary of the key products used on today's project for you to pin for easy reference:

Before you reach for your ink and papers, check out what our amazing team has created to inspire you this week:

Here's a quick recap of our challenge rules:
 
1.  Create a new paper project
2.  Upload your creation to your blog with a link back to us and provide a direct link to the post featuring your challenge submission.
3.  Please link your card to no more than four challenges, TOTAL.
4.  Have FUN!
 
I can't wait to see your clean and simple creations and look forward to visiting your blogs this week! Enjoy the rest of your weekend - it looks like we are going to enjoy another day of sunshine here in the UK so I will be looking forward to spending some time in my garden, amongst other things. I'll be back tomorrow with another project; until then, happy stampin'!


Stampin' Up! Supplies Used: 

Table built using Product Table Builder by The Crafty Owl - Independent Stampin' Up! Demonstrator.

Mini Catalogue

BROWSE THE CATALOGUE

The mini catalogue is now live! Read and download your copy here.

Shop Online

Access my online shop 24 x 7, 365 days of the year:

Current April hostess code:

VDKNV7BH

Shop Online

Join My Team

It's always a great time to join Stampin’ Up! New team members can get £130 worth of products for only £99 + free business supplies + free shipping + all the fun being a part of Stampin’ Up! Stampin' Up! has something for everyone: join my growing team and benefit from my support to enjoy Stampin' Up! however you choose.

If you're interested, call me for a chat to understand how I can help you realise your goals. Alternatively, if you have already decided to sign up and you just can't wait, please click here for the link to the online form where you can sign up and order your starter kit right away! 

Latest Kit!

Stampin Cut and Emboss

The Rock Legend Kit has all you need to make 8 cards with coordinating envelopes. Along with the new Panda Friends Kit, both are available from January 4th for just £14 each - get yours here!

2023-24 Annual Catalogue

BROWSE THE CATALOGUE

Click on the catalogue for a full list of current SU! supplies - if you would like to order any of the items featured, please drop me a line at [email protected] or give me a call on 07773 421446 - I'd be happy to help.

New Online Exclusives

There are new products available exclusively in the online store from 5 March - check them out here.

About Me

Hi I'm Joanne and live in Northampton and when I'm not looking after my husband and two beautiful children, am an avid crafter with a passion for all things Stampin' Up!

I must confess that I have never been a big rubber stamper - until I discovered Stampin' Up! that is. I love the fact that I can get such great results with co-ordinating stamps, inks, papers and punches - the possibilities are endless! Join me on my stamping journey as I share the things I love and be inspired to create amazing things yourself!

Follow Me

Monthly Newsletter

Box Builder

Click the button above to use Box Buster to create your custom box design using the Envelope Punch Board!

Kits Collection Now Available!

Stampin Cut and Emboss

The new Kits Collection from Stampin' Up! is now available!

Click here to see the current kits available and order yours online today.

I Design For


Stampin' Up Stuff

This is my personal blog and is not endorsed by Stampin’ Up! I hope you find it a plentiful source of ideas and personal inspiration but please don't copy my designs for contest submission or use for classes, publication or sale without express permission.