Congratulations Peaceful Poppies for PP473

by Joanne James12. January 2020 10:00

Today it's Sunday and time for this week's new challenge over at The Paper Players! It's the turn of the fabulous Anne Marie to host this week and she has what I'm sure will be a popular colour challenge for you to work with:


The reason I think Anne Marie's colour palette will be popular this week is that all of her key colours feature in the new Peaceful Poppies designer series paper from Stampin' Up! and try as I might to go in a different direction, I couldn't help but cut into my pack for today's card. With the help of Judy's great sketch over at Freshly Made Sketches this week, I was able to let the paper do all the talking - take a look:


Here's the low-down on today's card:

Peaceful Poppies - Peaceful Poppies is one of the headline suites of the new Stampin' Up! Spring Mini Catalogue and it appears on the front cover. Beautiful line-art images accented by watercolour effects, all inspired by a field of poppies, the suite contains not one, but two bundles along with a range of co-ordinating accessories. My regular readers will know that I am a lover of designer series paper and I think the Peaceful Poppies paper is some of the most beautiful I've ever seen. One of the designs looks just like a painting and is perfect for card fronts and I cut a piece of this, featuring both Poppy Parade and Rich Razzleberry coloured poppies.

Neutral Black - My paper choice was so pretty, I couldn't bring myself to add much more to the front of my card. I used a Poppy Parade card base and added a double mount to frame my patterned paper, in Old Olive and Basic Black. I also decided to heat emboss my sentiment in white on black, as opposed to stamping the other way around - using black to 'frame' my picture and sentiment ties in to the black line-drawn design of the paper, so whilst used sparingly my neutral choice plays an important role.

Beautiful Inside And Out - Having done very little stamping on the front of my card, I decided a little interior decoration along with my split/masked sentiment was needed to redress the balance:

I added a poppy to the front of my envelope too - no naked envelopes here this week!

Here is the visual summary of the key products used on today's project for you to pin for easy reference:


You can see all of my Product and 'How To' summaries on my 'How To - Tips and Techniques' Pinterest board in case you've missed any. 

Before you reach for your ink and papers, check out what our amazing team has created to inspire you this week:

Here's a quick recap of our challenge rules:
 
1.  Create a new paper project
2.  Upload your creation to your blog with a link back to us and provide a direct link to the post featuring your challenge submission.
3.  Please link your card to no more than four challenges, TOTAL.
4.  Have FUN!

You can see all of my 'How To' summaries on my 'How To - Tips and Techniques' Pinterest board in case you've missed any. 

Enjoy your day; we had a day of sport yesterday so today should be a quieter one. I spent yesterday making final preparations for my class tomorrow, however if I'm lucky I might squeeze in a little extra crafting today - here's hoping! I'll be back tomorrow with another project. Until then, happy stampin'!


Stampin' Up! Supplies Used: 

Table built using Product Table Builder by The Crafty Owl - Independent Stampin' Up! Demonstrator.

Welcome Little One For Our First Paper Players Challenge of 2020 PP472

by Joanne James5. January 2020 10:00

Today it's Sunday and time for our first challenge of 2020 over at The Paper Players! It's the turn of the fabulous Jaydee to host this week and she has a fun theme challenge for you to work with:


Our theme is 'something new' - a new year, a new season, new job, new baby - so many possibilities! I took some new product to make a card to welcome the arrival of a new baby, using Brian's layout over at CAS(E) This Sketch this week as my starting point and this is what I came up with - take a look:


Here's the low-down on today's card:

Welcome Witty-cisms - The sweet pram stamp I used on today's card sis from a new stamp set called 'Witty-cisms', inspired by one of Stampin' Up!'s Million Dollar Sales Achievers, Lisa Fast. A collection of fun stamps with witty sayings and cute hand-drawn illustrations, they are perfect for lots of different occasions and also for a spot of quick colouring if that's your thing. These images are great for quick and simple cards and can also be dressed up with a few layers and embellishments into something more detailed as I've done here.

Baby Blue - I chose to go monochromatic with today's colours and feature Coastal Cabana on my card as I had all the right bits and pieces in my collection (I used some retired Brights DSP but the current gingham would look lovely too). I stamped my image in Basic Grey as opposed to black to soften the image, which is something I often do on a baby card. I love cards like this - it would be just as easy to make in pink or a neutral too.

A Simple Embellishment Trio - I used some of the new white crinkle ribbon for a soft bow and a silver 'made with love' charm and felt border from the Follow Your Art Embellishment Kit to add the finishing touches to my card - I think that little heart charm is a neat play on words for a new arrival.

Here is the visual summary of the key products used on today's project for you to pin for easy reference:


You can see all of my Product and 'How To' summaries on my 'How To - Tips and Techniques' Pinterest board in case you've missed any. 

Before you reach for your ink and papers, check out what our amazing team has created to inspire you this week - including our fabulous new trio of guest designers, Allisa, Stef and Mary:

Here's a quick recap of our challenge rules:
 
1.  Create a new paper project
2.  Upload your creation to your blog with a link back to us and provide a direct link to the post featuring your challenge submission.
3.  Please link your card to no more than four challenges, TOTAL.
4.  Have FUN!

You can see all of my 'How To' summaries on my 'How To - Tips and Techniques' Pinterest board in case you've missed any. 

Enjoy your day; we are looking forward to a leisurely family lunch today before we are all back to school and work at various points next week. I have a card prepared though so will be back tomorrow with another project. Until then, happy stampin'!


Stampin' Up! Supplies Used: 

Table built using Product Table Builder by The Crafty Owl - Independent Stampin' Up! Demonstrator.

An Unusual Christmas Crowd for PP471

by Joanne James8. December 2019 09:00

Today it's Sunday and time for this week's new challenge over at The Paper Players! It's the turn of the fabulous LeAnne to host this week and for our last challenge of the year she has a colour challenge for you to work with:


I used Karren's sketch over at Freshly Made Sketches (turned through 90 degrees) for my layout this week and decided to use this fun stamp 'Christmas Crowd' again but in a somewhat less traditional way - take a look:


Here's the low-down on today's card:

I stamped the image in Versamark then heat embossed it in silver and coloured with my Stampin' Blends, adding either clear Wink of Stella or Dazzling Diamonds glitter to the white areas for added sparkle. I heat embossed my silver sentiment onto vellum so that it wouldn't overwhelm the main image too much and added both a strip of Mercury Glass acetate over the Seaside Spray border edge of my card, with a strip of Seaside Spray scalloped edge linen ribbon to border my piece of Whisper White. A sprinkle of snowflake sequins completes my card.

Normally I wouldn't dream of colouring this image in anything but traditionally festive colours such as red and green (I mean, a blue Santa?!) yet I thought it would be a good opportunity to show how even a large image can be successfully coloured with only a few colours and supplies and whilst a break from the norm, I quite like the finished result. What do you think? Do you ever dress Santa in anything other than red or is that an absolute no-go?

Here is the visual summary of the key products used on today's project for you to pin for easy reference:


You can see all of my Product and 'How To' summaries on my 'How To - Tips and Techniques' Pinterest board in case you've missed any. 

Before you reach for your ink and papers, check out what our amazing team has created to inspire you this week:

Here's a quick recap of our challenge rules:
 
1.  Create a new paper project
2.  Upload your creation to your blog with a link back to us and provide a direct link to the post featuring your challenge submission.
3.  Please link your card to no more than four challenges, TOTAL.
4.  Have FUN!

We understand that you are super busy in the run up to Christmas however we hope you can find a few minutes to craft along with us this week! Since it's our last challenge of 2019 before we take a break for Christmas, it's also time for us to say goodbye to our wonderful trio of 2019 guest designers: Su Mohr, Wanda Cullen and Windy Ellard. All three of them have proved worthy guest designers and share some fabulous creations with us this year. We will be sad to see them leave us and would like to thank each of them for their efforts. We look forward to welcoming in a new team of guest designers in the new year - more about that in a later PP post!

Enjoy your day; I have a busy day with a quick Christmas shopping trip, followed by the Christmas swim squad outing to the Snow Dome for some winter sledging and then an evening of tree decorating and Christmas card writing. I'll be back tomorrow with another project. Until then, happy stampin'!


Stampin' Up! Supplies Used: 

Table built using Product Table Builder by The Crafty Owl - Independent Stampin' Up! Demonstrator.

Let It Snow Card In A Box For PP470

by Joanne James1. December 2019 09:00

Today it's Sunday and time for this week's new challenge over at The Paper Players! It's the turn of the lovely Laurie to host this week and she has a fun theme challenge for you to work with:


I have a fancy card to share with you today that is perfect to give someone special for the festive season - take a look:


Here's the low-down on today's card:

A Card In A Box - Is it a gift? Is it a card? I guess it's a little of both! When closed it looks like a gift box, but undo the ribbon and the top and bottom of the box separate to reveal an accordion-style expanding card:


I made a holly-themed 'card in a box' project at my October Creative Escapes Craft Retreat using the Christmas Gleaming Stamp Set and made a few other versions to show the attendees how they could use the same concept using other papers and stamp sets - this is one of them. They are quite straightforward to make and rather addictive; I've had lots of photos from my retreat weekend attendees after the event showing me more examples of ones they've created too, so it must be catching! One of my top tips when making this type of card is to use temporary adhesive or a couple of glue dots to hold the last panel in place so that you can remove it to write your message to the recipient before gluing it in place; this is much easier than trying to write it when it's already in the box.

Let It Snow - I used the 'Let It Snow' papers for the accordion-fold of my card and the letters that spell out 'snow', which I diecut using the Hand-Lettered Prose dies and I used the adorable Let It Snow Embellishment Kit to dress up the snowman on the front of my box - how cute are those little felt accessories?!


Snowman Season - The sentiment on the front and inside my card are from the 'Snowman Season' stamp set. The 'Let It Snow' stamp was perfect for a partial stamp to then finish the sentiment with the diecut letter panels. I also used the snowflakes in the stamp set with some Stampin' Glitter to add some sparkle to each of the Coastal Cabana panels and a snowman on the first panel that I coloured with co-ordinating Stampin' Blends markers:


Here is the visual summary of the key products used on today's project for you to pin for easy reference:


You can see all of my Product and 'How To' summaries on my 'How To - Tips and Techniques' Pinterest board in case you've missed any. 

I'm also linking today's project up with the current fancy fold challenge over at Inspire Create.

Before you reach for your ink and papers, check out what our amazing team has created to inspire you this week:

Here's a quick recap of our challenge rules:
 
1.  Create a new paper project
2.  Upload your creation to your blog with a link back to us and provide a direct link to the post featuring your challenge submission.
3.  Please link your card to no more than four challenges, TOTAL.
4.  Have FUN!

You can see all of my 'How To' summaries on my 'How To - Tips and Techniques' Pinterest board in case you've missed any. 

Enjoy your day; as it's the first of December we are going to begin decorating the house for Christmas today, much to the children's delight! Especially as we have a couple of extra Christmas trees and some new rainbow baubles too. I'll be back tomorrow with another project. Until then, happy stampin'!


Stampin' Up! Supplies Used:

Table built using Product Table Builder by The Crafty Owl - Independent Stampin' Up! Demonstrator.

Night Before Christmas Memories and More Reindeer for PP469

by Joanne James24. November 2019 09:00

Today it's Sunday and time for this week's new challenge over at The Paper Players! It's my turn to host this week and I have my favourite, a sketch challenge for you to work with:


Despite the fact that I chose the sketch, I struggled with it initially - too many possibilities I think and I almost couldn't decide what to choose as my focal point! In the end I made a couple of cards - I'll share the second one with you tomorrow, along with a co-ordinating gift box. For today I settled on this colourful little fella - take a look:


Here's the low-down on today's card:

Night Before Christmas - I decided to use this bright and bold reindeer patterned paper from the Night Before Christmas paper pack as the starting point for my card. This bold pattern works really well for a background and the spots were one of my two for my second attempt at the 'Take Two' challenge over at Just Add Ink this week. The second part was the strip of (retired) copper glimmer paper that I used along the edge of my sentiment strip and the trio of Holiday Rhinestones I used for some added bling and sparkle.

A Majestic Deer - I used one of the deer stickers from the Night Before Christmas Memories and More Pack as my focal point. I backed him with a Mossy Meadow stitched circle and popped him up on dimensionals to make him stand out. He is slightly larger than the deer on the paper so works well to emphasise the design and bring it into focus. 

Itty Bitty Christmas - The sentiment on my card is from the 'Itty Bitty Christmas' stamp set. This is a great Christmas standard, with a ton of festive sentiments in a variety of shapes and sizes for both the inside and outside of cards.

Here is the visual summary of the key products used on today's project for you to pin for easy reference:


You can see all of my Product and 'How To' summaries on my 'How To - Tips and Techniques' Pinterest board in case you've missed any. 

Before you reach for your ink and papers, check out what our amazing team has created to inspire you this week:

Here's a quick recap of our challenge rules:
 
1.  Create a new paper project
2.  Upload your creation to your blog with a link back to us and provide a direct link to the post featuring your challenge submission.
3.  Please link your card to no more than four challenges, TOTAL.
4.  Have FUN!

You can see all of my 'How To' summaries on my 'How To - Tips and Techniques' Pinterest board in case you've missed any. 

Enjoy your day; we had a day of sport yesterday with both hockey match and swimming competitions so today will hopefully be a slightly more restful one. I'll be back tomorrow with another project. Until then, happy stampin'!


Stampin' Up! Supplies Used: 

Table built using Product Table Builder by The Crafty Owl - Independent Stampin' Up! Demonstrator.

A Clean and Simple Christmas Crowd for PP468

by Joanne James17. November 2019 09:00

Today it's Sunday and time for this week's new challenge over at The Paper Players! It's the turn of the fabulous Jaydee to host this week and she has a great seasonal Clean and Simple challenge for you to work with:


Since this challenge theme was the North Pole, I had to go with a Santa and his festive friends - take a look:


Here's the low-down on today's card:

I used this week's CAS(E) This Sketch for my layout and heat embossed my sentiment in white onto my Real Red card base before stamping my single stamp image from 'Christmas Crowd' in Tuxedo Black Memento ink onto my top layer of Whisper White and colouring with my Stampin' Blends. I added some clear Wink of Stella to the fur on Santa's suit and a sprinkling of snowflake sequins, before popping my panel up on dimensionals and attaching to the front of my card base. I also stamped the outline image on the inside of my card behind my sentiment:

Now I know not all of Santa's Christmas crowd can be normally found in the North Pole (cue the penguin!!) however I think for such a cute bunch we can make an exception and grant a little creative licence!

Here is the visual summary of the key products used on today's project for you to pin for easy reference:


You can see all of my Product and 'How To' summaries on my 'How To - Tips and Techniques' Pinterest board in case you've missed any. 

Before you reach for your ink and papers, check out what our amazing team has created to inspire you this week:

Here's a quick recap of our challenge rules:
 
1.  Create a new paper project
2.  Upload your creation to your blog with a link back to us and provide a direct link to the post featuring your challenge submission.
3.  Please link your card to no more than four challenges, TOTAL.
4.  Have FUN!

You can see all of my 'How To' summaries on my 'How To - Tips and Techniques' Pinterest board in case you've missed any. 

Enjoy your day; we had a day packed with sport yesterday so today will be about homework and baking for tomorrow's school charity bake sale. I have a busy week ahead but I have managed to make and photograph some other projects, so I'll be back tomorrow with more Christmas goodness to share. Until then, happy stampin'!


Stampin' Up! Supplies Used: 

Table built using Product Table Builder by The Crafty Owl - Independent Stampin' Up! Demonstrator.

Inspiring Mermaid Lunch Box Love Note

by Joanne James12. November 2019 20:00

Today I'm sharing a card that uses a fun technique that is inspired by the theme and photo inspiration for the current FUSION challenge:


I love that fabulous colourful mermaid tail cupcake and took that as my inspiration rather than the sketch this week, as I also wanted to try out a fun technique inspired by a rather unusual household item. Here's my card:


Here's the low-down on today's card:

A Magical Mermaid ... Or Two Or Three - I created a mermaid-patterned cardfront using the small solid mermaid image from the 'Magical Mermaid' stamp set; I stamped each image freehand as I wanted the spacing close than I could achieve with my stamp positioning tool. I haven't used this stamp in this set before - I usually use the large mermaid image - so it was a good opportunity to use the set in a different way. 

A Fun Technique - to achieve the multi-coloured effect, I revisited the 'oldie but goodie' baby wipe technique. I created two separate stamp pads using baby wipes and drops of three reinkers on each, then alternated stamping with each one to create my pattern. This is such a fun technique if you are trying to create variegated colour; no two stamped images are the same so it makes for colourful patterns. 

Unusual Inspiration - You may be wondering where I got my rather eclectic colour inspiration from this week; all is revealed in the photo below:


Yes, one of Rebecca's bedsets! She loves these brightly coloured mermaids and since my card is a little notecard that I slipped into her school bag as a surprise note as I sometimes do, I knew she would instantly recognise the inspiration. The thing I love most about the finished card is the watery effect of the blended colours, which seems fitting for my nautical mermaid. 

Here is the visual summary of the key products used on today's project for you to pin for easy reference:


You can see all of my 'How To' summaries on my 'How To - Tips and Techniques' Pinterest board in case you've missed any. 

So as you can see, inspiration really can be found in the most unusual of places. What is your most unusual source of inspiration in your crafting? Do leave me a comment below - I would love to know.

Enjoy your evening and I'll be back tomorrow with another project. Until then, happy stampin'!


Stampin' Up! Supplies Used:

Table built using Product Table Builder by The Crafty Owl - Independent Stampin' Up! Demonstrator.


Festive Birds of a Feather for PP467

by Joanne James10. November 2019 09:00

Today it's Sunday and time for this week's new challenge over at The Paper Players! It's the turn of the fabulous Claire to host this week and she has a great colour challenge for you to work with:


I decided I would make another Christmas card for my stash using this week's colours using the cute 'Birds of a Feather' stamp set - take a look:


Here's the low-down on today's card:

I did some layering onto my card base with a piece of Bermuda Bay DSP (this is last year's design but a current one would work just as well), along with a strip of retired glimmer paper for a pop of sparkly green, before my stitched rectangle. I did take a liberty here and used a piece of Pool Party; my birds were originally stamped on Whisper White, but the finished result was too 'white' so I fussy cut my birds and then paper-pieced two of them into a couple of outlines stamped directly onto the Pool Party rectangle, which works much better. The last birdy I popped up on dimensionals between the other two. Each of them was coloured with my Stampin' Blends and whilst it's difficult to see in the photo, I gave the fur on their Santa hats a liberal dose of clear Wink of Stella for some extra sparkle and shine. I added a couple of Granny Apple green glitter enamel dots and inked my partial sentiment with my Stampin' Write markers. I completed my sentiment by adding the last line inside my card, along with a trio of masked outlined birdies:


I was pleased with the finished card, until it occurred to me that there are four in the James 'flock' not three, and whilst I think odd numbers look better than even on a card front, it might make the recipient think we have reduced in numbers as the year has progressed! What to do? I think I need to add another birdie to the front of my envelope at least for the avoidance of doubt!! 

Here is the visual summary of the key products used on today's project for you to pin for easy reference:


You can see all of my Product and 'How To' summaries on my 'How To - Tips and Techniques' Pinterest board in case you've missed any. 

Before you reach for your ink and papers, check out what our amazing team has created to inspire you this week:

Here's a quick recap of our challenge rules:
 
1.  Create a new paper project
2.  Upload your creation to your blog with a link back to us and provide a direct link to the post featuring your challenge submission.
3.  Please link your card to no more than four challenges, TOTAL.
4.  Have FUN!

You can see all of my 'How To' summaries on my 'How To - Tips and Techniques' Pinterest board in case you've missed any. 

Enjoy your day; we have a day of homework and housework and the arrival of the muddy kit as the boys return from their rugby tour to York. Thankfully the weather stayed dry when it counted and all matches were played without incident. Alas the same couldn't be said for the female counterparts of Year 8, who were on a hockey tour to Wales this weekend and had play stopped yesterday afternoon due to - heavy SNOW!! It looks like winter has well and truly arrived here in the UK this week.

I'll be back tomorrow with another project. Until then, happy stampin'!


Stampin' Up! Supplies Used: 

Table built using Product Table Builder by The Crafty Owl - Independent Stampin' Up! Demonstrator.

Beautiful Boughs Meets Rooted in Nature for a Woodland Christmas PP466

by Joanne James3. November 2019 09:00

Today it's Sunday and time for this week's new challenge over at The Paper Players! It's the turn of the fabulous Anne Marie to host this week and she has a fun theme challenge for you to work with:


I had a few ideas for Ann Marie's 'woodsy' theme today and decided to really go all-out to incorporate as many wood-themed elements into my card as possible. I decided to continue with another Christmas card to add to my collection and ended up creating something a little different (for me!) - take a look:


Here's the low-down on today's card:

Knock on Wood - My card has lots of elements that tie in to the wood theme: some woodland background dry embossing, a panel of retired Wood Textures DSP, the tree trunk stamp from Rooted in Nature (stamped in Crumb Cake and then sponged with Early Espresso around the edge), as well as some greenery and a couple of pine cones that could easily be spotted on a walk through the woods.

Texture, Texture - There are lots of layers and textural elements on today's card too: in addition to the dry embossing, I added shimmery white embossing paste to my greenery for  textured snow and the glimmer paper and twine bow also adds contrast. I originally started out using Jen's sketch over at Freshly Made Sketches (you can see that sketch here), but ended up adding so many layers and bits and pieces I rather lost my usual 'clean' look. Whilst I love the finished result, I will need to go back to the drawing board if I'm to put in an FMS entry this week!

Woodland Sparkle - All that wood made for a rather neutral card, with only the greens adding colour to the mix of browns. I decided to add a silver glimmer 'merry' diecut for some festive sparkle, along with some frosted epoxy droplet 'berries' and a silver and linen twine bow. I really like the finished effect.

Here is the visual summary of the key products used on today's project for you to pin for easy reference:


You can see all of my Product and 'How To' summaries on my 'How To - Tips and Techniques' Pinterest board in case you've missed any. 

I'm also linking up today's card to the Festive Friday Challenge (my card features silver, wood, texture, circles and green from the inspo list) and the challenge over at Paper Craft Crew where I went across the middle of the board: embossing paste/rustic/gone wild and the top left-bottom right diagonal: found in the forest/rustic/sponging)

Before you reach for your ink and papers, check out what our amazing team has created to inspire you this week:

Here's a quick recap of our challenge rules:
 
1.  Create a new paper project
2.  Upload your creation to your blog with a link back to us and provide a direct link to the post featuring your challenge submission.
3.  Please link your card to no more than four challenges, TOTAL.
4.  Have FUN!

Enjoy your day; we are enjoying the last day of the half-term holiday before returning the school tomorrow. We have some hockey planned and a trip to the farm shop, along with preparations for my classes this week. I'll be back tomorrow with another project. Until then, happy stampin'!


Stampin' Up! Supplies Used: 

Table built using Product Table Builder by The Crafty Owl - Independent Stampin' Up! Demonstrator.

A Celebration of Let It Snow PP465

by Joanne James27. October 2019 09:00

Today it's Sunday and time for this week's new challenge over at The Paper Players! It's the turn of the fabulous Ann to host this week and she has my favourite, a sketch challenge for you to work with:
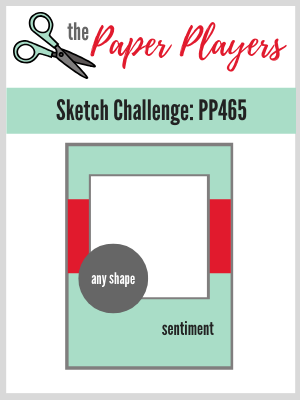
 

There were so many ways to go with this sketch - in the end I decided to 'Let It Snow' - in a big way! Take a look:
 

Here's the low-down on today's card:

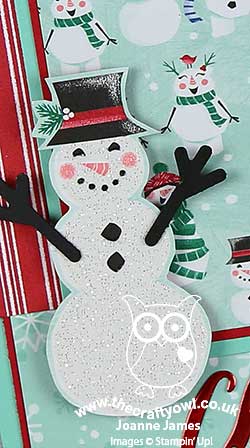
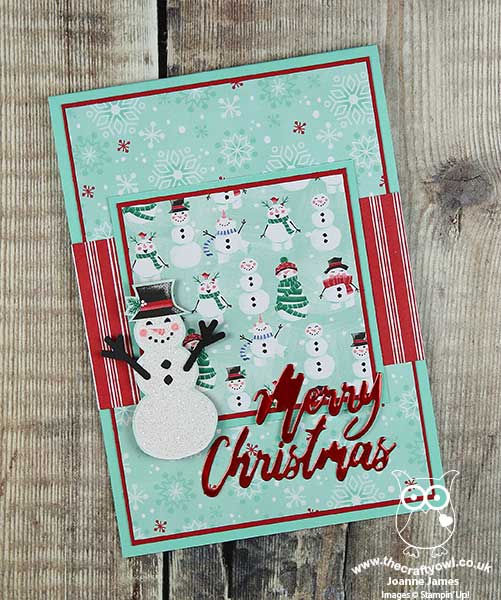
My card today is a celebration of the wintery-themed Let It Snow Specialty Designer Series Paper. This collection of cute snowmenwas at the top of my Christmas shopping list; my regular readers know how much I love DSP, and today's card uses not one, not two, not three, but four - yes four! - of the patterns in the pack. I used three of the non-glittery patterns for the layers (it was so hard not to use the sparkly designs on the reverse!) and fussy cut a glittery snowman for my corner embellishment from the fourth (I added some arms using the Snowman Builder Punch).

I added a diecut from 'Word Wishes' for the sentiment on the front of my card, although have a slight confession to make: this was supposed to be red glimmer paper for a touch of festive sparkle to compliment my glittery snowman, however could I find mine anywhere in my crafting square mile? Not a chance! I know I have some, but I couldn't find it anywhere so I resorted to some red foil instead. 

My card doesn't have a stitch of stamping on the front, although I did add a sprinkling of snowflakes and a sentiment from the 'Snowman Season' stamp set on the inside:
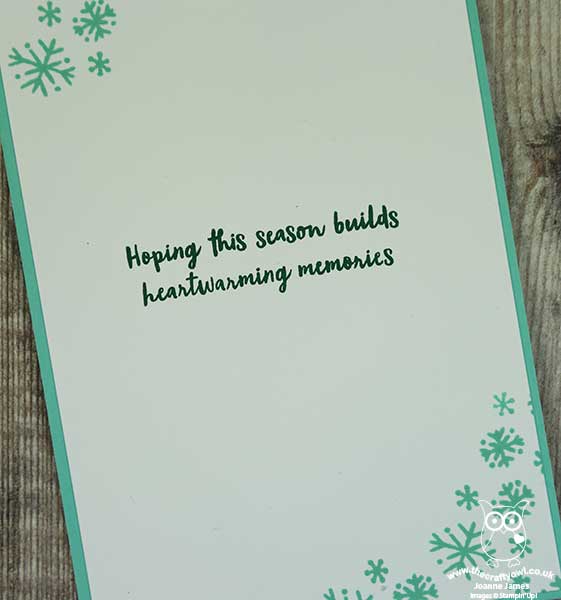
I love the combination of cool greens, white and red - it reminds me of candy canes - that feature in this paper pack and one thing is for sure: those glittery snowmen really are as sweet as sugar, and as sparkly too!

Here is the visual summary of the key products used on today's project for you to pin for easy reference:
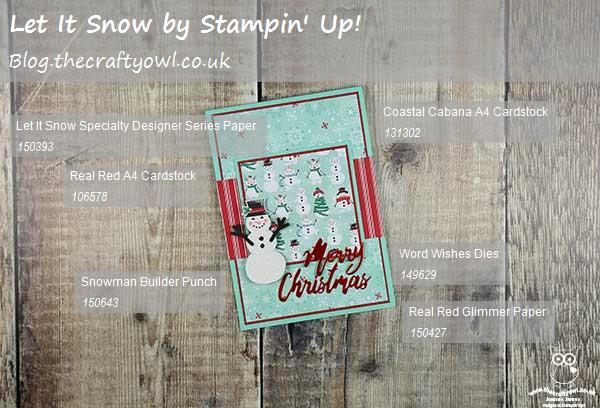
 

You can see all of my Product and 'How To' summaries on my 'How To - Tips and Techniques' Pinterest board in case you've missed any. 

Before you reach for your ink and papers, check out what our amazing team has created to inspire you this week:

Here's a quick recap of our challenge rules:
 
1.  Create a new paper project
2.  Upload your creation to your blog with a link back to us and provide a direct link to the post featuring your challenge submission.
3.  Please link your card to no more than four challenges, TOTAL.
4.  Have FUN!

You can see all of my 'How To' summaries on my 'How To - Tips and Techniques' Pinterest board in case you've missed any. 

Enjoy your day; today marks the official start of winter and with that an extra hour in bed - yay! My day will be a quiet one and hopefully I'll be back tomorrow with another project. Until then, happy stampin'!


Stampin' Up! Supplies Used: 

Table built using Product Table Builder by The Crafty Owl - Independent Stampin' Up! Demonstrator.

Mini Catalogue

BROWSE THE CATALOGUE

The mini catalogue is now live! Read and download your copy here.

Shop Online

Access my online shop 24 x 7, 365 days of the year:

Current April hostess code:

VDKNV7BH

Shop Online

Join My Team

It's always a great time to join Stampin’ Up! New team members can get £130 worth of products for only £99 + free business supplies + free shipping + all the fun being a part of Stampin’ Up! Stampin' Up! has something for everyone: join my growing team and benefit from my support to enjoy Stampin' Up! however you choose.

If you're interested, call me for a chat to understand how I can help you realise your goals. Alternatively, if you have already decided to sign up and you just can't wait, please click here for the link to the online form where you can sign up and order your starter kit right away! 

Latest Kit!

Stampin Cut and Emboss

The Rock Legend Kit has all you need to make 8 cards with coordinating envelopes. Along with the new Panda Friends Kit, both are available from January 4th for just £14 each - get yours here!

2023-24 Annual Catalogue

BROWSE THE CATALOGUE

Click on the catalogue for a full list of current SU! supplies - if you would like to order any of the items featured, please drop me a line at [email protected] or give me a call on 07773 421446 - I'd be happy to help.

New Online Exclusives

There are new products available exclusively in the online store from 5 March - check them out here.

About Me

Hi I'm Joanne and live in Northampton and when I'm not looking after my husband and two beautiful children, am an avid crafter with a passion for all things Stampin' Up!

I must confess that I have never been a big rubber stamper - until I discovered Stampin' Up! that is. I love the fact that I can get such great results with co-ordinating stamps, inks, papers and punches - the possibilities are endless! Join me on my stamping journey as I share the things I love and be inspired to create amazing things yourself!

Follow Me

Monthly Newsletter

Box Builder

Click the button above to use Box Buster to create your custom box design using the Envelope Punch Board!

Kits Collection Now Available!

Stampin Cut and Emboss

The new Kits Collection from Stampin' Up! is now available!

Click here to see the current kits available and order yours online today.

I Design For


Stampin' Up Stuff

This is my personal blog and is not endorsed by Stampin’ Up! I hope you find it a plentiful source of ideas and personal inspiration but please don't copy my designs for contest submission or use for classes, publication or sale without express permission.