Thankful Thoughts Meets Succulent Garden

by Joanne James12. March 2017 09:00

It's Sunday and time for this week's new challenge over at The Paper Players! It's the turn of the wonderful Jaydee to host this week and she has a fun colour challenge for us to work with:


I love green, especially bright greens - Cucumber Crush is one of my all time favourites! - but for today's challenge I decided to go with an altogether more subtle green in Mint Macaron - take a look:


Here's the low-down on today's card:

Succulent Garden - I chose to use a 'tricky' piece of designer series paper on my card today from the Succulent Garden pack. I have been at a loss as to how I should use some of the papers and patterns in this pack and I felt that this sheet in particular lent itself to a monochromatic card in green and white, so used is to cover my entire card front.

A Bold Sentiment - With such a busy paper pattern, I needed a simple, bold sentiment so I chose this bold thank you from the 'Thankful Thoughts' stamp set. I stamped in Mint Macaron onto Whisper White and I used my Stitched Shape Framelits to add a little interest to my otherwise plain circle. With the exception of my row of stamped cacti inside my card and on the front of my co-ordinating envelope, this is all the stamping to feature on my card.

Triple Banners That Sparkle - I added a trio of banners to anchor my sentiment circle, one each in green and white and the third in Mint Macaron glimmer paper, the latest in the Sale-A-Bration free product offering. The sparkle and texture of the glimmer paper introduces another element yet is still in keeping with the overall monochromatic feel of my card.

Here is the visual summary of the key products used on today's project for you to pin for easy reference:


You can see all of my Product and 'How To' summaries on my 'How To - Tips and Techniques' Pinterest board in case you've missed any. 

So a super simple card today, but one with a very calming colour scheme that I hope Jaydee will appreciate.

Before you reach for your ink and papers, check out what our amazing team has created to inspire you this week:

The Paper Players Design Team
 
 
Here's a quick recap of our challenge rules:
 
1.  Create a new paper project
2.  Upload your creation to your blog with a link back to us and provide a direct link to the post featuring your challenge submission.
3.  Please link your card to no more than four challenges, TOTAL.
4.  Have FUN! 


I look forward to seeing what you create with this week's colour palette. Enjoy the rest of your weekend as it will be over all too quickly; I'll be back tomorrow with another project; until then, happy stampin'!


Stampin' Up! Supplies Used: 

Table built using Product Table Builder by The Crafty Owl - Independent Stampin' Up! Demonstrator.

Birthday Blast Diecut Pop Up Card

by Joanne James5. March 2017 09:00

It's Sunday and time for this week's new challenge over at The Paper Players! It's the turn of the fantastic Sandy to host this week and she has a fun theme challenge for us to work with:


Now I know from the outside of my card you could be forgiven for thinking that I was working to the wrong theme this week; with the exception of a punched circle and a snipped banner, there isn't any evidence of punching, cutting or snipping: 


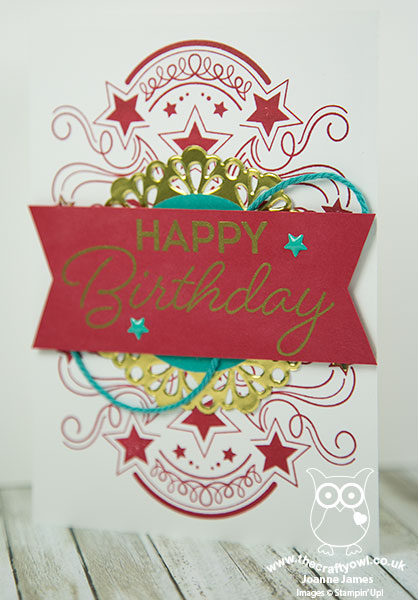
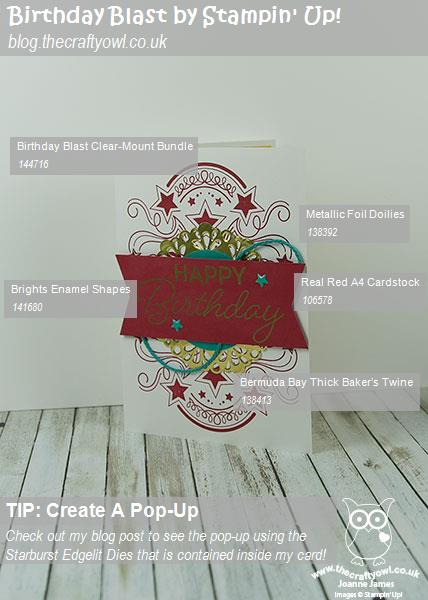
A fun and colourful front featuring the 'Birthday Blast' stamp set - but look what I did with the inside of my card: 


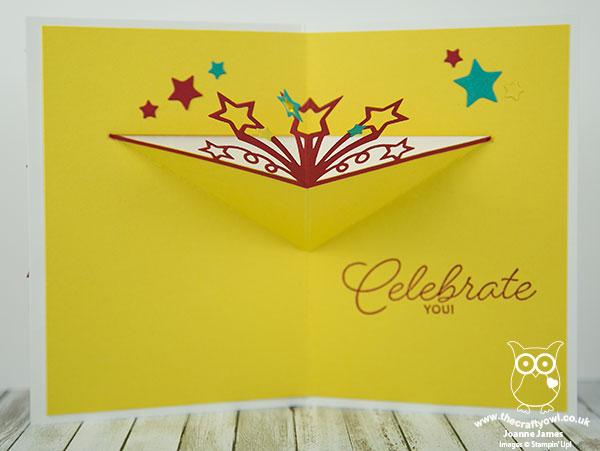
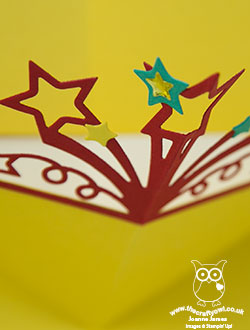
I created a bright pop-up using the largest piece in the Star Blast Edgelits die set! How cool is that?!

Here's a close-up of the pop-up:


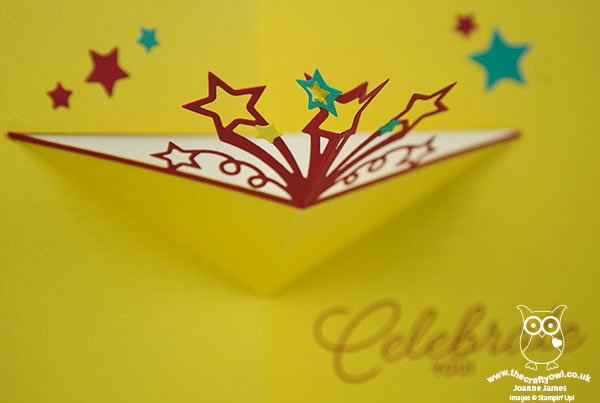
I lined my card with Daffodil Delight and attached my Real Red diecut to my simple pop-up fold so that as the card is opened, it looks just like a starburst. I added a few extra stars that were the waste from the same piece cut in each of the other feature colours and some gold metallic enamel stars for extra sparkle. 

This card was so easy to make and such a fun way to showcase this edgelit die; if you would like to see more detail on how I made it including measurements, pop back later this week and I will have a short video tutorial for you that explains all.

To complete my project, I also decorated up one of the white gift boxes with another starburst, some leftover stars and some extra thick Bermuda Bay baker's twine to create a little co-ordinated packaging for an accompanying birthday treat:


Lastly, here's my card and box together:


This set would work in lots of different colourways and is great for young and old - I think I'm going to have to make a few more of them to have on hand! Thank you Sandy for such a great challenge this week.

Here is the visual summary of the key products used on today's project for you to pin for easy reference:


You can see all of my Product and 'How To' summaries on my 'How To - Tips and Techniques' Pinterest board in case you've missed any. 

Before you reach for your ink and papers, check out what our amazing team has created to inspire you this week:

The Paper Players Design Team
 
 
Here's a quick recap of our challenge rules:
 
1.  Create a new paper project
2.  Upload your creation to your blog with a link back to us and provide a direct link to the post featuring your challenge submission.
3.  Please link your card to no more than four challenges, TOTAL.
4.  Have FUN! 


I look forward to seeing what you create with our fun theme this week. Enjoy the rest of your weekend as it will be over all too quickly; I'll be back tomorrow with another project; until then, happy stampin'!


Stampin' Up! Supplies Used: 

Table built using Product Table Builder by The Crafty Owl - Independent Stampin' Up! Demonstrator.

Baking Makes Life Sweeter - Perfect Mix Card

by Joanne James26. February 2017 09:00

It's Sunday and time for this week's new challenge over at The Paper Players! My good friend LeAnne is the hostess this week and she has a sketch for us to work with:


Now you know me - I love a good sketch and this one is a keeper! I had a couple of ideas for this sketch and made two quite different cards. The one I'm sharing today is very much in keeping with my style (maybe that's why it won the James family vote 2 to 1 when I conducted a quick poll!) I went with my signature 'clean and layered' style and took the opportunity to make another card using my 'Perfect Mix' stamp set - take a look:


Here's the low-down on today's card:

It's In The Detail - My card today is my usual clean and layered style. I toyed with adding some additional background pattern or even designer series paper, however the size of my circle elements would have made this too busy. Instead I opted to create detail in other ways: I used my circle Stitched Shape Framelits to cut out my stamped images and layered these onto some punched circles to add a thin border of colour. I also used the partial die cutting technique to add interest by allowing part of the image to overhang the circle. The mixer I inked using my Stampin' Write marker so that I could omit the sentiment that goes with it. I also stamped my oven glove onto coloured cardstock and fussy cut it before popping up on a dimensional for added colour and impact.

Rule of Threes - It is a known principle that things that come in threes are somehow more satisfying or more effective than other numbers. LeAnne's sketch uses three circular elements; I also added a trio of enamel shapes to echo my layered circles and continue the harmony of my card.

A Perfectly Purple Colour Combination - I love purple but it's not a colour I use often on a card, so I chose to use a combination of purples and neutrals today for a change - here it is if you'd like to try it too:


This is such a great stamp set! I love the punny sentiments but if you, like me, are a baker then you will find so many uses for these images.

Here is the visual summary of the key products used on today's project for you to pin for easy reference:

 **To be updated - Stampin' Up! Website currently unavailable due to overrunning maintenance work. Online ordering currently offline.**

You can see all of my Product and 'How To' summaries on my 'How To - Tips and Techniques' Pinterest board in case you've missed any. 

Before you reach for your ink and papers, check out what our amazing team has created to inspire you this week:

The Paper Players Design Team
 
 
Here's a quick recap of our challenge rules:
 
1.  Create a new paper project
2.  Upload your creation to your blog with a link back to us and provide a direct link to the post featuring your challenge submission.
3.  Please link your card to no more than four challenges, TOTAL.
4.  Have FUN! 


I look forward to seeing what you create with our sketch this week. Enjoy the rest of your weekend as it will be over all too quickly; I'm off to spend the day at the swimming pool as Rebecca is racing in her rescheduled Counties Competition. I don't know which I'd rather - the gale-force icy winds I experienced as I stood outside watching her play in her netball match yesterday morning or the sauna-like temperatures of the swimming pool today! The things us mothers do for love!. I'll be back tomorrow with another project; until then, happy stampin'!


Stampin' Up! Supplies Used:

To be updated - Stampin' Up! Website currently unavailable due to overrunning maintenance work.

Clean And Simple Cake Crazy Birthday Card

by Joanne James19. February 2017 09:00

It's Sunday and time for this week's new challenge over at The Paper Players! It's the turn of the lovely Laurie to host this week and she has a clean and simple challenge for us to work with:


So I have a slight confession: if you read my blog post on Friday you may have been expecting something else today! I had a moment of inspiration for a sentiment-based card on Friday and was so pleased with myself when it was finished. All was well until I came to load it up onto the Paper Players blog and I remembered this week was 'clean and simple' week and my card definitely wasn't! So I will share that card with you another day and in the meantime I took the opportunity to make another card using one of the great sentiment-based sets in the current Spring-Summer catalogue - take a look:


Here's the low-down on today's card:

Cake Crazy - The Cake Crazy stamp set is a fun cake-building stamp set with lots of words. I made my cake stack entirely out of words, coloured to co-ordinate with my side strips of designer series paper for a fun, unisex birthday card.

Party With Balloons - I used some balloon-patterned Party Animal Designer Series Paper to border the edges of my central panel and tie in with my Emerald Envy baker's twine and fun balloon embellishment. After all, what's a party without balloons?

Add A Banner - I added a little stepped banner in Pacific Point to my card to top off my cake - whilst not designed to co-ordinate, the photopolymer stamp sits perfectly into the banner shape for easy co-ordination. 

Here is the visual summary of the key products used on today's project for you to pin for easy reference:


You can see all of my Product and 'How To' summaries on my 'How To - Tips and Techniques' Pinterest board in case you've missed any. 

Before you reach for your ink and papers, check out what our amazing team has created to inspire you this week:

The Paper Players Design Team
 
 
Here's a quick recap of our challenge rules:
 
1.  Create a new paper project
2.  Upload your creation to your blog with a link back to us and provide a direct link to the post featuring your challenge submission.
3.  Please link your card to no more than four challenges, TOTAL.
4.  Have FUN! 


I look forward to seeing your clean and simple creations in the gallery this week. Enjoy the rest of your weekend as it will be over all too quickly; we have basketball this morning (riding high on last week's regional-qualifying tournament win!) and then a social lunch with the swim squad - should be fun. I'll be back tomorrow with another project; until then, happy stampin'!


Stampin' Up! Supplies Used: 

Table built using Product Table Builder by The Crafty Owl - Independent Stampin' Up! Demonstrator.

Hot Glue Embossed Sunset Watercolour

by Joanne James12. February 2017 09:00

It's Sunday and time for this week's new challenge over at The Paper Players! It's the turn of the super-sweet and talented Nance to host this week and she has a fun colour challenge for us to work with:


I absolutely love Nance's colour combination this week - so unusual! I considered a variety of things to do with my card - mostly floral - but decided to be brave and try something different: hot glue embossing. I used this week's sketch over at CAS(E) This Sketch as it had a perfect vertical panel for my design - take a look:


Here's the low-down on today's card:

Hot glue embossing is a fun technique to combine with watercolouring. The idea is simply that you take your hot glue gun and 'draw' a pattern onto a piece of watercolour paper. Once set, you reheat the glue with your heat tool, sprinkle with embossing powder then reheat to set. I decided that I would draw a sunset with my glue gun, by creating the sun on the horizon and then some reflection and I heat embossed this with copper embossing powder.

I then used my aquapainter and Blushing Bride and Smoky Slate reinkers to colour my sky and water. I finished my card with a sentiment  from Flourishing Phrases, which I also heat embossed in copper. Finally I used a piece of copper foil to border my sentiment and watercoloured panel. 

This card is rather abstract for me, yet such fun to create and I think it makes a lovely sympathy card - I've been needing a few too many of these lately. So what do you think? Is this a technique you would like to try?

Here is the visual summary of the key products used on today's project for you to pin for easy reference:


You can see all of my Product and 'How To' summaries on my 'How To - Tips and Techniques' Pinterest board in case you've missed any. 

Before you reach for your ink and papers, check out what our amazing team has created to inspire you this week:

The Paper Players Design Team
 
 
Here's a quick recap of our challenge rules:
 
1.  Create a new paper project
2.  Upload your creation to your blog with a link back to us and provide a direct link to the post featuring your challenge submission.
3.  Please link your card to no more than four challenges, TOTAL.
4.  Have FUN! 


I look forward to seeing what you create with this week's colour palette. Enjoy the rest of your weekend as it will be over all too quickly; we are attending a basketball match this afternoon with Ben captaining his team (hopefully to victory!) I'll be back tomorrow with another project; until then, happy stampin'!


Stampin' Up! Supplies Used: 

Table built using Product Table Builder by The Crafty Owl - Independent Stampin' Up! Demonstrator.

Sealed With Love Lidded Notelet Box Using The Envelope Punch Board

by Joanne James6. February 2017 20:00

Happy Monday everyone! I've had a busy day today with the first of this month's classes. I'll share some of those projects later in the week, but for today I wanted to share a simple little lidded box that I made with my Envelope Punch Board to hold some cute little Valentine's love notes. Now I didn't do the best job of photographing this one - the lid edges get a little lost against the background:


Here's the box with one of the little notelets inside:


Here's the low-down on today's project:

Sending Love Notes - Way back at Onstage last November we made three little notelets using the Sealed with Love Bundle. I modified mine slightly, cutting down the panels of Sending Love patterned paper and adding each one to a 3 1/2" Whisper White card base. I designed a few more using the other stamps in the set and made a bunch of co-ordinating envelopes and decided to make a little box to keep them all in. 

Love My Envelope Punch Board - Not only did I use my Envelope Punch Board to make my designer series paper envelopes (each made to fit a card of 3 1/2" square and requiring a 6" square piece of paper) but I also used my Box Buster tool to help me design a 4" square lidded box to hold them in. I love making lidded boxes usign the EPB rather than a scoreboard, as it makes them much more sturdy and rigid. It's really easy to do - you just need to make your lid 1/8" larger than your base for a snug fit.

Ribbon and Hearts - I continued the red and white theme of my project by adding a triple loop of Sending Love Ribbon with a double bow to adorn my sassy red Valentine-embossed heart to complete my box embellishment.

Here is the visual summary of the key products used on today's project for you to pin for easy reference:


You can see all of my 'How To' summaries on my 'How To - Tips and Techniques' Pinterest board in case you've missed any. 

I will be using these little notes to hide in my children's school bags and pencil cases this month; they love to find a surprise note when they least expect it; I might even slip in a little chocolate treat too. I'm also linking up with the team over at SUO Challenges again where they are also celebrating Valentine's this week.

I'll be back tomorrow with another project. Until then, happy stampin'!


Stampin' Up! Supplies Used:

Table built using Product Table Builder by The Crafty Owl - Independent Stampin' Up! Demonstrator.

A Gift Of Love Quilt-Inspired Valentine's Card

by Joanne James5. February 2017 09:00

It's Sunday and time for this week's new challenge over at The Paper Players! It's the turn of my sweet friend Claire to host this week and she has a timely theme challenge for us to work with:


I've been sharing lots of Valentine's-themed cards with you in recent weeks, almost all of which have featured the Sealed With Love bundle and Sending Love Designer Series Paper. For today though I wanted to go back to some products in the annual catalogue that would make a Valentine's card but are not designed specifically with that in mind. I had a few bits and pieces out on my desk, then when I saw this week's inspiration photo over at Fusion I knew exactly where I was headed - I even used the sketch layout too (turned through 90 degrees). Here's what I came up with:


Here's the low-down on today's card:

A Quilt Of Love - I drew inspiration from a number of elements of the Fusion photo for my card: the border of pink flowers (courtesy of the Jar of Love stamp set), the cream textured panel (created with the Happy Heart Textured Impressions Embossing Folder) and the red flower-entwined heart as a focal point. My colour scheme also came directly from the photo - here it is if it's one you would like to save to use too:


Have A Heart - I die cut the heart from the Sunshine Wishes Thinlits set and embellished this with flowers from the Jar of Love set and leaves from Swirly Bird too. 

A Gift Of A Sentiment - The sentiment on my pale pink banner comes from the exclusive hostess set 'A Gift of Love'. I love the soft script of the sentiments in this set and think this one is such a lovely way to let someone know how much they mean to you. 

I think this is a pretty Valentine's card that makes a softer alternative to the bright red and white colour schemes of my previous cards. I'm also linking up with the team over at SUO Challenges where they are also celebrating Valentine's this week.

Here is the visual summary of the key products used on today's project for you to pin for easy reference:


You can see all of my Product and 'How To' summaries on my 'How To - Tips and Techniques' Pinterest board in case you've missed any. 

Before you reach for your ink and papers, check out what our amazing team has created to inspire you this week:

The Paper Players Design Team
 
 
Here's a quick recap of our challenge rules:
 
1.  Create a new paper project
2.  Upload your creation to your blog with a link back to us and provide a direct link to the post featuring your challenge submission.
3.  Please link your card to no more than four challenges, TOTAL.
4.  Have FUN! 


I look forward to seeing what you create with our fun theme this week. Enjoy the rest of your weekend as it will be over all too quickly; we have a morning of sport and one of the James Juniors has a trampolining birthday party to attend this afternoon. I'll be back tomorrow with another project; until then, happy stampin'!


Stampin' Up! Supplies Used: 

Table built using Product Table Builder by The Crafty Owl - Independent Stampin' Up! Demonstrator.

Sending Love Hearts, Hearts And More Hearts!

by Joanne James29. January 2017 09:00

It's Sunday and time for this week's new challenge over at The Paper Players! I am your hostess this week and I have a sketch for you to work with:


When I came up with my sketch I had an idea about what I was going to do with it, yet when I came to make my card ended up going in a completely different direction -go figure! I'm still loving those patterns in the Sending Love Designer Series Paper Pack and just had to feature another one on my card today  - take a look:


Here's the low-down on today's card:

Sending Love - My sketch allowed me the opportunity to showcase another of these gorgeous red and white patterns in the Sending Love stack; the large panel is perfect for a bigger pattern, so I decided to go with the white hearts on a red background. This was the starting point for my card, my mat, base and embellishments followed from there. 

This Card Is All Heart - I decided to replicate the heart pattern in my embellishment shapes and represented each of the diamonds in my sketch with a layered heart. Having heat-embossed the white stamped heart onto red and layered this onto white to echo my mat border, I felt it still needed a little something; I decided to add in an additional background heart in red glimmer paper and bingo! I backed my tiny hearts with a red glimmer one too; all cut with the Sweet & Sassy framelit dies.

Hugs And Kisses - I heat embossed my sentiment in white directly onto my card base. I love the delicate scripted font and it was perfect for the recipient of this card; my daughter has a love of all things sparkly so with the addition of the glimmer paper this has to be her valentine's card. I paired my 'hugs and kisses' with an 'I love you' on the inside - and finished with the flourish that is also featured in this set.

I've a second little project for you today - I can't give Miss Rebecca a Valentine's card without a chocolate treat , so here's a little something that took me just minutes to put together:


I took one of our clear boxes, filled it with chocolate hearts and added a belly band, some Sending Love red ribbon and a tag with some sweet Sending Love heart embellishments. I love that with just a few basic supplies I can turn a few chocolates into something special that I know my daughter will love. 

Here is the visual summary of the key products used on today's project for you to pin for easy reference:


You can see all of my Product and 'How To' summaries on my 'How To - Tips and Techniques' Pinterest board in case you've missed any. 

Before you reach for your ink and papers, check out what our amazing team has created to inspire you:

The Paper Players Design Team
 
These ladies have created some amazing cards to wow you with this week and have interpreted my sketch in a ton of different ways.
 
Here's a quick recap of our challenge rules:
 
1.  Create a new paper project
2.  Upload your creation to your blog with a link back to us and provide a direct link to the post featuring your challenge submission.
3.  Please link your card to no more than four challenges, TOTAL.
4.  Have FUN! 


I look forward to seeing what you create with my sketch this week. Enjoy the rest of your weekend as it will be over all too quickly; we have our usual morning of sport but have an unexpected free afternoon; both of the James Juniors have had sports fixture cancellations this weekend, so we will be able to enjoy some unexpected additional family time together - I'm looking forward to it already! I'll be back tomorrow with another project; until then, happy stampin'!


Stampin' Up! Supplies Used: 

Table built using Product Table Builder by The Crafty Owl - Independent Stampin' Up! Demonstrator.

Stylish Stems Layered Negative Space Friendship Card

by Joanne James22. January 2017 09:00

It's Sunday and time for this week's new challenge over at The Paper Players! It's the turn of the lovely Jaydee to host this week and she has a clean and simple challenge for us to work with:


I decided that for today's card I was going to try and come up with a CAS card that featured a single flower. I originally started out stamping and played around with lots of different combinations before settling on a card using the negative space created using the Stylish Stems Framelits Dies. Here's my final card:


Here's the low-down on today's card:

Unorthodox Floral Colour Combination - I took my colour combination from this week's challenge over at Fab Friday. I love how the pale blue and warm vanilla tone down the Sweet Sugarplum, which I sometimes find a little stark when paired with stronger colours. For the original card I was making, it worked perfectly (I'll share that card with you tomorrow and explain more then!) It does look slightly unorthodox here granted, given the simplicity of the design - what flower has a blue stem?! - yet I decided that since I love the colour combination and the card has a clean and contemporary feel, I would go with it. Who knows, maybe I'll start a new trend!

Layered Negative Space - When I first saw the Stylish Stems Framelits Dies in the Spring-Summer catalogue, I thought - do I really need another set of flower framelits? The answer though on closer inspection was a definite 'yes'; I'm a big fan of using the negative space created when using framelits and dies this set is actually designed with that in mind; the flowers and stem can be used both to cut a positive shape, by layering the outline with the inside shape together, but the inner piece can be used alone to make the negative space itself the focal point. So many creative possibilities! Using the layers of this week's sketch over at CAS(E) This Sketch for inspiration, I cut through a single layer of Very Vanilla cardstock to reveal my Sweet Sugarplum flower, then cut the stem through both the Very Vanilla and Sweet Sugarplum layers to reveal the Soft Sky cardstock layer below. All that cutting makes this CAS card great for the challenge over at CASology this week too.


For A Good Friend - Lastly, I added a sentiment from the co-ordinating 'Special Reason' stamp set that is perfect for a special friend. My placement is not strictly as per the sketch, as I needed it to have more prominence so stamped it on the Very Vanilla top layer. My card is destined for one of my very best friends to say thank you for entertaining the James family for dinner yesterday evening.

A super-simple clean and simple card with minimal supplies - I just love this set!

Here is the visual summary of the key products used on today's project for you to pin for easy reference:


You can see all of my Product and 'How To' summaries on my 'How To - Tips and Techniques' Pinterest board in case you've missed any. 

Before you reach for your ink and papers, check out what our amazing team has created to inspire you this week:

The Paper Players Design Team
 
 
Here's a quick recap of our challenge rules:
 
1.  Create a new paper project
2.  Upload your creation to your blog with a link back to us and provide a direct link to the post featuring your challenge submission.
3.  Please link your card to no more than four challenges, TOTAL.
4.  Have FUN! 


I look forward to seeing your clean and simple creations in the gallery this week. Enjoy the rest of your weekend as it will be over all too quickly; I'll be back tomorrow with another project; until then, happy stampin'!


Stampin' Up! Supplies Used: 

Table built using Product Table Builder by The Crafty Owl - Independent Stampin' Up! Demonstrator.

Beautiful You And A Pop Of Pink

by Joanne James15. January 2017 09:00

It's Sunday and time for this week's new challenge over at The Paper Players! It's the turn of the talented Sandy to host this week and she has a fun colour challenge for us to work with:


I haven't been getting as much time to get in my office and craft as much as I'd like lately, so decided that today I was going to make a card using a set that was at the top of my wish list as soon as I set eyes on the Spring-Summer catalogue, along with the Fusion sketch for my layout - take a look:


Here's the low-down on today's card:

Beautiful You - I loved this set the moment I saw it! Sketched outlines of the female form and some great sentiments in fonts that combine script and print; now who wouldn't want to receive a card with the sentiment 'Happy birthday, Gorgeous'? That's guaranteed to raise a smile. Here I stamped the elegant lady in the hat in Archival Black in watercolour paper and coloured her in with Melon Mambo ink and my aquapainter. This set has so many creative possibilities, I'm really looking forward to using it in lots of other ways too.

A Pop of Pink - Having chosen pink as my 'colour', I spent some time experimenting with different layouts and pattern combinations and decided on a plain Melon Mambo central panel with a piece of Pop of Pink Specialty Designer Series Paper beneath it.

Stitched Framelits are back! - I chose to cut out my elegant lady with my Layered Oval Framelits and frame it with a simple stitched oval in mat black. Why am I teasing you with something you can't get hold of, I hear you cry? Well, fear not - as of tomorrow, 16th January, Stitched Framelits are back in stock and available to order - woohoo! These are the perfect way to add the finishing touch to a border or frame. Order yours tomorrow!

Here is the visual summary of the key products used on today's project for you to pin for easy reference:


You can see all of my Product and 'How To' summaries on my 'How To - Tips and Techniques' Pinterest board in case you've missed any. 

I'm also linking my card up with the challenge over at Stamp, Ink Paper where this week the challenge is also black, white and one colour; what are the odds?!

Before you reach for your ink and papers, check out what our amazing team has created to inspire you this week:

The Paper Players Design Team
 
 
Here's a quick recap of our challenge rules:
 
1.  Create a new paper project
2.  Upload your creation to your blog with a link back to us and provide a direct link to the post featuring your challenge submission.
3.  Please link your card to no more than four challenges, TOTAL.
4.  Have FUN! 


I look forward to seeing what you create with this week's colour palette. Enjoy the rest of your weekend as it will be over all too quickly; we are off to watch the National League basketball finals today - the tickets were one of Ben's Christmas presents. I'll be back tomorrow with another project; until then, happy stampin'!


Stampin' Up! Supplies Used: 

Table built using Product Table Builder by The Crafty Owl - Independent Stampin' Up! Demonstrator.

Mini Catalogue

BROWSE THE CATALOGUE

The mini catalogue is now live! Read and download your copy here.

Shop Online

Access my online shop 24 x 7, 365 days of the year:

Current April hostess code:

VDKNV7BH

Shop Online

Join My Team

It's always a great time to join Stampin’ Up! New team members can get £130 worth of products for only £99 + free business supplies + free shipping + all the fun being a part of Stampin’ Up! Stampin' Up! has something for everyone: join my growing team and benefit from my support to enjoy Stampin' Up! however you choose.

If you're interested, call me for a chat to understand how I can help you realise your goals. Alternatively, if you have already decided to sign up and you just can't wait, please click here for the link to the online form where you can sign up and order your starter kit right away! 

Latest Kit!

Stampin Cut and Emboss

The Rock Legend Kit has all you need to make 8 cards with coordinating envelopes. Along with the new Panda Friends Kit, both are available from January 4th for just £14 each - get yours here!

2023-24 Annual Catalogue

BROWSE THE CATALOGUE

Click on the catalogue for a full list of current SU! supplies - if you would like to order any of the items featured, please drop me a line at [email protected] or give me a call on 07773 421446 - I'd be happy to help.

New Online Exclusives

There are new products available exclusively in the online store from 5 March - check them out here.

About Me

Hi I'm Joanne and live in Northampton and when I'm not looking after my husband and two beautiful children, am an avid crafter with a passion for all things Stampin' Up!

I must confess that I have never been a big rubber stamper - until I discovered Stampin' Up! that is. I love the fact that I can get such great results with co-ordinating stamps, inks, papers and punches - the possibilities are endless! Join me on my stamping journey as I share the things I love and be inspired to create amazing things yourself!

Follow Me

Monthly Newsletter

Box Builder

Click the button above to use Box Buster to create your custom box design using the Envelope Punch Board!

Kits Collection Now Available!

Stampin Cut and Emboss

The new Kits Collection from Stampin' Up! is now available!

Click here to see the current kits available and order yours online today.

I Design For


Stampin' Up Stuff

This is my personal blog and is not endorsed by Stampin’ Up! I hope you find it a plentiful source of ideas and personal inspiration but please don't copy my designs for contest submission or use for classes, publication or sale without express permission.