Sweetest Time Christmas Candles PP514

by Joanne James25. October 2020 09:00

Today it's Sunday and time for this week's new challenge over at The Paper Players! It's the turn of the amazing Jaydee to host this week and she has my favourite, a sketch challenge for you to work with:


Jaydee's sketch has three vertical images; it's a great sketch that is wide open to interpretation. I considered something that incorporated three panels but in the end decided on a much more liberal interpretation and decided on three candles - take a look:


Here's the low-down on today's card:

Sweetest Time - I've used the 'Sweetest Time' stamp and co-ordinating borders dies before (here if you missed it), but had yet to combine with the candles. I went all-out on today's card, layering a piece of Feels Like Frost foiled designer paper (it has a pines pattern but that is obscured by the main panels), followed by the panel with the stamped candles, followed by the integrated holly border.

Borders in Blue - Whilst this border looks great in traditional reds and greens, I thought I would ring the changes and make a blue card today. I know that you don't get blue holly and berries but it's the cardmaker's prerogative to get creative with colour, right? That's my story anyway and I'm sticking to it! 

Foil, Frost and Sparkle - The challenge over at Just Add Ink this week is to add two of foil, ribbon and sequins to your card. I did use some foil-embossed designer paper for my background layer to compliment my silver heat-embossed flames and sentiment, but I also added some loops of Seaside Spray/Silver metallic ribbon behind my paper-pieced holly border and since the diecut berries are obscured by my sentiment banner, I added a selection of clear epoxy droplets and a few Seaside Spray sequins for some added sparkle; you can see them better on the photo below:

So I inadvertently ended up incorporating all three - and I love the finished effect!

Here is the visual summary of the key products used on today's project for you to pin for easy reference:


You can see all of my Product and 'How To' summaries on my 'How To - Tips and Techniques' Pinterest board in case you've missed any. 

Before you reach for your ink and papers, check out what our amazing team has created to inspire you this week:

Here's a quick recap of our challenge rules:
 
1.  Create a new paper project
2.  Upload your creation to your blog with a link back to us and provide a direct link to the post featuring your challenge submission.
3.  Please link your card to no more than four challenges, TOTAL.
4.  Have FUN!

You can see all of my 'How To' summaries on my 'How To - Tips and Techniques' Pinterest board in case you've missed any. 

Enjoy your day. We have no specific plans; if the weather is as poor as it has been these last few days, we may hunker down for a movie afternoon. We watched Disney's live remake of 'Mulan' last week; have you seen it? We thoroughly enjoyed it. I'll be back tomorrow with another project. Until then, happy stampin'!


Stampin' Up! Supplies Used: 

Table built using Product Table Builder by The Crafty Owl - Independent Stampin' Up! Demonstrator.

Cake and Cookies For PP513

by Joanne James18. October 2020 09:00

Today it's Sunday and time for this week's new challenge over at The Paper Players! It's the turn of the queen of diecuts, the lovely Laurie, to host this week and she has a Clean and Simple challenge for you to work with:


REMEMBER THIS IS CLEAN AND SIMPLE WEEK 
 
What do we mean by Clean and Simple?
 
Minimal layers and embellishments
Plenty of open space, aka "white" space
Simple and uncluttered 

I actually have a few cards for you today! First up - cake! A quick review of my stamp collection told me I had no current cake or cupcake stamps - go figure! So I decided to use Linda's sketch over at Freshly Made Sketches this week:

 myI used my current Playful Alphabet Dies, along with some retired Patio Party designer series paper and last year's 'Piece of Cake' stamp set to create a couple of clean and simple cake-themed cards. Here's the first one using the negative space of the diecut letters:


And a close up of that fun sentiment:


And here's the second card, using the same paper and alternative colour base with the actual diecut letters, popped up on foam adhesive sheets:


Both cards finish with this sentiment on the inside:


Perfect for birthdays or other occasions! Here's a picture of them both together:


The Patio Party paper actually dates back to 2013 so I'm thinking there won't be many of you with some of this on your shelves (unless you are a paper hoarder like me!!) so I also made a third card using current products and this week's Global Design Project sketch:

For this card I reached for my 'Nothing's Better Than' bundle and tweaked my sentiment to create a festive cookie card:


I paired my cookies with some festive plaid from the Plaid Tidings DSP pack (15% off in this month's DSP sale!); having photographed my card, I wish I'd added a sprig of holly too (maybe I'll go back and add one on before I send it!) but to be fair this card is less clean and simple than the first two, with a few more layers and elements so probably best I quit when I did!


Here is the visual summary of the key products used on the above project for you to pin for easy reference:


You can see all of my Product and 'How To' summaries on my 'How To - Tips and Techniques' Pinterest board in case you've missed any. 

Before you reach for your ink and papers, check out what our amazing team has created to inspire you this week:

Here's a quick recap of our challenge rules:
 
1.  Create a new paper project
2.  Upload your creation to your blog with a link back to us and provide a direct link to the post featuring your challenge submission.
3.  Please link your card to no more than four challenges, TOTAL.
4.  Have FUN!

You can see all of my 'How To' summaries on my 'How To - Tips and Techniques' Pinterest board in case you've missed any. 

Enjoy your day; we will be having a quiet family day today as we head into the start of the half-term holiday for one of the James Juniors at least (the other has another 4 days of school to go!). I managed to get some crafting done yesterday so will definitely be back tomorrow with another project. Until then, happy stampin'!


Stampin' Up! Supplies Used: 

Table built using Product Table Builder by The Crafty Owl - Independent Stampin' Up! Demonstrator.

Life is Beautiful Autumn Leaves PP512

by Joanne James11. October 2020 09:00

It's Sunday and time for this week's new challenge over at The Paper Players! I'm back following a break last week as I was running my first virtual Creative Escapes Weekend Craft Retreat. More news on that later this week; today it's the turn of the amazing Ann to host this week and she has a seasonal colour challenge for you to work with:


These colours are just perfect for autumn; as I've been driving through the countryside on the school run this week, I have marvelled at just how wonderful the trees are looking with their blends of colour, so armed with my ink pads, some sponge daubers and the current Fusion sketch, I grabbed my 'Life is Beautiful' stamp set and set about recreating the look. This is what I came up with:


Super simple, with a couple of punched banners and stapled ribbon decoration, but oh so pretty with those variegated autumn leaves.

Here is the visual summary of the key products used on today's project for you to pin for easy reference:


You can see all of my Product and 'How To' summaries on my 'How To - Tips and Techniques' Pinterest board in case you've missed any. 

Before you reach for your ink and papers, check out what our amazing team has created to inspire you this week:

Here's a quick recap of our challenge rules:
 
1.  Create a new paper project
2.  Upload your creation to your blog with a link back to us and provide a direct link to the post featuring your challenge submission.
3.  Please link your card to no more than four challenges, TOTAL.
4.  Have FUN!

You can see all of my 'How To' summaries on my 'How To - Tips and Techniques' Pinterest board in case you've missed any. 

Enjoy your day; I will be busy finishing up some bits and pieces before going in to hospital tomorrow for surgery on my shoulder. This will be my fourth visit in 14 months and I'm hoping this will be the last! I will still be sharing here though and will be back tomorrow with another project. Until then, happy stampin'!


Stampin' Up! Supplies Used: 

Table built using Product Table Builder by The Crafty Owl - Independent Stampin' Up! Demonstrator.

Brightly Gleaming Dove of Hope PP510

by Joanne James27. September 2020 09:00

Today it's Sunday and time for this week's new challenge over at The Paper Players! It's my turn to host this week and I have my favourite, a sketch challenge for you to work with:


I love clean and layered cards and decided to incorporate lots of layers into this week's sketch. Lots of ways to interpret it - I decided to go with something new and a returning favourite and create another Christmas card for my stash:


Here's the low-down on today's card:

Dove of Hope - There are lots of elements to today's card but my focal point is one of the doves and sentiment from the new Dove of Hope bundle. There are two stamped doves and an additional diecut dove in the Detailed Dove Die set, and I used the only left-facing one on my card. The stamp set has a number of sentiments, including this one that is perfect for decorating the inside of your card:

Brightly Gleaming - I paired my dove with some of the Brightly Gleaming designer series paper and used this to inspire my Pretty Peacock and Very Vanilla colour scheme. The Brightly Gleaming Specialty Designer Series Paper is a returning favourite from last year; it's great to be able to use if again!

Brushed Metallics - I decided to add in some Brushed Metallic Cardstock in gold to tie in with my metallic edge ribbon and add an additional touch of luxury and elegance to my card. I carried this through to my card too, where on a whim I added a strip of sparkly gold washi tape to the edge of my envelope flap, but have to say I quite like it!

I really like the Dove of Hope Bundle and think it has lots of creative possibilities. It is going to be the focus bundle for my November online card class so if you like this set too, I'd love you to join me. Message me to book your place.

Here is the visual summary of the key products used on today's project for you to pin for easy reference:


You can see all of my Product and 'How To' summaries on my 'How To - Tips and Techniques' Pinterest board in case you've missed any. 

Before you reach for your ink and papers, check out what our amazing team has created to inspire you this week:

Here's a quick recap of our challenge rules:
 
1.  Create a new paper project
2.  Upload your creation to your blog with a link back to us and provide a direct link to the post featuring your challenge submission.
3.  Please link your card to no more than four challenges, TOTAL.
4.  Have FUN!

You can see all of my 'How To' summaries on my 'How To - Tips and Techniques' Pinterest board in case you've missed any. 

Enjoy your day; following a busy day yesterday we are having a day at home with all hands on deck as I complete the final preparations for my bi-annual retreat which is next weekend. There will be lots of diecutting from everyone! I'll be back tomorrow with another project. Until then, happy stampin'!


Stampin' Up! Supplies Used: 

Table built using Product Table Builder by The Crafty Owl - Independent Stampin' Up! Demonstrator.

Pampered Pets CAS Birthday Card PP509

by Joanne James20. September 2020 09:00

Today it's Sunday and time for this week's new challenge over at The Paper Players! It's the turn of the fabulous LeAnne to host this week and she has a timely Clean and Simple challenge for you to work with:


I used this week's sketch over at The Paper Craft Crew which was perfect for a clean and simple card, grabbed my Playful Pets designer paper and set to work - take a look:


Here's the low-down on today's card:

Pampered Pets - I pulled out my Playful Pets designer paper and after adding a strip, I diecut one of the dogs from the set and layered it with a scalloped rectangle and a sentiment banner. The only stamping on the front of my card is the sentiment and some sponged pawprints. 

Inside Action - I added a sentiment and a stamped outline of the same puppy from the Pampered Pets stamp set on the inside of my card:

Clean and Simple - A reminder that this week is clean and simple week, so in addition to the theme of 'pets', your cards should meet the following criteria:

  • Minimal layers and embellishments
  • Plenty of open space, aka "white" space
  • Simple and uncluttered

I think the fact that it's taken me longer to write this post than make my card is probably a good indicator that I ticked the 'clean and simple' box, but the distraction of the comedy I'm watching on TV might also have something to with that! Here is the visual summary of the key products used on today's project for you to pin for easy reference:


You can see all of my Product and 'How To' summaries on my 'How To - Tips and Techniques' Pinterest board in case you've missed any. 

Before you reach for your ink and papers, check out what our amazing team has created to inspire you this week:

Here's a quick recap of our challenge rules:
 
1.  Create a new paper project
2.  Upload your creation to your blog with a link back to us and provide a direct link to the post featuring your challenge submission.
3.  Please link your card to no more than four challenges, TOTAL.
4.  Have FUN!

You can see all of my 'How To' summaries on my 'How To - Tips and Techniques' Pinterest board in case you've missed any. 

Enjoy your day; I'll be back tomorrow with another project. Until then, happy stampin'!


Stampin' Up! Supplies Used: 

Table built using Product Table Builder by The Crafty Owl - Independent Stampin' Up! Demonstrator.

Autumn Stitched Leaves Trio For PP508

by Joanne James13. September 2020 09:00

Today it's Sunday and time for this week's new challenge over at The Paper Players! It's the turn of the amazing Anne Marie to host this week and she has a colour challenge for you to work with:


I thought these colours would be perfect for modern autumn leaves and combined them with the current Just Add Ink sketch and my new Stitched Leaves Dies for my card today - take a look:


I used some retired copper glimmer paper for my background panel (our current copper foil would work too but I liked the idea of the added texture of glimmer paper) and cut a leaf in each colour, backing with a Very Vanilla stitched square. My sentiment is from the stamp set in the bundle, called 'Love of Leaves'; I heat embossed it in copper and cut it out with a stitched rectangle. The front of my card is mostly diecuts - perfect for another link up over at SUO Challenges where the current challenge is to use dies/punches on your card - although I did add a little more stamping from the same set to the inside of my card:


I also added a border of leftover scraps of colours to create a co-ordinating border to complete my card.

Here is the visual summary of the key products used on today's project for you to pin for easy reference:


You can see all of my Product and 'How To' summaries on my 'How To - Tips and Techniques' Pinterest board in case you've missed any. 

Before you reach for your ink and papers, check out what our amazing team has created to inspire you this week:

Here's a quick recap of our challenge rules:
 
1.  Create a new paper project
2.  Upload your creation to your blog with a link back to us and provide a direct link to the post featuring your challenge submission.
3.  Please link your card to no more than four challenges, TOTAL.
4.  Have FUN!

You can see all of my 'How To' summaries on my 'How To - Tips and Techniques' Pinterest board in case you've missed any. 

Enjoy your day; my day will consist of cooking, laundry, hockey and BBQ - not necessarily in that order! I'll be back tomorrow with another project. Until then, happy stampin'!


Stampin' Up! Supplies Used: 

Table built using Product Table Builder by The Crafty Owl - Independent Stampin' Up! Demonstrator.

Way To Goat Grandpa PP507

by Joanne James6. September 2020 09:00

Today it's Sunday and time for this week's new challenge over at The Paper Players! It's the turn of the amazing Jaydee to host this week and she has a theme challenge for you to work with:


I have lots of birthdays this month and one of those is my Dad's. I made his card from me earlier this week (you can see that card here if you missed it) but I needed to make another one for the James Juniors to send to Grandpa, so Jaydee's theme is perfect timing! I used Julee's Mojo Monday sketch for my layout and set to work - take a look:


Here's the low-down on today's card:

Way To Goat - I decided to make a fun and colourful card using the 'Way To Goat' stamp set, so paired my serious-looking stamped goat with some retired party-themed papers (I especially like the partially eaten doughnut, given the sentiment!) for some birthday wishes.

Another Way To Personalise - There are lots of layers on this card and I wanted the main sentiment to be the humorous one highlighted in the circle about the cake-eating goat. I wanted to be able to reference Grandpa too though (the stamp is from the retired set 'For My Family'), so decided to use some tone-on-tone stamping onto one of my layers. You can't see the whole word anywhere, but it's stamped enough times that you get the gist.

Crossing A Line? - I have been having lots of debates with the ladies attending my weekly Zoom sessions about this stamp set and how old you have to be for this stamp set to be funny - or equally, for it to be seen to be crossing a line. It's not the sentiment that I used on the front of my card that's up for the debate - rather the one that I used on the inside:

Personally, I think this set is hilarious - and I may or may not have been teasing my mother-in-law (who also has her birthday this month and is the same age as my Dad!) that I am going to use it to make a card for her birthday too, much to her dismay! My Dad has absolutely no interest in stamping so he won't have seen this set, so the children and I are looking forward to seeing his reaction when he opens his card! What do you think - funny or too close to the mark? Do leave me a comment below - I'd love to hear your thoughts! 

Here is the visual summary of the key products used on today's project for you to pin for easy reference:


You can see all of my Product and 'How To' summaries on my 'How To - Tips and Techniques' Pinterest board in case you've missed any. 

Before you reach for your ink and papers, check out what our amazing team has created to inspire you this week:

Here's a quick recap of our challenge rules:
 
1.  Create a new paper project
2.  Upload your creation to your blog with a link back to us and provide a direct link to the post featuring your challenge submission.
3.  Please link your card to no more than four challenges, TOTAL.
4.  Have FUN!

You can see all of my 'How To' summaries on my 'How To - Tips and Techniques' Pinterest board in case you've missed any. 

Enjoy your day; we will be enjoying our final day of the long summer holiday for one of the James Juniors, who returns to school on Monday (Junior Number 2 isn't back until Wednesday) and doing things such as polishing shoes and packing school bags, for the first time complete with face masks. I'll be back tomorrow with another project. Until then, happy stampin'!


Stampin' Up! Supplies Used: 

Table built using Product Table Builder by The Crafty Owl - Independent Stampin' Up! Demonstrator.

CASEing The Catalogue With Snowflake Splendor PP506

by Joanne James30. August 2020 09:00

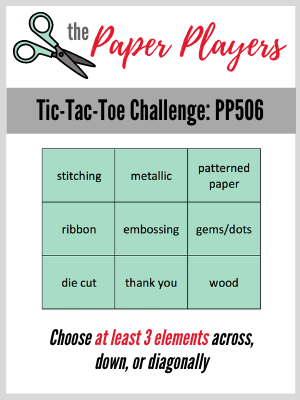
Today it's Sunday and time for this week's new challenge over at The Paper Players! It's the fifth week of the month and the turn of the amazing Ann to host this week with a fun TicTaToe challenge board for you to work with:
    

My cards today feature lots of products from the Snowflake Splendor Suite in the Autumn-Winter mini catalogue. Take a look:
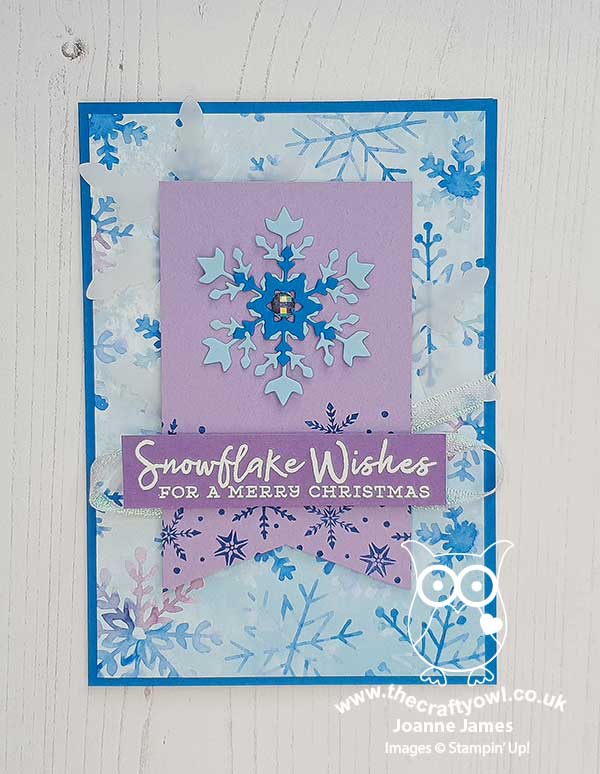
 

Here's the low-down on today's card:

TicTacToe - I love a tic tac toe board - they offer such a wealth of creative possibility and always result in an interesting gallery. I went along the diagonal bottom left to top right - diecut, embossing and patterned paper - for my card today, but realised afterwards it also works for the middle horizontal row of ribbon, embossing and gems - check out the sparkly blue faceted gem I used to centre my diecut layered snowflake:
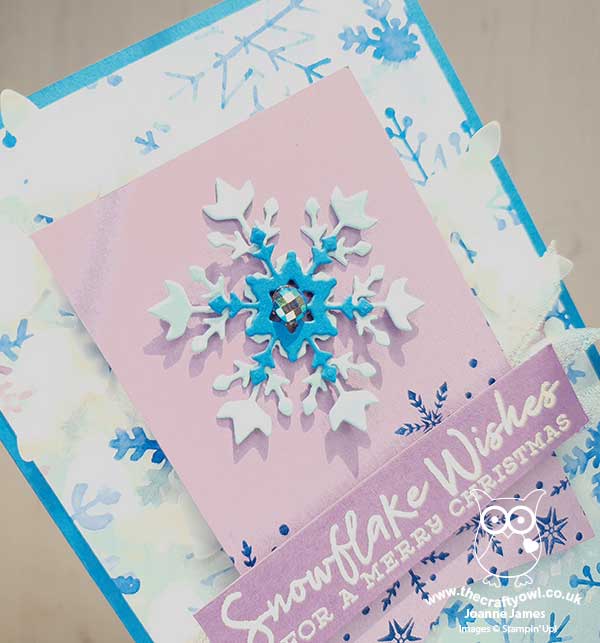
 

CASEing The Catalogue - Does the layout I chose for today's card look familiar? The team over at SUO Challenges are challenging us to CASE (Copy And Share Everything or Copy And Selectively Edit, you choose) either of the cards featuring the 'Whale Done' Suite on page 94 of the catalogue:
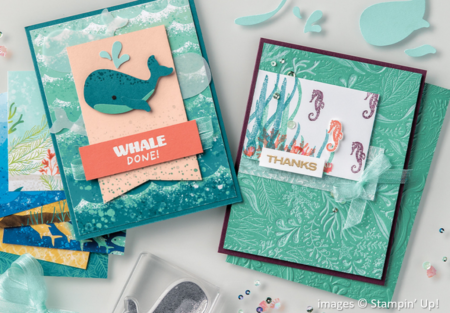
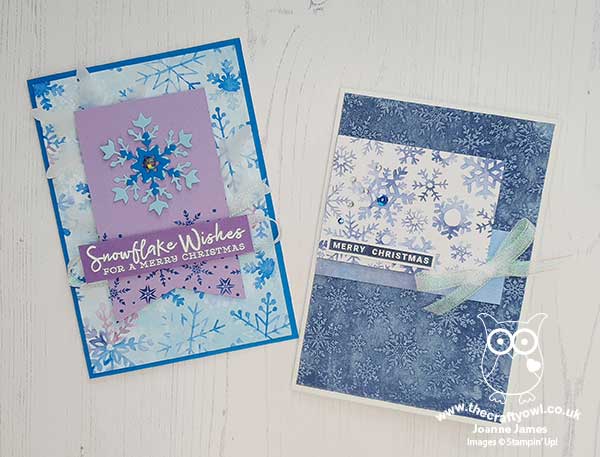
I often use my Stampin' Up! catalogue for inspiration in terms of colours or layouts and this was a fun challenge to show how you can take inspiration from the catalogue to create something fresh and new. I actually made both of the cards I'm sharing today live in a Zoom demonstration with the ladies in my Online Classes Facebook Group during last week's session, as I wanted to explain my process and encourage them not to discount pages that featured products that might not be of interest to them, but instead look to see what other inspiration they could take. My card uses the same layout as the one on page 94 and includes all of the same elements: patterned paper, a central banner with contrasting stamping, a feature diecut image, diecut vellum pieces behind the banner and an embossed sentiment backed with ribbon - yet my card looks quite different to the one on page 94 as it uses a completely different product suite.

Snowflake Splendor Times Two - Having made this card, I then went on to CASE the second card on this page, that highlights an inked embossing folder technique:
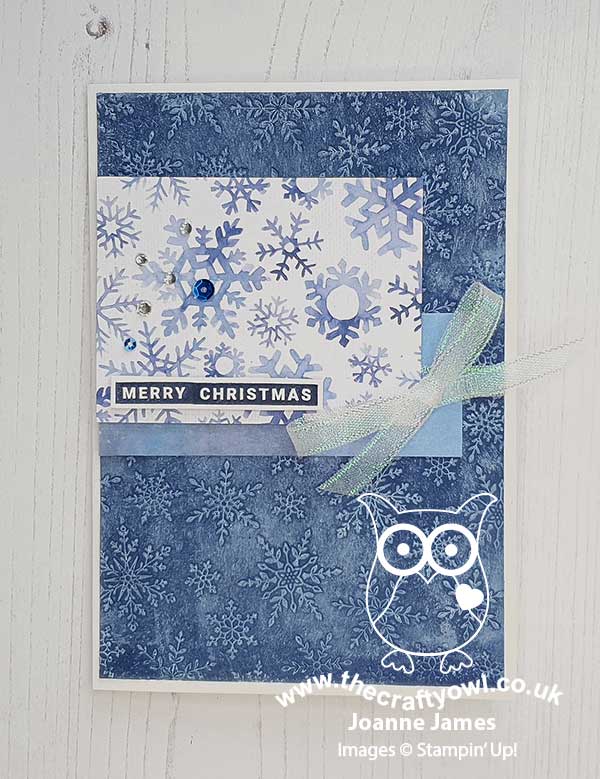
 

I used the Winter Snow embossing folder and instead of a stamped panel, used a couple of pieces of contrasting designer series paper for the feature panel, embellished with some rhinestones and Whale of a Time sequins, along with a sentiment created from stamping two of the greetings from the 'Peace And Joy' stamp set next to each other to create a single one; this one is slightly different in layout to the catalogue sample, yet the similarities in layout still make it recognisable. 

Here's both of my CASEd cards together: 
 

Here is the visual summary of the key products used on today's project for you to pin for easy reference:
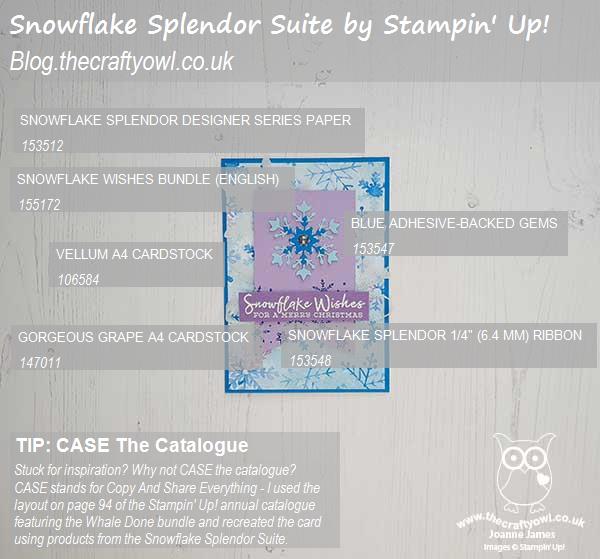
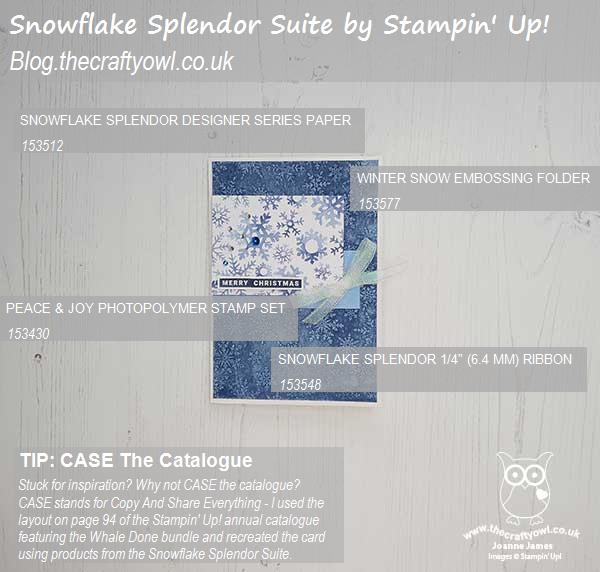


You can see all of my Product and 'How To' summaries on my 'How To - Tips and Techniques' Pinterest board in case you've missed any. Do you ever use layouts from the catalogue as a starting point for your card making? Do let me know in the comments below - I'd love to hear what inspires you to create! Equally, if you would like to watch the video of me making both of these cards, do get in touch for more details on how to join my Online Classes group - I would love to have you join me.

Before you reach for your ink and papers, check out what our amazing team has created to inspire you this week:

Here's a quick recap of our challenge rules:
 
1.  Create a new paper project
2.  Upload your creation to your blog with a link back to us and provide a direct link to the post featuring your challenge submission.
3.  Please link your card to no more than four challenges, TOTAL.
4.  Have FUN!

You can see all of my 'How To' summaries on my 'How To - Tips and Techniques' Pinterest board in case you've missed any. 

Enjoy your day; my day today will be a busy one, for a Sunday. Rebecca is back to hockey for the first time in 6 months for pre-season training so is very excited about that and I have hours of content to catch up on from Stampin' Up!'s Leader Summit this past few days, much of which I didn't do live because we were otherwise engaged as a family celebrating young Master James' finishing of prep school. Thank heavens for online recordings and catch-up - where would we be without it?! I also have a mound of raspberries to make into jams, jellies and more - the weather here these last few days has been positively autumnal so I have some very soft and squishy fruit that has been rather battered by the high winds! I'll be back tomorrow with another project. Until then, happy stampin'!


Stampin' Up! Supplies Used: 

Table built using Product Table Builder by The Crafty Owl - Independent Stampin' Up! Demonstrator.


Gilded Autumn Patterned Paper Trio of Thank You Cards for PP505

by Joanne James23. August 2020 09:00

Today it's Sunday and time for this week's new challenge over at The Paper Players! It's the turn of the amazingly talented LeAnne to host this week and she has my favourite, a sketch challenge for you to work with:


LeAnne's sketch is perfect to showcase some designer series papers and I couldn't resist another card using the Gilded Autumn speciality designer series papers - take a look:


Here's the low-down on today's card:

Gilded Autumn Goodness - The Gilded Autumn papers are beautiful, with some fabulous foil detailing. I paired my chosen patterns with a sentiment and label from the 'So Sentimental' bundle and added some of the ribbon from the suite to my label too.

A Copper Acorn - I used some retired dies for my diecut leaves (from the Beautiful Bouquet die set) as they had a shape that works well with the patterns on the paper and added a double linen thread bow. I stopped there on my two additional cards as I wanted them to be post-friendly, however I couldn't resist adding one of the lovely copper acorn trinkets from the suite to one of my cards - these are just so pretty:


I'm going to link this card up over at Hand Stamped Sentiments too - I just love their inspiration photo this week, it's so perfect for the season!

And Two Makes Three - As I mentioned above, having cut 3 rectangular pieces of DSP, and then cut all three together at the same angle on my guillotine, I made another two cards to use up all of the pieces. Here's my second card:


And my third card:


A little simple stamping using the 'Beautiful Autumn' set inside finished each card:


Here's all three of my cards together - do you have a favourite? Leave me a comment, I would love to hear your thoughts.


Here is the visual summary of the key products used on today's project for you to pin for easy reference:


You can see all of my Product and 'How To' summaries on my 'How To - Tips and Techniques' Pinterest board in case you've missed any. 

Before you reach for your ink and papers, check out what our amazing team has created to inspire you this week:

Here's a quick recap of our challenge rules:
 
1.  Create a new paper project
2.  Upload your creation to your blog with a link back to us and provide a direct link to the post featuring your challenge submission.
3.  Please link your card to no more than four challenges, TOTAL.
4.  Have FUN!

You can see all of my 'How To' summaries on my 'How To - Tips and Techniques' Pinterest board in case you've missed any. 

Enjoy your day; I'll be back tomorrow with another project. Until then, happy stampin'!


Stampin' Up! Supplies Used: 

Table built using Product Table Builder by The Crafty Owl - Independent Stampin' Up! Demonstrator.

Back To School CAS Inspiration PP504

by Joanne James16. August 2020 09:00

Today it's Sunday and time for this week's new challenge over at The Paper Players! It's the turn of the amazing Claire to host this week and she has a timely Clean and Simple challenge for you to work with:


Back to school is still a few weeks away here in the UK, but I'm all for getting organised! Hopefully the Juniors will be returning to school properly; this is a big year for us, with one about to embark on GCSEs and the other moving schools for the start of year 9. So I have a couple of cards to share with you today, each made with them in mind. Here's the first one, that was inspired by the current sketch, colours and photo over at Sugar Pea Designs:


I used the sweet image of a young lady reading a book whilst sheltered under a tree from the annual catalogue hostess set, 'Summer Days', and coloured with my Blends in the likeness of Miss Rebecca, before cropping with my (retired) Circle Framelits and mounting on a Night Of Navy card base, with a Cherry Cobbler banner piece tied with some twine from my stash. The sentiment on the front of my card is from the 'Rooted In Nature' stamp set and I used another stamp from this set to complete the inside of my card:


My second card uses this week's Freshly Made Sketches layout from Jen B where I challenged myself to embrace the diagonal and got creative with my diecut sentiment - take a look:


I added a 'd' from the 'adventure' die and added it to the 'inspire' die in the Sweet Silhouettes set and combined with a 'be' from the Rooted In Nature set to create my sentiment and backed it with a black strip for a chalkboard effect, then anchored it with a stamped and punched red apple that I added a couple of clear epoxy dots too for a little shine:


And I finished off the inside with an inspirational quote from the 'Silhouette Scenes' stamp set: 


Here is the visual summary of the key products used on today's projects for you to pin for easy reference:


You can see all of my Product and 'How To' summaries on my 'How To - Tips and Techniques' Pinterest board in case you've missed any. 

Before you reach for your ink and papers, check out what our amazing team has created to inspire you this week:

Here's a quick recap of our challenge rules:
 
1.  Create a new paper project
2.  Upload your creation to your blog with a link back to us and provide a direct link to the post featuring your challenge submission.
3.  Please link your card to no more than four challenges, TOTAL.
4.  Have FUN!

You can see all of my 'How To' summaries on my 'How To - Tips and Techniques' Pinterest board in case you've missed any. 

Enjoy your day; we have no special plans today and the weather is looking pretty poor, so I think it will be baking and board games for us! I'll be back tomorrow with another project. Until then, happy stampin'!


Stampin' Up! Supplies Used: 

Table built using Product Table Builder by The Crafty Owl - Independent Stampin' Up! Demonstrator.
 
 
Table built using Product Table Builder by The Crafty Owl - Independent Stampin' Up! Demonstrator.

Mini Catalogue

BROWSE THE CATALOGUE

The mini catalogue is now live! Read and download your copy here.

Shop Online

Access my online shop 24 x 7, 365 days of the year:

Current April hostess code:

VDKNV7BH

Shop Online

Join My Team

It's always a great time to join Stampin’ Up! New team members can get £130 worth of products for only £99 + free business supplies + free shipping + all the fun being a part of Stampin’ Up! Stampin' Up! has something for everyone: join my growing team and benefit from my support to enjoy Stampin' Up! however you choose.

If you're interested, call me for a chat to understand how I can help you realise your goals. Alternatively, if you have already decided to sign up and you just can't wait, please click here for the link to the online form where you can sign up and order your starter kit right away! 

Latest Kit!

Stampin Cut and Emboss

The Rock Legend Kit has all you need to make 8 cards with coordinating envelopes. Along with the new Panda Friends Kit, both are available from January 4th for just £14 each - get yours here!

2023-24 Annual Catalogue

BROWSE THE CATALOGUE

Click on the catalogue for a full list of current SU! supplies - if you would like to order any of the items featured, please drop me a line at [email protected] or give me a call on 07773 421446 - I'd be happy to help.

New Online Exclusives

There are new products available exclusively in the online store from 5 March - check them out here.

About Me

Hi I'm Joanne and live in Northampton and when I'm not looking after my husband and two beautiful children, am an avid crafter with a passion for all things Stampin' Up!

I must confess that I have never been a big rubber stamper - until I discovered Stampin' Up! that is. I love the fact that I can get such great results with co-ordinating stamps, inks, papers and punches - the possibilities are endless! Join me on my stamping journey as I share the things I love and be inspired to create amazing things yourself!

Follow Me

Monthly Newsletter

Box Builder

Click the button above to use Box Buster to create your custom box design using the Envelope Punch Board!

Kits Collection Now Available!

Stampin Cut and Emboss

The new Kits Collection from Stampin' Up! is now available!

Click here to see the current kits available and order yours online today.

I Design For


Stampin' Up Stuff

This is my personal blog and is not endorsed by Stampin’ Up! I hope you find it a plentiful source of ideas and personal inspiration but please don't copy my designs for contest submission or use for classes, publication or sale without express permission.