Beautiful Baubles Bright Christmas Card

by Joanne James13. November 2018 20:00

I've had a busy start to my week with two days of classes, so it's nice to be able to sit for a while and share a card for the current challenge over at Just Add Ink where they have a beautiful bright and vibrant colour combination: 


I love these bold and bright colours and thought they would be perfect for a Christmas card in non-traditional colours and this is what I came up with:


Here's the low-down on today's card:

Go Long With Beautiful Baubles - I decided to 'go long' with today's card, and repeatedly stamp the collection of baubles in Versamark onto watercolour paper along the length of my extra-long card. The stamp set is photopolymer and I didn't even use my Stamparatus - it was really easy to see where the next set needed to go.

A Watercolour Wonder - I heat-embossed my baubles in silver and used my aquapainter to 'decorate' my baubles in the three challenge colours. I'm something of a traditional girl when it comes to Christmas decorations, however there is a part of me that loves the idea of a bright, unconventionally-coloured tree in blue, berry and lime!

Bows and Borders - I added a lime decorative ribbon punched border either side of my watecoloured panel and a silver-edged Berry Burst ribbon and bow, before adding to my Blueberry Bushel card base, onto which I stamped and heat-embossed my sentiment to finish my card. 

Here is the visual summary of the key products used on today's project for you to pin for easy reference:


You can see all of my 'How To' summaries on my 'How To - Tips and Techniques' Pinterest board in case you've missed any. 

Enjoy your evening (I have a hot date with a mountainous ironing pile!) and I'll be back tomorrow with another project. Until then, happy stampin'!


Stampin' Up! Supplies Used:

Table built using Product Table Builder by The Crafty Owl - Independent Stampin' Up! Demonstrator.

Glimmer Stained Glass Sympathy Card

by Joanne James11. November 2018 22:00

Today I'm sharing an extra card that uses Linda's oh-so simple sketch over at Freshly Made Sketches (you can see my earlier Paper Players post here if you missed it):


The circle could be used in so many ways and I decided to use it to try out a fun new-to-me colouring technique - take a look:


Here's the low-down on today's card:

Glimmer Stained Glass - I decided the circular aperture would be perfect for a stained glass window using the Stained Glass Thinlits and a technique I've seen previously where you stamp and/or colour onto acetate and back this with silver glimmer paper for a sparkly coloured effect. I cut two semi-circular windows and mirrored them, inset into the circle cut out of my mat layer and backed this with a piece of acetate window sheet. I then flipped it over and coloured the reverse with my Stampin' Blends, using the borders of the diecuts to define my changes in colour, before adding a piece of silver glimmer paper for a sparkly shine. This is such a fun technique and really very pretty in real life. 

Painted Glass Sympathy - I originally set out to create a Christmas card (what can I say - I'm on a roll!), but having completed my window I didn't think it looked particularly Christmassy and since I didn't want to add anything else to it and detract from the window, I decided to change purpose and used the appropriate sentiment from the Painted Glass stamp set to create a sympathy card instead. I don't believe that sympathy cards should be devoid of colour and there is something quite tranquil about sunlight shining through a coloured stained window in a church so thought it would work perfectly with this in mind. I added one of my favourite sentiments from Flourishing Phrases to the inside of my card:


A Word About Colour - I used a variety of brightly-coloured Stampin' Blends to bring my stained glass window to life and I think it would work with pretty much any colour combination. I think it's the use of black though that defines this card - in the definition of the layers, the inlaid detail of the window itself and my heat-embossed Gothic-style sentiment. Black shouldn't be reserved just for outlines and sentiments - be brave in your use of black as a colour in its own right.

Here is the visual summary of the key products used on today's project for you to pin for easy reference:


You can see all of my 'How To' summaries on my 'How To - Tips and Techniques' Pinterest board in case you've missed any. 

I'll be back tomorrow with another project. Until then, happy stampin'!


Stampin' Up! Supplies Used:

Table built using Product Table Builder by The Crafty Owl - Independent Stampin' Up! Demonstrator.

Love Never Melts Spirited Snowmen PP418

by Joanne James11. November 2018 09:00

I've had a busy couple of days with some of my team at Stampin' Up!'s Onstage event in Birmingham to celebrate the launch of the upcoming Spring Summer catalogue. More about that in my later post though as for now it's Sunday and time for this week's new challenge over at The Paper Players! It's the turn of the queen of diecuts, the lovely Laurie, to host this week and she has an unusual colour challenge for you to work with:


When I first saw this colour combination I almost ran a mile and it did have me stumped initially, although a sudden flash of inspiration led to me not only creating with but loving this trio that I used to create another Christmas card to share with you this week  - take a look:


Here's the low-down on today's card:

Love Never Melts - What could be sweeter than this pair of snowmen, all wrapped up in their winter woollies and hats? I coloured their accessories using a combination of my Stampin' Write markers and Stampin' Blends and added a Smoky Slate outline to the snowy areas for a touch of extra definition. I'm hoping Laurie will forgive me the liberty of adding a touch of green to my holly leaves, but I'm afraid it just had to be done! The sentiments in this stamp set are so sweet - the one on today's card is perfect to send festives wishes to your bestie and continues onto the inside of the card:


Another Custom Plaid - When considering what paper to pair with my snowmen, I drew a blank. Instead, I decided to create another custom plaid design using my Buffalo Check stamp set in Smoky Slate and using the thick and thin ends of my Stampin' Write markers in Poppy Parade and So Saffron respectively to customise my pattern. I love the Buffalo Check stamp on its own, yet love how you can create such fun and unique patterns with this stamp. What colour combinations and patterns would you try?

Subtle Sparkle and Shine - Although difficult to see on my photos, all of the snowy areas on my image are brushed with clear Wink of Stella and the red heart the snowmen are holding has been painted using a fine tipped glue pen to give a wonderful glossy shine when dry. The shimmer and gloss are subtle, but they are there and add so much to this clean and simple card.

Here is the visual summary of the key products used on today's project for you to pin for easy reference:


You can see all of my Product and 'How To' summaries on my 'How To - Tips and Techniques' Pinterest board in case you've missed any. 

Before you reach for your ink and papers, check out what our amazing team has created to inspire you this week:

Here's a quick recap of our challenge rules:
 
1.  Create a new paper project
2.  Upload your creation to your blog with a link back to us and provide a direct link to the post featuring your challenge submission.
3.  Please link your card to no more than four challenges, TOTAL.
4.  Have FUN!

I can't wait to see what you create with this week's colours and look forward to visiting your blogs this week! Enjoy the rest of your weekend as it will be over all too quickly. I'll be back tomorrow with another project; until then, happy stampin'!


Stampin' Up! Supplies Used: 

Table built using Product Table Builder by The Crafty Owl - Independent Stampin' Up! Demonstrator.

Beautiful Blizzard Christmas Card

by Joanne James7. November 2018 07:00

Today I'm sharing a card using last week's sketch over at the Paper Craft Crew:

I have a technique class featuring the Beautiful Blizzard Bundle next week and having designed the cards for my class I wanted to create another card in a similar colourway to demonstrate the versatility of this set and this sketch was perfect - take a look:


 Here's the low-down on today's card:

Beautiful Blizzard - This is such a pretty stamp set; the splodges, spots and wisps make it easy to create lots of texture in detail with minimal layering. I stamped the background behind my sentiment oval in a combination of Balmy Blue and Night of Navy, stamping some of the images full strength and stamping some off first to create depth. I also added a little touch of snow to the inside too:


Frosted Shimmer Snowflakes - I used a couple of the snowflakes cut with my Blizzard Thinlits Die to embellish my sentiment oval, liberally sponging each with Frosted White Shimmer Paint for a wonderful soft shimmery finish.

A Snowflake Trinket - To finish my card, I added one of the new snowflake trinkets too - because you can never have too many snowflakes!

Here is the visual summary of the key products used on today's project for you to pin for easy reference:


You can see all of my 'How To' summaries on my 'How To - Tips and Techniques' Pinterest board in case you've missed any. 

Enjoy your day; I've a busy day in my craft room today catching up following a busy day yesterday. One big thing achieved though - finally got the last bits in the kitchen finished so I'm all set to decorate the week after next then I'll be able to share some pictures! I'll be back tomorrow with another project. Until then, happy stampin'!


Stampin' Up! Supplies Used:

Table built using Product Table Builder by The Crafty Owl - Independent Stampin' Up! Demonstrator.

Detailed Baubles Tricolour Christmas Card Trio

by Joanne James5. November 2018 20:00

Today I've another post for you and I'm sharing not one but three cards - all variations on a theme for this week's challenge over at CAS Colours and Sketches:

Now normally I would run a mile at the thought of a colour and sketch combo. but I saw this one and immediately loved it! I no longer have those three retired Stampin' Up! ink colours, so I substituted with a current trio of similar colours:


I used my three colours to create the same card in three colourways - here's the basic design:


Here's the low-down on today's card:

Detailed Baubles - The multiple bauble stamp in the 'Beautiful Baubles' stamp set was perfect to accompany my sentiment on the portrait feature panel on my card. I stamped it in the same colour as my card base, then used one of the other three colours to mat this layer and tie with a co-ordinating ribbon. I stamped the baubles again on a piece of spare cardstock and used my In-Colour Stampin' Write Markers to add selective colour to a few of my baubles, before cutting out with the Detailed Baubles Thinlits and popping some of the baubles up with mini-dimensionals to add interest. 

Tone on Tone Backgrounds - I initially left my base layer blank, but it seemed a little too plain. I tried stamping a tone-on-tone background all over with the large bauble stamp in this set and decided I quite like it - so repeated in the other colourways too. 

Mix and Match - This card was easy to replicate and achieve a different look simply by switching the colours of the bases and layers around. I ended up creating six cards in one go, two in each colourway. A nice dent on my Christmas card pile and with the focus on three in-colours too, it meant that I didn't need a ton of supplies either - bonus! Here's a picture showing all three colourways:


And I stamped the inside too:

Here is the visual summary of the key products used on today's project for you to pin for easy reference:


You can see all of my 'How To' summaries on my 'How To - Tips and Techniques' Pinterest board in case you've missed any. 

Enjoy your day and I'll be back tomorrow with another project. Until then, happy stampin'!


Stampin' Up! Supplies Used:

Table built using Product Table Builder by The Crafty Owl - Independent Stampin' Up! Demonstrator.

Aqua Snow is Glistening Christmas Tree Card

by Joanne James5. November 2018 10:00

Today I'm sharing a card for the current challenge over at Freshly Made Sketches where they have the following sketch to work with:


This layout was perfect for me to make another snowflake card using the exclusive limited offer Snowflake Showcase products that I shared with you last week - take a look:


Here's the low-down on today's card:

Softly Falling - I reached for my perennial favourite embossing folder, Softly Falling, for the perfect snowy backdrop  for my Snowflake Christmas tree. The texture adds just enough interest and detail without detracting from my snowflakes and trees and ties in with my wintry theme beautifully. 

Snow is Glistening - I decided to feature the snowflake Christmas tree on my card today. This is such a versatile stamp - with the aid of the Stamparatus or a Stampamajig, the image can be stamped in a row to create a border too as well as this fabulous snowy tree. I heat embossed my sentiment in white onto a strip of Bermuda Bay for an extra pop of colour against my pastel card. I also used another of the border stamps in the set for some falling snow on the inside too:

Snowflake Swirls - I couldn't resist using the snowflake swirls die cut from the Snowfall Thinlits set for the horizontal element on today's card (I had to trim the end slightly to fit), although it seemed a shame to hide it behind the portrait upright panel - I had to cut this into the tree shape to show off as much of the swirl as possible. I just love it!

Here is the visual summary of the key products used on today's project for you to pin for easy reference:


You can see all of my 'How To' summaries on my 'How To - Tips and Techniques' Pinterest board in case you've missed any. 

Enjoy your day and I'll be back tomorrow with another project. Until then, happy stampin'!


Stampin' Up! Supplies Used:

Table built using Product Table Builder by The Crafty Owl - Independent Stampin' Up! Demonstrator.

Wishing You Well Thanksgiving Wreath PP417

by Joanne James4. November 2018 09:00

Today it's Sunday and time for this week's new challenge over at The Paper Players - yay! It's the turn of my wonderful friend Claire to host this week and she has a timely theme challenge for you to work with that I know she would love you to play along with:


I know that Claire loves Thanksgiving and whilst it isn't something we celebrate here in the UK, the underlying theme of being grateful and thankfulness is one we should all celebrate. I used both the sketch layout and photo inspiration over at Fusion and CASual Fridays as starting points for today's card: warm autumn leaves and wood textures feature heavily on my card this week - take a look:


Here's the low-down on today's card:

Textured Layers -  I wanted to create texture on my card and did something quite unusual for me: used not one, but two embossing folders on my background panels. To recreate the grey weatherboard effect, I used my Simple Stripes embossing folder on a panel of Smoky Slate. For my feature panel, I used a piece of Wood Textures Designer Series Paper and added further texture by running this through my Pinewood Planks embossing folder. I love the effect this gives - it adds so much interest and detail.

A Wreath of Twigs and Leaves - I stamped the wreath from the Wishing You Well stamp set in Early Espresso onto a stitched circle of Very Vanilla and punched out the middle using my 1 1/4"  circle punch, so that more of the textured wood panel could be seen. I coloured a selection of pearls in various sizes with my Pumpkin Pie, Daffodil Delight and Cajun Craze Blends markers to suggest leaves and then added a trio of actual leaves cut with my Seasonal Layers Thinlits to frame my sentiment (I sponged the edges of the leaves to add depth).

Something For The Thanksgiving Table - When I started my card, I wanted to create a wreath like the one in the Fusion inspiration photo. I made a wreath in autumnal colours using my sprig punch that I really loved, but when it came to adding it to my card, it was a little too bulky so I went back to the drawing board. I didn't want my punched wreath to go to waste though, so instead I attached it to a band of Very Vanilla stamped with my Buffalo Check stamp in Crushed Curry, added a banner sentiment and a braided linen twine bow and made a napkin ring - perfect for the Thanksgiving table. Here's a photo of my finished napkin ring:


I'm linking my napkin ring up with the ladies over at SUO Challenges where they are looking for home decor items for the Thanksgiving table. This was so easy to make yet really effective - you could make a while bunch of these to decorate the Thanksgiving table in a relatively short space of time. 

Here is the visual summary of the key products used on today's project for you to pin for easy reference:


You can see all of my Product and 'How To' summaries on my 'How To - Tips and Techniques' Pinterest board in case you've missed any. 

Before you reach for your ink and papers, check out what our amazing team has created to inspire you this week:

Here's a quick recap of our challenge rules:
 
1.  Create a new paper project
2.  Upload your creation to your blog with a link back to us and provide a direct link to the post featuring your challenge submission.
3.  Please link your card to no more than four challenges, TOTAL.
4.  Have FUN!

You can see all of my 'How To' summaries on my 'How To - Tips and Techniques' Pinterest board in case you've missed any. 

Enjoy your day; it is the last day of the James Juniors' half term and there is hockey to be played along with a little down time before the return to school tomorrow. I'll be back here tomorrow with another project. Until then, happy stampin'!


Stampin' Up! Supplies Used - For the card: 

Table built using Product Table Builder by The Crafty Owl - Independent Stampin' Up! Demonstrator.
 

Stampin' Up! Supplies Used - For the napkin ring: 

Table built using Product Table Builder by The Crafty Owl - Independent Stampin' Up! Demonstrator.

Snowflake Showcase Pillow Box Creative Retreat Gifts

by Joanne James2. November 2018 19:00

As promised in my earlier post today (you can read that here if you missed it), today I'm sharing something a little different that I gave a sneak peek of on my Facebook page the week before last - a 3D project! Today is the perfect day to share it since it coincides with the launch of the Snowflake Showcase product suite yesterday - you can read all about that here.

The weekend before last I held my second residential craft retreat this year. I love these weekends: they are a great opportunity for me to spend quality time with my customers, some of whom I see at my regular classes but for many who follow my blog and shop with me online and for whom this is an opportunity to get away from it all for some quality crafting time amongst friends. I am grateful that they choose to spend a weekend with me crafting and as such in addition to their goody bags, they receive lots of little pillow gifts and table favours throughout their stay as a token of my appreciation. When they leave at the end of the weekend, I like to gift them a key ring that is unique to that retreat as a reminder of the fun time that they've had. It has to showcase some fabulous Stampin' Up! product too, both on the keyring and the packaging so for this one I just had to feature the limited edition, exclusive Snowflake Showcase products that went live on sale yesterday. So first up here is the packaging for my gift:


I dressed up one of the kraft pillow boxes available in the annual catalogue with some silver-trimmed ribbon and added a sentiment banner stamped tone-on-tone with the border stamp and then heat-embossed my sentiment in silver over the top. I then added the fabulous string of snowflakes diecut to the front of the box for a real 'wow'.

It didn't end there; I continued the snowflake theme inside with a keyring, that had a snowflake tree, a teeny-tiny sentiment and one of my craft retreat logos all stamped onto shrink plastic and reduced in size, along with one of the gorgeous snowflake trinkets that are also part of this suite. I made them in two colourways, Pool Party and Balmy Blue:


Here's a picture of them both together - gift and packaging. What do you think - cute enough to hang your keys from? 

I received such lovely comments from the ladies who attended my retreat, who all said they felt truly spoiled all weekend. Here's one of the pictures I shared over on my Facebook page of us at dinner on the Saturday evening, with some of them sharing another of their table gifts:


Christmas crackers, what else?! I will have more projects using the fabulous Snowflake Showcase in the coming weeks so look out for those and meanwhile do get in touch with me directly or via my online store to order yours whilst supplies last.

Equally, if you would like to be similarly spoiled and enjoy a fabulous crafty weekend away from it all, there are still spaces available on my March 2019 retreat which will be held in the West Midlands on 2-3 March - you can read more about it here and I would love it if you could join me! The dates for next October will be released soon and I already have a waiting list for this event, so if you would like to be one of the first to receive the details as they are published then do get in touch with me via [email protected] to register your interest as spaces are likely to be snapped up quickly!

Enjoy your evening and I'll be back tomorrow with another project. Until then, happy stampin'!


Stampin' Up! Supplies Used:

Table built using Product Table Builder by The Crafty Owl - Independent Stampin' Up! Demonstrator.

Snowflake Showcase Exclusive Products - Available Until 30th November Or While Supplies Last!

by Joanne James2. November 2018 07:00

Happy Friday everyone! I've had continuing blog and website issues to contend with this week, so all of my carefully scheduled blog posts have gone awry and you haven't heard from me in the timely manner I had hoped this week! This one should have gone live yesterday, but I'm pleased to be able to publish it finally because this is news of the release of an exclusive limited time collection of products called 'Snowflake Showcase' and trust me you are not going to want to miss it!

It seems following the success of the Blended Seasons stamp set and co-ordinating framelits a few months ago that you love an exclusive, limited offer - so here's another one: two stamp sets, one for Christmas and one all-rounder that both co-ordinate with the Snowfall Thinlits dies - available now until 30 November or whilst stocks last. What's more there are some co-ordinating Snowflake Trinkets and White Velvet paper sheets too. Here's a close up of the products in more detail:

I'm sure this set will be popular and I've taken orders for a few already having given the customers in my Facebook VIP Customer Group a sneak peek a few weeks ago (do get in touch if you would like to know more about the benefits associated with belonging to this group), so don't delay in placing your order - I wouldn't want you to be disappointed. Don't forget if you are placing an order online to also include this month's hostess code RW3QD6VN to receive a free thank you gift from me too! 

For more information on this set, please see today's second post here, which also includes a 3D project made using this gorgeous suite.

If you have any questions on any of the above, then please do get in touch - I am always happy to help!

Back shortly with my second post of the day; until then, happy shopping!


 Links to purchase the above items in my online store:

Table built using Product Table Builder by The Crafty Owl - Independent Stampin' Up! Demonstrator.

Bethlehem Edgelits Meets Twinkle Twinkle

by Joanne James30. October 2018 07:00

Today I'm sharing a card for the current Inspire.Create Challenge where they have a great sketch that I just couldn't resist:


I was tempted to go with a focal piece of designer series paper and one of the fabulous festive word dies we have for the horizontal element, but with some great Design Team examples of this, I decided to take a slightly different tack and explore options around the horizontal piece. I ended up making two cards, each with the same basic design, however one portrait and the other landscape - take a look:


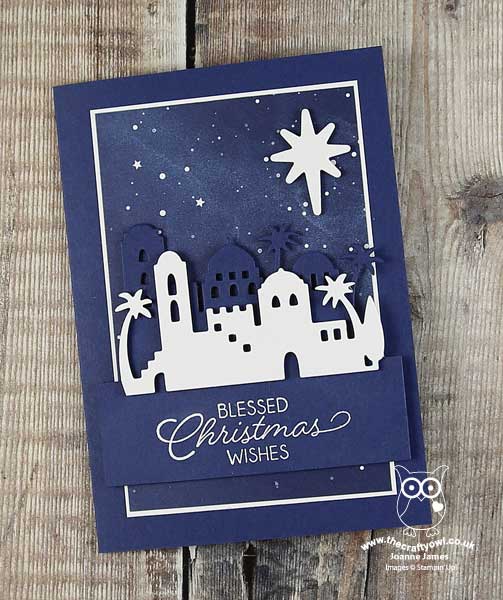
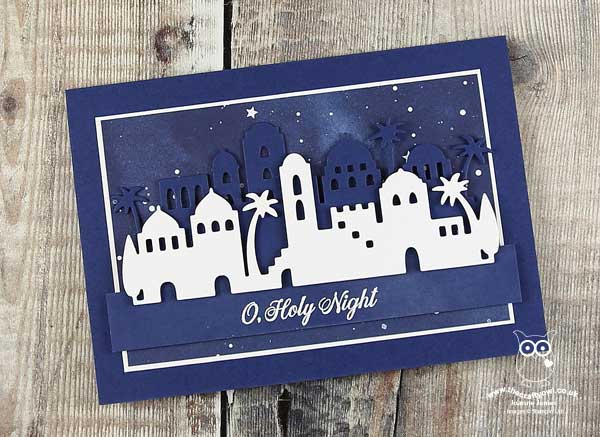
And here's the landscape version that uses the whole of each of the diecut pieces:


Here's the low-down on today's card:

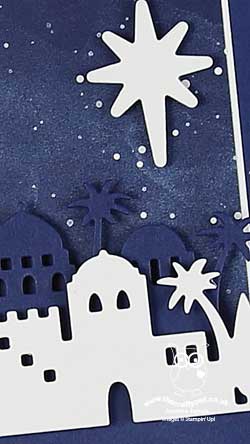
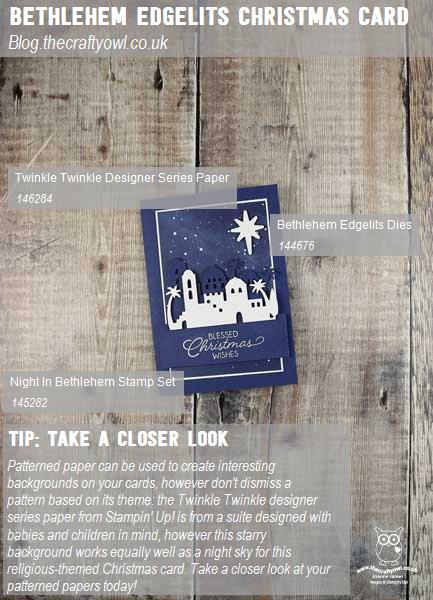
Bethlehem Edgelits - I decided that the landscapes in the Bethlehem Edgelits set would make a perfect horizontal feature on my card and that informed my decision to make two cards: one in a landscape orientation in order to accommodate them completely and a second in a portrait orientation that necessitated me trimming them to fit. For each card, I layered a white top layer on a Night of Navy bottom layer and embossed the sentiment in white onto the navy base layer. 

Twinkle, Twinkle Little Star - You might be wondering how I created my atmospheric night sky; furthermore, you might be surprised to know that there was no sponging, brayering or splattering required. This rather realistic sky is courtesy of one of the patterns in the Twinkle Twinkle designer series paper pack. Part of a suite originally designed for baby and children projects, many of the starry papers in this pack work for plenty of other projects - especially this one. It is easy to overlook certain packs of papers and to be fair the catalogue doesn't always make it easy to see some of the detail. The lovely people at Stampin' up! have produced this great video though that shows these papers in more detail:

Here's the papers from the current seasonal catalogue too:

And of course you can continue to follow my blog; you all know how much I love patterned paper!

A Night In Bethlehem - With the exception of the 'O Holy Night' sentiment on the front of the landscape card (this comes from the 'Illuminated Christmas' stamp set in the current seasonal stamp set), all of the stamping on my card comes from the Night in Bethlehem stamp set, which also has this beautiful verse that is great for the inside of your card: 


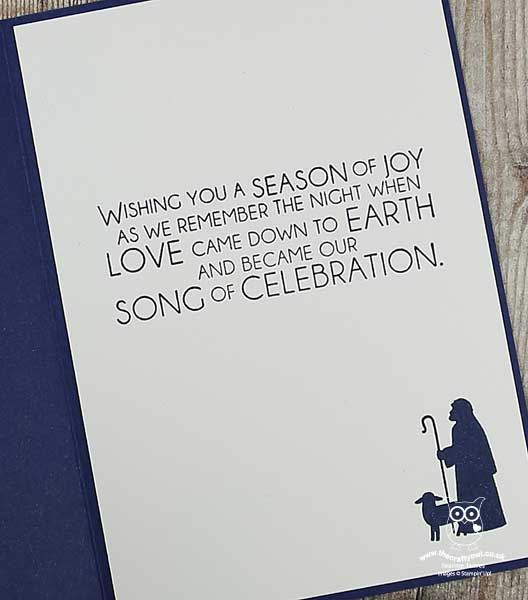
The silhouetted images are great for easy decorating of your envelopes too - love a co-ordinated envelope! I do like to make cards that remind us of the true meaning of Christmas and this set is one of my favourites for reminding us why we celebrate at this special time of year. So which of these cards is your favourite - the portrait or landscape version? I like them both but would love to know what you think - do leave me a comment below with your thoughts!

Here is the visual summary of the key products used on today's project for you to pin for easy reference:


You can see all of my 'How To' summaries on my 'How To - Tips and Techniques' Pinterest board in case you've missed any. 

Enjoy your day, however you choose to spend it. The James family is off to the dentist for our 6-monthly checkup followed by something special in store which I'll share with you later in the week. I'll be back tomorrow with another project though for sure. Until then, happy stampin'!


Stampin' Up! Supplies Used:

Table built using Product Table Builder by The Crafty Owl - Independent Stampin' Up! Demonstrator.

Mini Catalogue

BROWSE THE CATALOGUE

The mini catalogue is now live! Read and download your copy here.

Shop Online

Access my online shop 24 x 7, 365 days of the year:

Current April hostess code:

VDKNV7BH

Shop Online

Join My Team

It's always a great time to join Stampin’ Up! New team members can get £130 worth of products for only £99 + free business supplies + free shipping + all the fun being a part of Stampin’ Up! Stampin' Up! has something for everyone: join my growing team and benefit from my support to enjoy Stampin' Up! however you choose.

If you're interested, call me for a chat to understand how I can help you realise your goals. Alternatively, if you have already decided to sign up and you just can't wait, please click here for the link to the online form where you can sign up and order your starter kit right away! 

Latest Kit!

Stampin Cut and Emboss

The Rock Legend Kit has all you need to make 8 cards with coordinating envelopes. Along with the new Panda Friends Kit, both are available from January 4th for just £14 each - get yours here!

2023-24 Annual Catalogue

BROWSE THE CATALOGUE

Click on the catalogue for a full list of current SU! supplies - if you would like to order any of the items featured, please drop me a line at [email protected] or give me a call on 07773 421446 - I'd be happy to help.

New Online Exclusives

There are new products available exclusively in the online store from 5 March - check them out here.

About Me

Hi I'm Joanne and live in Northampton and when I'm not looking after my husband and two beautiful children, am an avid crafter with a passion for all things Stampin' Up!

I must confess that I have never been a big rubber stamper - until I discovered Stampin' Up! that is. I love the fact that I can get such great results with co-ordinating stamps, inks, papers and punches - the possibilities are endless! Join me on my stamping journey as I share the things I love and be inspired to create amazing things yourself!

Follow Me

Monthly Newsletter

Box Builder

Click the button above to use Box Buster to create your custom box design using the Envelope Punch Board!

Kits Collection Now Available!

Stampin Cut and Emboss

The new Kits Collection from Stampin' Up! is now available!

Click here to see the current kits available and order yours online today.

I Design For


Stampin' Up Stuff

This is my personal blog and is not endorsed by Stampin’ Up! I hope you find it a plentiful source of ideas and personal inspiration but please don't copy my designs for contest submission or use for classes, publication or sale without express permission.