Copper Star of Light Christmas Card

by Joanne James23. August 2016 15:33

Happy Tuesday everyone! It's Christmas in the house today and I have another festive 'sneak peek' for you from the forthcoming Autumn-Winter catalogue using this week's sketch over at Just Add Ink:

Before I share my card, I'd just like to give the lovely ladies over at Just Add Ink a quick shout out for choosing my light-up firefly card as their top pick a couple of weeks ago (you can see that card here if you missed it) - thank you ladies! This week they have a sketch - and you all know how much I love a good sketch! I took this one fairly literally - take a look:


Here's the low-down on today's card:

Star of Light - The stamps used on today's card all come from the Star of Light set in the forthcoming autumn-winter catalogue. This is a set full of stars and some beautiful sentiments and sayings and the detail lends itself beautifully to a heat embossed finish. Just check out the intricate pattern on that large die cut star! I chose a simple colour combination of copper and Island Indigo for today's card - the two colours compliment each other beautifully.

Copper Foil - There's another new product on this card: the gorgeous new copper foil that I used to die cut a couple of stars from to compliment my larger stamped one. I used the co-ordinating Starlight Thinlit Dies and my Big Shot to cut out all of the stars on today's card; they are part of a 'bundle and save' offer with the Star of Light stamp set - bonus!

Textured Border - I could have used more of the copper foil for my mat layer, but instead decided I wanted more texture. I simply sponged the edge of my cardstock with Versamark and then heat embossed using copper embossing powder to give a textured finish, and did the same to the piece that backs my sentiment banner.

Isn't it lovely? All copper and sparkly!

Here is the visual summary of the key products used on today's project for you to pin for easy reference:


You can see all of my 'How To' summaries on my 'How To - Tips and Techniques' Pinterest board in case you've missed any. 

I have a class scheduled featuring this set on 10th October; if you live in or around Northampton and would like to join me, please get in touch to book your place.

That's all from me today; back tomorrow with another Christmas card; until then, happy stampin'!


Stampin' Up! Supplies Used:

Table built using Product Table Builder by The Crafty Owl - Independent Stampin' Up! Demonstrator.

You're The Icing On My Cupcake ... Or The Jam In My Jelly Roll!

by Joanne James22. August 2016 21:38

Happy Monday everyone! I've had a long day of school uniform shopping today but just have time to squeeze in another cupcake card, altogether more clean and simple to yesterday's; I had some leftover bits and pieces and wanted to use the colour scheme over at CAS Colours and Sketches which is almost identical:

Here's my card:

I went with a layered border so that I could leave lots of all-important 'white space' on the centre of my card and stamped my cupcake base directly onto the vanilla mat (using a couple of other neutrals for my case), then cut out the frosting top with my framelits and just popped it on a few dimensionals.

A super-simple card, although for me the funniest thing about this card is the sentiment: if there are any Lethal Weapon movie fans out there, every time I read it I think of the scene where Delores is hunting down Sergeant Murtaugh and says "Well you tell him he's the jam in my jelly roll!" You're the icing on my cupcake just doesn't seem to have the same ring to it!

Back with a Christmas card for you tomorrow - a seasonal 'sneak peek' :-) Until then, happy stampin'!


Stampin' Up! Supplies Used:

Table built using Product Table Builder by The Crafty Owl - Independent Stampin' Up! Demonstrator.

The Best Things In Life Are Sweet

by Joanne James21. August 2016 10:00

It's Sunday and time for a new challenge over at The Paper Players! It's the super-talented Sandy's turn to host this week and she has a fun theme for you to work with:


I also used this week's sketch over at Freshly Made Sketches for my layout. Ok, so first up - a confession! I was so excited to have some child-free craft time to make my card earlier this week, that I did go a little crazy with my layering and so my card is not maybe as CAS as it should be. That said, I love it too much not to share :-) So - here's my card:


Here's the low-down on today's card:

A Sweet Cupcake - What's sweeter than a cupcake? This delicious triple-time stamped number is so easy to create with the Sweet Cupcake stamp set. The photopolymer stamps make lining up the images a piece of cake (yes, pun intended!) and having mounted my card on a couple of layered circles I used the 'sweet' from the co-ordinating Cupcake Cutouts Framelits to finish my sentiment, which I brushed with clear Wink of Stella for a little shimmer.

Sugar Frosting - Those of you who attended Onstage in April or follow the Facebook page of the Stampin' Up! CEO, Sara Douglas, will have seen her demonstrate this set and finish with some textured frosting. I decided to get creative with my cupcake and give it a go! It was really easy to make - I've included the recipe on my 'How To - Tips and Techniques' image below - an adds an interesting texture and dimension to the third layer of frosting. I went one step further and whilst wet sprinkled my frosting with Dazzling Diamonds to create a really sparkling sugary finish - yum! The photo below shows the dimension of the frosting in more detail:

Almost good enough to eat! Thank you Sara for this fun suggestion to step up our cupcake creations!

Playful Palette-inspired Colour Combo - I used one of the patterns in the Playful Palette designer series paper stack as the starting point for my card today and paired my Sweet Sugarplum, Blushing Bride, Very Vanilla combo with Chocolate Chip - feel free to save this colour combination if it's one that appeals to you:


Here is the visual summary of the key products used on today's project - including the recipe to create your own frosting - for you to pin for easy reference:


You can see all of my 'How To' summaries on my 'How To - Tips and Techniques' Pinterest board in case you've missed any. 

Before you reach for your ink and papers, check out what our amazing team has created to inspire you this week:

The Paper Players Design Team
 
 
Here's a quick recap of our challenge rules:
 
1.  Create a new paper project
2.  Upload your creation to your blog with a link back to us and provide a direct link to the post featuring your challenge submission.
3.  Please link your card to no more than four challenges, TOTAL.
4.  Have FUN! 


I look forward to seeing what you create with this week's theme.

Back tomorrow with another project; until then, happy stampin'!


Stampin' Up! Supplies Used:

Table built using Product Table Builder by The Crafty Owl - Independent Stampin' Up! Demonstrator.

Project Life by Stampin' Up! Hello Lovely Card

by Joanne James20. August 2016 22:08

I hope you are enjoying the weekend! I managed to squeeze in a little crafting time this afternoon and made a card for this week's challenge over at Mojo Monday:

I had been sorting through some Project Life and was struck by the lovely natural florals and phrases in my Hello Lovely card box so decided to use one of them as the focal point for my card today. Take a look:


Here's the low-down on today's card:

Hello Lovely Project Life - The Hello Lovely Project Life set has some great sentiments to illustrate your Project Life pages and record those special times with loved ones. They can also work as the focal point for a card too: I've used one of the 3" x 4" cards that I cropped to focus on the sentiment. 

Mix It Up - I am always torn when it comes to using PL cards for something other than memory-keeping; I love to use them in my recording too much! I wanted to use the leaf pattern and black and white watercolour striped cards for the circle and background elements of my card, but they both had designs on the reverse that I wanted to use for memory-keeping. How did I solve my dilemma? I found some very similar patterned papers in the retired English Garden and Go Wild designer series papers that I could use instead - crisis averted!

Pool Party Blue - Black and white are the dominant colours on my card, but the hint of green and the blue Pool Party base picked out from flowers on the PL card, belly band, twine and sequin embellishment play a key role in lightening and brightening this otherwise monochromatic colour scheme. 

Here is the visual summary of the key products used on today's project for you to pin for easy reference:


You can see all of my 'How To' summaries on my 'How To - Tips and Techniques' Pinterest board in case you've missed any. 

Enjoy your day and I'll be back tomorrow with this week's card for our new challenge over at The Paper Players. Until then, happy stampin'!


Stampin' Up! Supplies Used:

Table built using Product Table Builder by The Crafty Owl - Independent Stampin' Up! Demonstrator.

Tags: , , , , , , ,

Cards | Project Life | Shop Online

Cookie Cutter Christmas Eskimo Sneak Peek

by Joanne James18. August 2016 08:05

I've had a few blog-free days this week; we are in thick of the summer holidays and I've been spending time with the James Juniors, meeting up with friends, cooking and cycling and more. Crafting time has been limited and blogging time even less so, but I'm not complaining! We've been having fun and enjoying the sunshine and I'm sure that those of you out there in a similar situation understand completely! That said, today it's time for a new challenge over at Create With Connie and Mary and this week we have a colour combination for you:


I also used this week's sketch over at Retrosketches for my layout. I was so tempted to create a Foxy Friends card, given that these colours all appear in the A Little Foxy DSP stack; instead though, I used this paper and broke out one of my preorder Christmas stamps - wahoo! - to make my first card using my new goodies. Here's my card:


How cute is that little chap?! Here's the low-down on today's card:

Cookie Cutter Eskimo - This cute eskimo comes from the Cookie Cutter Christmas stamp set which is part of a bundle with the co-ordinating Cookie Cutter Builder Punch. He comes with a santa, gingerbread man, reindeer and teddy bear too but for today I thought he would look great on my card in his Pool Party outfit with Calypso Coral shoes. It's tricky to see, but I also added a liberal dose of clear Wink of Stella to his fur trim which gives it a lovely shimmer. The sentiment is perfect too: it carries on to the inside of the card with 'warm heartfelt greetings for a very merry Christmas'.

A Little Foxy For The Festive Season - I used two of the papers from the A Little Foxy DSP stack for the layered panels on my card. This is such a versatile pack with lots of great patterns that work all year round, Christmas included!

A Little Sparkle And Shine -  As my card was for Christmas, I took the opportunity to add some touches of silver for a little festive sparkle: a small silver metallic doily behind my eskimo, some silver metallic thread, a liberal sprinkling of rhinestones. Well, if you can't add some sparkle at Christmas when can you add it?!

Here is the visual summary of the key products used on today's project for you to pin for easy reference:


You can see all of my 'How To' summaries on my 'How To - Tips and Techniques' Pinterest board in case you've missed any. 

You only have to wait until the 1st of September before you can order this little chap and lots of other goodies from the seasonal catalogue - not long now! If you can't wait, talk to me about joining my team - you are able to order items from the new catalogue immediately as part of your starter kit. I am currently preparing my catalogues to be sent out to my customers; if you don't currently have a demonstrator and would like a copy of the new Autumn Winter catalogue, get in touch with me and I can add you to my list.

Do visit the other Design Team members to see what they did with this week's colours; there's lots of inspiration over on their blogs too!

Enjoy your day and I'll be back tomorrow with another project; until then, happy stampin'!


Stampin' Up! Supplies Used:

Table built using Product Table Builder by The Crafty Owl - Independent Stampin' Up! Demonstrator.

Mondrian-Inspired Colourblock Congratulations Card

by Joanne James14. August 2016 10:00

It's Sunday and time for a new challenge over at The Paper Players! It's my dear friend Claire's turn to host this week and she has a great palette of primary colours for you to work with:

    AYSIChallenge140

These colours are perfect for a back to school project. I actually used these colours for a quick card that I made for this week's sketch challenge over at the As You See It Challenge earlier this week but couldn't link it up as their site is down, so I thought I would instead share it today (edited to add: subsequently back on line now so I've linked):


There is so much you could do with the AYSI sketch, but I found myself constantly returning to the idea that it had all the makings of a Mondrian painting - so I decided to create a clean and simple card in that style. Here's the low-down on today's card:

Mondrian Blocks of Colour - Piet Mondrian is a Dutch painter famous for his modern art using bold blocks of primary colours and white, delineated with black lines. My card is a super-simple card in this style; my fellow PP designer, Hannelie Bester, has also made a card with a Mondrian influence this week that is much more intricate and detailed and if you're a fan of this style of art you should definitely check it out.

Suite Words of Success - This message of success comes from the 'Suite Sayings' sentiment set. I've not used this set in a while, but I've used it many times earlier this year and it's one I was so pleased to see carried over from the Spring-Summer seasonal catalogue into the annual. This modern font was the perfect fit for my card today.

Perpetual Stars - Rather than leave my sentiment just black on white, I did break with my colour blocking slightly to add a burst of bright yellow stars to add to the celebratory feel. I used the star stamp from the Perpetual Calendar stamp set for this - such a useful set with lots of small stamps that are perfect for small details. 

I know lots of students expecting GCSE exam results this year, so I thought this would make a great exam success card. Maybe one that would work for a boy too - not too 'pretty'!

Here is the visual summary of the key products used on today's project for you to pin for easy reference:


You can see all of my 'How To' summaries on my 'How To - Tips and Techniques' Pinterest board in case you've missed any. 

Before you reach for your ink and papers, check out what our amazing team has created to inspire you this week:

The Paper Players Design Team
 
 
Here's a quick recap of our challenge rules:
 
1.  Create a new paper project
2.  Upload your creation to your blog with a link back to us and provide a direct link to the post featuring your challenge submission.
3.  Please link your card to no more than four challenges, TOTAL.
4.  Have FUN! 


I look forward to seeing what you create with our colours this week.

Back tomorrow with another project; until then, happy stampin'!


Stampin' Up! Supplies Used:

Table built using Product Table Builder by The Crafty Owl - Independent Stampin' Up! Demonstrator.

Playful Palette Square Birthday Card

by Joanne James11. August 2016 08:05

Today it's time for a new challenge over at Create With Connie and Mary and this week we have a sketch for you:


For my card today I decided to stick with a square card and to make a big splash of colour with the Playful Palette Suite - take a look:


Here's the low-down on today's card:

Painter's Palette - I created a little easel as the focal point for today's card, with a fun sentiment and paint splatters from the Painter's Palette stamp set. I stamped the frame to the easel twice and cut out the inside of the second one with my Layered Squares Framelits so that I could create a raised frame with added dimension. I also added some tone-on-tone splatter to my card base to tie in with the 

Playful Palette - The papers in the Playful Palette DSP stack are full of bright colours and patterns. I chose a variety of paint-splattered papers for my background panels - all so clashing that they look oddly co-ordinated! 

Ribbon and Glimmer - I added some Peekaboo Peach and Flirty Flamingo ruched ribbons to my card, along with a strip of retired black glimmer paper that was lying in my scrap box. You could of course colour some silver glimmer with black ink if you don't have any black to hand.

A fun card that would work for a male or female - a great standby card for those last-minute birthdays!

Here is the visual summary of the key products used on today's project for you to pin for easy reference:


You can see all of my 'How To' summaries on my 'How To - Tips and Techniques' Pinterest board in case you've missed any. 

Do visit the other Design Team members to see what they did with this week's sketch; there's lots of inspiration over on their blogs too!

Enjoy your day - we are celebrating a birthday in the house today, with young Benjamin reaching the ripe old age of 9 (where did that time go?!) so we will be having a fun day. I'll be back tomorrow with another project; until then, happy stampin'!


Stampin' Up! Supplies Used:

Table built using Product Table Builder by The Crafty Owl - Independent Stampin' Up! Demonstrator.

Project Life All Year Long Notecard

by Joanne James9. August 2016 22:00

I've had a busy couple of days but I wanted to pop by with a quick card that I made for this week's sketch challenge over at CAS(E) This Sketch:


Did you know that the new Project Life accessory packs now include a set of photopolymer stamps? I used the ones in the All Year Long pack to create a little notelet - take a look:


I stamped each of the little seasonal stamps and heat embossed the sentiment in gold, added a gold frame and mounted on a Crumb Cake base. Super simple, super quick!

I'll be back tomorrow with a card for this week's challenge over at Create With Connie and Mary; until then, happy stampin'!


Stampin' Up! Supplies Used:

Table built using Product Table Builder by The Crafty Owl - Independent Stampin' Up! Demonstrator.

Tags: , , , , , ,

Cards | Shop Online | Stamping

Touches of Texture Dragonfly Card

by Joanne James8. August 2016 08:00

Happy Monday everyone! Today I have the first of this month's technique classes featuring the 'Touches of Texture' stamp set and I'm sharing one of the cards that we will be making, that is based on this week's Paper Craft Crew Challenge sketch:

Welcome to the Paper Craft Crew Sketch Challenge 205 hosted by Pam Staples, SunnyGirlScraps.  #papercraftcrew #sunnygirlscraps #challengeblog #papercrafts  Play along at www.papercraftcrew.com #papercraftcrew #sketch

Here is my card:


Here's the low-down on today's card:

Touches of Texture - Touches of Texture is one of a number of stamp sets in the annual catalogue that are all about artistic expression. The stamp set features three outline florals, a bee, a dragonfly and then a number of textured stamps that can be used in lots of creative ways. It's a great stamp set for a beginner, as there are no real rights or wrongs; no need to align the stamps precisely and you can achieve a different look each time. For this card I used the large flower head and infilled it with Cajun Craze, having added a little Early Espresso to the flower centre with a sponge dauber before stamping. I used the fine splatter behind the flower on my punched circle in Delightful Dijon, the more dense splatter in Emerald Envy on my card base for some tone-on-tone texture and lastly the dragonfly, which I fussy cut and added a little clear Wink of Stella to its wings. 

A Touch of Morocco - The ladies that attended my Moroccan Nights class last month really enjoyed using the papers and colours of the product suite and rediscovering the use of washi tape in their cardmaking, so I've continued the theme this month with similar colours and using some of the Moroccan Designer Series Paper behind my flower and some of the co-ordinating washi tape for the vertical stripe and to decorate the inside of my card and the envelope. 

Thoughtful Banners - I make more thank you cards than any other and today's card features the sweet thank you from the Thoughtful Banners stamp set, set inside a stamped banner and punched out with the co-ordinating Duet Banner punch. Another of the great bundled pairs to be found in the annual catalogue, with a saving of 10% if you buy both items together - yay!

Here is the visual summary of the key products used on today's project for you to pin for easy reference:


You can see all of my 'How To' summaries on my 'How To - Tips and Techniques' Pinterest board in case you've missed any. 

I'm off to the cinema with the James Juniors this afternoon to watch the BFG; enjoy your day and I'll be back tomorrow with another project. Until then, happy stampin'!


Stampin' Up! Supplies Used:

Table built using Product Table Builder by The Crafty Owl - Independent Stampin' Up! Demonstrator.

Jar of Love Light-Up Fireflies Card

by Joanne James7. August 2016 10:00

It's Sunday and time for a new challenge over at The Paper Players! It's my turn to host this week and I have a fun theme for you to play along with:


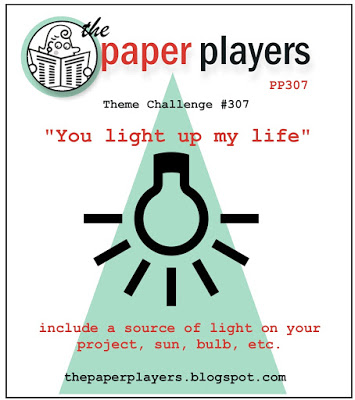
I decided to choose something really open-ended with my 'you light up my life' theme - from sunshine to light bulbs and everything in between, so long as your card includes a source of light, real or artificial, it will fit the bill for my challenge this week! I decided to try something that I've been wanting to have a go at for a while - an actual light-up card! Take a look:


Here's the low-down on today's card:

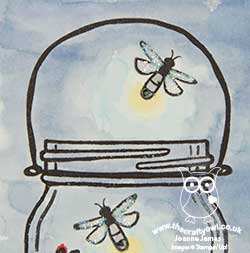
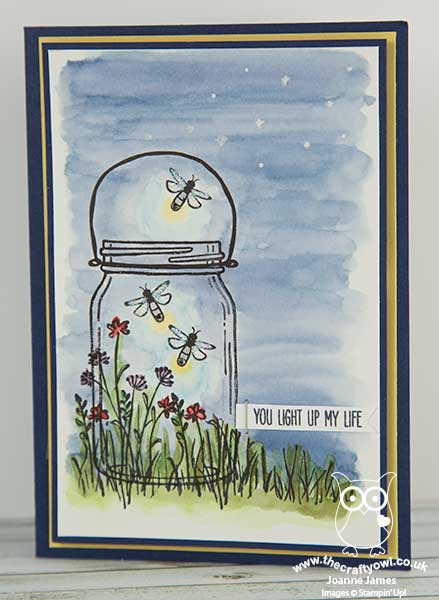
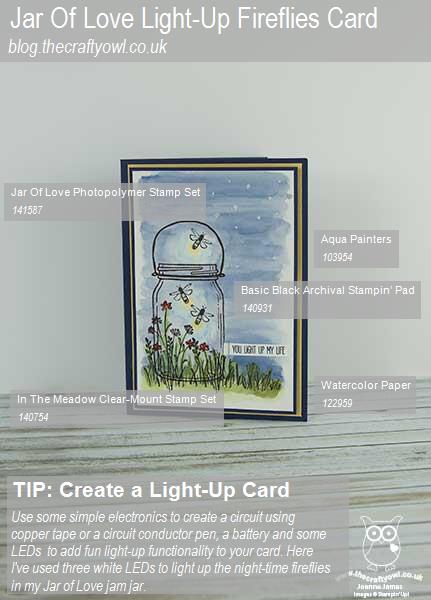
A Jar of Light and Love - I decided to watercolour a little scene for my card, stamping my large Jar of Love as the temporary home for my fireflies. I did all my stamping in Archival Black ink onto watercolour paper, then coloured my image using my inks and an aquapainter. I didn't worry about being too precise with my watercolouring as I wanted that fluid, loose feel. I also added a few tiny dots representing more fireflies in the distance with my white gel pen and some Dazzling Diamonds glitter to my firefly wings with my fine tip glue pen. 

A Fire Fly Glow - Mr James is passionate about electronics and the James Juniors are really into circuits and creating things and, amongst other things, they have made cute light-up houses with their circuit pens previously; I have been wanting to have a go at 'drawing' my own circuit and using it to incorporate lights into my card for a while so for today's card, I raided hubby's electronics supply of LEDs, circuit pens, copper tape and batteries to create my very own circuit and give my fireflies a bright glow. The circuit sits behind the image panel and when you press on the sentiment tab it completes the circuit and the fireflies light up like this:


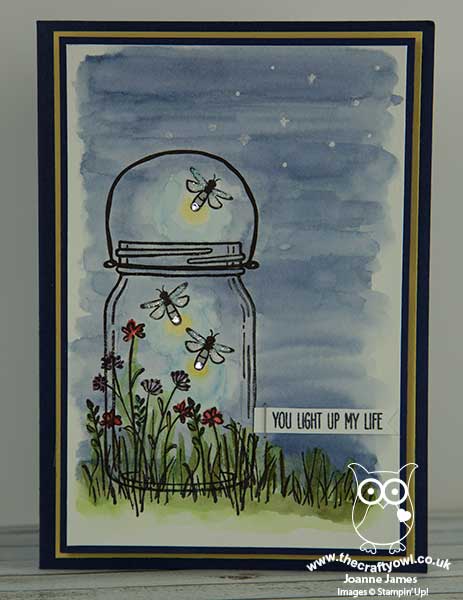
Isn't that just so much fun?! It really wasn't that tricky to do and does create a fun element to your card, although it can work out expensive if you need to purchase lots of electronics supplies, so this is definitely a card to send to someone special.

Meadow Grass - To create the grassy ground for my jar to sit on, I used the flower stems stamp and grass from the 'In the Meadow' stamp set. The loose, sketchy style of this set fitted perfectly with my jar and watercoloured scene. I stamped the flower stamp twice, masking the stamp the second time I stamped it so that my grasses would taper away across my card.

I'm linking today's card up with the team over at Just Add Ink where the theme is 'Just Add F' or things beginning with F - in my case, fireflies.

Here is the visual summary of the key products used on today's project for you to pin for easy reference:


You can see all of my 'How To' summaries on my 'How To - Tips and Techniques' Pinterest board in case you've missed any. 

Before you reach for your ink and papers, check out what our amazing team has created to inspire you this week:

The Paper Players Design Team
 
 
Here's a quick recap of our challenge rules:
 
1.  Create a new paper project
2.  Upload your creation to your blog with a link back to us and provide a direct link to the post featuring your challenge submission.
3.  Please link your card to no more than four challenges, TOTAL.
4.  Have FUN! 


I look forward to seeing what you create with my theme this week. I am spending the day at home today, taking it easy; the James Juniors had a friend each over to camp in the garden last night so a late night and early morning will undoubtedly have been had by all! Daddy was on camp out too, so he will have fared the worst; I suspect much of today will be spent surviving until we can all have an early bedtime, but this kind of fun is most definitely what summer holidays should be about!

Back tomorrow with another project; until then, happy stampin'!


Stampin' Up! Supplies Used:

Table built using Product Table Builder by The Crafty Owl - Independent Stampin' Up! Demonstrator.

Mini Catalogue

BROWSE THE CATALOGUE

The mini catalogue is now live! Read and download your copy here.

Shop Online

Access my online shop 24 x 7, 365 days of the year:

Current April hostess code:

VDKNV7BH

Shop Online

Join My Team

It's always a great time to join Stampin’ Up! New team members can get £130 worth of products for only £99 + free business supplies + free shipping + all the fun being a part of Stampin’ Up! Stampin' Up! has something for everyone: join my growing team and benefit from my support to enjoy Stampin' Up! however you choose.

If you're interested, call me for a chat to understand how I can help you realise your goals. Alternatively, if you have already decided to sign up and you just can't wait, please click here for the link to the online form where you can sign up and order your starter kit right away! 

Latest Kit!

Stampin Cut and Emboss

The Rock Legend Kit has all you need to make 8 cards with coordinating envelopes. Along with the new Panda Friends Kit, both are available from January 4th for just £14 each - get yours here!

2023-24 Annual Catalogue

BROWSE THE CATALOGUE

Click on the catalogue for a full list of current SU! supplies - if you would like to order any of the items featured, please drop me a line at [email protected] or give me a call on 07773 421446 - I'd be happy to help.

New Online Exclusives

There are new products available exclusively in the online store from 5 March - check them out here.

About Me

Hi I'm Joanne and live in Northampton and when I'm not looking after my husband and two beautiful children, am an avid crafter with a passion for all things Stampin' Up!

I must confess that I have never been a big rubber stamper - until I discovered Stampin' Up! that is. I love the fact that I can get such great results with co-ordinating stamps, inks, papers and punches - the possibilities are endless! Join me on my stamping journey as I share the things I love and be inspired to create amazing things yourself!

Follow Me

Monthly Newsletter

Box Builder

Click the button above to use Box Buster to create your custom box design using the Envelope Punch Board!

Kits Collection Now Available!

Stampin Cut and Emboss

The new Kits Collection from Stampin' Up! is now available!

Click here to see the current kits available and order yours online today.

I Design For


Stampin' Up Stuff

This is my personal blog and is not endorsed by Stampin’ Up! I hope you find it a plentiful source of ideas and personal inspiration but please don't copy my designs for contest submission or use for classes, publication or sale without express permission.